The feature of Spaces and Pages within SAP Launchpad has been there for a while, for example, SAP S/4HANA Cloud (S4HC) 2005 and beyond, SAP S/4HANA 2020 and beyond, and any SAP Fiori Launchpad services. In this blog, I’d like to introduce the setup of this feature in the S4HC 2208 environment through two examples. The concept applies to on-premise SAP S/4HANA as well.
What is the Spaces and Pages
To put it in a simple way, Spaces and Pages are used to organize tiles in an SAP Fiori Launchpad in an efficient way, with more flexibility and options. It doesn’t change the functionalities of the solutions, but make them more user friendly.
What is the Classical Homepage
In S4HC solution, we have the so called Classical Homepage for early releases, and Spaces and Pages for release 2005 and beyond. They are both available in early and current S4HC releases. Users can choose which option to organize their tiles.
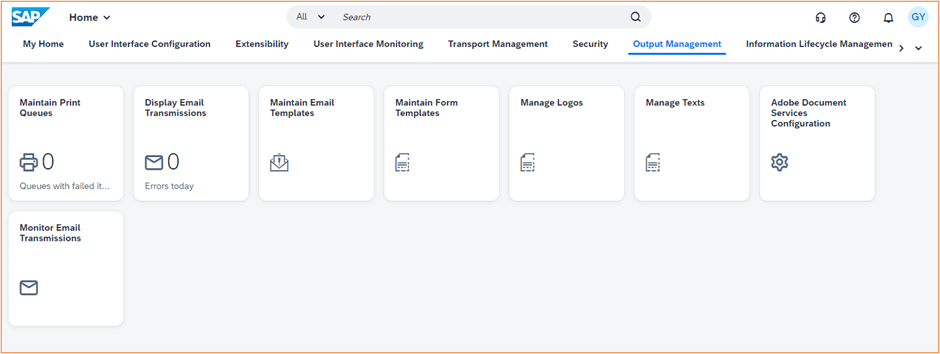
The Classical Homepage approach organizes tiles by Groups. Groups are delivered with Business User Roles. For example, the user GY has seven or more roles assigned. Each role is represented by one group on the Navigation Bar. For the role of Output Management, there is a corresponding group named after it, along with eight tiles or Apps, such as Maintain Print Queues, etc.
Besides user role based Groups, users can assign Apps into the My Home group to organize favorite Apps for the purpose of efficiency. With that, a user can access a particular App either from the My Home group, or by a group name containing this App.
Building Blocks of Spaces and Pages
In contrast to two tier (Group and Tile) structure in the Classical Homepage, the Spaces and Pages has a multi-tier structure, organized in six layers (top to bottom): Users, Roles, Spaces, Pages, Sections and Tiles.
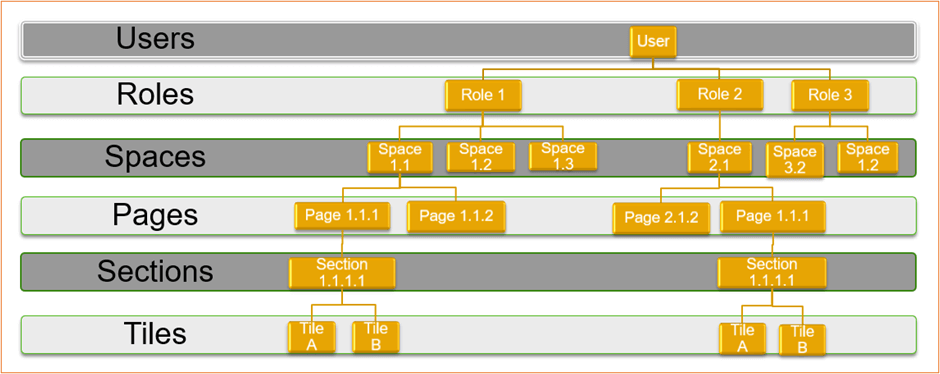
Each lower layer is the building blocks of the upper layer. For example, Tiles A and B contribute to the Section 1.1.1.1; Section 1.1.1.1 in turn contributes to Page 1.1.1. Page 1.1.1 contributes to both Spaces 1.1 and 2.1, simultaneously. One role can have more than one Space.
Similar as Groups in the Classical Homepage, a user must have a Business User Role assigned to use the Spaces. In other words, Business User Role and Spaces are tightly bound together.
The following table has a quick comparison of the Classical Homepage vs. Spaces and Pages.
| Classical Homepage | Spaces and Pages |
|
|
|
|
|
|
| |
| |
|
Comparison of Classical Homepage vs. Spaces and Pages
Prerequisites and Apps for Spaces and Pages
To build and use Spaces and Pages as an Administrator, there are three prerequisites:
Prerequisite 1: Business Catalog SAP_CORE_BC_UI_FLD – This business catalog must assign to the Administrator before starting any work, such as access to two critical Apps: Manage Launchpad Spaces and Manage Launchpad Pages.
Prerequisite 2: Access to app Maintain Business Roles.
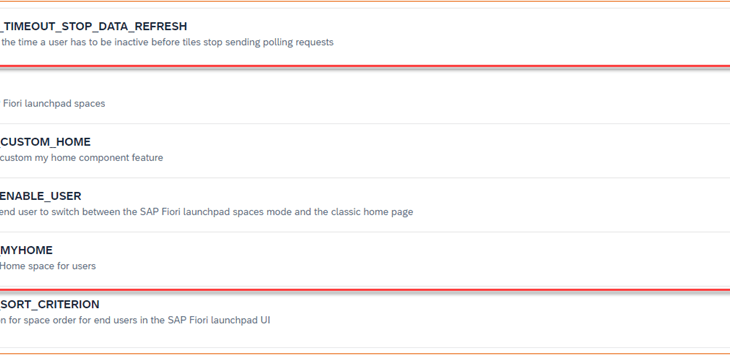
Prerequisite 3: Turn on parameters SPACES and SPACES_MYHOME in App Manage Launchpad Settings by the Administrator. This enables Spaces and Pages feature to all end users.
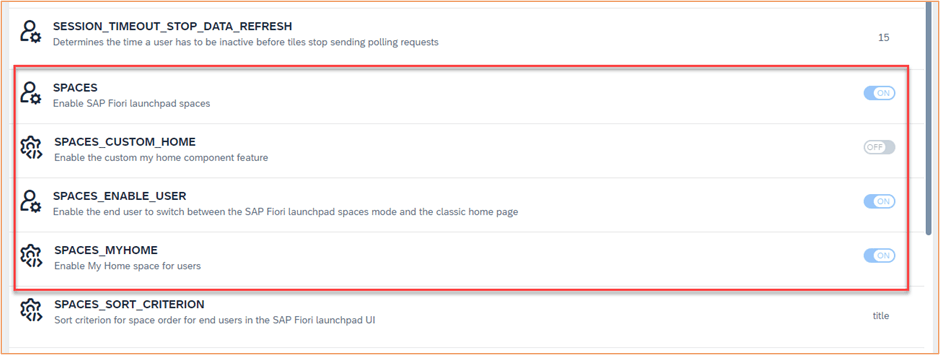
When you turn on this option, make sure to notify your colleagues. I got inquiries from my colleagues right after Spaces and Pages option is turned on, because they don’t see anything besides My Home. I advise them immediately to turn off the Use Spaces option in User Settings (described in Prerequisite 4).
The reason is that as soon as the global Spaces and Pages option is turned on, it enables Use Spaces option to all users. That means, when they logon, they use the Spaces option by default. If at that time, their user roles have no spaces assigned, they don’t have access to any spaces. Therefore, only a blank screen is shown. No user is happy about that.
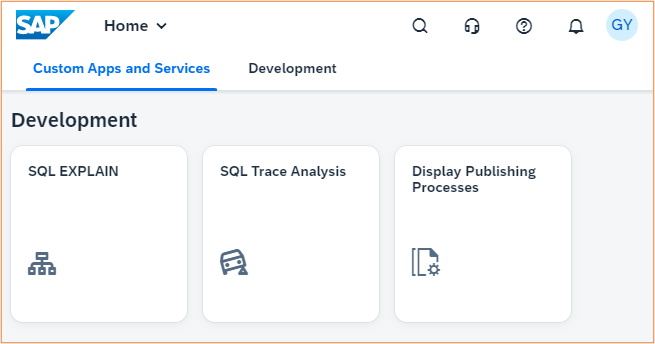
To make this point clearly, let me give an example here. The user GY has one SAP standard role assigned Application Support Engineer – Development Support BR_APPL_SUP_ENG_DEV_SUP. With that role, three Apps are assigned:
- SQL Explain
- SQL Trace Analysis
- Display Publishing Processes
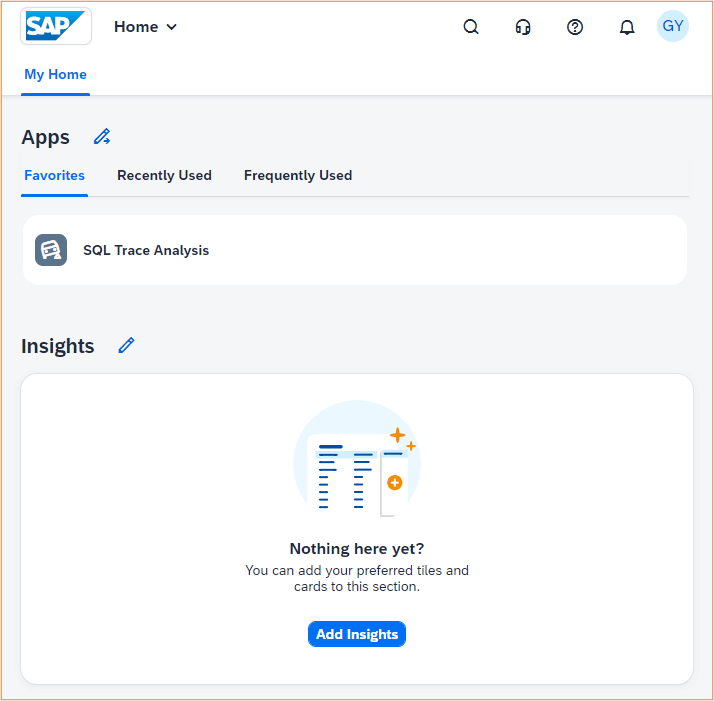
Unfortunately, there is no standard space assigned to this user role.
In the Classical Homepage, the Launchpad is shown as two Groups Custom Apps and Services and Development and three Apps.
If we switch on Spaces and Pages option, the Launchpad only shows My Home space. There is no second space shown on the Navigation Bar. Unless there is one App SQL Trace Analysis is assigned to the section Apps, nothing is shown.
For the end user to continue his/her work, he/she can switch back to the Classical Homepage to access Groups and Tiles (see Prerequisite 3), until the spaces are assigned to the user.
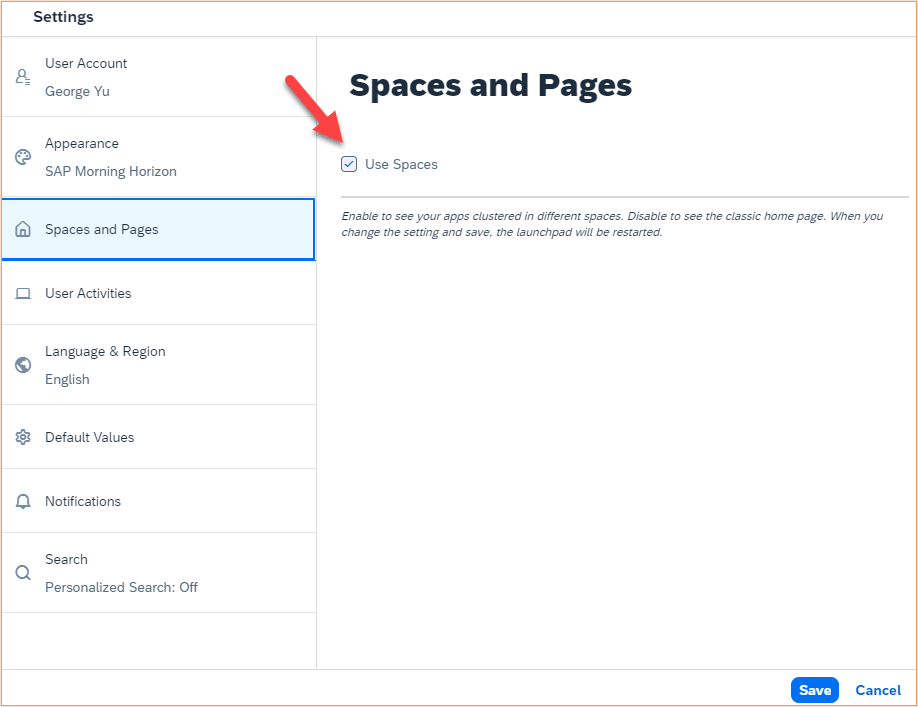
Prerequisite 4: After the parameter SPACES_ENABLE_USER is turned on global by the Administrator, an end user can switch back and forth between the Classical Homepage and the Spaces and Pages to organize the launchpad, such as the one user case discussed above. This switch can be accessed by User Name –> Settings –> Spaces and Pages –> Use Spaces.
Example 1: Creating Spaces from SAP Standard Templates
In this example, I am going to adopt completely the standard Space and Page templates delivered by SAP for the user role Accounts Receivable Manager SAP_BR_AR_MANAGER.
- Enter Maintain Business Roles app
- Click Create from Template button
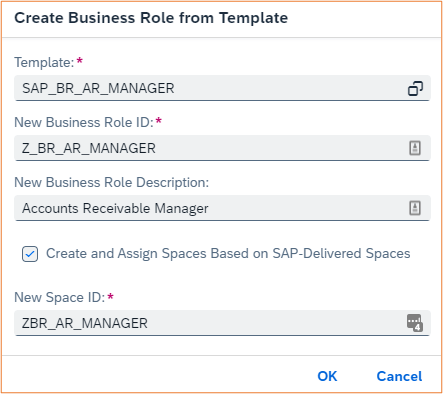
- Select template Accounts Receivable Manager SAP_BR_AR_MANAGER, new Business Role ID Z_SAP_BR_AR_MANAGER, check Create and Assign Spaces Based on SAP-Delivered Spaces, and New Space ID: Z_BR_AR_MANAGER.
By clicking tab Assigned Launchpad Spaces(1), you can see the assigned Space ID is ZBR_AR_MANAGER. Hit Save button.
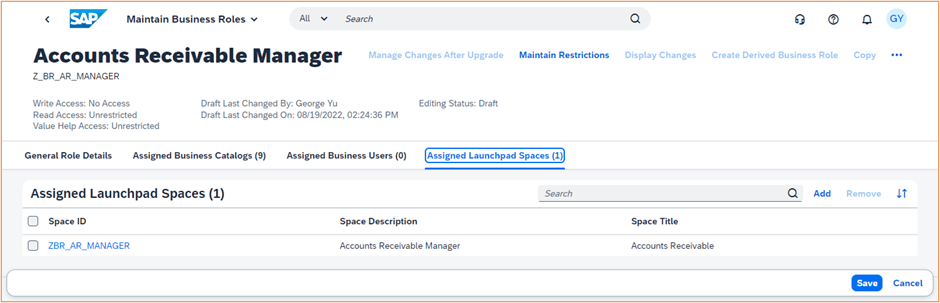
Pay attention to the words in the column Space Title. These are the words displayed in front of the end user in the launchpad. In this case, it is displayed as Accounts Receivable.
4. Click ZBR_AR_MANAGER under Space ID column, it switches to the app Manage Launchpad Spaces. From there, you can see three Pages are assigned to this space, and they are all started with letter Z. This is because Pages follow the same prefix naming conversion from the Spaces. If we use “ZZ” in Spaces, there will be “ZZ” in Pages’ prefix as well.
Pay attention to the words in the column Title. These are the words displayed in front of the end user when clicking the space in the launchpad. They are pages Overview, Analytics and Current Settings.

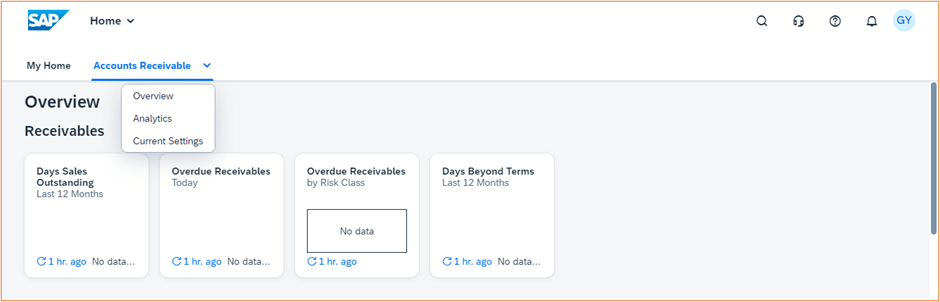
5. Now we can assign this user role Z_BR_AR_MANAGER to user GY, who can see the Space Accounts Receivable (technical name ZBR_AR_MANAGER) is shown in this Launchpad after refreshing the screen.
Example 2: Creating a Tailored Composite Space
SAP standard roles and templates are always a good starting point for administrators to create new spaces and pages. However, depending on the business scenarios, we want to create our own roles, and spaces accordingly. In this example, I illustrate how to create a customer tailored composite role and its relevant space.
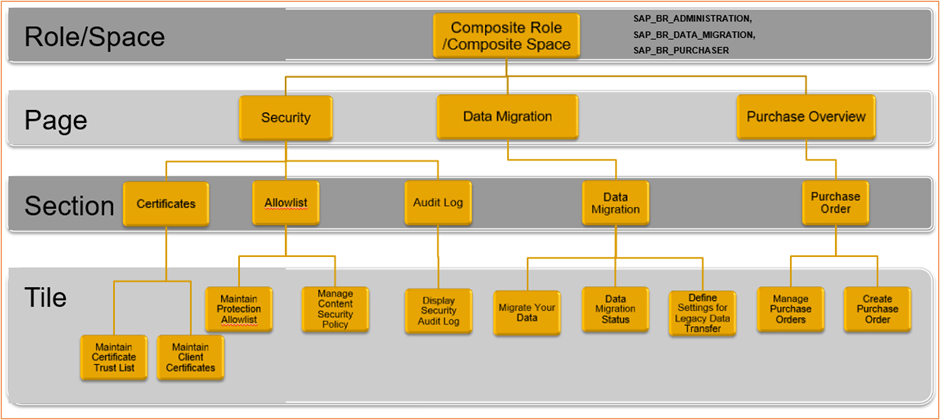
Business scenario: In a typical small enterprise, one user can take on multiple responsibilities: user security, data migration and purchase overview as outlined in below figure. From my past experience, I know there are standard page templates just doing that, if not more. I want to take the advantage of these SAP-delivered pages, or at least use them as my starting point.
The pages I am looking for involve three distinguished standard business roles:
- SAP_BR_ADMINISTRATION
- SAP_BR_DATA_MIGRATION
- SAP_BR_PURCHASE
Let’s adopt SAP standard page templates for this tailored composite space.
Step 1. Enter Maintain Business Roles app
Step 2. Select Create from Template button
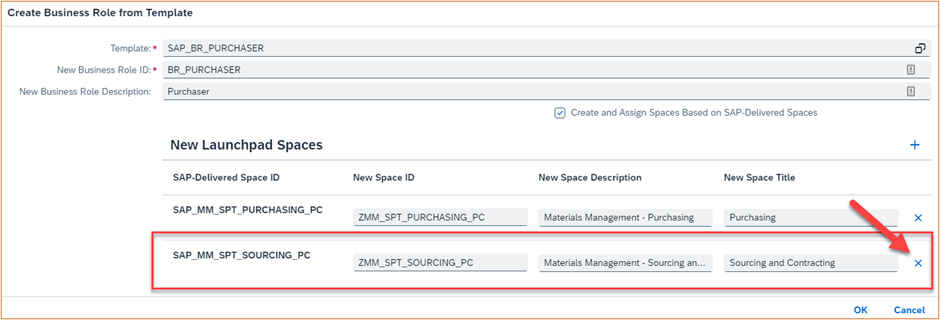
Step 3. Select template Purchaser SAP_BR_PURCHASER, new Business Role ID Z_SAP_ BR_PURCHASER, check Create and Assign Spaces Based on SAP-Delivered Spaces, and New Space ID: Z_BR_PURCHASER.
This SAP standard business user role delivers two standard spaces: SAP_MM_SPT_PURCHASING_PC and SAP_MM_SPT_SOURCING_PC. We can create two new space ID’s attaching a prefix “Z_”. From what I know, the 2nd space ID SAP_MM_SPT_SOURCING_PC is not needed for my purpose. I can delete it immediately by clicking on the “X” sign.
Step 4. After clicking the OK button, and assign the user GY to the role, clicking on the Save button.
Step 5. Now let’s edit the newly created space ZMM_SPT_PURCHASING_PC. I can either click on the newly created space ID within Assigned Launchpad Spaces (1) tab, or launch the app Manage Launchpad Spaces. I choose the later.
Step 6. The app Manage Launchpad Spaces shows four user created spaces, one is ZBR_AR_MANAGER created from above Example 1. Another one is from our previous step, the space ZMM_SPT_PURCHASING_PC. I will explain the other two spaces later.

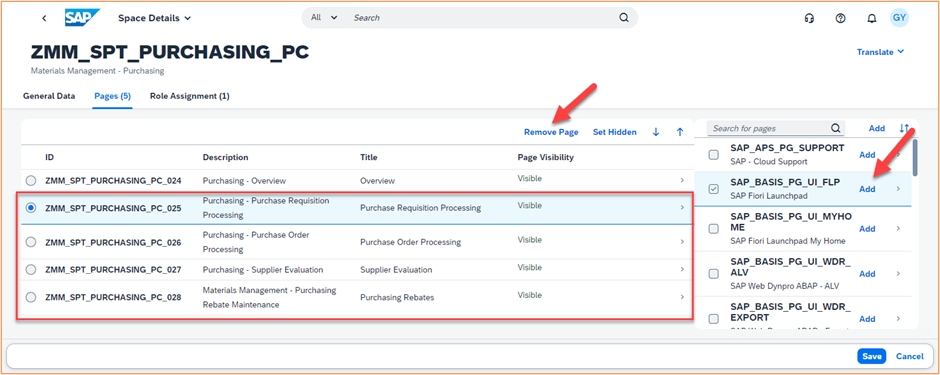
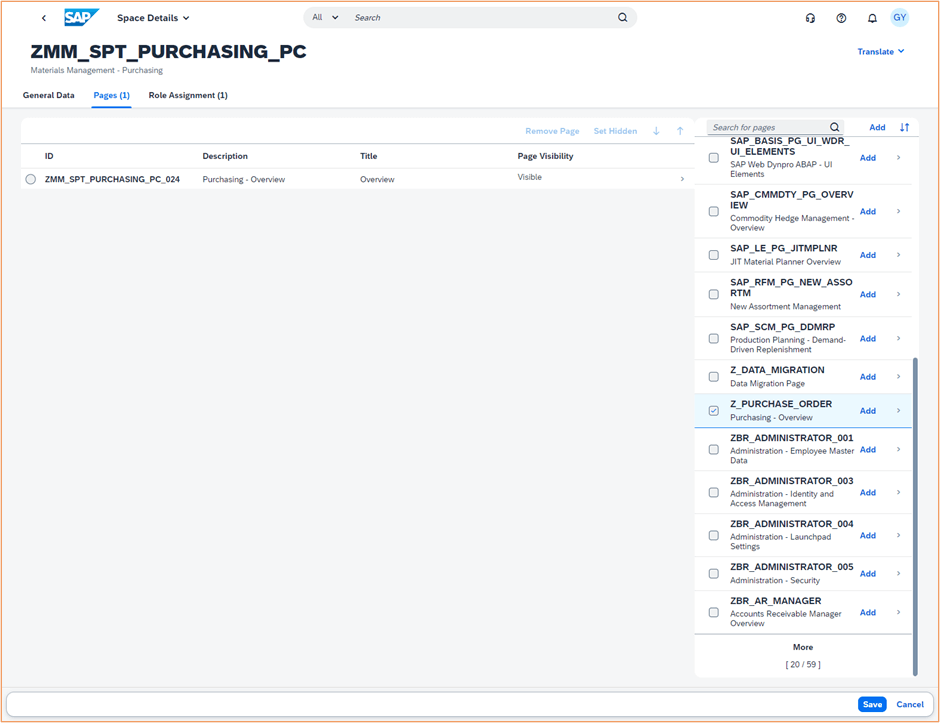
Step 7. By clicking on space ID ZMM_SPT_PURCHASING_PC, we can see five standard SAP-delivered pages. Only one page is relevant to my business needs, a page with two apps: Manage Purchase Order and Create Purchase Order. Clicking on Edit I delete other four pages from this space by selecting the Page and clicking Remove Page button.
If I want to add some other SAP-delivered standard pages, I can browse the right column, select and add the standard pages into this space. For example, selecting SAP_BASIS_PG_UI_FLP, and click on Add button. For this example, I don’t need to add a new page.
Hi Save button.
Step 8. Now let’s open the app Manage Launchpad Pages to modify the page ZMM_SPT_PURCHASING_PC_024.
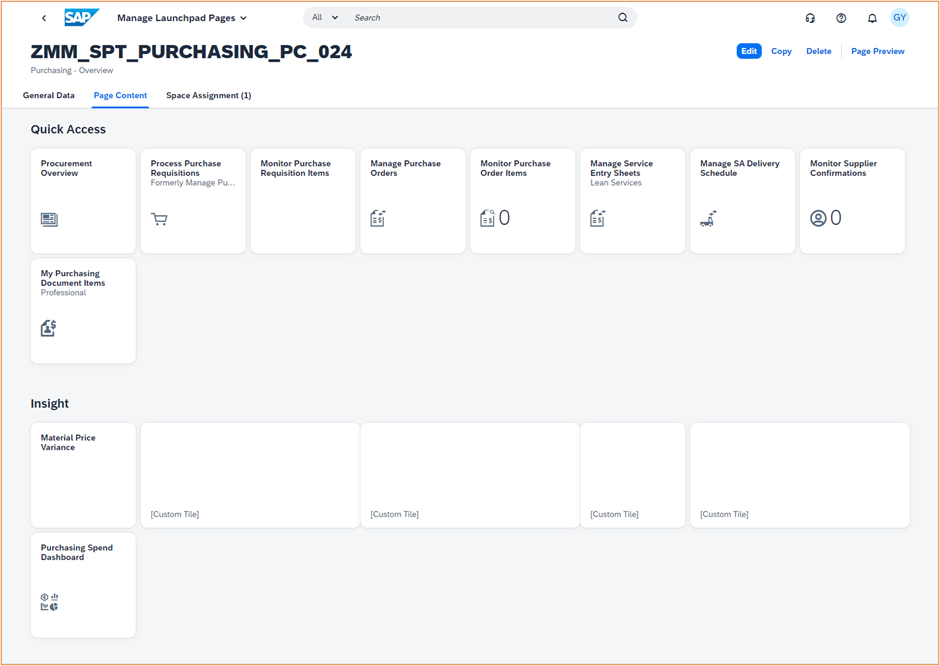
This standard page has three tabs:
- General Data about description, title, user and timestamp of creation and change.
- Page Content about the layout of the page.
- Space Assignment about spaces uses this page.
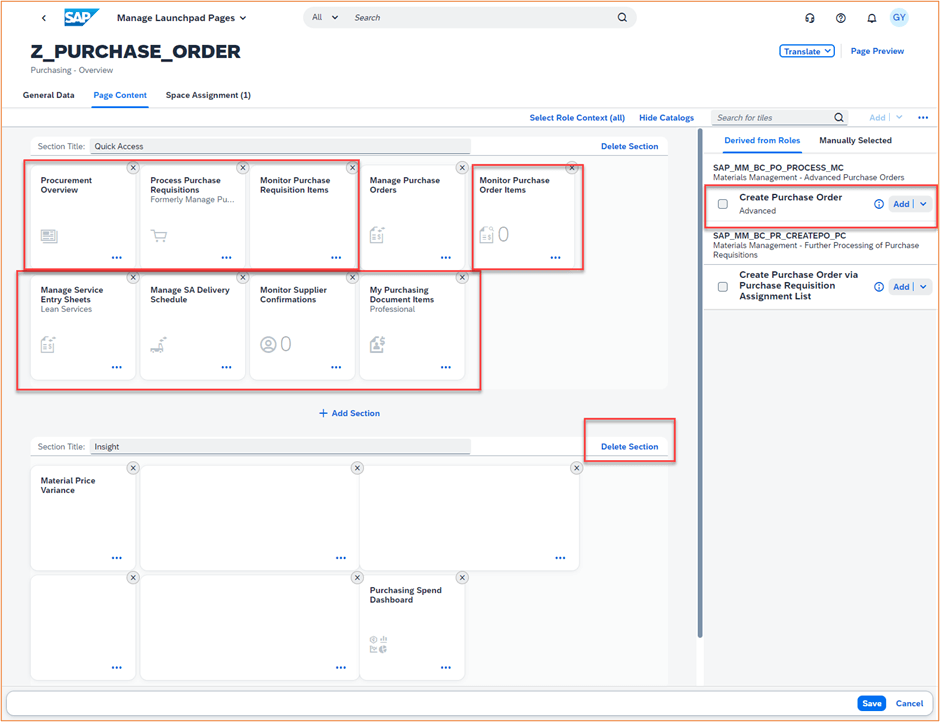
In the Page Content, there are two sections, Quick Access and Insight. For my purpose, the Insight section will be deleted. In the Quick Access section, there is only one app I will keep, the Manage Purchase Orders. There is no app Create Purchase Order.
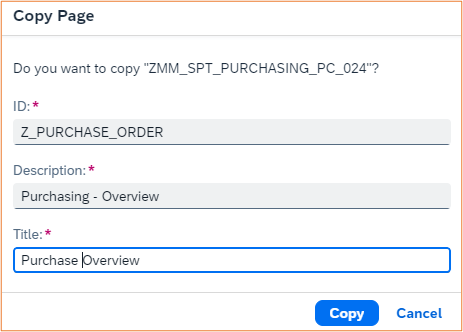
Step 9. I don’t want to alter SAP-delivered standard page, so I click on Copy button, and name it accordingly.
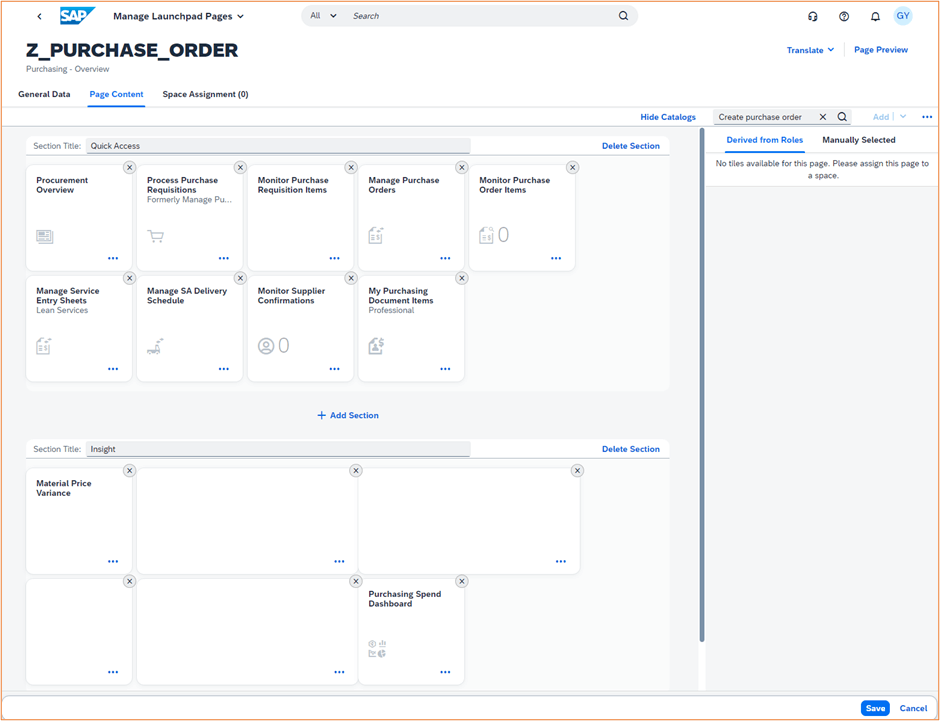
Step 10. Now I am in the edit mode of page Z_PURCHASE_ORDER. Since this page does not belong to any space, hence, no user roles are assigned, we cannot add any new apps to it. We need to assign user roles to this page.
Note: if there is no change made in this step, there is no need to hit Save button before moving to Step 11.
Step 11. From Space Assignment tab, clicking on Manage Launchpad Spaces. It launches app Manage Launchpad Spaces. Since I want to get the right business catalogs and hence the relevant apps, I select space ZMM_SPT_PURCHASING_PC, and Edit it. By selecting page Z_PURCHASE_ORDER and hit Add button, the space ZMM_SPT_PURCHASING_PC has two pages, ZMM_SPT_PURCHASEING_PC_024 and Z_PURCHASE_ORDER.
Hit Save button.
Step 12. Launch app Manage Launchpad Pages, select page Z_PURCHASE_ORDER and enter Edit mode. Now I have the Apps I can work with.
First, I delete section Insight.
Second, I delete all apps except Manage Purchase Orders.
Third, from right-hand side column, I add the app Create Purchase Order from Derived from Roles.
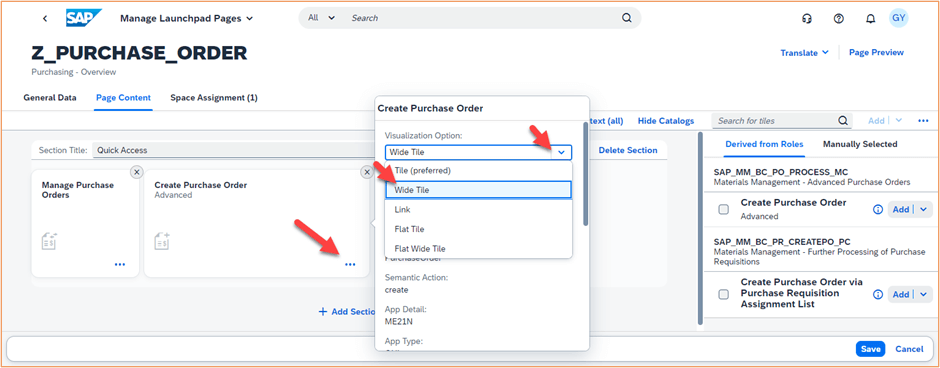
In the introduction of Spaces and Pages, I mentioned that tile can be resized. Let’s explore this option here. Select the tile Create Purchase Order, click on “…”, select Wide Tile for app Create Purchase Order, and Save. Now the tile is saved as a wide tile. It helps you to spot a particular tile quickly. This is another increased usability feature.
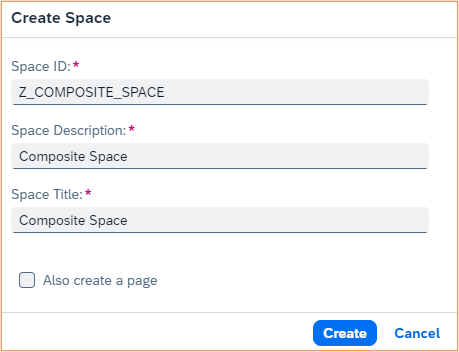
Step 13. Launch app Maintain Launchpad Spaces, and click on Create button. Uncheck Also create a page, because I am going to select and use my own created pages in next step. Then hit Create button.
Step 14. In the Space Details window, select and add three pages created previously:
- Z_DATA_MIGRATION: was created similarly as page Z_PURCHASE_ORDER. I won’t repeat the entire steps.
- Z_PURCHASE_ORDER: was created in Step 12.
- ZBR_ADMINISTRATOR_005: is a standard page as part of SAP-delivered space BR_ADMINISTRATOR.
The sequence of pages appear under the space can be adjusted by using the upper or down arrow.
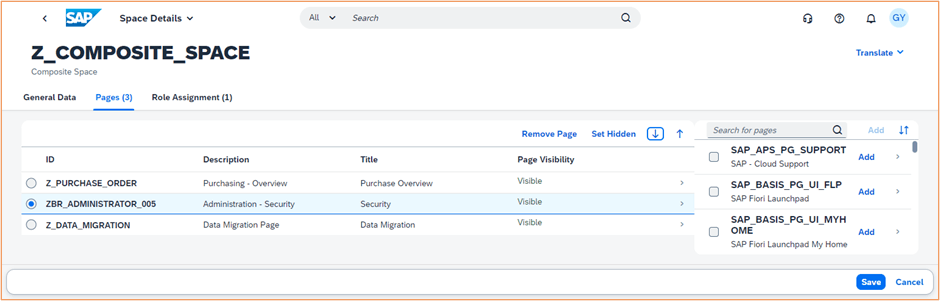
Hit Save button.
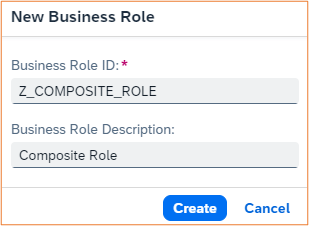
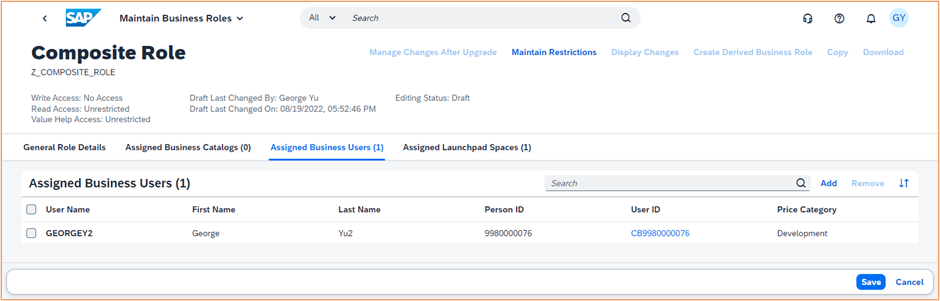
Step 15. Launch app Maintain Business Roles, and click on New button to create a new Business Role called Z_COMPOSITE_ROLE.
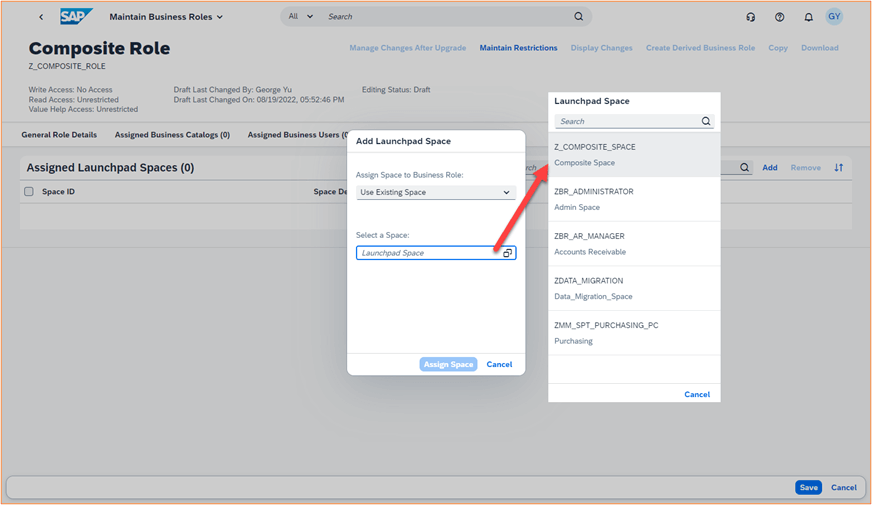
Step 16. Go to Assigned Launchpad Spaces tab, and hit Add. In the Add Launchpad Space window, click on Launchpad Space icon. In the Launch Space window, double click on Z_COMPOSITE_SPACE. Then click on Assign Space button.
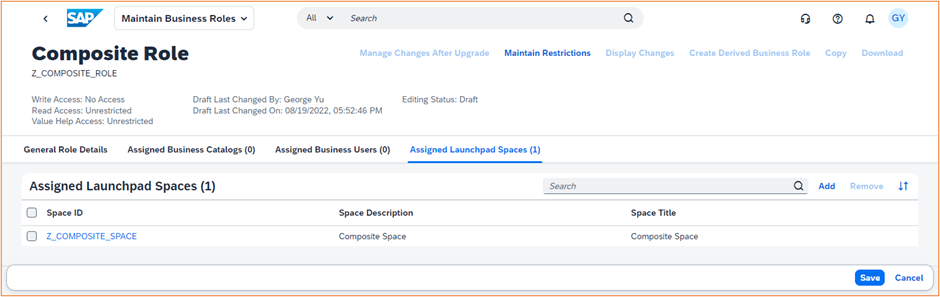
Step 17. By clicking on Save button, the space Z_COMPOSITE_SPACE is effectively being assigned to the business role Z_COMPOSITE_ROLE.
Step 18. After assigning business user GY to this role, we have successfully create a user tailored role with its user tailored space.
Step 19. From user GY’s launchpad, we can see the Composite Space with three pages: Purchase Overview, Security and Data Migration.
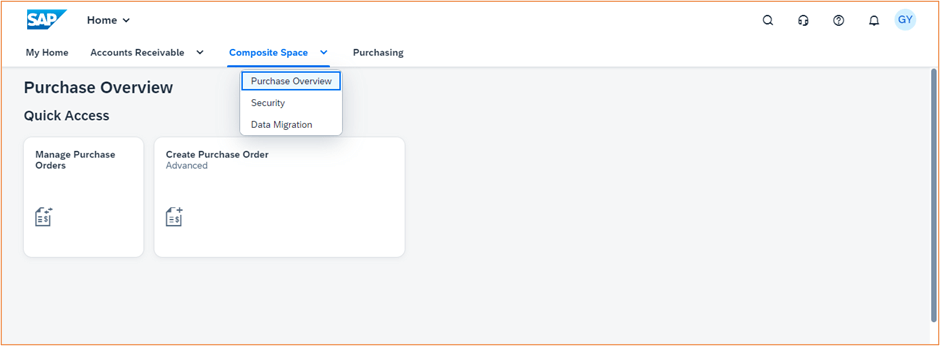
Note: The space Purchasing is coming from business role Z_BR_PURCHASER. We can remove it from assigned space of that business role. However, we should not remove the user from this role, because to properly use purchase order related apps, this user role is critical.


