Introduction
Secure cloud software should always rely on some sort of authentication and authorization mechanism to let users benefit from its functionality and protect it from attackers and/or malicious usage.
Based on such mechanism, users must first authenticate using login and password (safer systems even use two-factor authentication with some extra identity check technique, such as security tokens), so they can prove their identity, and, then, the application checks whether they are authorized to use its functionality and, if yes, which functionality – from the whole application – they are allowed to use: this is basically the definition of authentication (first part) and authorization (second part).
Authorizations are provided through some role-based mechanism through which a set of “roles” are assigned to users, granting them authorization to perform operations in the system (i.e. create, read, and/or update some data). So, a user with a role of, let’s say, “Viewer” would be allowed to access data in “read-only mode”, whilst a user with a role of “Admin” would also be allowed to write data to the system.
Therefore, it’s not unusual that, often times, the application should know who the authenticated user is (based on some user ID) and use that information to protect its functionality from unauthorized usage.
Most common example of such requirement, is an application that executes transactions triggered by the end-user (i.e. list orders, create, update and/or delete items, etc.). In such scenario, it would be nice to adjust the UI according to the user’s permissions (roles) and provide/display the appropriate controls which trigger only the authorized transactions.
And that’s why having information about the current authenticated user is definitely useful.
Access SAP Business Application Studio
We are going to start by accessing the selected IDE for development (in this case, SAP Business Application Studio).
Access your trial subaccount
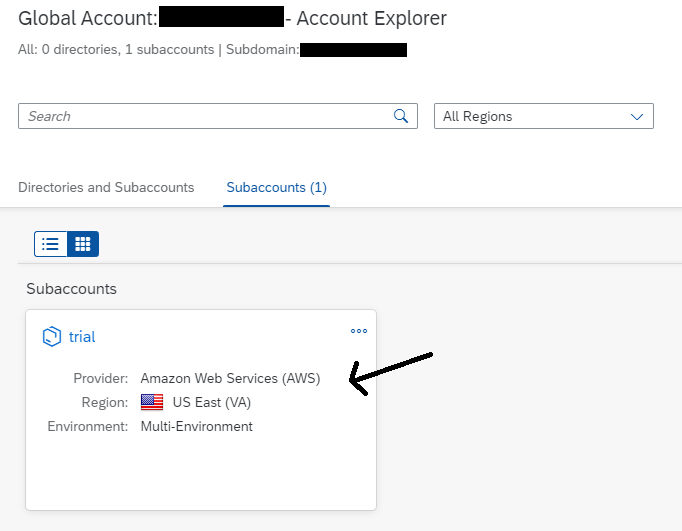
On the left-hand side expand Services and click on Instances and Subscriptions
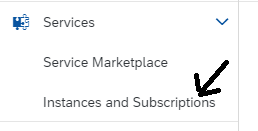
On the right, under Subscriptions, click on the small icon next to the SAP Business Application Studio subscription to go to the application

Start your previously created Dev Space by clicking on the Start Icon on the right

After the Dev Space has started (status RUNNING), go into it by clicking on the Space Name

Login to Cloud Foundry
Before starting the development, you need to make sure to be properly logged in to the Cloud Foundry environment on your BTP subaccount.
From the top menu, click on View and select Find Command…

In the Find Command dropdown, search for CF: Login to Cloud Foundry and select it

Confirm the Cloud Foundry endpoint, by pressing Enter

Enter the e-mail address you have used to create your trial account and press Enter

Enter the password you have used to create your trial account and press Enter

Select your trial organization and press Enter

Select your Cloud Foundry dev space and press Enter

Click on the small notifications icon in the bottom right corner to view the login notifications to make sure the login has been successful

Create the CAP Project
Now it’s time to create the CAP Project.
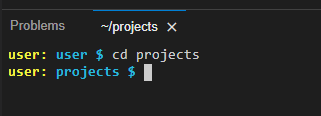
From the top menu, click on Terminal and select New Terminal

In the terminal window at the bottom, type cd projects and press Enter. The terminal should look like this:
Now type cds init user-info and press Enter. The output should look like this:
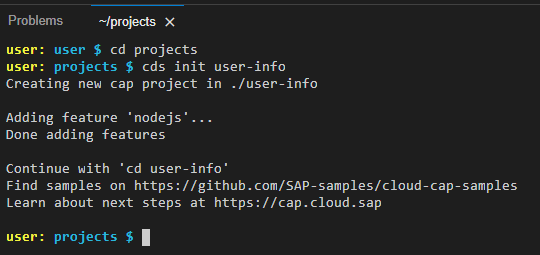
Notice that user-info is the project and application name and also the project folder name. Now, let’s open the project as a workspace.
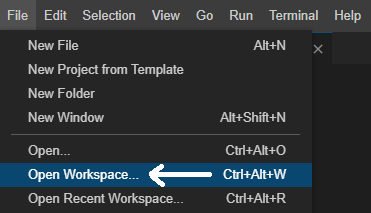
From the top menu, click on File and select Open Workspace…
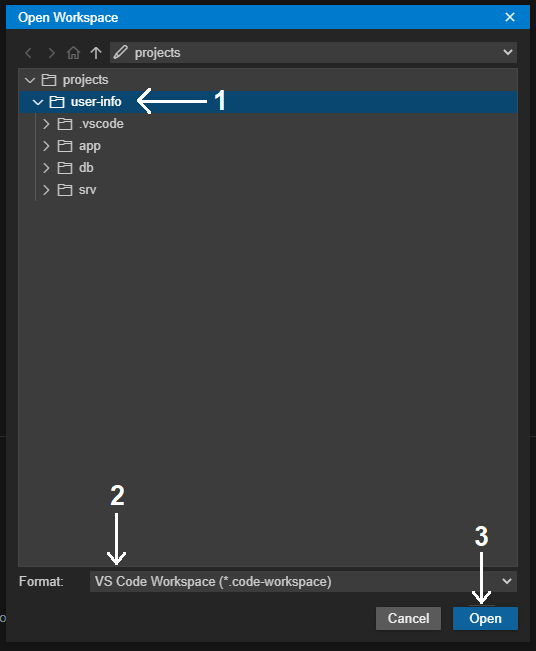
In the dialog, select the user-info folder under projects and the VS Code Workspace (*.code-workspace) from the Format dropdown, then click Open
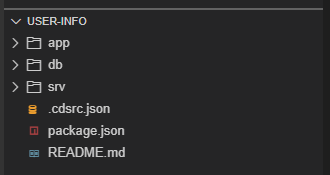
SAP Business Application Studio will restart and, after a few seconds, you should see the following structure at the bottom of the left-hand side pane:
As the Dev Space has restarted, execute the procedure to open a New Terminal again.
Create an Index Page
To test each method for getting the authenticated user information, let’s create an index page (index.html) which will represent our application’s basic front-end (UI).
In a new Terminal, type the following commands pressing Enter after each one.
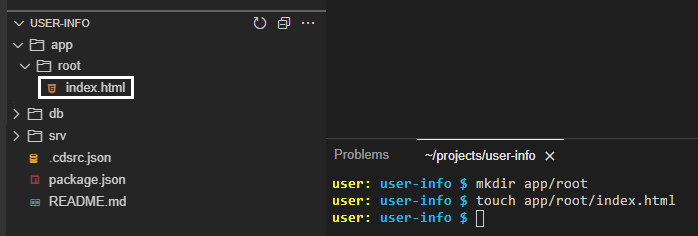
mkdir app/root
touch app/root/index.html
The index.html file will be created under the app/root folder:
Now, open-up that file and copy & paste the following content into it:
<!DOCTYPE html>
<html>
    <head>
        <meta http-equiv="X-UA-Compatible" content="IE=edge" />
        <meta charset="UTF-8" />
        <meta name="viewport" content="width=device-width, initial-scale=1.0" />
        <title>User Info Demo App</title>
    </head>
    <body>
        Three differnt ways for getting the authenticated user info:
        <ul>
            <!-- TODO: Add the links to each respective method -->
            <li>1. Directly from the UI (HTML5 app)</li>
                <ul>
                    <li>1a. Using the <b>/currentUser</b> endpoint</li>
                    <li>1b. Using the <b>/attributes</b> endpoint</li>
                </ul>
            <li>2. Using the CAP request object</li>
            <li>3. Using the XSUAA API</li>
        </ul>
    </body>
</html>
Create a Standalone AppRouter
To get user information, first, the user must be authenticated into your application. For that to happen the authentication flow must be completed. This flow follows the OAuth 2.0 protocol and is taken care by the so-called AppRouter. So, let’s add it to the project!
We will start by creating a package.json file into the app folder.
In the Terminal type these two command pressing Enter after each one:
cd app
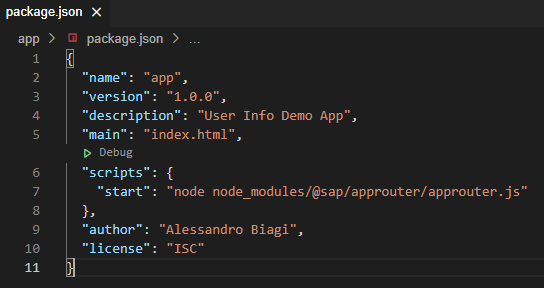
npm initFor the second one provide the following information:
- package name: app
- version: 1.0.0
- description: User Info Demo App
- entry point: index.html
- test command: node node_modules/@sap/approuter/approuter.js
- author: <your name>
- license: ISC
Leave all the other parameters blank.
Open-up the newly created package.json under the app folder and replace the “test” script by “start“. Your final content should look like this:
The next step is to install the AppRouter node package, by running the following command:
npm install @sap/approuter
OK, so, now the AppRouter should know what’s the application entry point and which routes it should map to such application. For that it uses a configuration file named xs-app.json. Therefore, we need to create that file under the app folder by running the following command:
touch xs-app.json
Now, open-up that file and copy & paste the following JSON content into it:
{
    "welcomeFile": "index.html",
    "authenticationMethod": "route",
    "routes": [
        {
            "source": "/user-info/(.*)",
            "destination": "srv-api",
            "csrfProtection": true,
            "authenticationType": "xsuaa"
        },
        {
            "source": "/(.*)",
            "localDir": "root",
            "authenticationType": "xsuaa"
        }
    ]
}
For now, in this configuration, we will just map the root folder as the location for static content such as de index page (second route) and the CAP backend service as a destination named “srv-api” (although you might not need it if you don’t want to experiment with any of the two approaches based on it – request object or XSUAA API). A new route will be added in the instructions of the blog post regarding the first approach.
Create an XSUAA Service Instance
We shall remember that, in Cloud Foundry, security (meaning authentication and authorization) is governed by the UAA (User Account and Authentication) mechanics which in SAP BTP is implemented by the XSUAA service (Authorization and Trust Management Service).
This means that only having the AppRouter properly set up in the application is not enough to achieve the complete OAuth 2.0 authentication flow as it depends on the XSUAA service for that.
Therefore, we need to create an XSUAA service instance on BTP, but, first, it will require a configuration file that’s provided upon instance creation. That file is named xs-security.json and it will be created under the project’s root folder.
In the Terminal type these two commands pressing Enter after each one:
cd ..
touch xs-security.json
Now, open-up that file and copy & paste the following JSON content into it:
{
    "xsappname": "user-info",
    "tenant-mode": "dedicated",
    "description": "Security profile of User Info Demo App",
    "scopes": [
        {
            "name": "uaa.user",
            "description": "UAA"
        }
    ],
    "role-templates": [
        {
            "name": "Token_Exchange",
            "description": "UAA",
            "scope-references": [
                "uaa.user"
            ]
        }
    ],
    "oauth2-configuration": {
        "redirect-uris": [
            "https://*.hana.ondemand.com/**",
            "https://*.applicationstudio.cloud.sap/**"
        ]
    }
}
The uaa.user scope associated to the Token_Exchange role template is required to perform the OAuth 2.0 authentication flow executed by the approuter. Basically, before loading the HTML5 application (in this case just the index.html page) the router authenticates the user logged in to SAP BTP via OAuth 2.0 and gets a JWT (JSON Web Token) which is, then, forwarded to the HTML5 application and, from there, to the CAP service, making sure that only authenticated users have access to the application.
The “redirect-uris” in the “oauth2-configuration” is just a list of allowed endpoints (hosts and paths which can use wildcards) to be used as callbacks to which the OAuth flow redirects when authentication is completed. URIs that are not listed are considered “invalid” by the OAuth flow, so the above configuration makes sure that the authentication flow is well executed either when the application is deployed to Cloud Foundry (*.hana.ondemand.com) as well as when running locally on Business Application Studio (*.applicationstudio.cloud.sap).
Now, we can create the XSUAA service instance by running the command below:
cf create-service xsuaa application user-info-xsuaa -c xs-security.json
This should be the expected outcome:

Bind the XSUAA Service Instance to the AppRouter
Upon successful creation of the service instance, on the left-hand pane of BAS click on the Cloud Foundry icon (small light bulb), then on the refresh button at the top right of the pane.
The newly created instance should be displayed at end of the list, like demonstrated below:
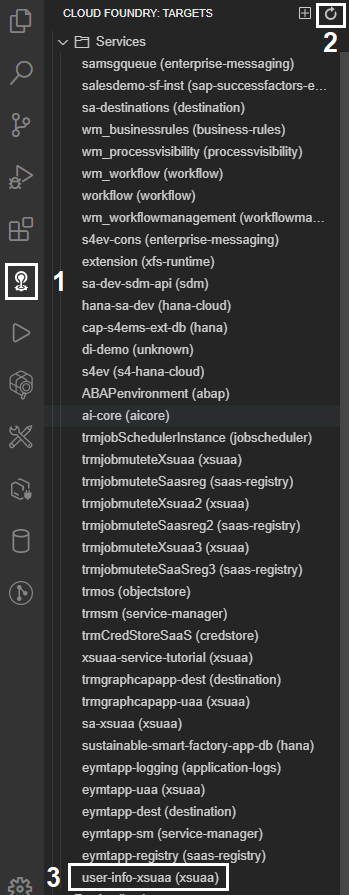
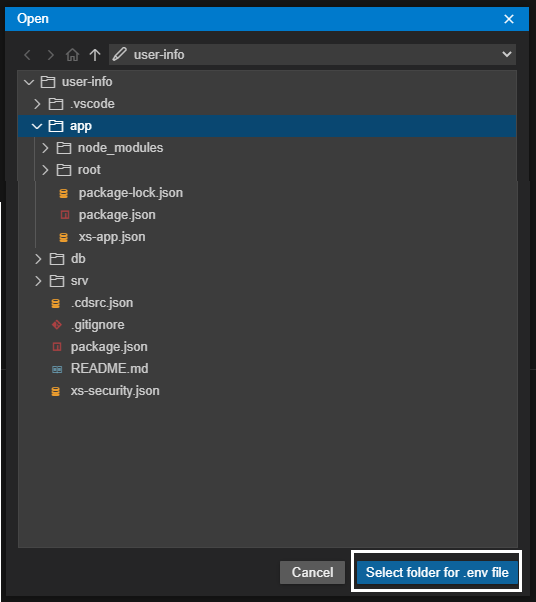
Right click on the user-info-xsuaa service instance and select “Bind service to a locally run project” and, then, in the dialog, make sure the app folder is selected and click on the “Select folder for .env file” button.
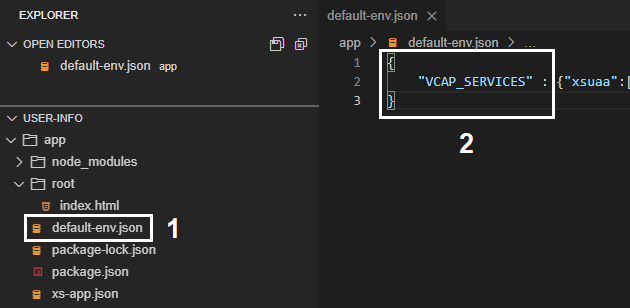
Click again on the Explorer icon in the left-hand pane. You should see the .env file that has been created like demonstrated below:
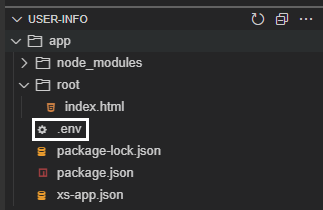
Now, we need to rename that file to default-env.json and transform its contents into JSON format (as it’s just defining a regular environment variable called VCAP_SERVICES which is not in the expected JSON format), like demonstrated below:
NOTE: if you do not intend to experiment with any of the backend service approaches (request object or XSUAA API) you can safely skip all the next steps.
Configure the Backend (CAP) Service Destination
You may recall that, in the xs-app.json configuration, the first route which was added to it is pointing to a destination named “srv-api“, right? Therefore, the AppRouter needs to read that destination’s configuration and it will look for it in the same default-env.json file, but in an environment variable (key) named destinations apart from the VCAP_SERVICES.
To create such configuration just add the following line right before the “VCAP_SERVICES” in the default-env.json file:
"destinations" : [{ "name" : "srv-api", "url" : "http://localhost:4004", "forwardAuthToken" : true }],After the modification, your default-env.json file should look like this:

You may have noticed that the URL points to the locally run CAP service (http://localhost:4004) and the router should forward the authentication token (JWT) to it after execution of the OAuth 2.0 flow.
One important thing to mention is that everything that’s configured in the default-env.json is only effective in a local development environment as this file is not deployed to BTP with the application and shall not be included in version control repositories (such as Git) as it holds sensitive information like credentials.
Create the Service Definition
The second and third approaches to get the authenticated user information from this blog posts series are done in the backend service of the solution, meaning the CAP service.
Therefore, the first thing that’s necessary is to create the usual CDS service definition in the “srv” folder. For that, just run the command below in the Terminal:
touch srv/user-info-service.cds
Open-up the user-info-service.cds file, then copy and paste the following content into it:
service UserInfoService @(path : '/user-info', requires: 'authenticated-user') {
    function userInfo() returns String; // using req.user approach (user attribute - of class cds.User - from the request object)
    function userInfoUAA() returns String; // using the XSUAA API
}
In the CAP service, we’ll not actually define any OData entities (as usually expected), but just two functions (one for each approach). You may notice that the service is being served in the “/user-info” path and requires authentication (as expected).
Create the Function Handler
Now, we need to create a “skeleton” for the implementation of the two functions described in the service definition. In the Terminal, run the command:
touch srv/user-info-service.js
Open-up the user-info-service.js file, then copy and paste the following content into it:
module.exports = cds.service.impl(async function () {
    // using req.user approach (user attribute - of class cds.User - from the request object)
    this.on('userInfo', req => {
        return "";
    });

    // using the XSUAA API
    this.on('userInfoUAA', async () => {
        return "";
    });
});
As you can see, in this “skeleton”, both functions are just returning an empty string, thus waiting for the corresponding implementation of each approach.
Install Project Dependencies
Both approaches will require the CAP backend service to handle security (basically the JWT – JSON Web Token – provided after authentication via XSUAA), thus the need to install the appropriate dependencies for it to accomplish that goal.
In the Terminal, run the following commands:
npm install @sap/xssec
npm install passport
And to install all other dependencies from the generated package.json just run:
npm install
Bind the XSUAA Service Instance to the CAP Service
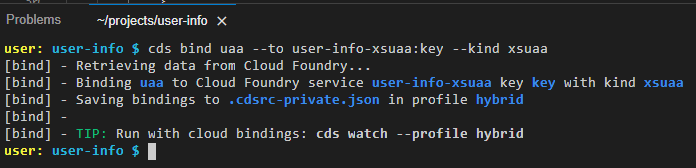
The binding of the XSUAA service instance to the CAP service is slightly different from the approach taken to bind it to the AppRouter. For a local development environment, CAP leverages what’s called hybrid testing approach through the cds bind command.
In the Terminal, run the following command:
cds bind uaa --to user-info-xsuaa:key --kind xsuaa
This should be the expected outcome:
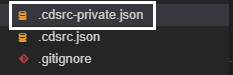
The command generates a new configuration file in the project: cdsrc-private.json.
Now, we need to make an enhancement to this file for the service authentication to work properly. So, open it and add the following block right after the block “uaa” : { … }:
,
            "auth": {
                "kind": "jwt-auth"
            }
After that modification your cdsrc-private.json file should look like this:

Notice that the [Hybrid] feature, defined at the very beginning, states that the configuration must emulate the VCAP_SERVICES environment variable. However, it does not dismiss the usage of the default-env.json file.
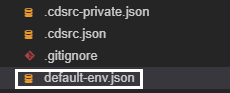
So, make sure to copy that file from the app folder to the root folder of your project (same folder as the cdsrc-private.json file):
And with that, we completed the setup of the project to start the development of the different approaches to the get the authenticated user information with CAP and we are now good to go!


