The Data Monitor layout in SAP S/4HANA lists consolidation units, their groups, and various tasks that you can perform on them. This layout also enables you to update the global parameters if required.
The purpose of the Data Monitor is to consume the financial data of each consolidation unit and perform various tasks before the financial data is consolidated at a consolidated group level. All the Data Monitor tasks are predefined and ready to use.
Each task must be configured and sequenced in the order of execution in the process. You’ll open the period and execute the tasks on the consolidation units. After the task is successfully executed, you need to block the task and move to the next task. However, data collection tasks and manual posting tasks can be blocked even without being executed.
In this blog post, you’ll learn how to configure the Data Monitor in SAP S/4HANA Finance and all the tasks that can be run from the monitor, how to assign them to a standard task group, and how to assign the task group to a dimension.
The table below lists all the tasks that the Data Monitor can have.
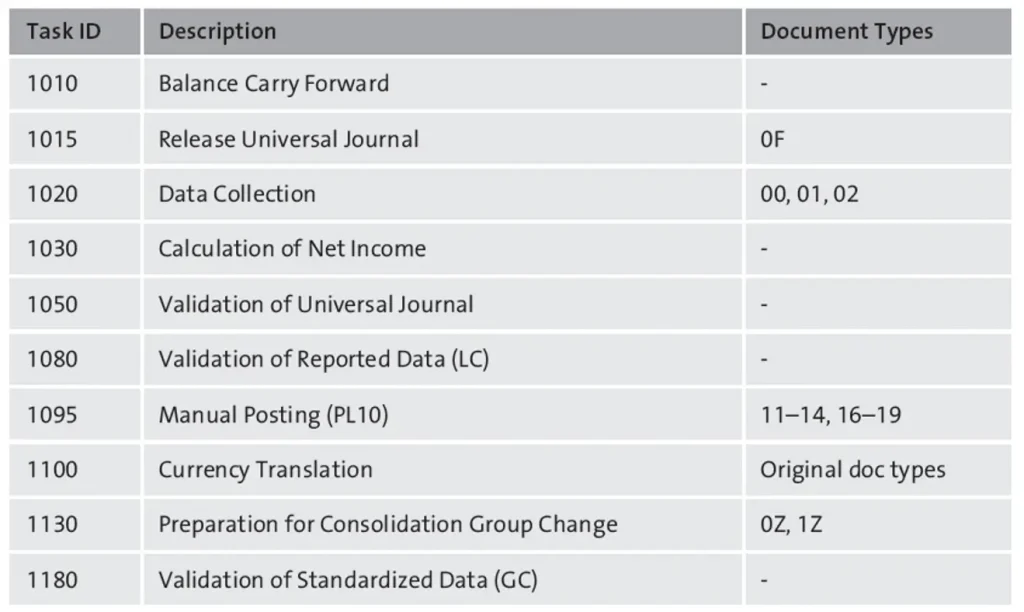
All the tasks to be executed in the Data Monitor needs to be assigned to a task group. The following are initial activities you need to perform while configuring the Data Monitor:
- Check the predefined task groups, and create one if necessary.
- Assign the tasks to a task group.
- Identify the tasks that need to be blocked after execution.
- Identify the tasks that are potential milestones.
- Determine the predecessor for each task.4
Because tasks are sets of processes that are required to be executed successfully to prepare for and perform consolidations, you’ll encounter tasks in both the Data Monitor and the Consolidation Monitor.
Let’s start by defining a task. To do so, execute Transaction CXE9N, and go to Data Collection for Consolidation > Define Task to see the screen shown in the figure below. By default, the screen contains a list of standard Data Monitor tasks, but you can always add a new task by selecting the New Entries button, which is highlighted in the figure. Select a Task, Task category, Short Text, and Medium Text, and then click the Save button.
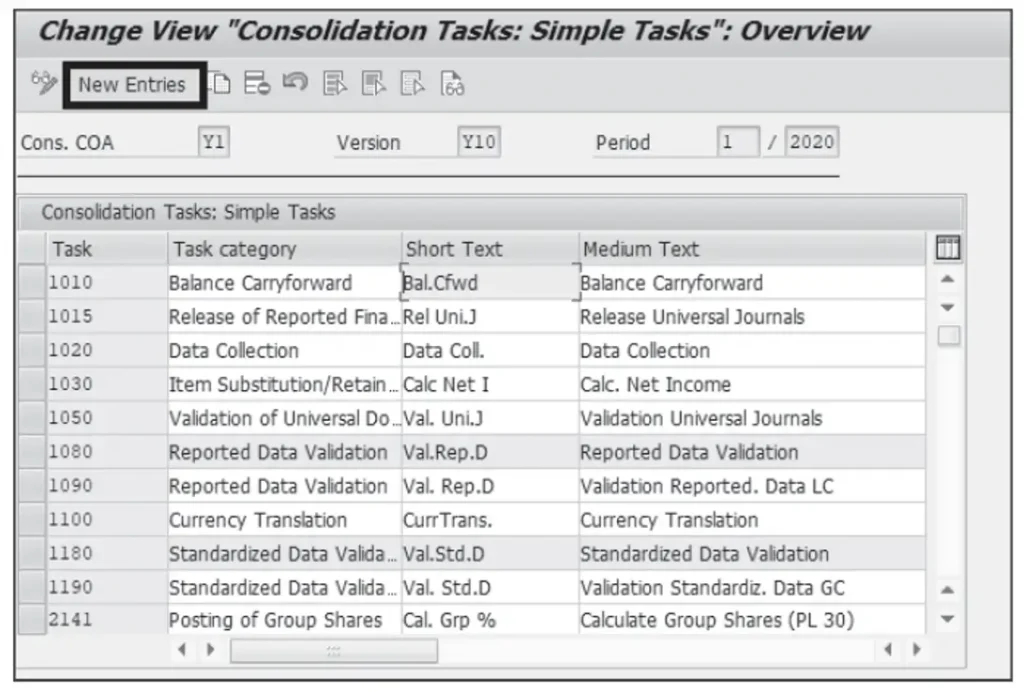
When you’ve defined all the tasks, move on to the next step in which you assign tasks to task groups.
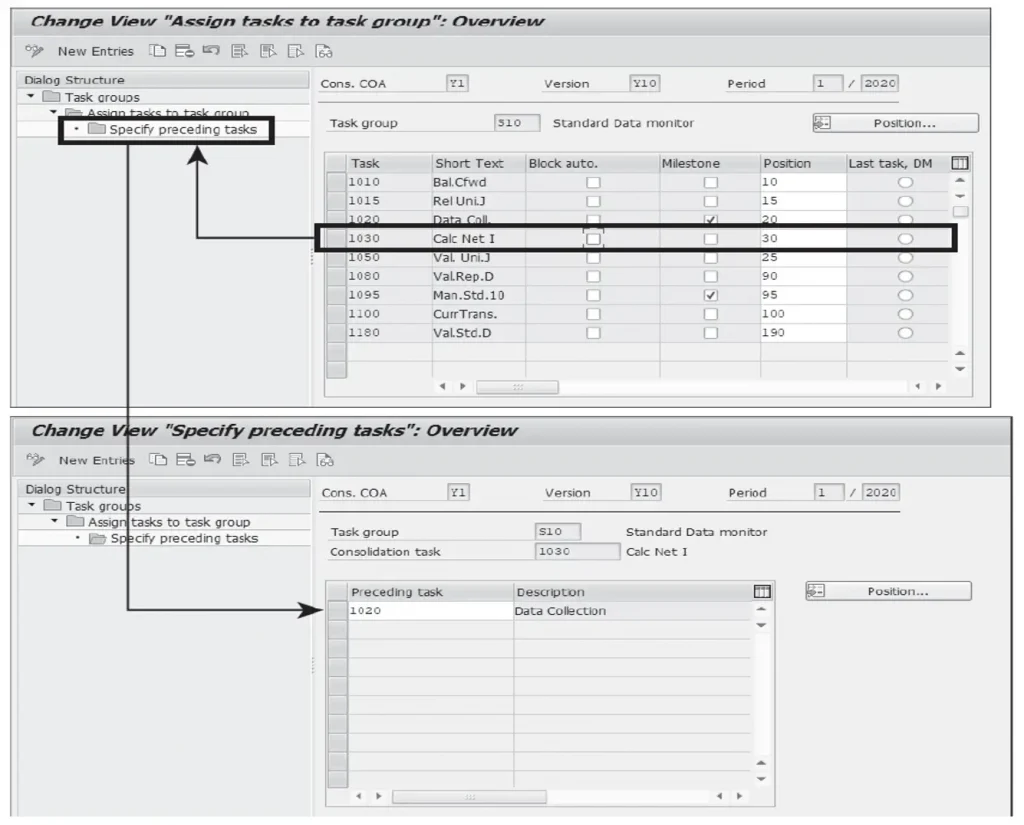
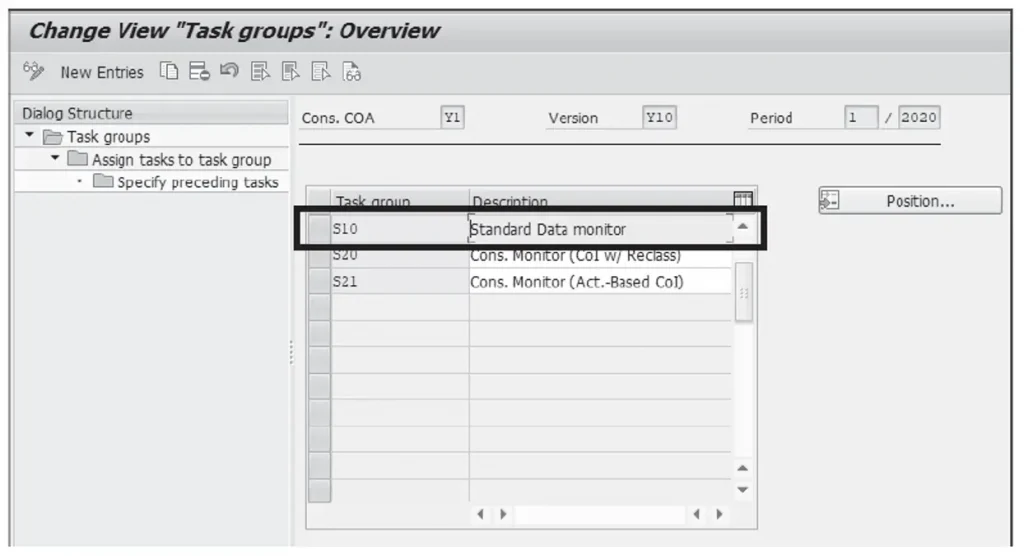
The next figure shows the predelivered task groups for the Data Monitor and the Consolidation Monitor, which contain the tasks that need to be executed before you perform consolidations. In this post, we’ll describe S10: Standard Data monitor. You can also create a new Task group and assign the tasks per your requirements. To access predefined task groups, execute Transaction CXE9N, select Configuration for Consolidation Processing, and then select Define Task Group. S10 contains all the tasks that you’ll perform in the Data Monitor.
Next, go to Task groups > Assign tasks to task group, as shown in the following figure, which shows the assignment of tasks to a task group. A task group can’t exist without tasks (in this case, we’re using the standard content delivered by SAP). All the tasks are assigned to the standard Data Monitor task group (S10), which means you can now proceed with the next steps in the configuration.
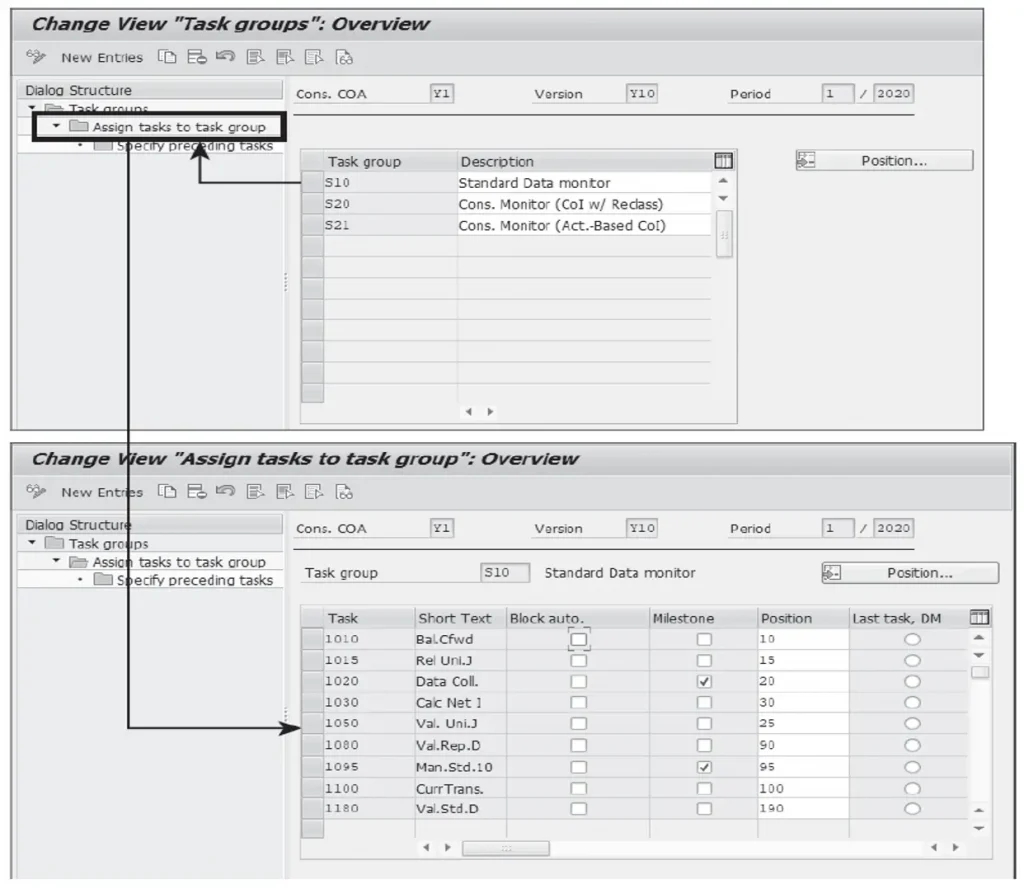
Let’s look into the details of the task settings for a deeper understanding of the Data Monitor tasks:
- Task and Short Text: These fields provide the basic details of a task. The preceding example uses SAP-delivered tasks, but you can create custom tasks and assign them to your task group.
- Block auto: Checking this box blocks any task automatically after it’s successfully executed; however, a task can also be blocked explicitly from the Data Monitor.
- Milestone: This setting stops the consolidation process, which is very helpful especially during the automated execution of Data Monitor tasks. When you select a task as a Milestone task, you’re instructing the system to stop the process after that task is executed. Data collection and manual postings are default milestone tasks.
- Position: Checking this box indicates the position of certain tasks in the Data Monitor based on their numeric values in ascending order.
- Last task, DM: This is a mandatory task in the Data Monitor that indicates the last task to be executed in the Data Monitor in order to execute the Consolidation Monitor without any errors.
Click Save when you’re done.
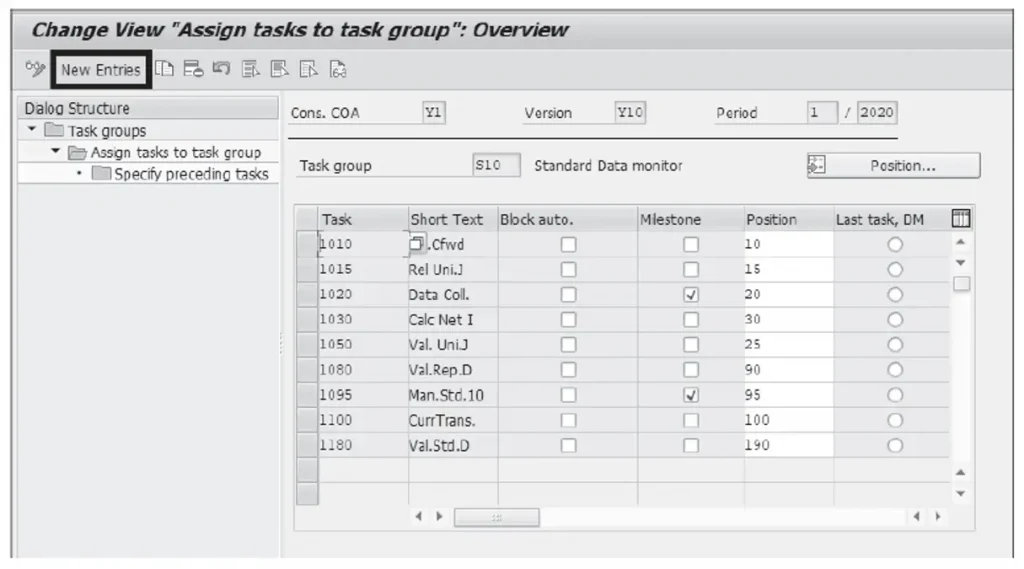
You can also create a custom task group per the requirement by selecting the New Entries button in the Change View “Assign tasks to task group”: Overview screen. To access it, execute Transaction CXE9N, select Configuration for Consolidation Processing, and enter the Task, Short Text, Block auto., Milestone, Position, and Last Task, DM, as shown here.
When a new task group is created, you need to assign it to a consolidation dimension. Assignment of task groups is version dependent by default, and it also signifies the period in which a task is effective. The period category gives you the ability to control when a task can be used. The Data Monitor task group and Consolidation Monitor task group contain the corresponding task groups that are used in the Data Monitor and Consolidation Monitor for a version. The next figure shows the details of the assignment. To access the screen, execute Transaction CXE9N, open Configuration For Consolidation Processing, and select Assign Task Group To Dimension.
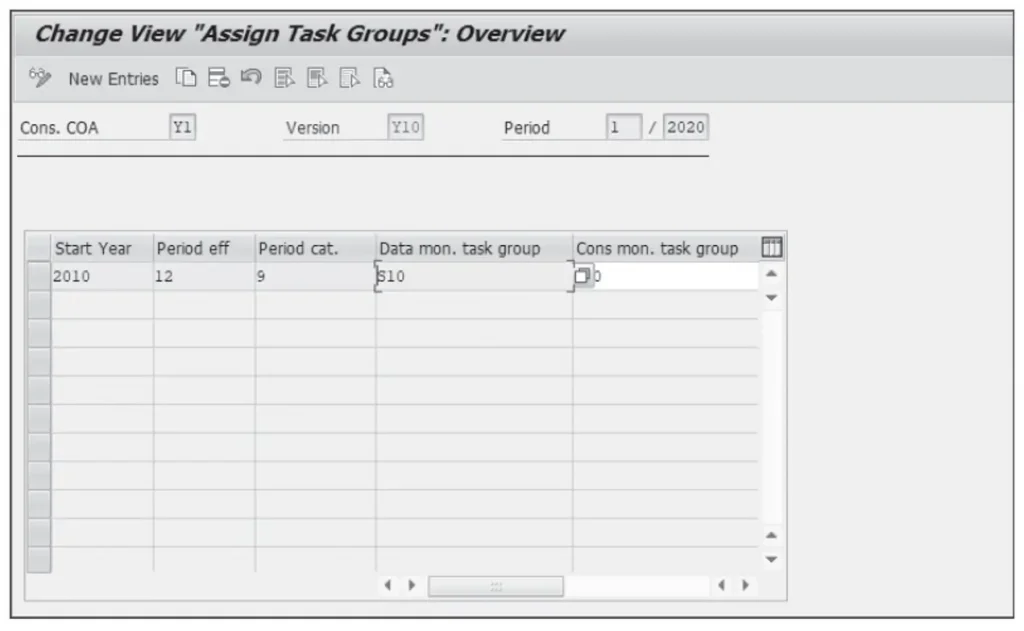
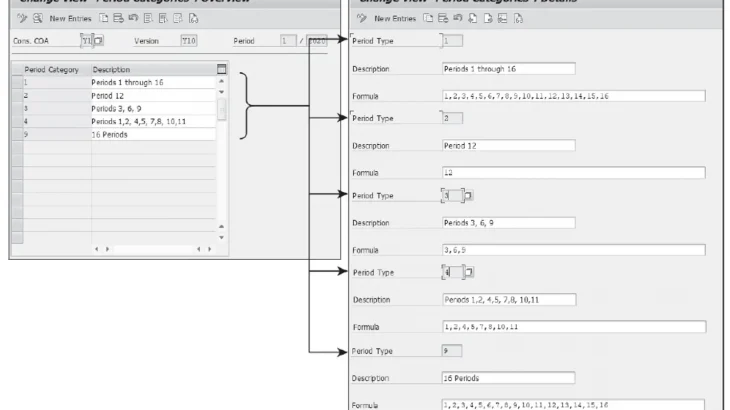
To assign the Data Monitor task group to the dimension for this example, you enter“S10” in the Data mon. task group field. After the task group is assigned to a consolidation dimension, you also need to define period categories per your requirements. Below demonstrates a predefined scenario.
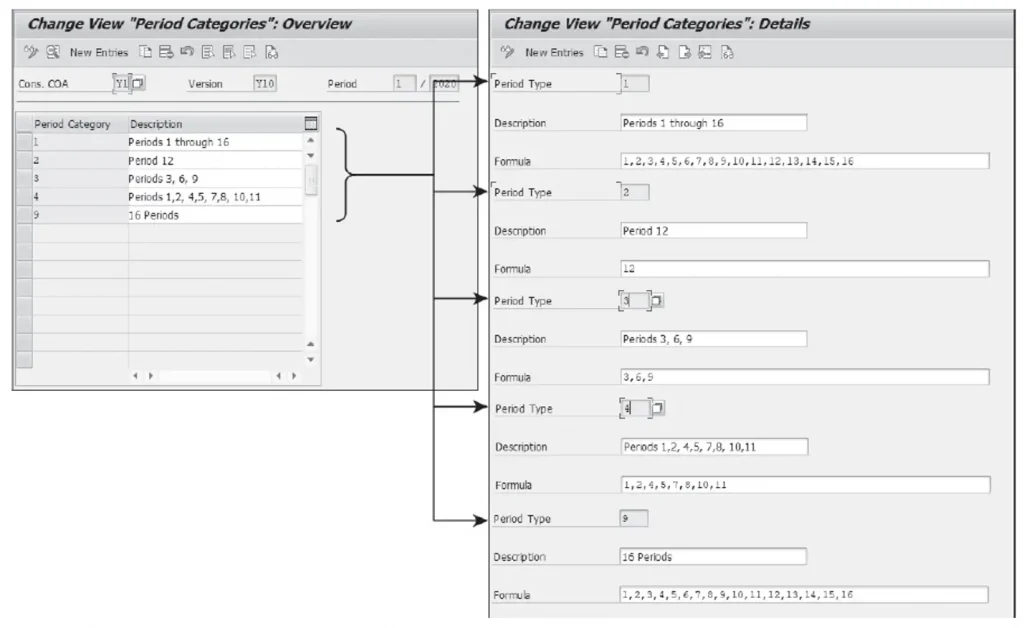
Period categories allow you to assign task groups to the dimensions in different periods. Depending on your requirements, you can group the periods in a fiscal year using period categories. Furthermore, period categories give you the ability to use different data entry profiles in different periods for entering data reported by consolidation units. You can create your own period categories for each period, quarter year, half year, and year end, or per your requirements.
To access Period Categories, execute Transaction CXE9N, open Data Collection for Consolidation, and select Define Period Categories. In the figure above, the period categories are defined for year-end, quarter-end, and period-end consolidations. You can also create additional period categories by clicking the New Entries button and entering the following fields (right side):
- Period Type: Group accounting periods that have the same data collection requirements for consolidations.
- Description: Enter a text description of the period type/period category.
- Formula: Enter the period values here in which a period type is used.
Click Save when you’re done.
In the final figure, the predecessor tasks and task sequencing are shown, which acts as a checklist during the close process. Execution of a task isn’t dependent on its preceeding task; however, the preceeding tasks must be executed and blocked so that a task can run successfully. After all the tasks are executed and blocked, the Data Monitor execution is complete.
To assign the preceeding tasks, execute Transaction CXE9N, open Configuration for Consolidation Processing, and select Assign tasks to task group to see all the tasks that you’ve assigned to the Data Monitor. These tasks can be arranged per your requirements by selecting a task and clicking on Specify preceding tasks to select the task that you want to be the predecessor of the selected task.
