Background
In this blog post I will discuss and demonstrate the configuration of single sign on (SSO) with Fiori Launchpad and Google G-Suite as the Identity Provider (IDP).
I found that after some extensive searches, I was unable to find any information or documentation covering this combination (most focus on Azure AD as an IDP with SAP). Instead, I had to use various documentation covering similar topics, but with differing technologies, and through by own discoveries managed to get this working.
I decided to share my experience in a step-by-step procedure in this blog, I hope that this fills the apparent gap in available documentation.
Assumptions
Before following this guide, the following would already need to be set up and working correctly:
- Google G-suite configured successfully and that the domain used is managed and has been validated by Google
- The reader can log in successfully to Google G-suite and has administration rights to create SAML Apps
- SAP Fiori Launchpad has already been configured and working with SSL
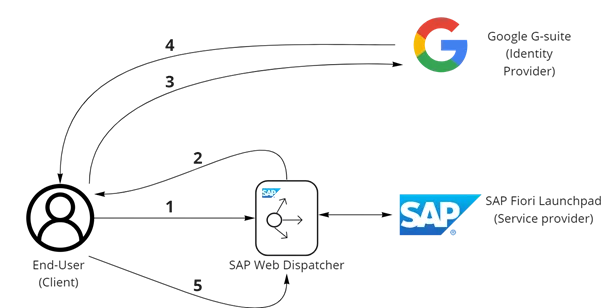
Overview of the Architecture
The following diagram summarizes the communication flow between the client, SAP Fiori, and Google:
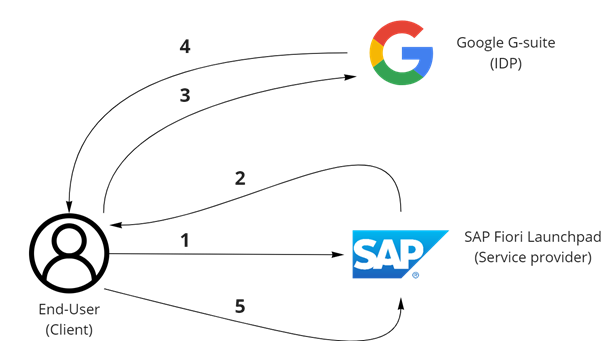
- The client makes a request to SAP Fiori launchpad
- A redirect to Google G-suite is issued by Fiori launchpad
- Google G-suite presents the client with a login screen, where the client logs on with their Google credentials
- After successfully logging in to Google, a SAML XML assertion is generated which contains information about the client, this is sent back to the client
- The client makes a post request to Fiori launchpad, the XML assertion is validated, and the client is granted access to Fiori launchpad
Let’s get started then! Here follows the steps required to get the combination working:
1. FIORI: Configuring the Service Provider
Parameter configuration in the Fiori system
The following table contains the required parameters in the Fiori system. Most of these parameters will be set by default already, so this table can be used just for reference purposes and to ensure that the parameters are set correctly.
You can check the parameters with transaction code RZ11.
| Parameter Name | Dynamic parameter | Default Value | Required Value |
| login/create_sso2_ticket | Yes | 3 | 2 |
| login/accept_sso2_ticket | Yes | 1 | 1 |
| login/ticketcache_entries_max | No | 1000 | 1000 |
| login/ticketcache_off | No | 0 | 0 |
| login/ticket_only_by_https | Yes | 0 | 0 |
| icf/set_HTTPonly_flag_on_cookies | Yes | 3 | 3 |
| icf/user_recheck | Yes | 0 | 0 |
| http/security_session_timeout | Yes | 1800 | 1800 |
| http/security_context_cache_size | No | 2500 | 2500 |
| rdisp/plugin_auto_logout | Yes | 1800 | 1800 |
| rdisp/autothtime | Yes | 60 | 60 |
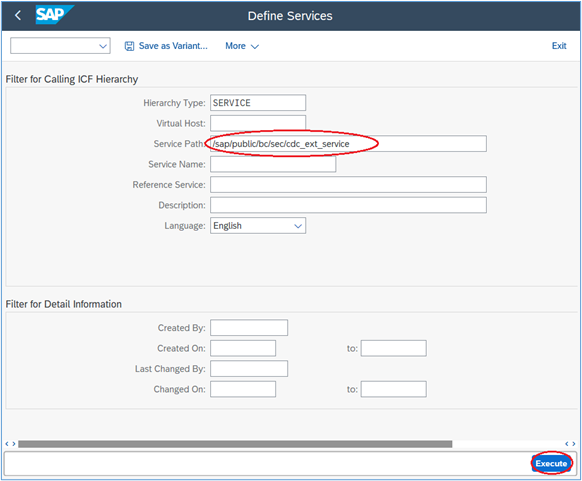
SICF services required
SSO will require some SICF services being activated if they aren’t already. Please check and activate where necessary.
/sap/public/bc/sec/cdc_ext_service
/sap/public/bc/sec/saml2
/sap/bc/webdynpro/sap/saml2
/sap/bc/webdynpro/sap/sec_diag_tool
To activate these services, follow the instructions for the first service listed, repeat the same procedure for the remaining services.
1. Logon to the Fiori system (or S/4HANA, if Fiori is embedded)
2. Go to transaction SICF
3. Enter the service name in the ‘Service Path’ field and then click ‘Execute’ as in the following screenshot:
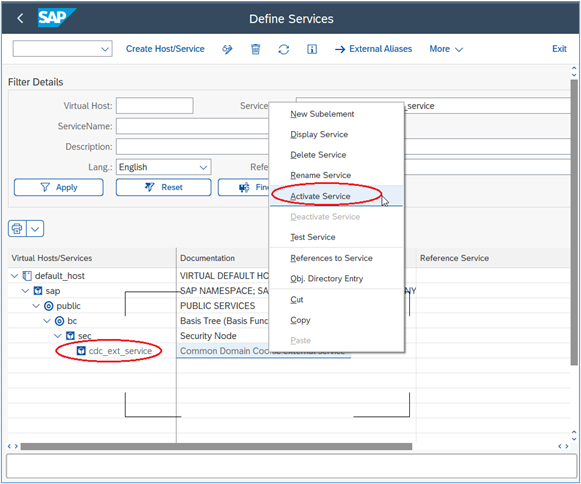
4. If the service is greyed out, this indicates that it is inactive. Activate it by right-clicking on the service and then select ‘Activate Service’ from the context menu:
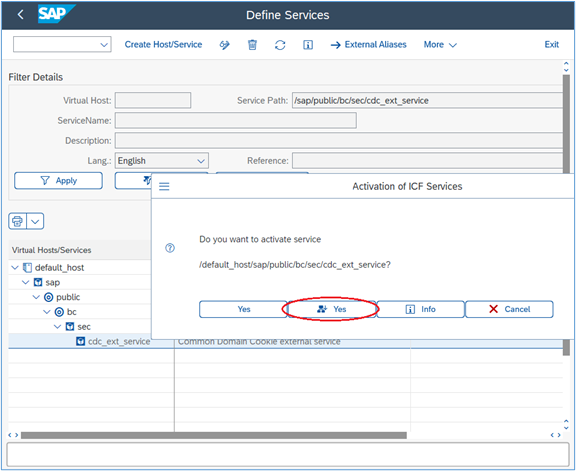
5. Select the 2nd ‘Yes’ button (this will activate any underlying services too, if there are any):
6. Repeat this process for the other services.
Configuring SAML on SAP Fiori
This section explains the configuration process for the Fiori launchpad, either as a standalone Fiori Frontend system, or as an embedded Fiori in S/4HANA.
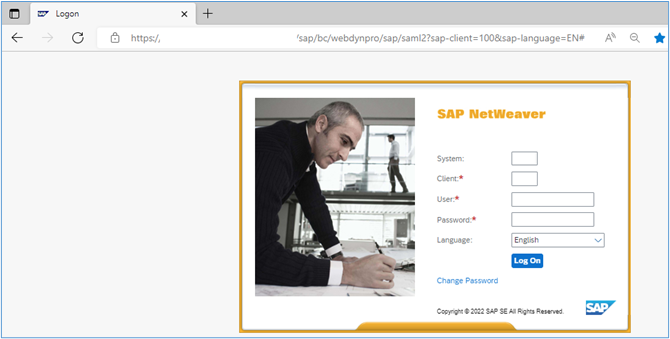
1. Logon to the Fiori system (or S/4HANA, if Fiori is embedded)
2. Go to transaction SAML2, or execute the following from a browser:
https://<hostname>:<port>/sap/bc/webdynpro/sap/saml2?sap-client=<client-id>3. Login with your SAP credentials:
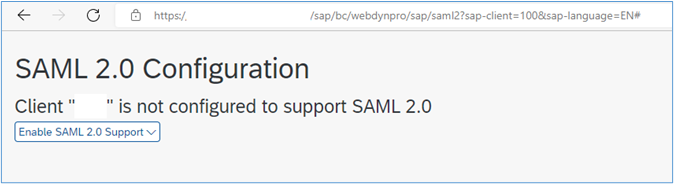
4. If SAML has not previously been configured, you should encounter the following screen:
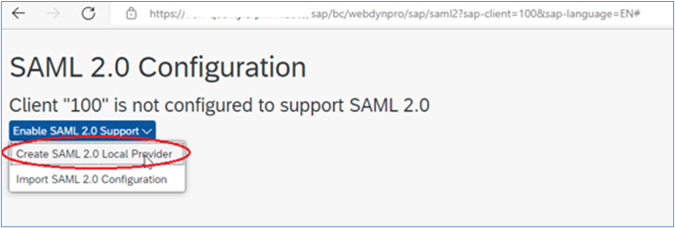
5. Select the ‘Enable SAML 2.0 Support’ button and then select ‘Create SAML 2.0 Local Provider’:
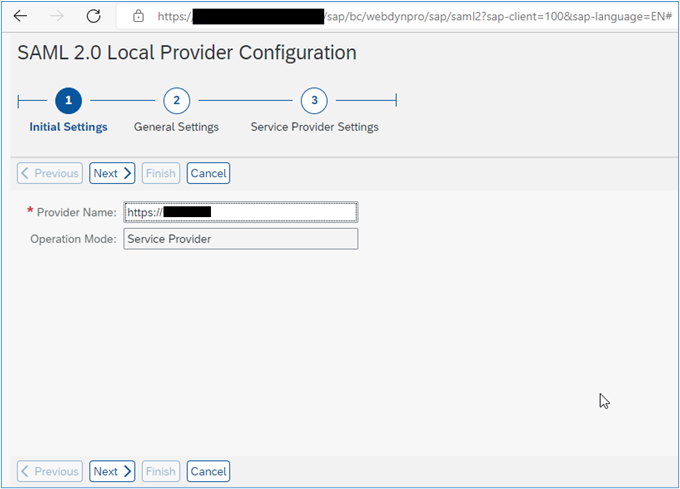
6. Insert a Provider Name, use the convention: “<protocol>://<sid><client>”, e.g.: https://SID120 and then click ‘Next’:
7. In the next screen, don’t change the value, click Next:

8. In the screen that follows, change the ‘Selection Mode’ to ‘Automatic’ from the drop-down, and then select the ‘Finish’ button:

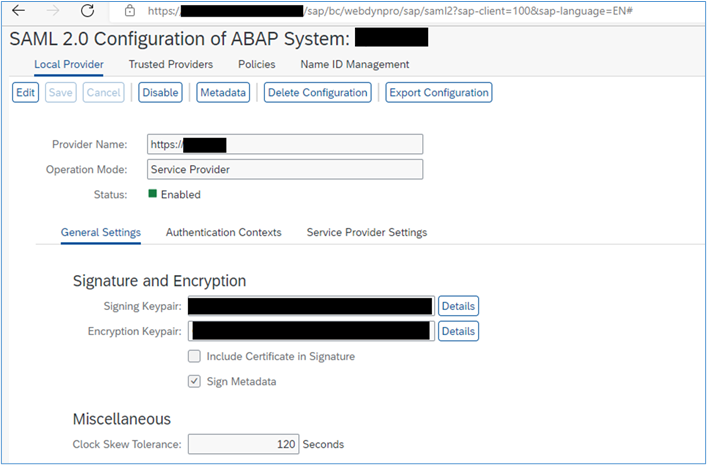
9. You should see a screen similar to the following:
2. G-SUITE: Configuring Google G-suite
Accessing the Google Admin Console
1. Log in to the Google Admin Console by accessing the following URL from a browser:
https://admin.google.com
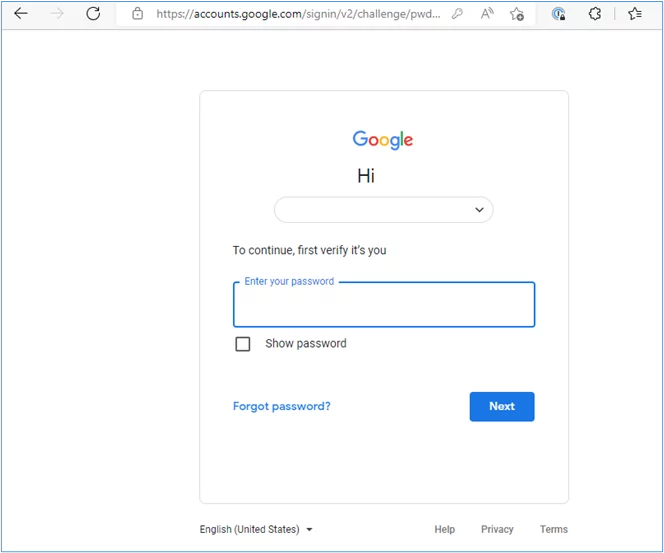
2. Ensure you are using the correct user and insert your password:
Creating a custom SAML App
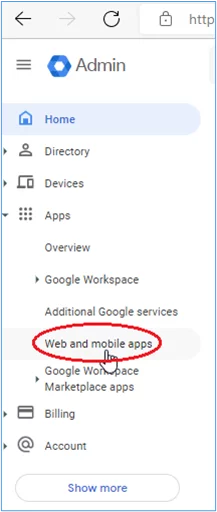
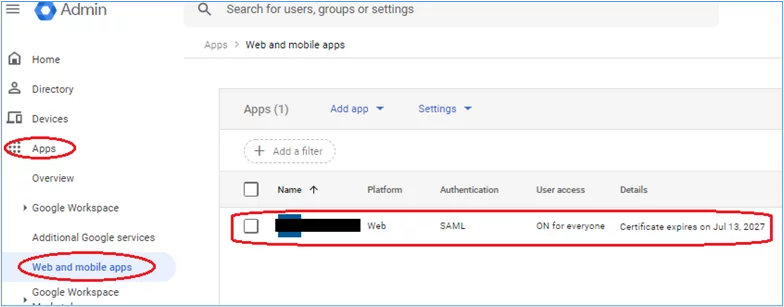
1. From the Admin console, select Apps -> Web and Mobile apps:
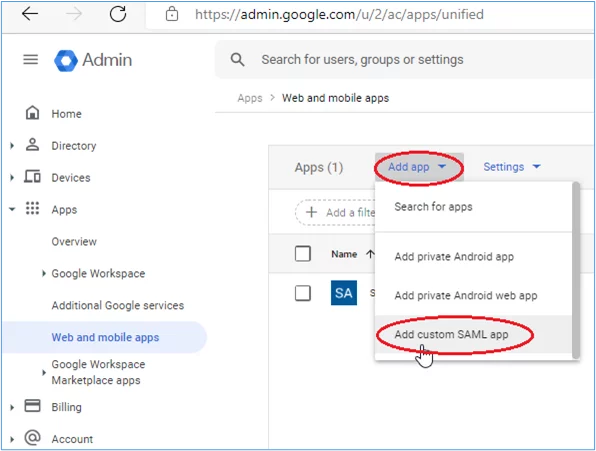
2. Add a custom SAML app as indicated by selecting ‘Add app’ then ‘Add custom SAML app’:
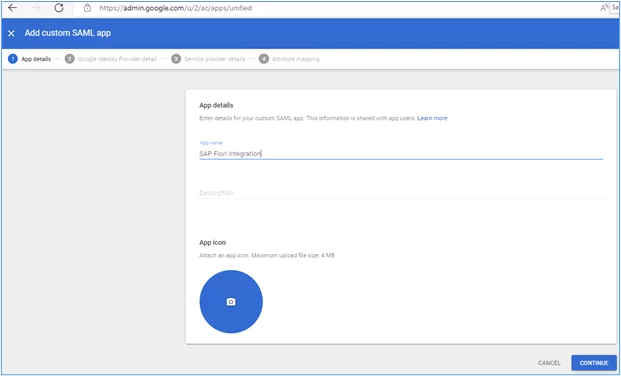
3. Give the app a name, for example: ‘SAP Fiori Integration’ and then click the ‘Continue’ button:
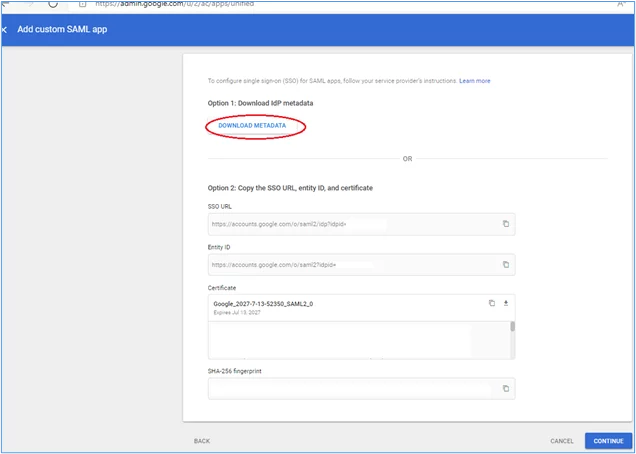
4. In the next screen, select the ‘Download metadata’ button. An XML file called “GoogleIDPMetadata.xml” will downloaded to your system, likely to be found in your ‘Downloads’ folder. This file is needed later to be imported into SAP Firoi. Click ‘Continue’ after downloading the file:
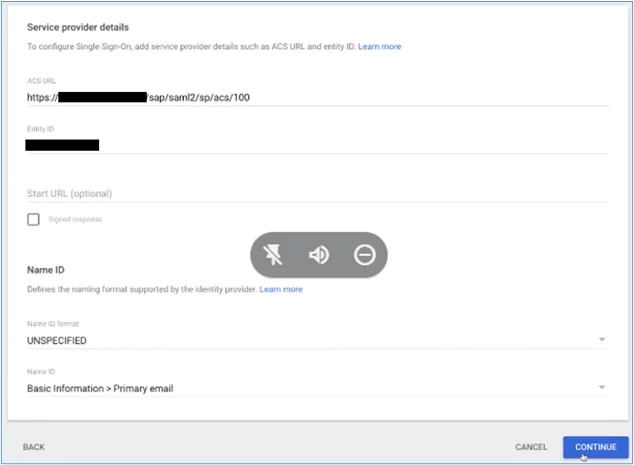
5. In the next screen you are asked to insert an ACS URL and entity ID. The URL will take the form of the following:
- https:<Fiori-hostname>:<port>/sap/saml2/sp/acs/100
- Use the URL for a Webdispatcher, gateway, or load balancer if these are being used to redirect traffic to your Fiori system, which may reside in a private subnet. Click ‘Continue’:
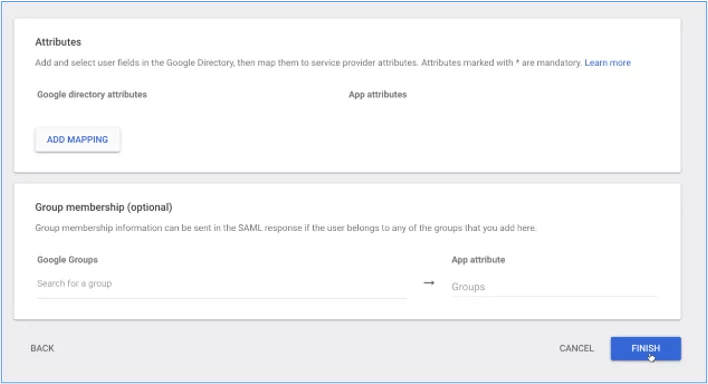
6. Accept the defaults in the next screen and then select ‘Finish’:
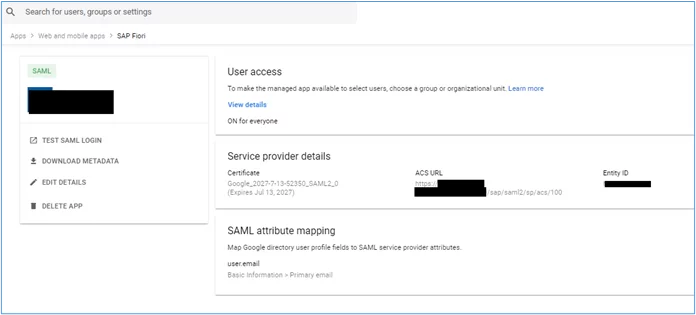
7. The following result should be shown:
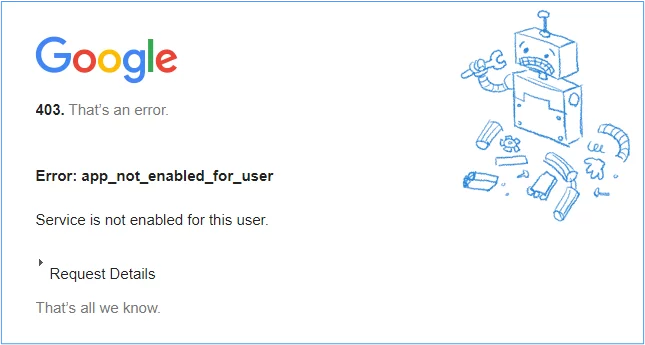
Enabling new SAML app for all users
If this section is not completed, you will see an error like the following when trying log on to the launchpad:
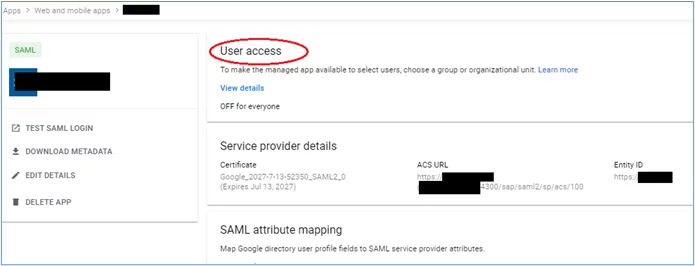
1. In your SAML App in G-suite, select ‘User access’:
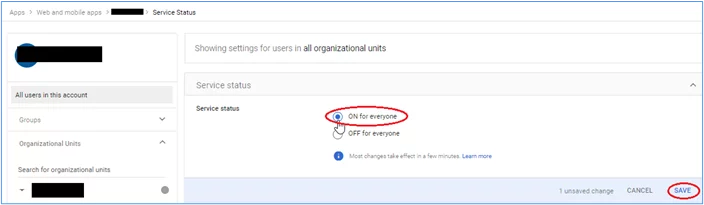
2. Select ‘ON for everyone’ in the next screen and then click ‘SAVE’:
3. FIORI: Configuring the Trusted Provider
Creating the Identity Provider
In the previous chapter, you downloaded the metadata during the process of creating a SAML app in the Google Admin console. This file will now be needed to create the Identity Provider in the Fiori SAML configuration.
- Logon to the Fiori system (or S/4HANA, if Fiori is embedded)
- Go to transaction SAML2, or execute the following from a browser:
https://<hostname>:<port>/sap/bc/webdynpro/sap/saml2?sap-client=<client-id>
3. Login with your SAP credentials.
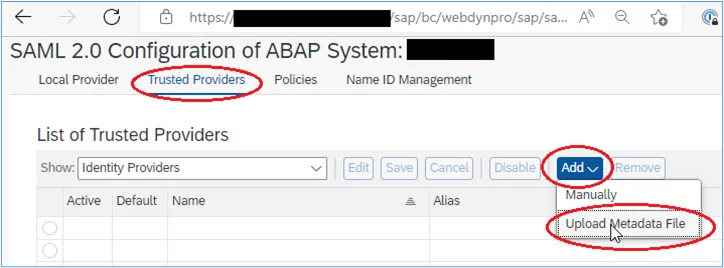
4. In the SAML configuration screen, select ‘Trusted Providers’, then click the ‘Add’ button, and then select ‘Upload Metadata File’:
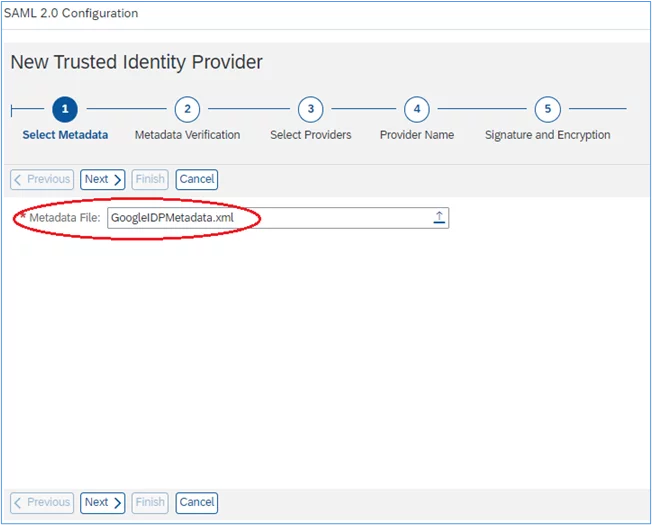
5. In the next screen, locate the metadata XML file (likely in your Downloads folder) and then click “next’:
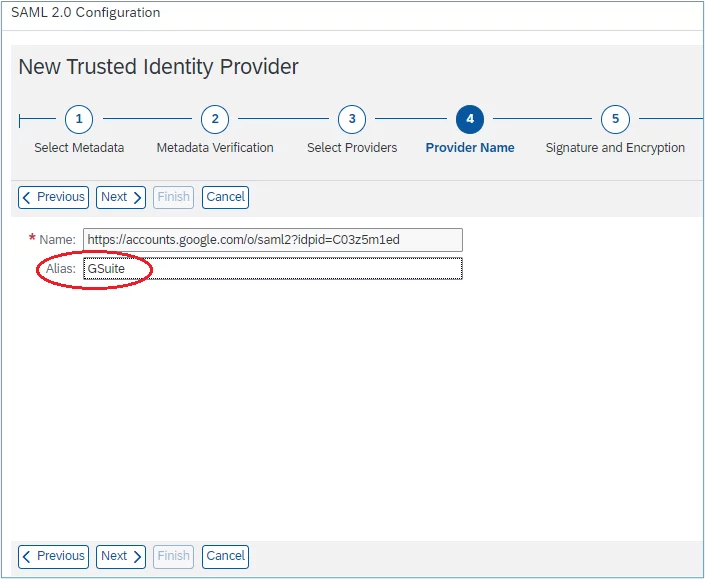
6. Insert an Alias and then click ‘Next’:
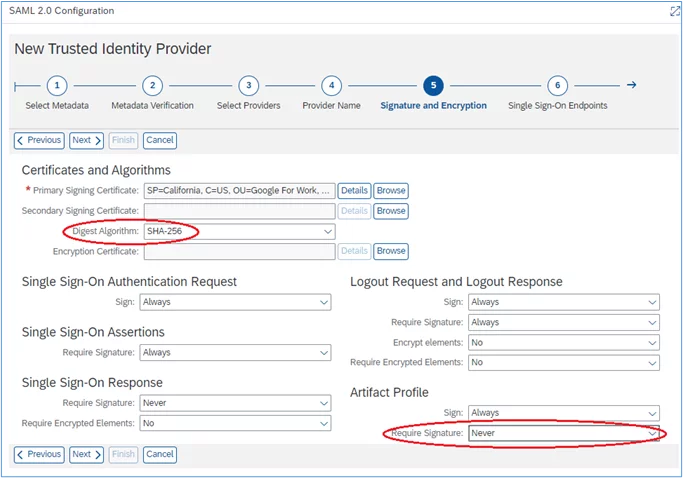
7. In the next screen, change the Digest Algorithm to SHA-256, and the ‘Require Signature’ to ‘Never’:
8. Click ‘Next’ in the screen that follows:
9. Click ‘Next’ in the following screen:
10. Again, click ‘Next’ in the following screen:
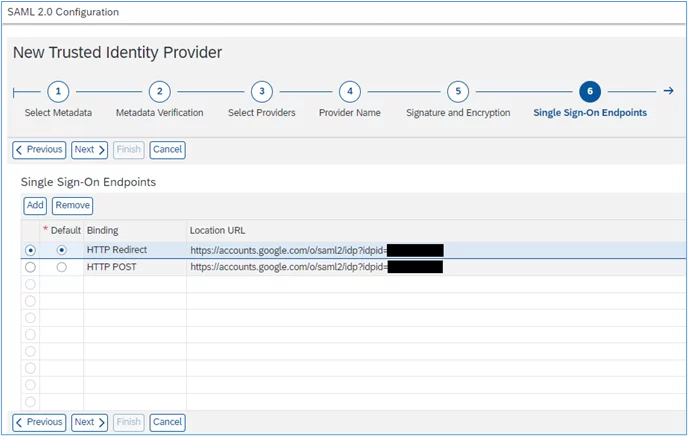
11. Finally, in the last screen, click ‘Finish’:
Configuring the Identity Provide
We must adjust the configuration of the Identity Provider in Fiori for our needs.
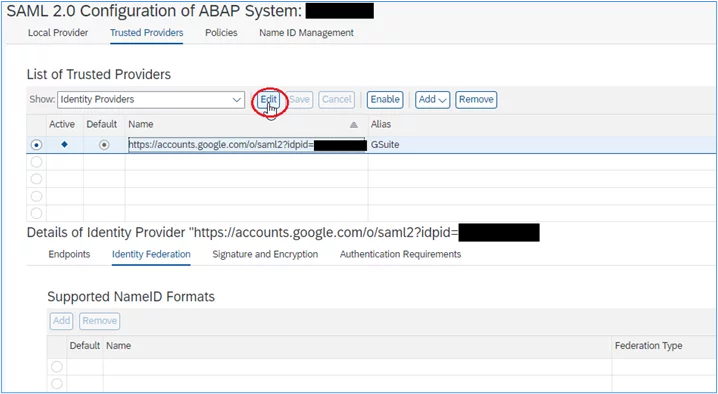
1. In the same SAML2 screen that we used previously, select the Identity Provider and click the ‘Edit’ button:
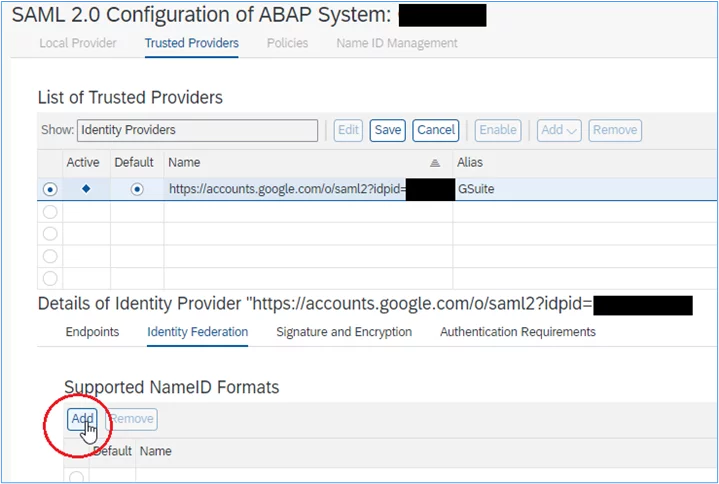
2. Select the ‘Identity Federation’ tab, and then under ‘Supported NameID Formats, select ‘Add’:
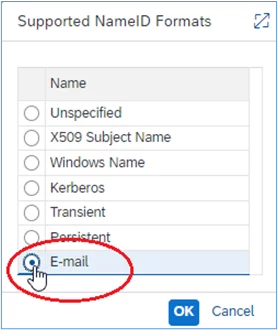
3. In the pop-up screen, select ‘E-mail’ and then ‘OK’:
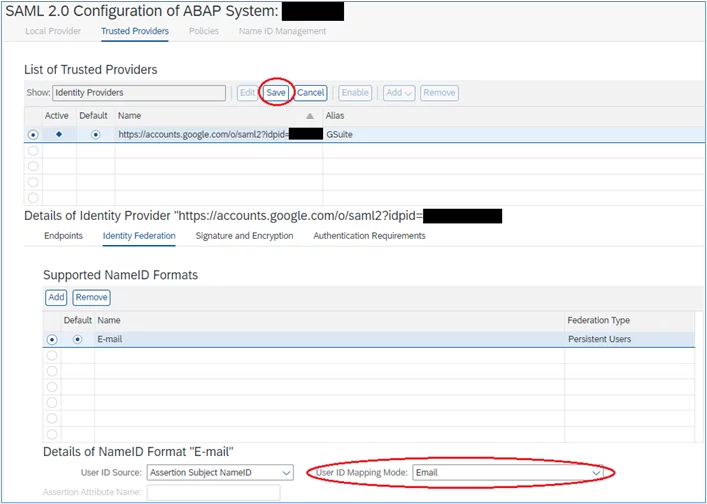
4. Confirm User ID Mapping Mode is Email, then select ‘Save’:
Activate the Identity Provider
Now that the Identity Provider has been configured, we need to activate it to take effect. By doing so, future log on attempts to Fiori will result in a redirected to Google.
1. In the same SAML2 screen, ensure that ‘Trusted Providers’ is selected, and the required trusted provider is selected, then click the ‘Enable’ button:
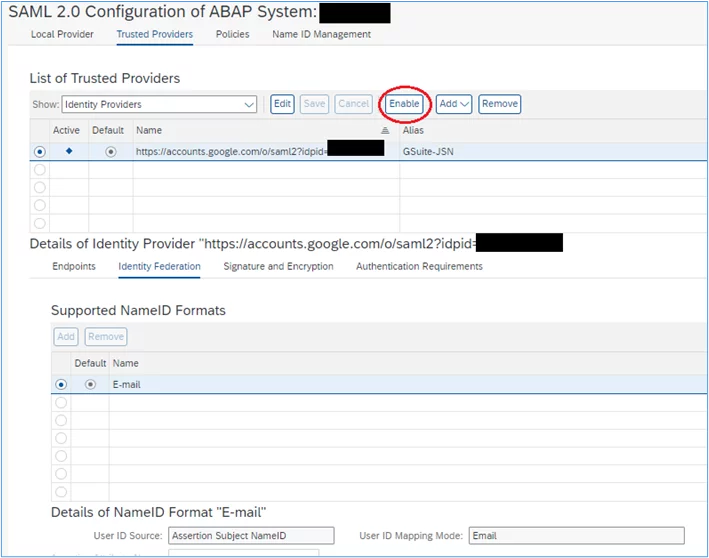
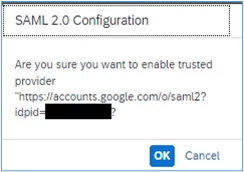
2. Confirm in the next screen:
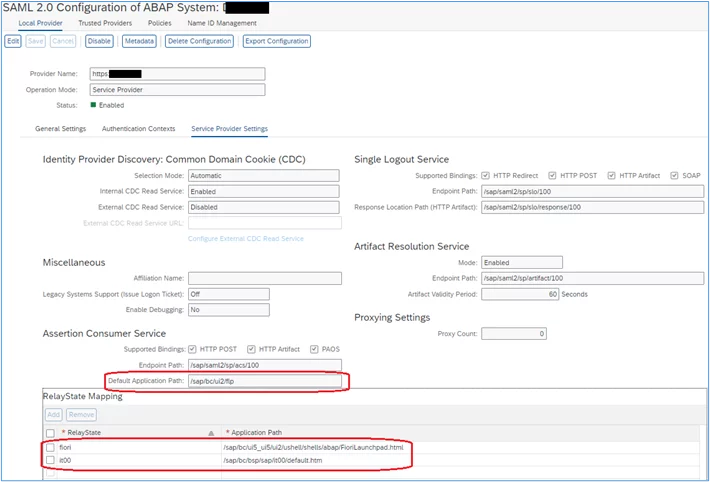
Configure the relay state for the Local provider
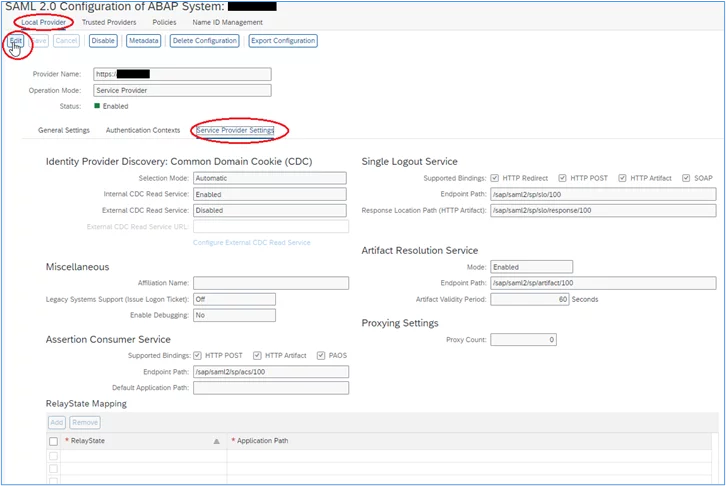
1. In the same SAML2 screen, ensure that ‘Local Provider’ is selected, and the ‘Service Provider Settings’ tab is selected, click ‘Edit’:
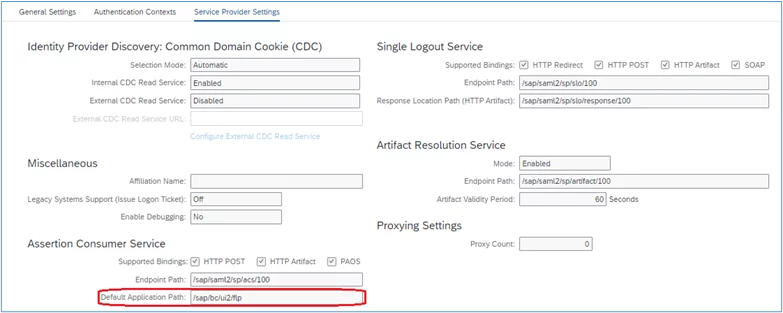
2. Insert ‘/sap/bc/ui2/flp’ in the ‘Default Application Path’ field:
3. Then, in the section ‘RelayStay Mapping’, click the ‘Add’ button:
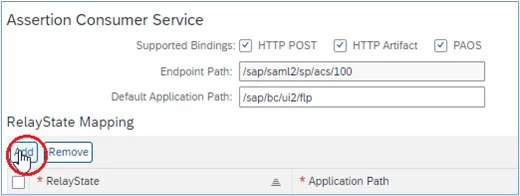
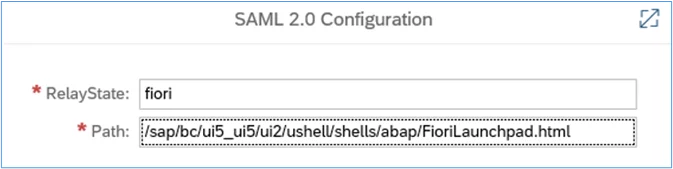
4. Enter a Relay State name and the Fiori launchpad path, use the following values and then click ‘OK’:
RelaySate: fiori
Path: /sap/bc/ui5_ui5/ui2/ushell/shells/abap/FioriLaunchpad.html
5. Repeat the process with the following values:
RelayState: it00
Path: /sap/bc/bsp/sap/it00/default.htm
6. The screen should indicate the following new entries:
4. FIORI: Configuring Fiori to support SAML2
Configuring the Fiori Launchpad
This section explains how Fiori launchpad needs to be configured to support SAML2.
- Logon to the Fiori (or S/4HANA, if Fiori is embedded) system
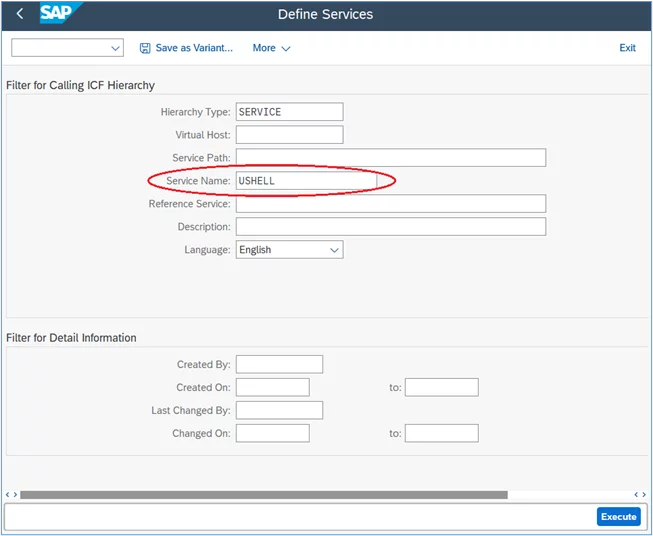
- Go to transaction SICF
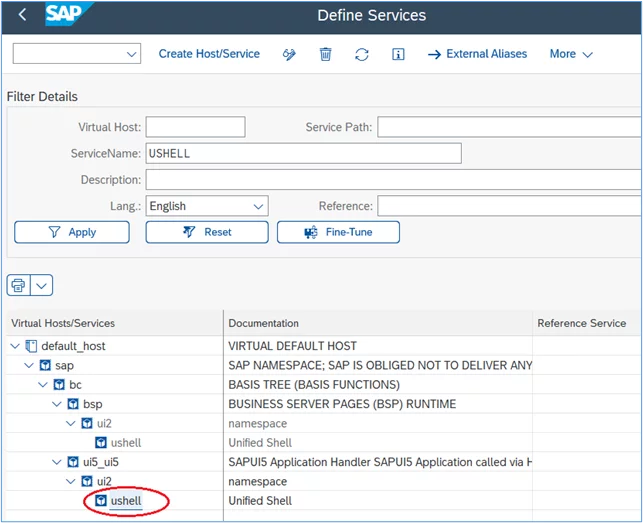
- Enter the ‘ushell’ service name in the ‘Service Name’ field and then click ‘Execute” as in the following screenshot:
4. Double-click on the ‘ushell’ service under ui5_ui5 -> ui2 as indicated here:
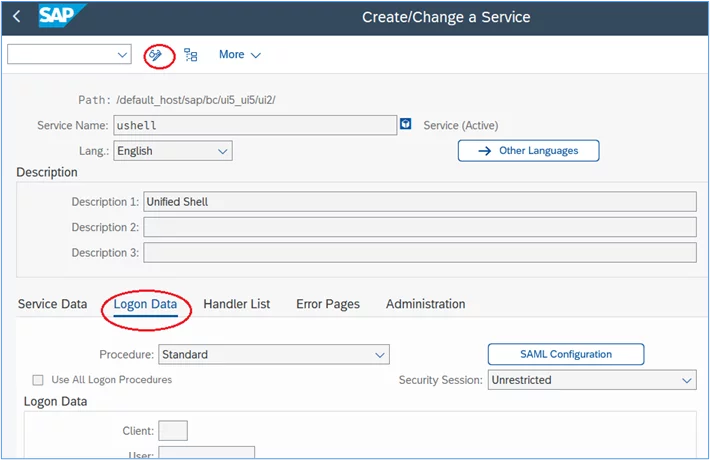
5. In the Create/Change a Service screen, select the ‘Logon Data’ tab and then click the Display/Change button:
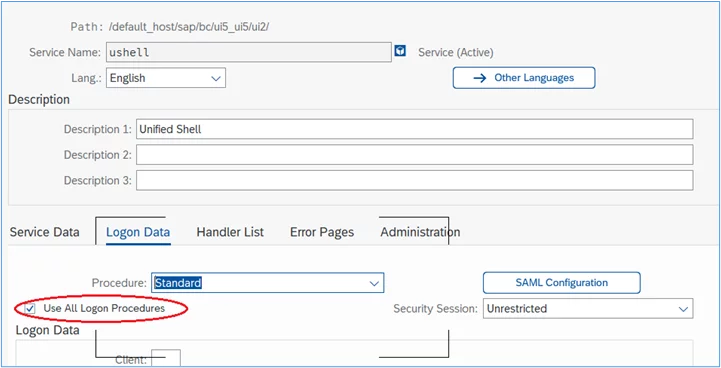
6. At ‘Procedure’, click the checkbox for ‘Use All Logon Procedures’:
7. Click Save / Store.
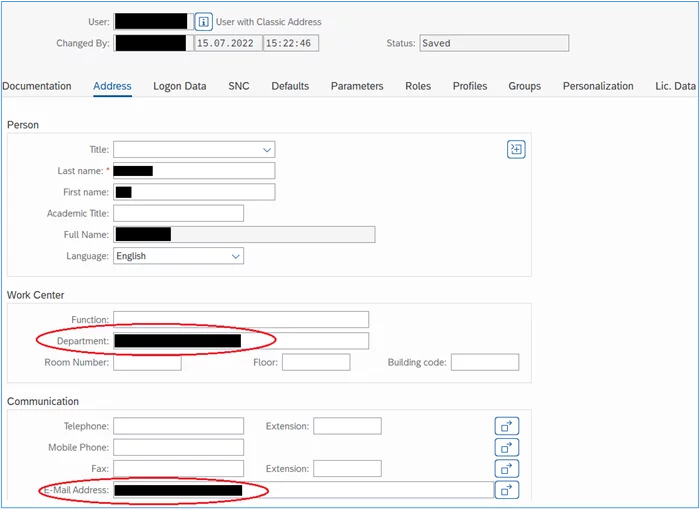
5. FIORI: User Configuration
In order for SSO to work for individual users, mapping needs to take place between Google IDP and SAP Fiori, so that a match is found between a Google ID and a Fiori User ID. To do this, individual users in Fiori need to have user data modified to include the Google email address for the same user. This is done as follows:
1. Logon to the Fiori system (or S/4HANA, if Fiori is embedded)
2. Go to transaction SU01
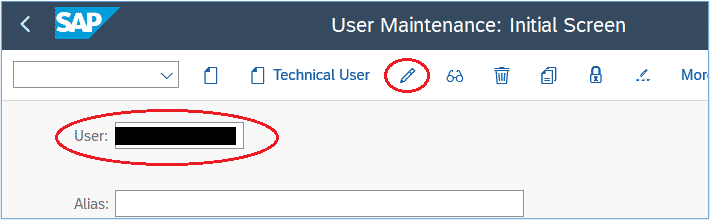
3. Enter the userID and then click the Edit button:
4. Insert the Google email address that will be used in SSO into both the Department and E-Mail Address fields as indicated below, click ‘Save’:
6. Testing SAML using Fiori Launchpad
To test the configuration, access the Fiori launchpad via a URL using a browser:
1. Open your web browser
2. Enter the URL of the Fiori launchpad:
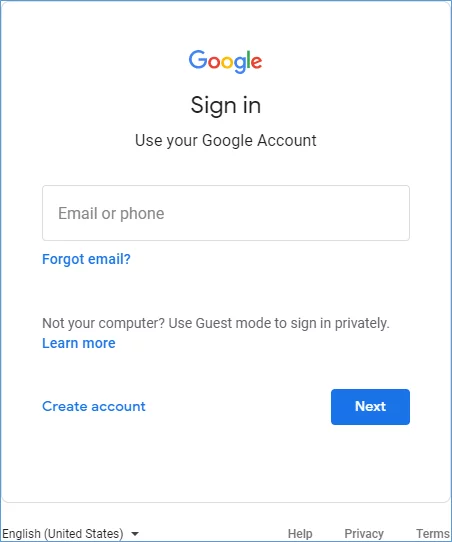
https://<hostname>:<port> /sap/bc/ui2/flp3. If all works as it should, you should be redirected to a Google logon screen:

4. Logon with your Google ID and password, Fiori should log you in successfully.
7. WEB DISPATCHER: Enabling SAML
In our scenario where we are using Google G-suite as the IDP, the change to the configuration to support a Web Dispatcher is relatively simple. This change is essentially just to point Google G-suite to the ACS path for the Web Dispatcher instead of the Fiori system.
Recall from previous sections, when configuring the SAML App in G-suite, we had to provide an ACS URL and entity ID. The URL in the previous chapter took the form of the following:
https://<Fiori-hostname>:<port>/sap/saml2/sp/acs/100Instead, now we will insert the ACS URL that includes the hostname for the Web Dispatcher instead:
https://<Web-Dispatcher-hostname>:<port>/sap/saml2/sp/acs/100
Before you start:
Two things need to be in place before you can switch the configuration of the G-suite SAML2 app to point to the Web Dispatcher ACS path:
- SAML2 with HTTP or HTTPS has already been configured and Fiori Launchpad can be accessed with SSO and their Google User ID.
- Web Dispatcher is also configured configured and Fiori Launchpad can be accessed using Web Dispatcher
The communication flow is described as follows:
Communication flow with a Web Dispatcher
- The client makes a request to SAP Fiori launchpad via the Web Dispatcher
- A redirect to Google G-suite is issued by Fiori launchpad
- Google G-suite presents the client with a login screen, where the client logs on with their Google credentials
- After successfully logging in to Google, a SAML XML assertion is generated which contains information about the client, this is sent back to the client
- The client makes a post request to Fiori launchpad via the Web Dispatcher, the XML assertion is validated, and the client is granted access to Fiori launchpad.
Making the change to the G-Suite SAML2 APP via the Google Admin Console
1. Log in to the Google Admin Console by accessing the following URL from a browser:
https://admin.google.com
2. Ensure you are using the correct user and insert your password

3. From the Admin console, select Apps -> Web and mobile apps, and then select the SAML App that was previously created:
4. Edit the ACS URL to include the Web Dispatcher’s details, such as its hostname and port. Ensure that you save your changes:

Testing SSO via the Web Dispatcher
To test the configuration with the Web Dispatcher, access the Fiori launchpad via the Web Dispatcher URL using a browser:
1. Open your web browser
2. Enter the URL of the Fiori Launchpad via the Web Dispatcher:
https://<WebDispatcherHost>:<WebDispatcher_port>/sap/bc/ui2/flp3. You should be redirected to Google:
4. Logon with your Google ID and password, Fiori should log you in successfully
Allow /sap/SAML2* URLs in the Web Dispatcher authpermfile
I am adding this section here as this caused issues when trying to get SSO working via a Web Dispatcher.
If, after all configuration seems correct, but you encounter screens such as the following when testing. This could indicate that the /sap/saml2* path is being blocked by the Web Dispatcher:
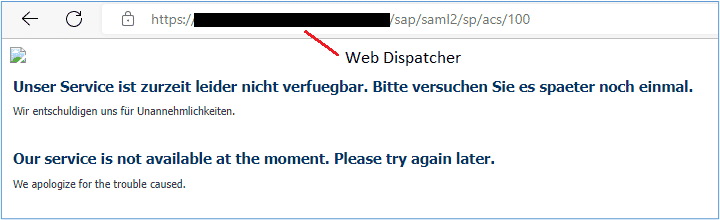
You should also see the following error messages in the Web Dispatcher trace file:
*** ERROR => Permission denied for /sap/saml2/sp/acs/100: {011631d0} [http_auth.c 1768]
Screenshot of the same:

This is caused due to an authpermfile that is configured to allow or deny certain paths via the Web Dispatcher. This is configured for additional security. The parameter that is set in the Web Dispatcher profile to make use of this authpermfile is as follows:
icm/HTTP/auth_0=PREFIX=/, PERMFILE=$(DIR_INSTANCE)/sec/authpermfile, FILTER=SAP
To fix this, the /sap/saml2* path needs to be permitted in the file.
ADDING /SAP/SAML2* TO AUTHPERMFILE:
- Log on to the operating system of the Web Dispatcher host with appropriate permissions
- Edit the authpermfile, located in the following path:
/usr/sap/<SID>/<Instance>/sec
For example:
/usr/sap/WD1/W00/sec
3. Add an entry to permit /sap/saml2*, example extract from an authpermfile:
P /sap/bc*
P /sap/wdisp*
P /sap/saml2*
D * #this denies all other paths
4. Restart the Web Dispatcher for the changes to take effect.


