This blog will cover the technical setup required to create HANA reptasks in Business Application Studio. In this scenario, we will be connecting to an on-prem S/4HANA instance and replicating the data into a HANA Cloud Service instance in Cloud Foundry.
Prerequisites:
- DPAgent installed, connected, and configured.
- There are several guides and blogs already available for this, and the setup is straightforward. Download the latest version from the SWDC by searching “HANA DP AGENT” in the downloads bar.
- HANA Cloud Service instance created.
- Business Application Studio project created.
- This includes all the service instances and containers. There is a lot that goes into setting up your project, and it is not a one-size-fits-all scenario. This guide will not cover that setup.
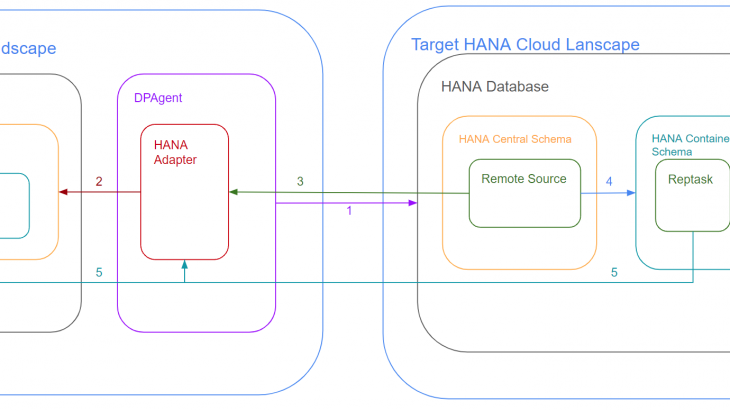
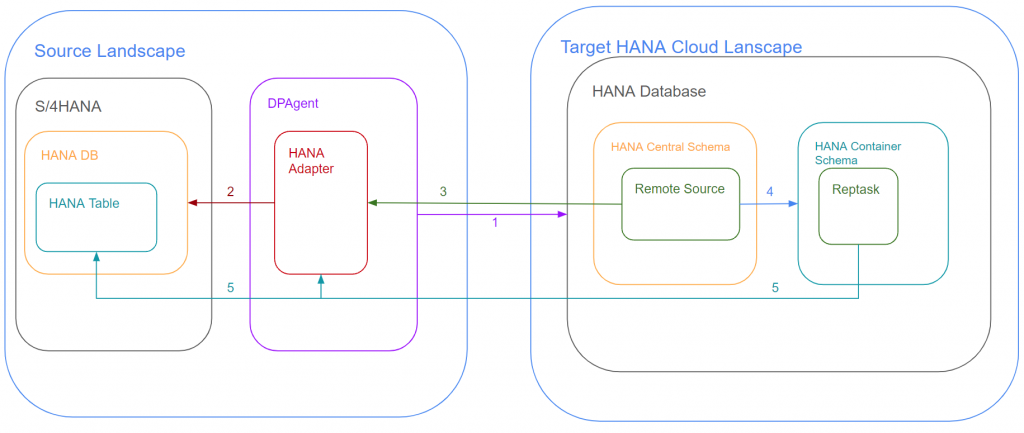
Architecture of a reptask:
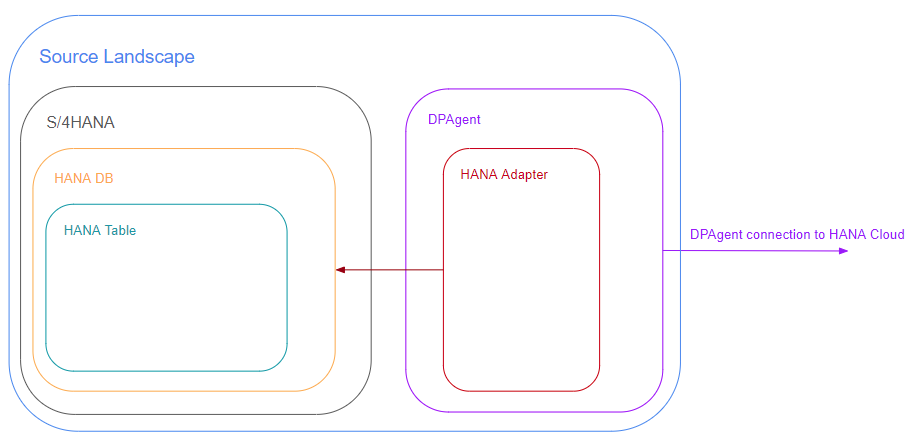
In your source landscape you install the DPAgent and register the HANA Adapter within the DPAgent. The DPAgent connects to the HANA Cloud instance, this establishes connectivity between HANA Cloud (public internet) and the network of your source landscape (private internet). When you create a remote source in HANA Cloud, the HANA Adapter establishes the connectivity to your source HANA Database.
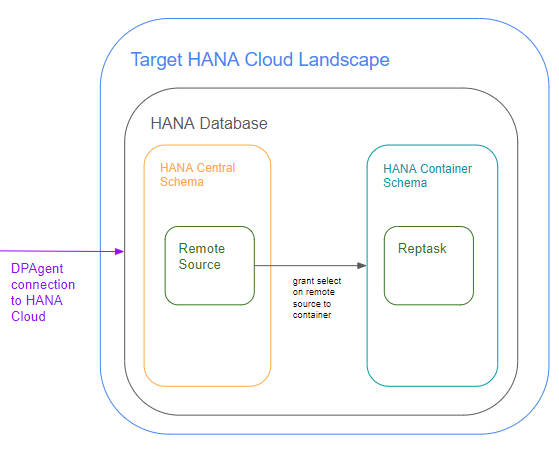
Your target landscape is the HANA Database that exists within the HANA Cloud Service in Cloud Foundry. Within the HANA database central schema, the remote source gets created. The remote source uses the HANAAdapter registered on the DPAgent in your source landscape to establish connectivity to your source HANA database. In XSA your projects are deployed into a container. Because this container exists outside of the central schema, you must specifically grant access to the remote source in the central schema to your container via an hdbgrants file. The reptask uses the remote source and HANAAdapter to establish the connectivity to the specific HANA table that will be replicated
Looking at the overall diagram, there are 5 key points of connectivity. They are shown in Figure 3 and summarized below.
- Line 1 is where the DPAgent establishes connectivity to your target HANA Cloud landscape.
- Line 2 is where the HANA Adapter establishes connectivity to the HANA DB. You register the HANA Adapter after step 1, but the connectivity isn’t established until the remote source is created.
- Line 3 is where the remote source gets created. It uses the HANA Adapter to establish the connectivity from your HANA Cloud database to your source HANA database (Line 2)
- Line 4 was discussed previously and allows your container access to the remote source
- Line 5 is the reptask connectivity. The reptask uses the remote source to connect to the HANA Adapter, which allows the reptask to connect to the individual HANA table it will replicate.
What is a reptask?
A reptask basically takes data from one table and moves it into another. There are a few different ways that a reptask can move data, but in the use cases I’ve been part of, it’s generally used for real-time replication scenarios. In this guide we will be setting up real-time replication of data from an on-prem S/4HANA system into a HANA Cloud Service database.
The DPAgent establishes the connection between your HANA Cloud system and the on-prem S/4 system. Within the DPAgent there are many different adapter types. Our scenario will be using the HANA Adapter, which will connect directly to the underlying database of the S/4 system instead of via the ABAP layer.
What happens when you create a reptask?
Well, a lot. Source and target tables get created. The source table is a virtual table that exists within your target system HANA Cloud database. It’s like a pointer—it points to the physical table that exists in your source system. If you perform a data preview on a virtual table, it uses Smart Data Access (SDA) to show the live data that exists in the source table. Your target table is where the data gets persisted, and this is where the reptask comes into play. The purpose of the reptask is to move the data from the virtual source table to replicate and persist that data in the target table.
A remote subscription also gets created. The subscription is established between the source and target table and is where the actual replication occurs. If your replication is not working, you would see an error status in the remote subscriptions. You can manually reset subscriptions with ALTER statements issuing RESET, QUEUE, and then DISTRIBUTE options.
Two stored procedures get created: an RS_SP stored procedure and a START_REPLICATION procedure. The START_REPLICATION procedure does exactly what it says it does—it starts the actual replication of the tables, which is accomplished by generating and executing the call statement of the START_REPLICATION stored procedure. Ultimately what this procedure is doing is establishing the remote subscription status. It performs a RESET, QUEUE, and then DISTRIBUTE on the remote subscription of the tables within the reptask.
How many reptasks should our team create?
This is probably a question that has come up for you once or twice before—it certainly has on my projects. Unfortunately, I don’t think there is a one-size-fits-all answer to this. One customer I am working with has replication jobs set up for tables alphabetically, with all the A tables in one reptask, all the B tables in another, etc. Another customer I work with has one replication task per table. There are pros and cons to each scenario, and it will have to be discussed with your project team on how best to approach your specific scenario. What I can specifically say is that the more tables that exist in a single reptask, the longer the deployment seems to take. Any time you add or remove a table from a reptask, or make an adjustment to a reptask, it has to completely undeploy and redeploy it. The more tables that exist in a reptask, the longer this process will take. Also note, during the undeploy/redeploy process, every single remote subscription is recreated, so full initial + realtime loads would be required for any table in that reptask.
Creating a remote source:
Your remote source must be created in the HANA system directly, not in your container. Our team usually likes to refer to this as the “central schema.” This is accomplished by logging into the DB Explorer with a HANA DB user (like DBADMIN or SYSTEM).This is important to note because you must grant this access to the remote source to your container where your reptask will be deployed. You accomplish this via an hdbgrants file. Figure 2 at the beginning explains this as well. This guide assumes your project already has set up and confirmed the hdbgrants file is working
I recommend naming your remote source something generic and not system specific, like _DEV, _QA, etc. The beauty of HANA Cloud and Cloud Foundry is that the reptasks are coded, so if you keep the names generic, your code will move smoothly through the landscape. Just note that you must set each specific HANA instance to point to the correct source database (e.g., your HANA DEV sidecar points to S/4HANA DEV, your HANA PRD sidecar points to S/4HANA PRD, etc.).
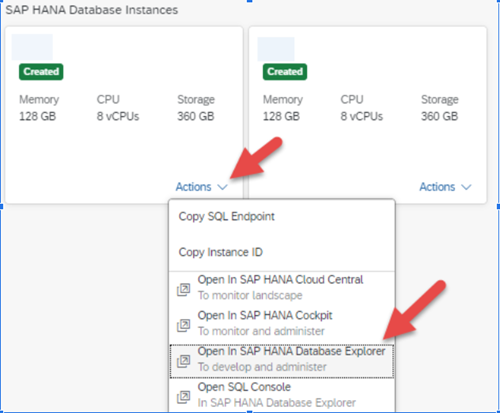
1. Login to your HANA Cloud database in the database explorer with a HANA DB user (like DBADMIN)
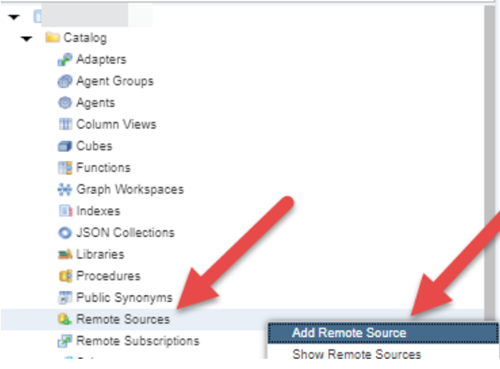
2. In your DB Explorer expand catalog, and look for Remote Sources. As mentioned, this option is only available to a HANA DB user and exists in the central schema. If you do not see an entry for Remote Sources, you are likely connecting to your container and not directly to the HANA Database. On Remote Sources, right click and “Add Remote Source”.
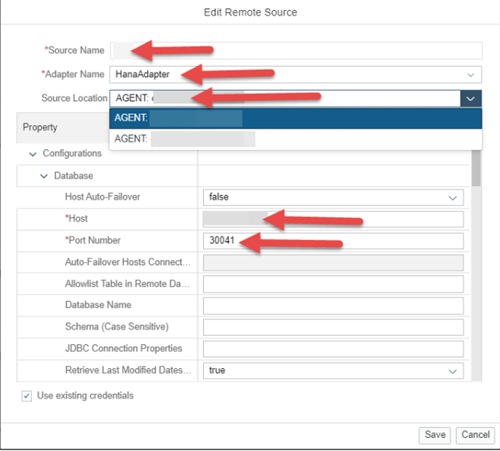
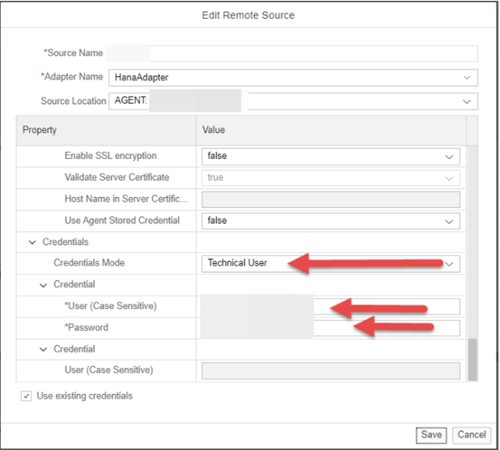
3. Enter the Source name, Source Location, Adapter Name, Host, Port Number. Scroll down and update the credentials. Keep the source name generic (Like, HANA, or S4HANA) to allow the code to move more easily between landscapes.
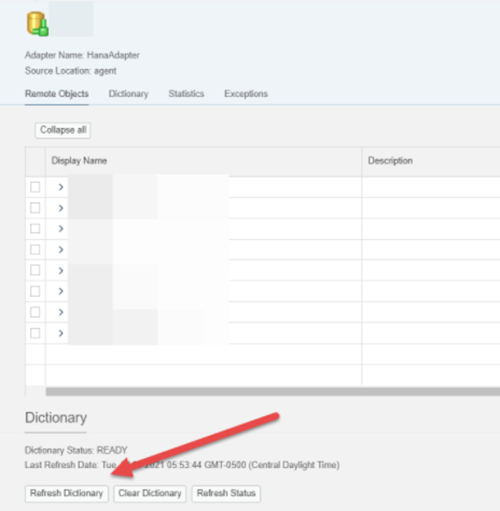
4. Once the connection is established make sure to refresh the dictionary. This will allow you to search more easily for the tables in your source system.
Creating the reptask:
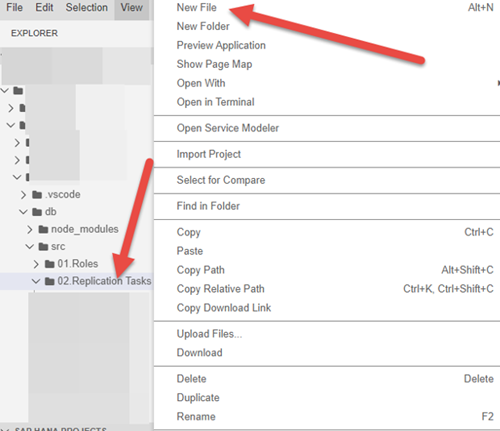
1. In your BAS project, click on the folder you want to add the reptask too and choose add new file. The file must be created under the db/src folder. The image below is an example and your folder structure may differ, but it must be under the db/src folder of the project.
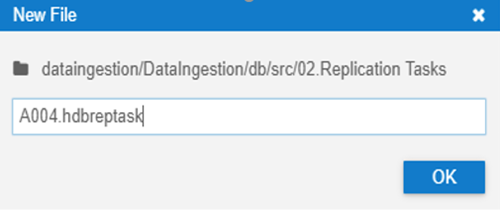
2. In our example we will be replicating the A004 table from our S/4 system, and we are doing one reptask per table so we will name it A004.hdbreptask. These can be named appropriately per your scenario.
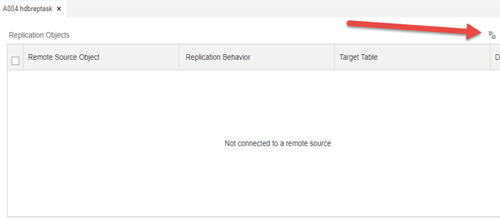
3. In your A004.hdbreptask tab select the plugs button at the top right and connect to the remote source we just created.
4. Once connected click the + button at the top right.
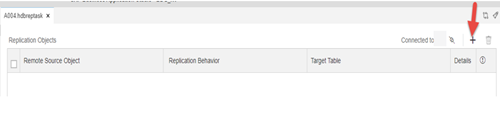
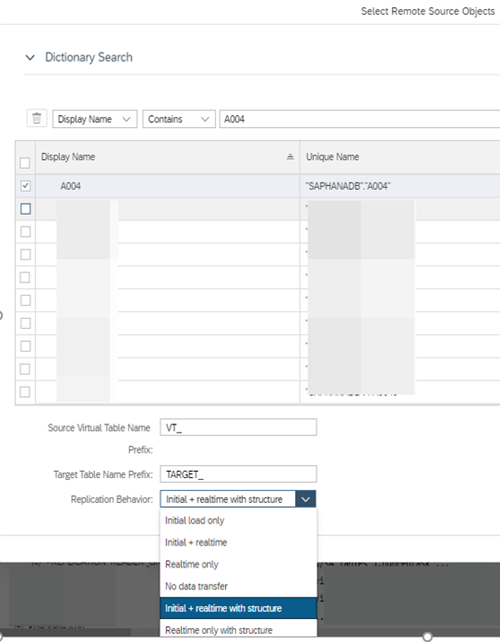
5. Expand the Dictionary Search and search for the table you want. You can change the search options if necessary to help narrow your searches. You are presented with options for both a Source and Target table prefix, you don’t have to have prefixes on both, however one must contain a prefix so your two tables have unique names. You should choose the replication behavior based on your scenario and requirements. Click OK when completed.
6. Once this file is created, save and deploy your project to push it to your container.
Running the replication:
1. Confirm that your project was deployed successfully. Validate the following
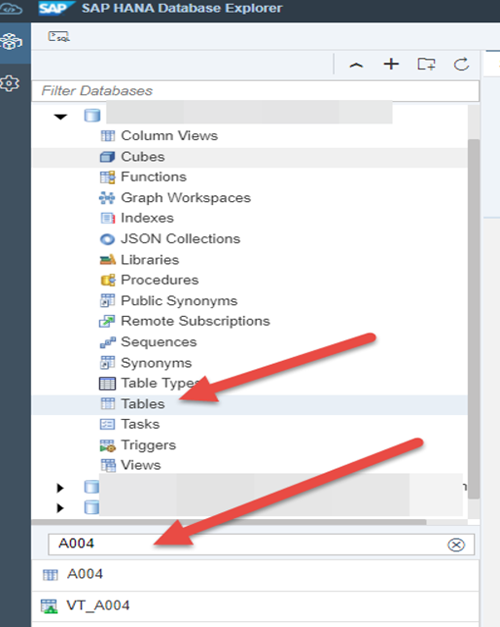
i. As your container user, validate the tables exist in DB Explorer. Note the Icon difference for the Source and Target table types.
ii. Validate the Remote Subscription exists. It should be in Created status

iii. Validate the Stored Procedures exist
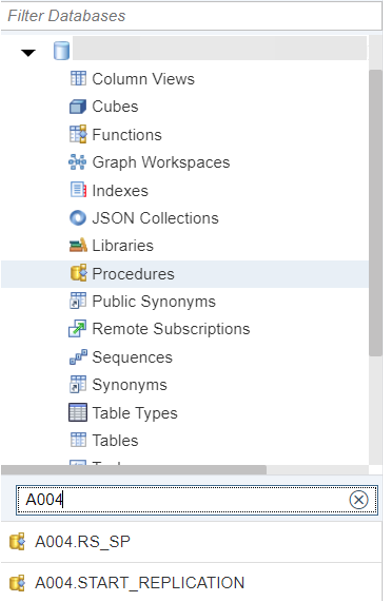
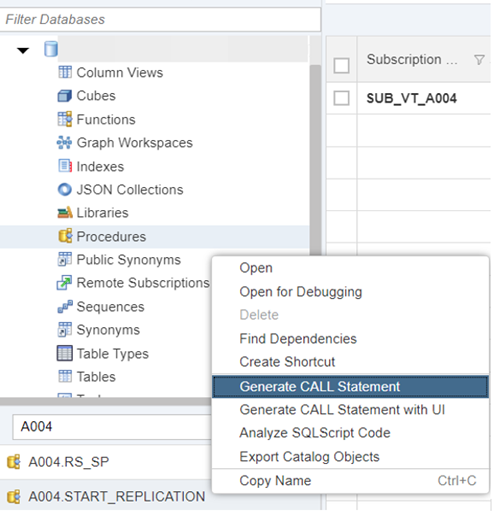
2. In the Procedures, right click on the START_REPLICATION procedure and select “Generate Call Statement”
3. A new SQL window will open, execute the statement
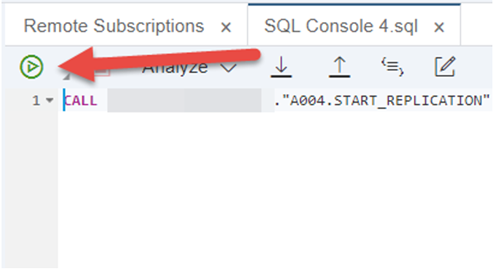
4. After execution, confirm the subscription status. You should see Replicating changes.

Once you’re done you can validate the number of records between the virtual and real tables and see that the record count is the same. The simplest way is to run a select count(*) on the virtual and target tables in the SQL console and confirm they match.
This blog has discussed some high level topics related to the technical architecture and setup of a reptask in HANA Cloud. A reptask itself is simply moving data from one place to another, however the overall architecture is actually quite impressive. Hopefully this guide gets you ready to start setting up your own environment!


