We are delivering another cool feature called “Termination End Handling” with the H2 2021 release for Early Adoption. This feature helps in improving some of the current manual processes at the time of termination. Processes such as, closure of time accounts, delimitation of time accounts, clean-up of future absences or accruals, and ensuring the balances are either paid-out or set to zero. All of it needs to be carried out manually after terminating a user. Imagine that after termination, admins need to cancel the future-dated absences manually for every terminated employee as they cannot make the correct payout if the absences aren’t cancelled. Isn’t this painful, tedious and error prone? That’s why we now have an automated process during termination which I believe will help a lot of our existing time off customers.
What was the real Problem?
When an employee was terminated and rehired in the same employment and within the same accrual period, the system raised an error and didn’t support automatic accrual creation on rehire.
You might have come across this issue in the recalculation logs again and again. “The user is being terminated and rehired in the accrual period. This scenario is not supported. Please create an accrual manually“
It’s very common use case in retail, hotel or in the airlines businesses that employees are terminated and rehired in the same accrual period. They do a lot of fixed-term hires so that they can rehire the same user again after the contract is over. Currently, admins need to manually update or close the time accounts using manage data. Not so nice! Some customers also use interim updates on time accounts to delimit and close the time accounts after termination but it still requires a lot of manual interventions.
Solution Overview:
This issue is now addressed with the Termination End Handling Process in Time Off. This picture gives you a brief overview of the solution.
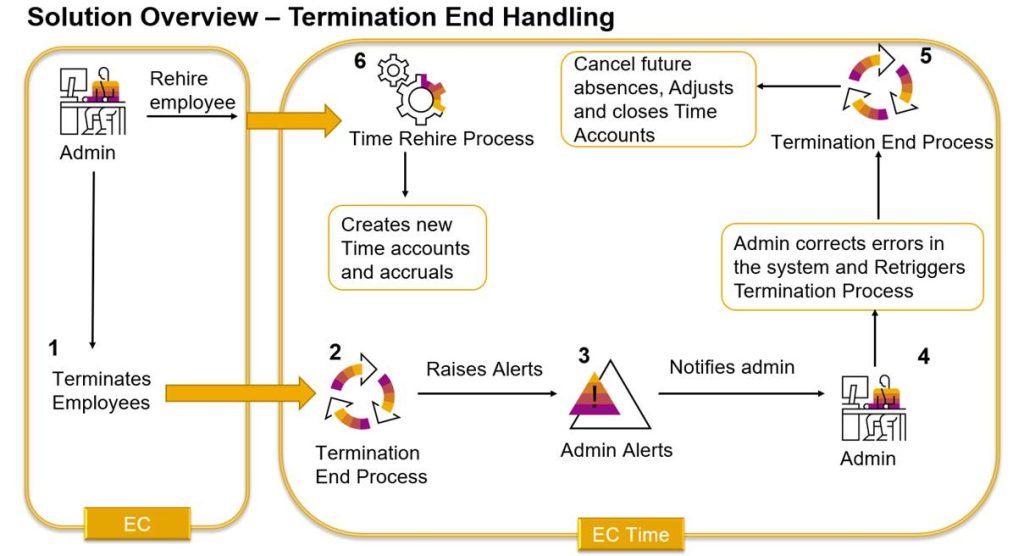
- The process starts with terminating a user in Employee Central using Take action->Terminate.
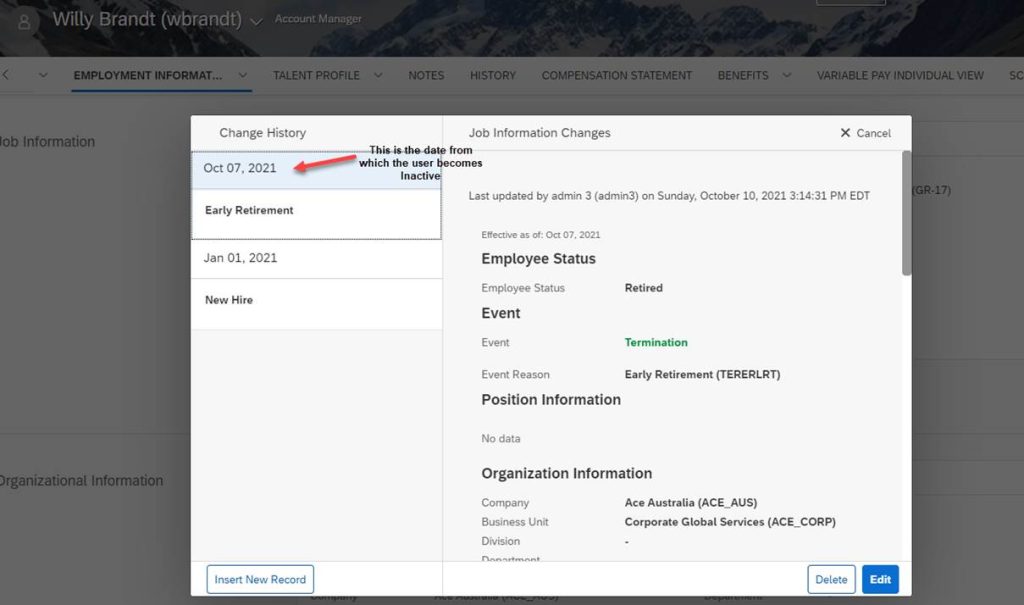
- As soon as the termination is entered in Employee Central, the “Termination End Handling” process is triggered automatically in Time Management for subsequent clean-up activities on termination. The date on which this process is triggered depends on the termination date. Termination date is the last working day of an employee. It’s called “Termination end handling” cause the process is executed at the end of the active employment i.e., the first day from which the user becomes “Inactive”.
- In case there are errors due to any future time account postings such as, manual adjustments or payouts or unapproved absences, the admin is notified with admin alerts.
- The admin alerts can be viewed using the Admin Alerts UI with a new alert type called “Termination End Handling Alert”. Admin can correct those errors and then re-trigger the Termination end handling process directly from the Admin Alerts UI.
- Once the process is executed successfully, the time accounts are delimited, and any future absences are cancelled. The Termination rule is called at the time of termination as before so any proration of accruals can still be done on termination.
- Now, if an HR admin rehires the user after some days in the same accrual period, the new accounts and accruals get created without any errors.
The following features are offered as part of the termination end handling process:
- Global configuration or a specific configuration for certain legal entities
- Cancellation of absences that lie after the termination date
- Deletion or adjustments of Accrual postings that lie after the termination date
- Delimitation and closure of time accounts. Closing of time accounts is configurable.
- Termination triggers
- Take Action->Terminate
- Add New Employee with Fixed-Term Hires
- Job Info History change with termination event
- Creation of Admin Alerts for error cases (E.g., Manual adjustment in future, Absences with flexible requesting that overlap with termination date, pending workflow, absences with country-specific fields that overlap with termination date)
- Re-trigger the job using Admin Alerts UI
How to Configure:
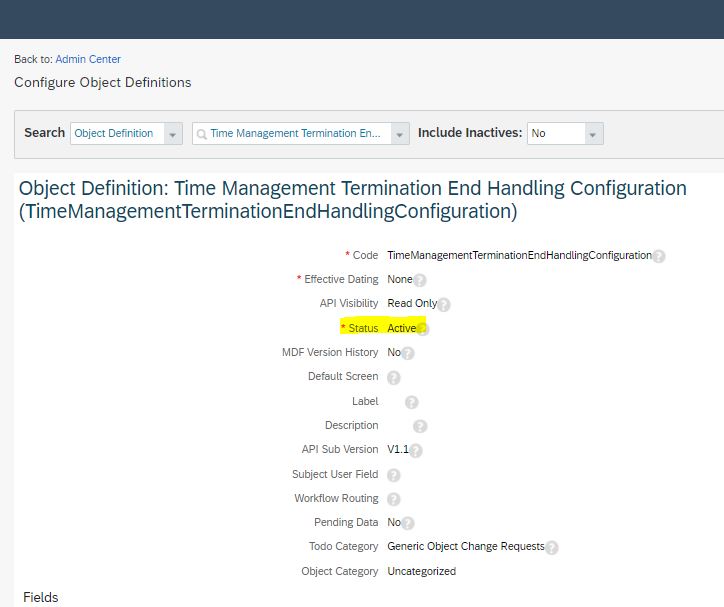
First, you need to activate the new objects related to termination end handling using “Configure Object Definitions” as these aren’t activated by default due to Early Adoption.
Likewise, do the same for other related objects. You can check the time off implementation guide for the list of objects delivered.
Second, set the RBP permissions for all these objects otherwise you can’t edit the objects under Manage data.
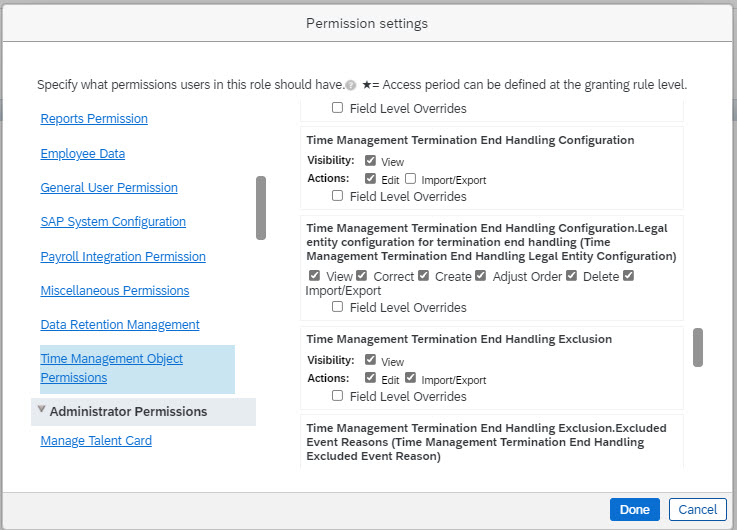
Now, you can start the configuration. Let’s say, you want to enable the process globally for all legal entities across different countries in your company.
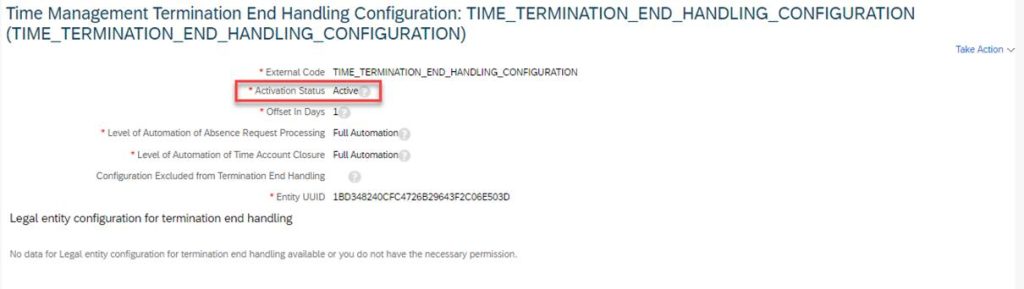
Set the activation status to active in the Time Management Termination End Handling Configuration object as shown. In this case, the same configuration is applied to all the employees globally.
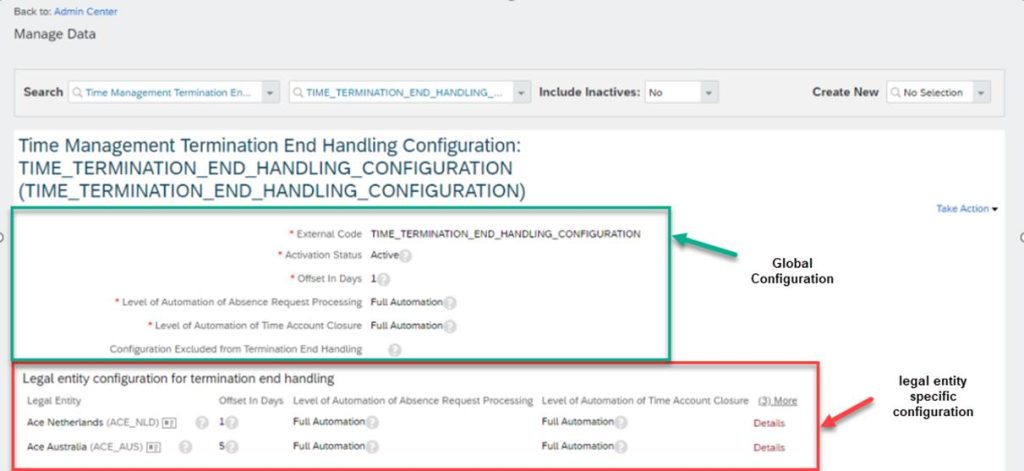
If you want to configure differently for legal entities, then you can do so by adding the details in the legal entity configuration. In this case, for employees belonging to Netherlands and Australia legal entity, the specific configuration defined at the legal entity level is used whereas for all other employees the global configuration is used.
The other aspects of configuration are described in detail in the Implementation guide, so I will not get into all the details in this blog.
I would like to touch upon some important aspects of the termination end handling job and execution of this process.
- Offset in Days: This option is provided to ensure that you can configure a certain amount of delay in the execution of the process. Usually, terminations are entered much in advance and are future-dated. For future terminations, you can choose the offset of 1 as that would be the earliest when the process is executed. However, if you are doing a past-dated termination, then the process is executed immediately. For example, with an offset of 1, if termination date is 30th September 2021, then this process is executed on 1st October 2021. Therefore, to be able to complete the closure activities, you can configure the offset to be more than 1. You can select a value between 1 and 30 for the offset. It’s possible to set a negative offset as it’s not recommended to execute this process before the terminate event has taken place.
- Future absences are required to be cancelled in order to delimit the validities and bookable periods of time accounts. Therefore, its recommended to choose “Full Automation”. If you don’t do that, you need to cancel the absences manually, otherwise the accounts don’t get delimited.
- Depending on your company process, you might want to not close the time accounts on termination because you do the payout much later. Hence, you can choose to not close the time accounts automatically as part of this process.
- For future-dated terminations, the termination end handling task is executed by the TLMTriggerTask nightly job which checks every night if the scheduled date of the termination end handling task is equal to today’s date and if so, its picked for execution.
Currently, an automated payout is not possible as part of this process. However, you can do a Period-End-Processing calendar run to make the payout after the termination end process is successful. Since the bookable end date is delimited to the termination date, the Period-End-Processing can be executed.
How does the termination end process work?
Let me take an example of a time account with monthly & biweekly accruals. This user is hired on Jan 1st, 2021 and has 2 fixed-date time accounts with monthly & biweekly accruals. The validity and bookable end date of the time accounts is Dec 31st, 2021.
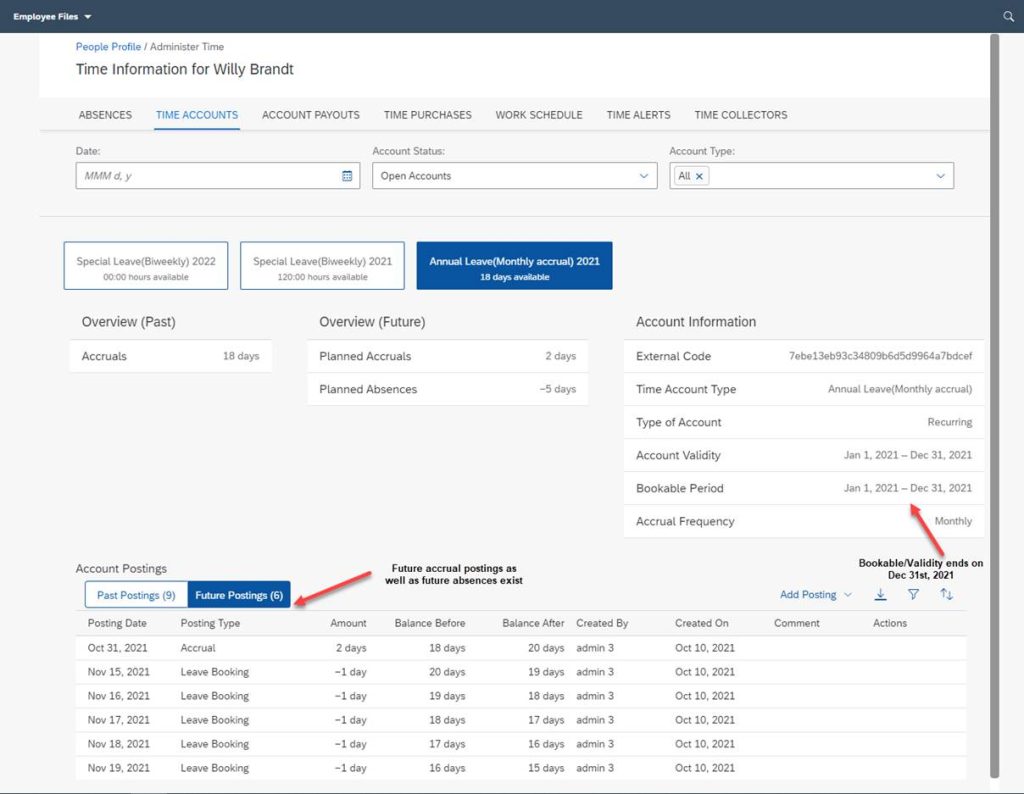
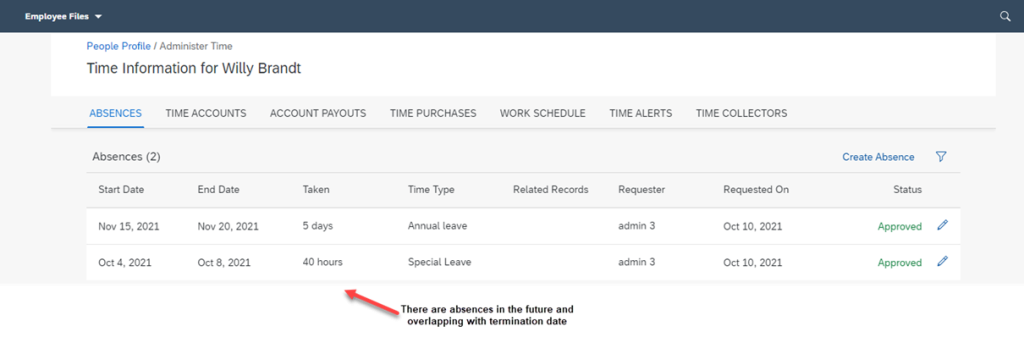
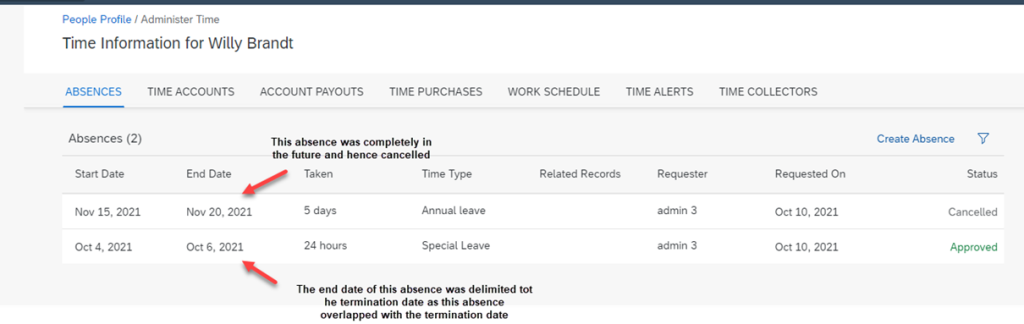
I will terminate this user on October 6th, 2021 such that the absence from Oct 4th to Oct 8th gets delimited and the one in November is cancelled.
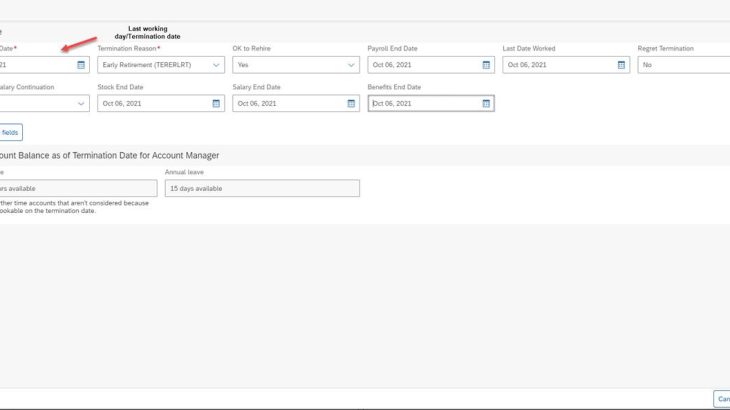
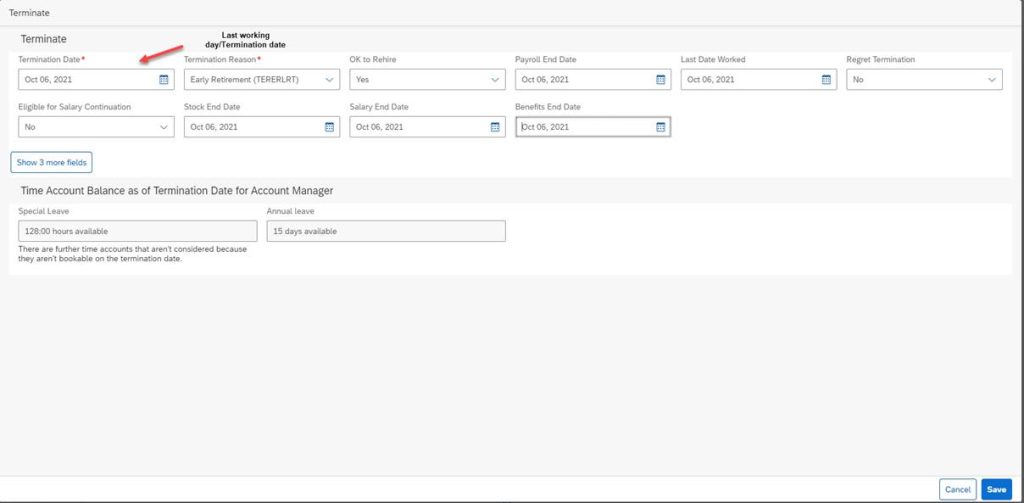
Now, let’s terminate this user on Oct 6th,2021 using Take action->Terminate.
Note: On the Terminate UI, the time account balances will still consider the future absences as they are not cancelled yet. So, it’s better to make the payout after the execution of this process when the balances are actually updated.
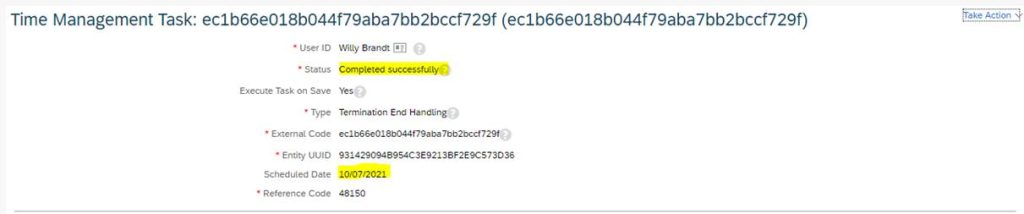
Since, I have used an offset of 1 day, a Time Management Task object is created with a scheduled date of Oct 7th, 2021 and executed successfully without any errors. This date is in the past, therefore the task was executed immediately.
This Time Management Task object gets created automatically when you enter the termination in the Job Information. It’s created with a scheduled date depending on the offset specified in the configuration. The scheduled date can be modified manually or using a save rule in the time management task object but not recommended. This is in case you want to execute the process even before the scheduled date is reached.
The absences which were after the termination date are cancelled and those that overlapped with the termination date are delimited as shown:
Note: Currently, it’s not possible to cancel/delimit the absences before the termination date is reached.
The future time account in year 2022 is deleted and the time accounts validities and bookable end dates are delimited for 2021 accounts. The future accrual postings are deleted (if already created). If the accrual period overlaps with the termination date and if the accrual posting date is after the termination date, then the accrual postings are adjusted to the termination date as shown below:
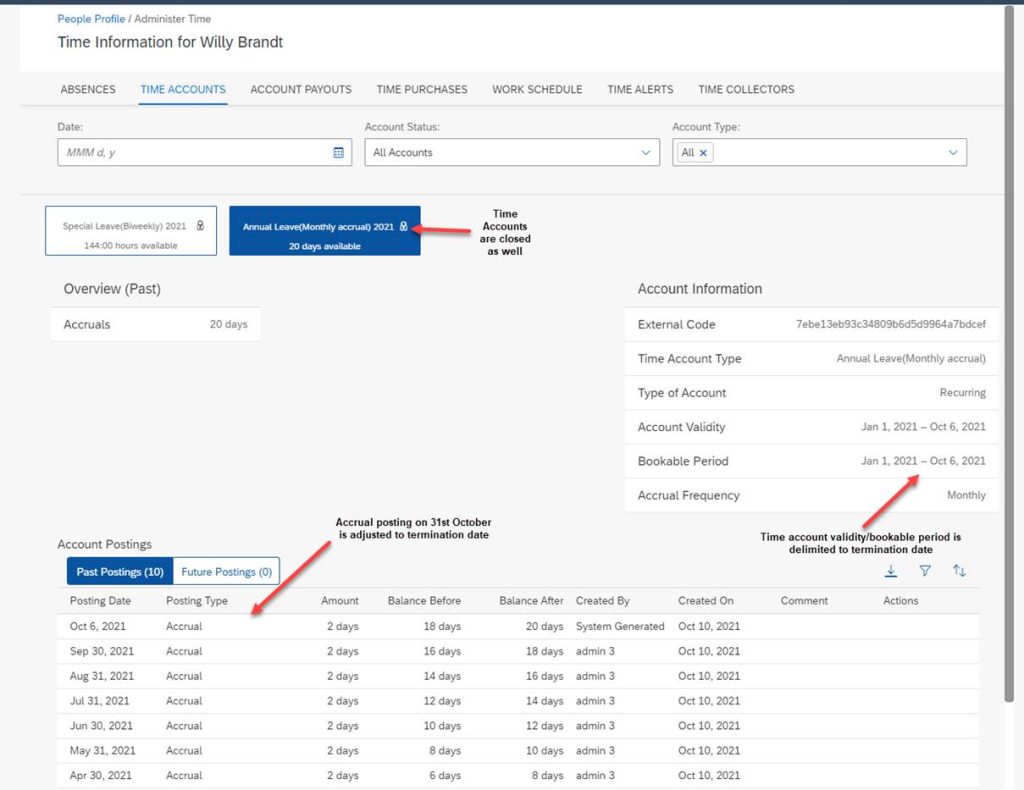
This is the Time Account with Biweekly accruals. Here as well the accrual posting is adjusted.

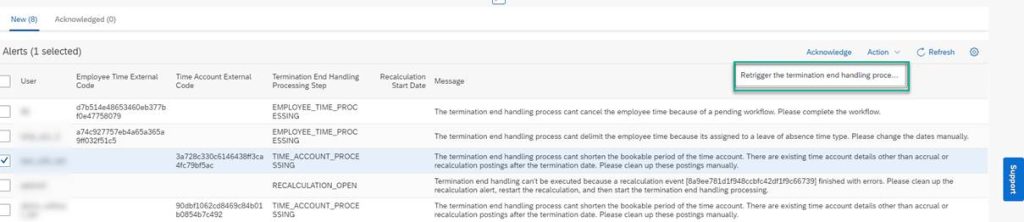
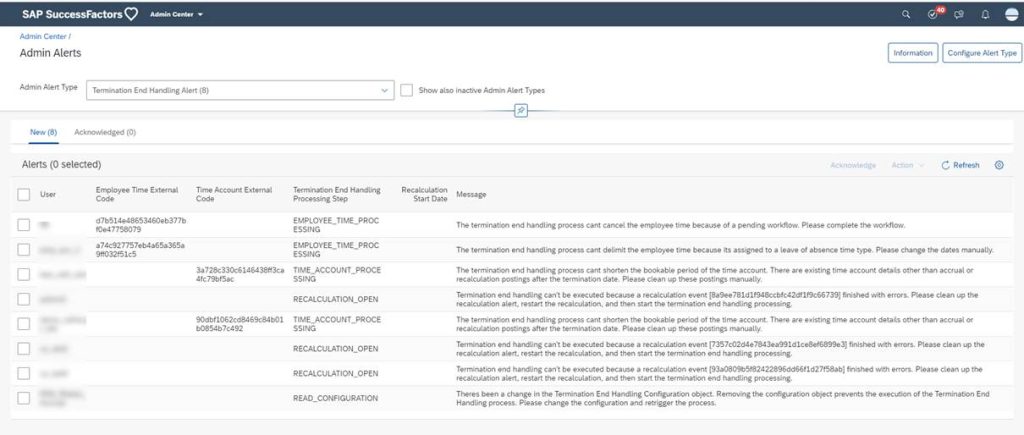
Admin Alerts:
Here are some examples where you can run into error situations and where admin alerts are created.
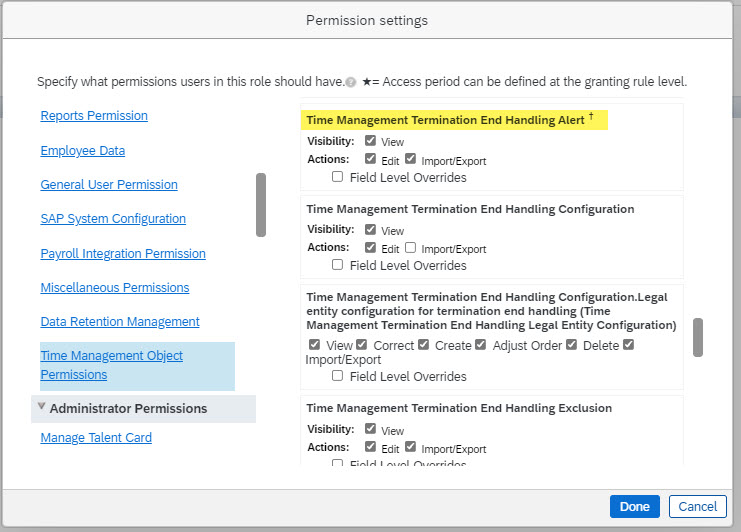
In order to view the admin alerts, ensure that the RBP permissions for the object “Time Management Termination End Handling Alert” are set for admins.
Admin can fix those errors and retrigger the termination end processing using the Admin Alerts UI on click of the button “Retrigger the termination end handling process”. This will execute the “Time Management Task” and run the Termination end handling process again.