Motivation
The SAP Screen Personas NetWeaver Add-On has been part of the SAP User Experience Strategy for several years. It is a popular choice among customers to improve the user experience for classic SAP GUI transactions (classic applications). It allows people to adapt screens using the no-code WYSIWYG (what you see is what you get) editor and automating user input by leveraging the low code script editor. With the release of SAP S/4HANA Cloud 2202, the classic application UI adaptation capabilities are now built into the platform foundation, also enabling cloud customers to enjoy a set of easy-to-use tools to tailor business processes featuring classic apps to their needs.
The goal of this article is to outline the steps on how to get started with the new Adapt UI functionality for classic applications in SAP S/4HANA Cloud.
Getting Started
The feature Adapt UI for Classic Applications with Screen Personas (short: Adapt UI) classic application adaptation is available starting with SAP S/4HANA Cloud release 2202. It supports the following system landscape setups:
- 2-system Quality-to-Production setup
- 3-system Development-to-Test-to-Production setup
There are no manual provisioning or configuration steps required as the feature is delivered ready-to-use as part of the standard delivery and can be activated by assigning relevant business catalogs to custom business roles or by using SAP-delivered business role templates specific to Adapt UI capabilities.
Classic application adaptations also called flavors are applied dynamically in runtime without requiring any direct code change or modifications to the original application. This enables cloud customers to create different, role-based, dynamically interchangeable adaptations for the same classic application.
To better illustrate the steps, we will create and deploy a new flavor for the Change Outbound Delivery classic application that is regularly used in the sell-from-stock scenario and also known as transaction VL02N. Let’s start by outlining the prerequisites for an SAP S/4HANA Cloud 2202 3-system setup.
Prerequisites
- An SAP S/4HANA Cloud 2202 development system, customizing tenant (client 100). The system will be used to create and export flavors
- An SAP S/4HANA Cloud 2202 test system, test tenant (client 100). The system will be used to import flavors created on the development system and assign them to the business users for further testing
- An administrative user in both systems with the Administrator (SAP_BR_ADMINISTRATOR) role assigned
- The extensibility including transport targets is enabled and configured.
- The shipping specialist business role is generated from the SAP_BR_SHIPPING_SPECIALIST business role template. It will be referred as BR_SHIPPING_SPECIALIST in this article
- At least one outbound delivery has been created in the development and test systems as it will be used to create and test UI adaptations.
The general process of creating and assigning flavors is as follows:
- The system administrator uses the Identity and Access Management tools such as the Maintain Business Roles application to set up user roles across the landscape.
- Set up and configure flavor builder user in the development system.
- Set up end-user access to consume assigned flavors in the test system.
- The flavor builder opens the classic app and uses the Screen Personas flavor editor (design time) in the development system to create UI adaptations.
- The administrator uses the Manage Flavors application to group flavors in assignment categories.
- The administrator uses Export Software Collections and Import Collections applications to transport created flavors from the Development system to the Test system.
- The administrator uses the Maintain Business Roles application to assign flavors to the business users.
- The business user (tester) opens the classic application and consumes the assigned flavor(s).
Setting Up Business Roles and Catalogs
There are three distinct roles involved when considering classic application UI adaptations:
- Administrator – performs flavor management activities such as maintaining assignments and performs transports across landscape
- Flavor Builder –creates, tests, and maintains flavors
- Business User – consumes flavors as part of the simplified business process. For example, a shipping specialist changes an outbound delivery using the adapted Change Outbound Delivery application
See the Figure 1 on more process details regarding the three roles involved in creating and consuming UI adaptations for classic application with Screen Personas.

To match the involved user roles, the Adapt UI functionality in SAP S/4HANA Cloud is shipped with three business catalogs that can be assigned to business roles for specific use-cases. Please see the table below for details.
Table 1. UI Adaptation for Classic Applications Feature – Catalogs for Different Roles
| User Role | Administrator | Flavor Builder | Business User |
| Business Catalog Name | User Interface – Personas Administration | User Interface – Personas Design | User Interface – Personas Usage Display |
| Business Catalog ID | SAP_CORE_BC_UI_PER_ADM _PC | SAP_CORE_BC_UI_PER_DSG _PC | SAP_CORE_BC_UI_PER_USE _PC |
| Included in Business Role Templates | SAP_BR_ADMINISTRATOR | SAP_BR_ADMINISTRATOR | SAP_BR_EMPLOYEE |
| Available in DEV Client 100 (3-system landscape) | X | X | X |
| Available in DEV Client 80 (3-system landscape) | – | – | – |
| Available in Quality Client 100 (2-system landscape) | X | X | X |
| Available in Test Client 100 (3-system landscape) | X | – | X |
| Available in Prod Client 100 | X | – | X |
| Comments | Required to access the Manage Flavors application | Required to access the flavor editor | Required to access assigned flavors |
Administrator Role
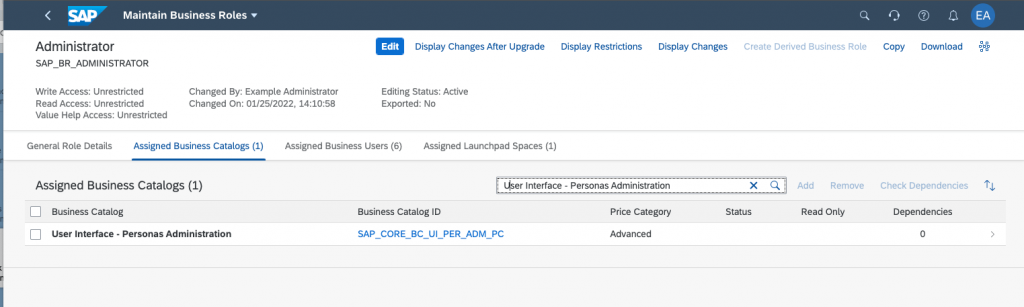
For the scenario we will be requiring a user that has access to the Manage Flavors application in the development system where the UI adaptations will be created. According to the Table 1, User Interface – Personas Administration Business catalog (SAP_CORE_BC_UI_PER_ADM_PC) gives access to the mentioned application and, in fact, the catalog is already included in the SAP_BR_ADMINISTRATOR business role template shipped by SAP. To verify the access:
- Log in to the SAP Fiori launchpad of the development system using the Administrator credentials.
- Open the Maintain Business Roles
- Search for the SAP_BR_ADMINISTRATOR business role and open it.
- Click on the Assigned Business Catalogs tab, then search for the User Interface – Personas Administration catalog and confirm it is assigned.
Alternatively, you may consider creating a dedicated custom business role for adapting the UI of classic applications by assigning the User Interface – Personas Administration business catalog to the desired business role manually.
Flavor Builder Role
The user who will be creating flavors requires the design time that is shipped in the User Interface – Personas Design catalog. This catalog must be assigned to one of the business roles in the development system. It is important to outline, that the catalog is only available in the development systems which is the customizing tenant (client 100) for 3-system landscape setups and in the quality systems which is the test tenant (client 100) for the 2-system landscape setups. Creating flavors directly in production systems is not supported.
For convenience, we assume that the flavor builder and the administrator is the same user entity, hence, we can make use of the SAP_BR_ADMINISTRATOR business role template that already features the required catalog assignment for the design time. Just like when preparing the administrator role, log in SAP Fiori launchpad of the development system, your customizing tenant (client 100) and confirm that the Administrator user has the User Interface – Personas Design business catalog assigned.
To create flavors for the classic application such as Change Outbound Delivery, the flavor builder requires additional access to the application itself along with some test data to ensure all screens are reachable.
1. Log in to the SAP Fiori launchpad of the development system, customizing tenant (client 100) using the Administrator credentials.
2. Open the Maintain Business Roles
3. Search for the Shipping Specialist Business Rule (for example, BR_SHIPPING_SPECIALIST) and assign it to the Administrator or any other user that has the flavor builder catalog mapped.
4. Confirm that the flavor builder who will be creating classic application UI adaptations for Change Outbound Delivery application now has at least two business roles assigned in the Quality system:

Just like for the administration of UI adaptations of classic applications, you may also consider creating a dedicated custom business role for the design time by assigning the User Interface – Personas Design business catalog to the custom business role manually. Remember that the user needs the business catalog for the classic UI and the business catalog for the design time.
Business User (Consumer) Role
According to the process for UI adaptation of classic applications, the flavor consumer requires:
- Access to the classic application in the test and production system(s)
- Access to the assigned UI adaptations
Here are the steps to set up a business user for flavor consumption
- Log in to the SAP Fiori launchpad of the test system, client 100 using the Administrator credentials.
- Open the Maintain Business Roles
- Create new Business Role BR_FLAVOR_CONSUMER and type in the description. The new role will provide access to the assigned flavors.
- Select the Assigned Business Catalogs tab and press the Add button to add a new business catalog.
- Search for the User Interface – Personas Usage Display and assign it to the business role.
- Click on the Assigned Business Users tab and look for the business user that will be consuming or testing the UI adaptations in runtime.
- Save the changes and go back to the list of available business roles.
- Search for the Shipping Specialist business role (for example, BR_SHIPPING_SPECIALIST) and assign it to the same business user
- Confirm that the business user who will be consuming the adapted UIs for the classic application in a production system now has at least two business roles assigned.
- BR_FLAVOR_CONSUMER
- BR_SHIPPING_SPECIALIST (Or other business role generated from the Shipping Specialist Business Role Template)
- BR_FLAVOR_CONSUMER
Creating UI Adaptation for Classic Application
In this section, a new UI adaptation for the Change Outbound Delivery application will be created. Please note, we will not discuss the available flavor editor features or the extensive scripting API.
1. Log in to the SAP Fiori launchpad of the development system, customizing tenant (client 100) using the previously prepared user for the flavor creation (Administrator).
2. Search for the Change Outbound Delivery application and open it.
3. At this point, it is important to have at least one outbound delivery available to advance to the application’s main screen. Select an item and click on Continue.
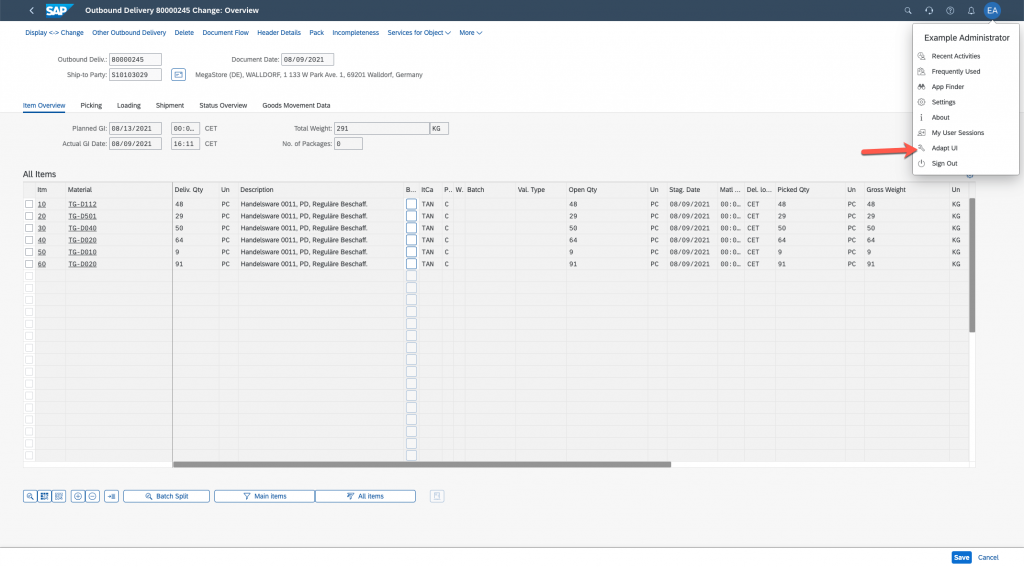
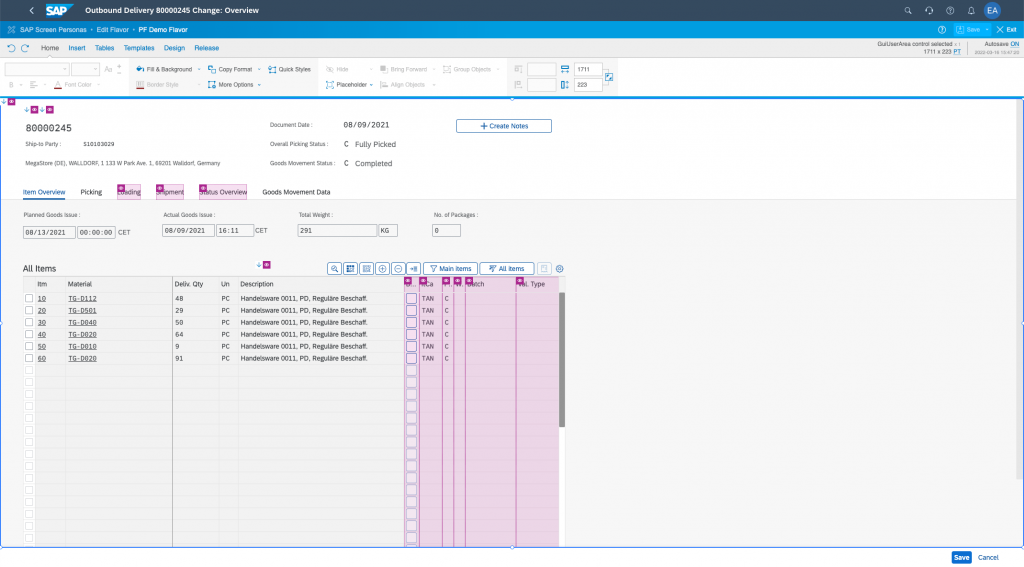
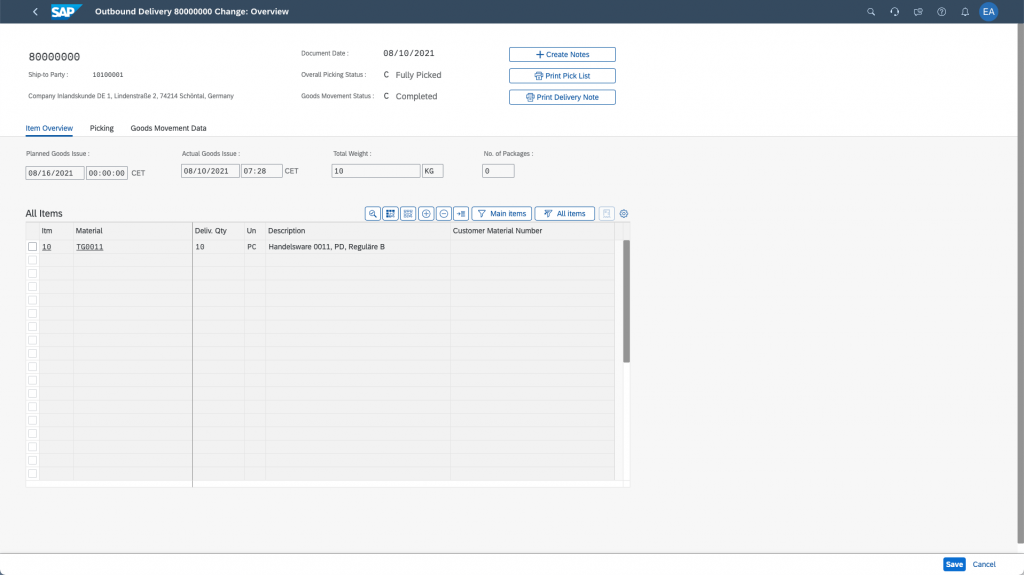
4. The Outbound Delivery Change screen opens.
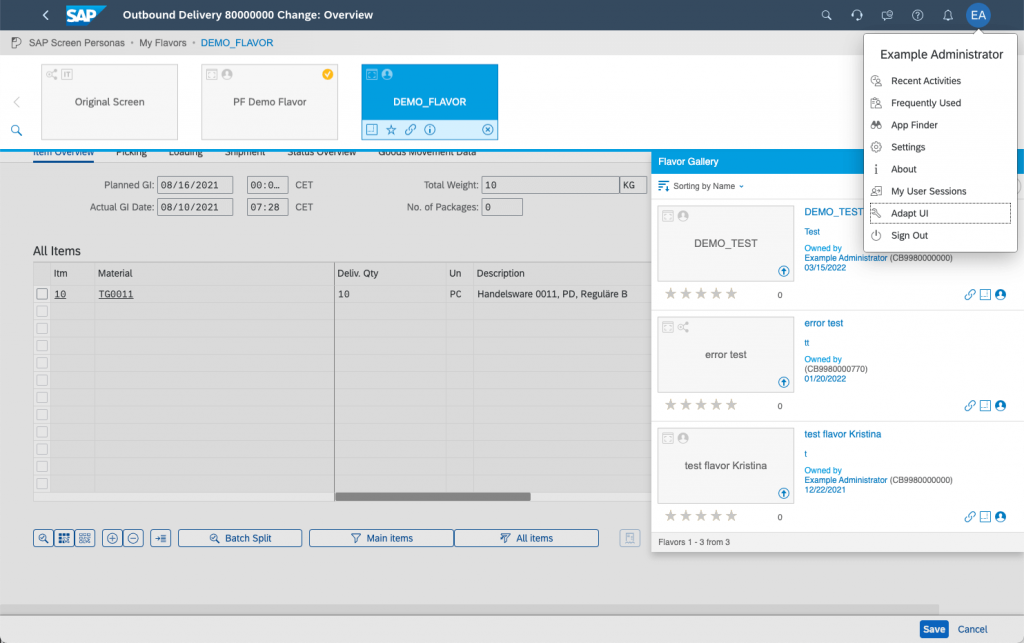
5. Click on the user action menu of SAP Fiori launchpad and select Adapt UI. The Flavor Manager opens.
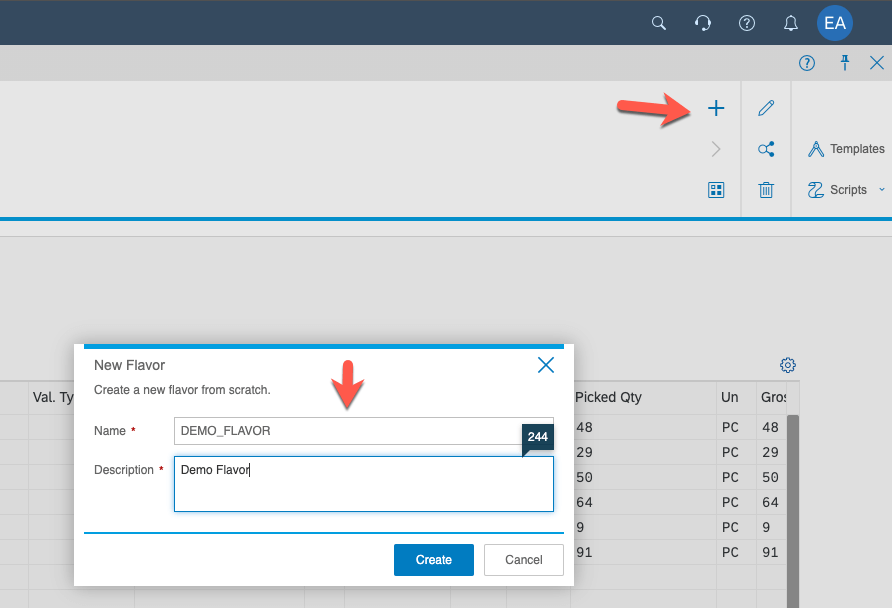
6. Click on the + button to create new flavor, type in the flavor name and description.
7. The flavor editor opens.
8. Click on the Insert tab, then insert a new label and provide the text value.
9. Feel free to explore other available tools and features and make further adaptations.
10. Save the changes and exit the flavor editor.
This concludes the flavor creation, and it is now possible to advance further by grouping the flavors in assignment categories, transporting to the test system, and assigning to business test users.
Managing UI Adaptations for Classic Applications
Most important maintenance activities for an administrator of UI adaptations for classic applications are the following:
- Group UI adaptations into common containers called assignment categories
- Transport assignment categories containing UI adaptations across the landscape
- Linking assignment categories to business roles to make the referenced UI adaptations available to end-users
In this section, the three main maintenance activities will be discussed to ensure that the previously created UI adaptation for the Change Outbound Delivery app is deployed on the test system and ready for the business user testing.
Understanding Assignment Categories
An assignment category is a container for common UI adaptations of classic application. Its main purpose is to define assignment scope for business users. Assignment categories enable grouping of semantically related UI adaptations along with their dependencies such as scripts, images, and icons into a single container. That container could be further shared with desired business roles via the restrictions feature. An assignment category can reference many UI adaptations for a single or multiple classic applications. Likewise, a single UI adaptation can be referenced in many assignment categories.
For instance, the Shipping Specialist role may feature not only adaptations for Change Outbound Delivery application but also another UI adaptation for the Display Outbound Delivery app. In such case, the two adaptations semantically belong to the same business role and, hence, a common assignment category could be considered.
Let’s create an assignment category for the previously created UI adaptation for the Change Outbound Delivery application. Assignment categories are created on the development system for 3-system landscape or on quality system for 2-system landscape setups and further transported to the test or production systems.
Creation of a new assignment category:
- Log in to the SAP Fiori launchpad of the development system, customizing tenant (client 100) using the Administrator credentials.
- Open the Manage Flavors
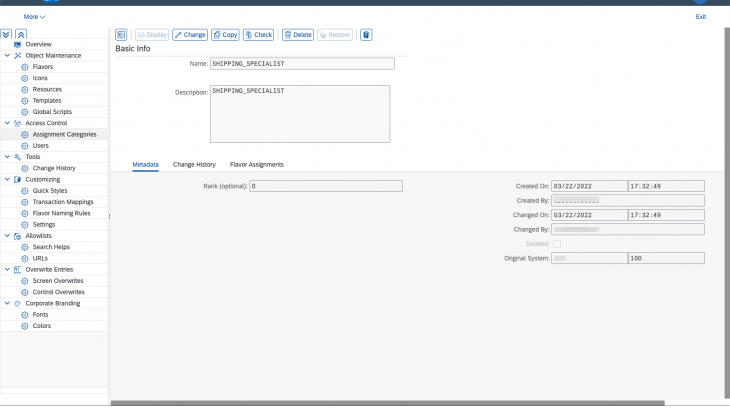
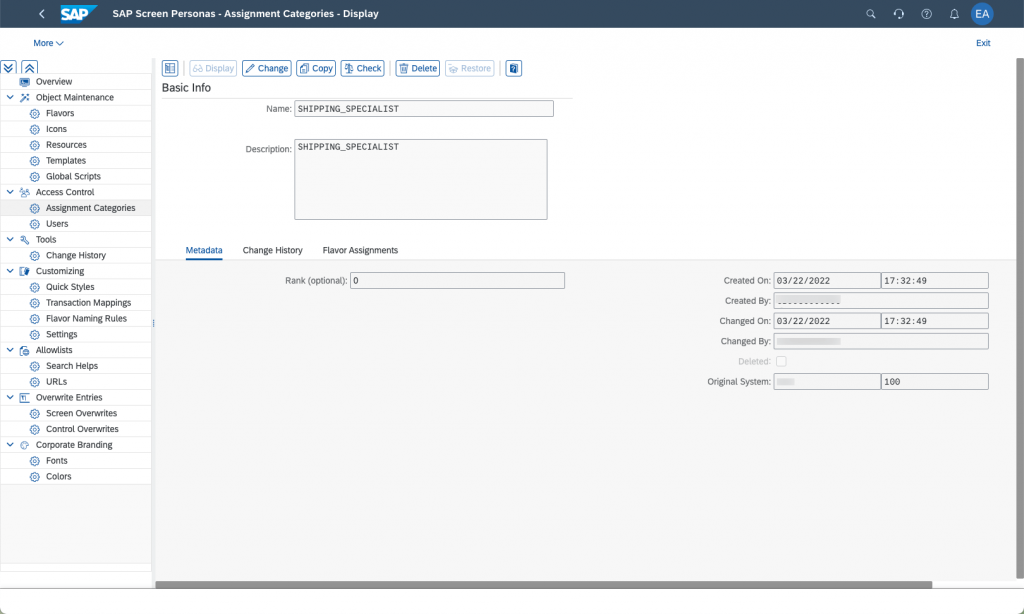
- Under the Access Control node, select Assignment Categories, then click on the Create
- Provide the Assignment Category name, for example SHIPPING_SPECIALIST and click on Continue.
- Save the assignment category.
Once the assignment category is created in the Manage Flavors application, it is possible to include flavors and maintain the relevant settings. There are two ways on how to assign a UI adaptation to the existing assignment category:
- Flavor builders can conveniently assign an adaptation to the previously created assignment category directly in the design time after the flavor is created
- Administrators can use the Manage Flavors application to assign previously created adaptations to assignment categories
The flavor builder way of assigning flavors to an existing assignment category
- Log in to the SAP Fiori launchpad of the development system, customizing tenant (client 100) using the previously prepared Flavor Builder user (Administrator).
- Search for the Change Outbound Delivery application and open it.
- The Outbound Delivery Change screen opens.
- Click on the user action menu of SAP Fiori launchpad and select Adapt UI. The Flavor Manager opens and the previously created DEMO_FLAVOR should be visible.
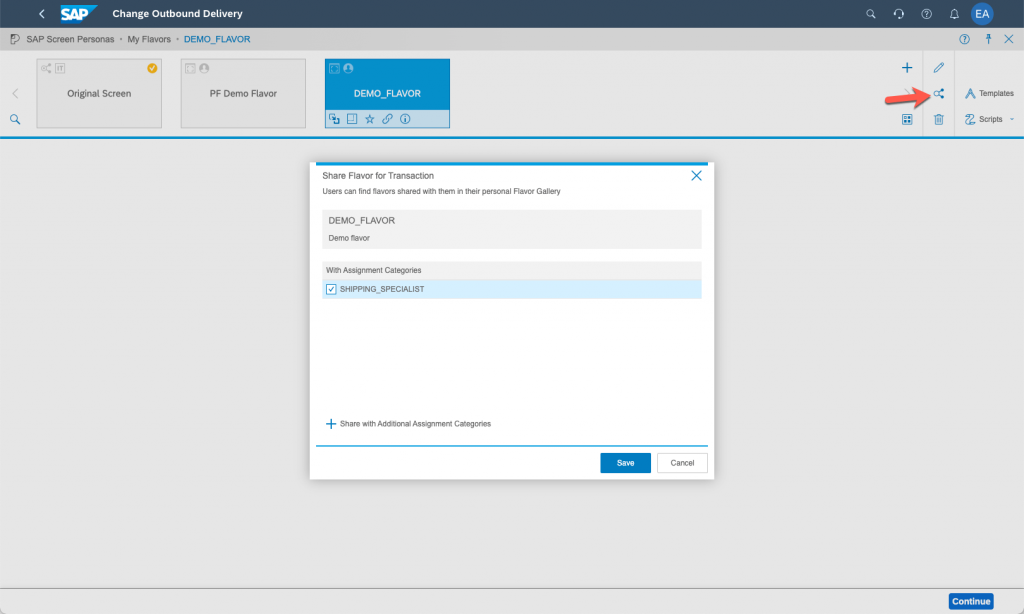
- Select the DEMO_FLAVOR flavor tile and then click on the Share Flavor The Share Flavor dialog should open.
- In the Share Flavor dialog click on the + icon and search for the previously created SHIPPING_SPECIALIST assignment category, then select it and press the Add Selected
- Save the flavor sharing with the assignment category and close the dialog.
The administrator way of assigning existing flavors to an assignment category
1. Log in to the SAP Fiori launchpad of the development system, customizing tenant (client 100) using the Administrator credentials.
2. Open the Manage Flavors
3. Under the Access Control node, select Assignment Categories.
4. Search for the previously created assignment category
5. Click on the Change button and go to the Flavor Assignments
6. Click on the + button to search for the flavor to be assigned to the assignment category.
7. For example, search for the Change Outbound Delivery adaptation by providing the previously created flavor name DEMO_FLAVOR. Select the flavor from the list of search results and then click on the OK button to proceed with the assignment.
8. Click on the Save button to save the flavor assignment to the assignment category.
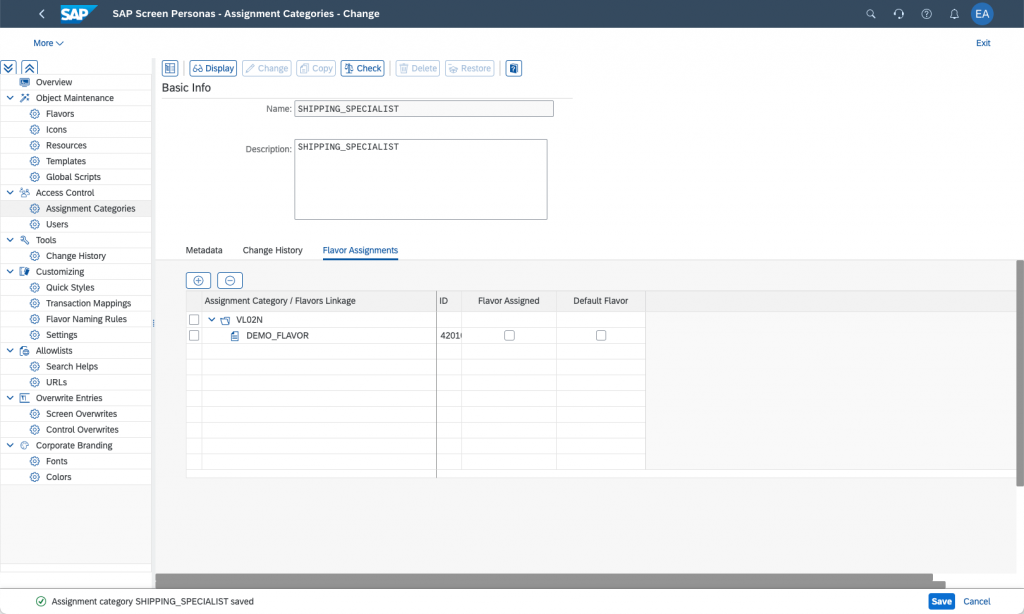
Once the flavor is assigned to the desired assignment category using one of the two outlined options, administrators can further adjust the flavor assignment settings.
As you can see from Figure 9, the Flavor Assignments tab of the Assignment Category features two checkboxes for the assigned flavor that both are unchecked by default:
- Flavor Assigned
- Default Flavor
The administrator maintains the flavor assignment settings and has the following options:
- Both checkboxes: Flavor Assigned and Default Flavor are unchecked (default)
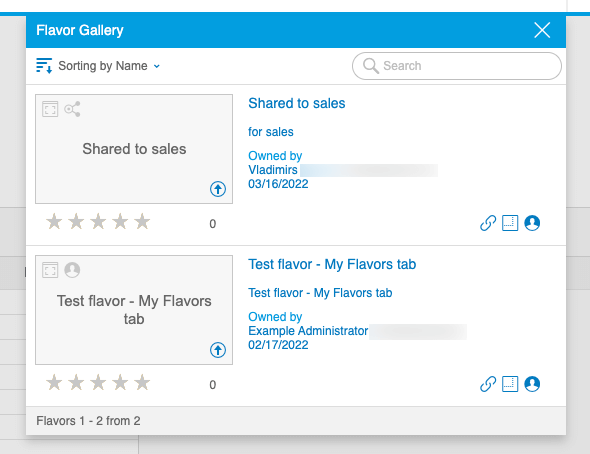
In this setup, the assigned flavor will only appear in the end-user’s Flavor Gallery from where users will be able to manually activate it in runtime or move it to the Flavor Manager and optionally make it default by pressing the Adapt UI option from the user action menu in SAP Fiori launchpad.
- The Flavor Assigned checkbox is checked
In this setup, the assigned flavor will appear in the Flavor Manager and still requires manual activation by the end user through the Adapt UI feature
- The Flavor Assigned and the Default Flavor checkboxes both are checked
In this setup, the assigned flavor will not only appear in the end-user’s Flavor Manager but also will be automatically activated in runtime by default without needing to manually open the Adapt UI feature and select the flavor tile.
However, the Adapt UI feature enables end-users to override the default flavor assignment, for example, by switching back to the original, unmodified version of the classic application.
For the featured demo scenario, this flavor assignment setup should be applied to ensure that Shipping Specialists will always see the assigned adaptation by default without needing to manually activate it.
Using Software Collections to Transport UI Adaptations
At this stage, a new UI adaptation DEMO_FLAVOR for the Change Outbound Delivery application is created and associated with the new assignment category SHIPPING_SPECIALIST in the development system. It is now possible to export the adaptations from the development system and import them into the test system for business user testing.
The Software Collection transport process has three distinct steps:
- Creation of new software collection in the development system
- Export the created software collection from the development system
- Import the software collection into the test system
Creation of new software collection in the development system
1. Log in to the SAP Fiori launchpad of the development system, customizing tenant (client 100) using the Administrator credentials.
2. Open the Export Software Collection
3. Click on the + button under the Software Collections to create new software collection.
4. Provide name for the new Software Collection, for example, Shipping Specialist Classic App Adaptations. An empty software collection should be created and opened.
5. Click on the Add Items A search dialog should open.
6. Choose Type: Personas: Assignment Category and click on the Go button. A search list containing all available assignment categories should appear.
7. Select the previously created assignment category SHIPPING_SPECIALIST and click on OK. The assignment category should be now added to the software collection.
8. Click on the Add Missing Items button to scan for dependencies related to the previously included assignment category. A dialog with assignable items should appear (Figure 12).
9. Select the previously created DEMO_FLAVOR and click on the OK button to proceed with the assignment.
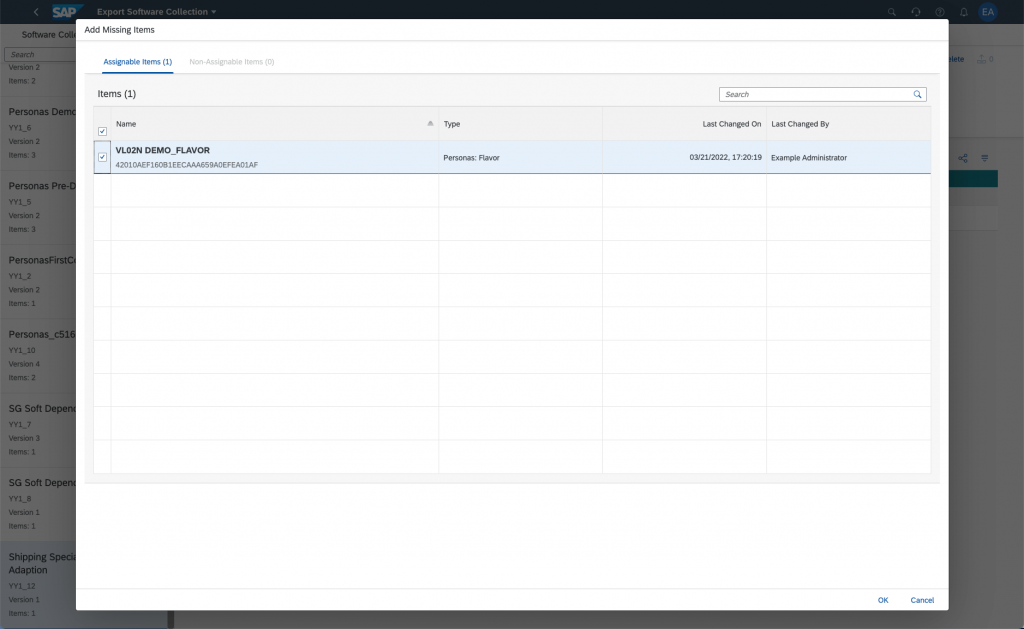
10. The software collection should now contain 2 items: The SHIPPING_SPECIALIST assignment category and the DEMO_FLAVOR adaptation of the Create Outbound Delivery app
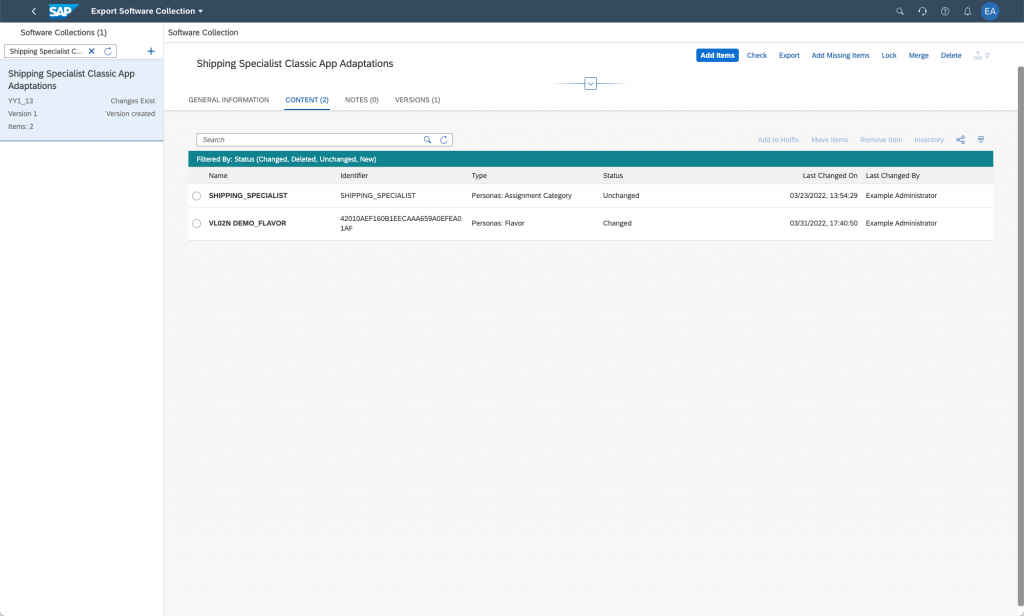
This completes the Software Collection creation and preparation. The software collection object is in everlasting relation with the dependent items. It not only enables export/import but also provides change versioning features. Every time the assignment category or the flavor is changed, a new version is generated, and the changes are reflected in the associated software collection which could be then further exported across the SAP S/4HANA Cloud landscape.
Exporting the created software collection from the development system
1. Open the Export Software Collection
2. Search and open the previously created Software Collection Shipping Specialist Classic App Adaptations.
3. Press the Export button and then select the Full (All items) option from the dropdown menu.
4. Confirm the Export Software Collection dialog by pressing the Export
5. Wait for the export process to finish.
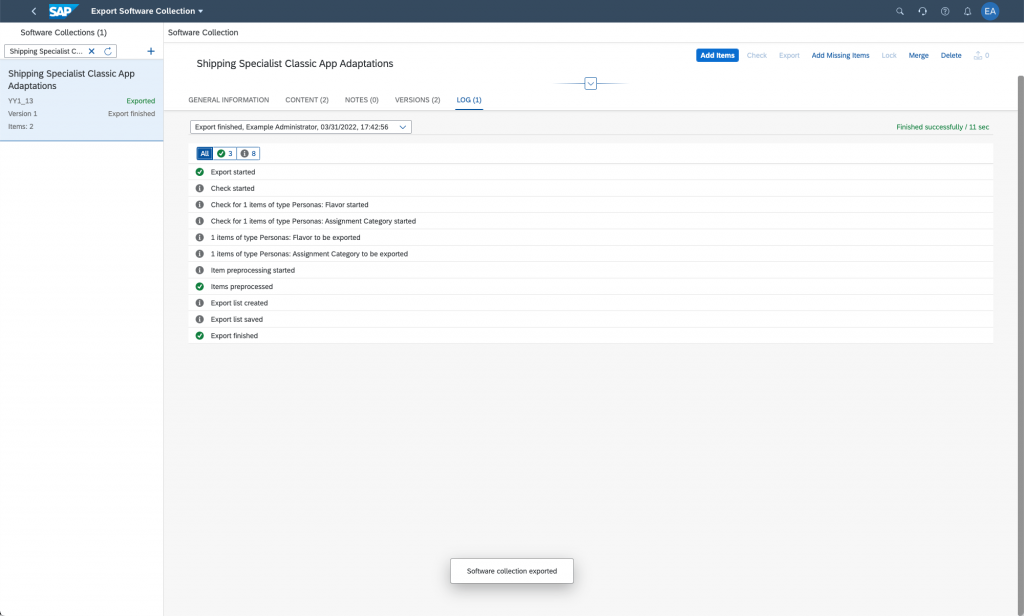
Please note that the export process should be repeated every time there is an object change or object deletion to either the flavor or the assignment category as UI adaptations for classic UIs should be only created or modified in the customizing tenant.
After the software collection export process is finished, it is now possible to import the software collection into the test system.
Importing the created software collection into the test system
1. Log in to the SAP Fiori launchpad of the test system, client 100 using the Administrator credentials.
2. Open the Import Collection
3. Search for the previously exported software collection Shipping Specialist Classic App Adaptation. It should appear in the list with the status Ready for Import.
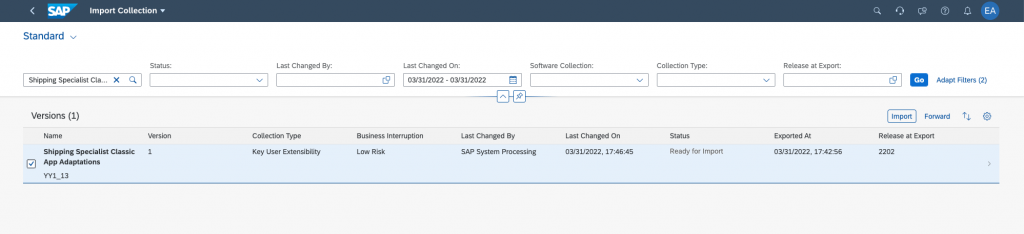
4. Select the exported software collection and press the Import button to proceed with the import into the test system.
5. After successful validation confirm the import by pressing the Import
6. Wait for the import process to successfully finish.
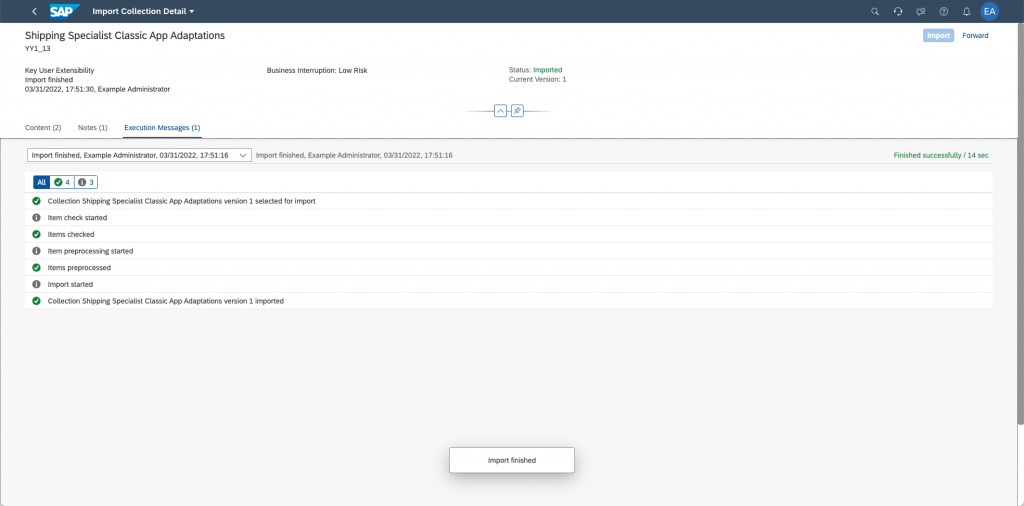
This completes exporting the created UI adaptation and the assignment category from the development system into the test system.
Once the testing of the adapted UI is completed, you may consider using the Forward feature to forward the tested software collection version from the test system into the production system.
Using Restrictions to Assign UI Adaptations to Business Roles
By default, all imported UI adaptations for classic applications are available for all test system users who have the unrestricted business catalog User Interface – Personas Usage Display assigned to their business role. In such setup, the available UI adaptations for the given classic application are listed in the Flavor Gallery, regardless of the previously maintained flavor assignment settings for the assignment category.
To ensure more granular role-based assignments of the UI adaptations it is recommended to define a restriction for the User Interface – Personas Usage Display business catalog by explicitly declaring assigned assignment categories. For our scenario, the Shipping Specialist should only have access to the content of the SHIPPING_SPECIALIST assignment category which includes the adaptation for the Change Outbound Delivery app. Here are the necessary steps to complete the assignment:
1. Log in to the SAP Fiori launchpad of the test system, client 100 using the Administrator credentials.
2. Open the Maintain Business Roles
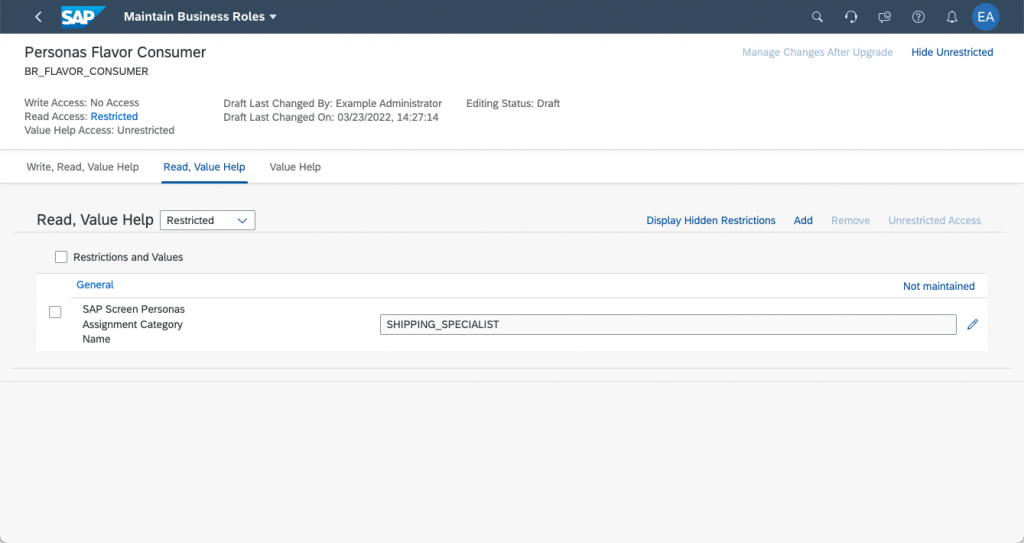
3. Search for the previously created business Role BR_FLAVOR_CONSUMER and open it.
4. Click on the Edit button to edit the business role and then click on the Maintain Restrictions
5. Switch to the Read, Value Help tab and then select the option Restricted from the dropdown list.
6. The restriction SAP Screen Personas Assignment Category Name should appear.
7. Click on the Edit button to edit the SAP Screen Personas Assignment Category Name restriction. A dialog opens showing a list of all available assignment categories.
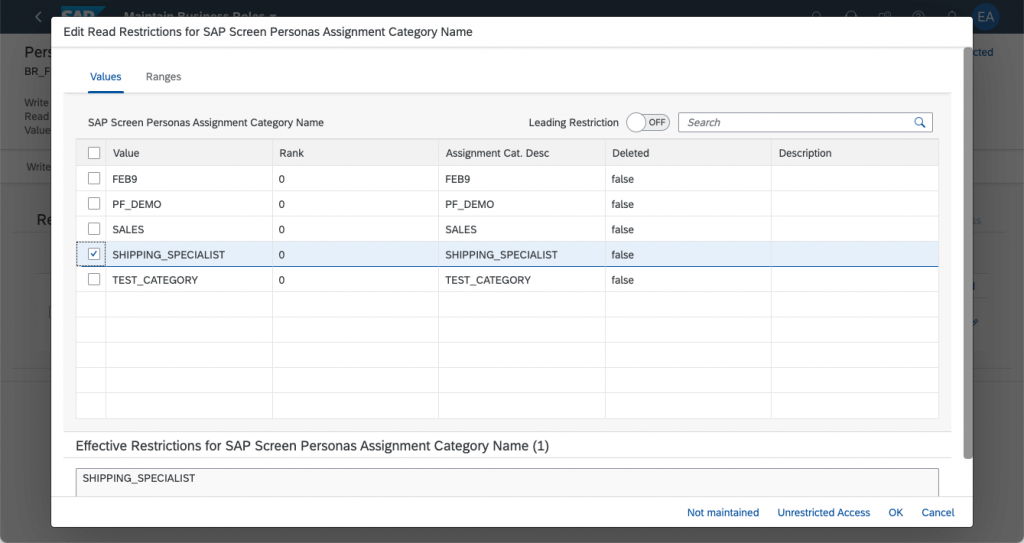
8. Select the previously imported SHIPPING_SPECIALIST assignment category and click on OK to maintain the restriction value.
9. Click on the back button to exit the Maintain Restrictions screen and save the business role changes.
The Change Outbound Delivery application now has been adapted and the adaptations are assigned to Shipping Specialists for further testing.
Consuming UI Adaptations for Classic Applications
Once the created UI adaptations for classic application are imported into the targeted test or production system and the business role has been configured to reference the User Interface – Personas Usage Display business catalog along with the desired assignment catalog restrictions, the business users can now start using the simplified applications.
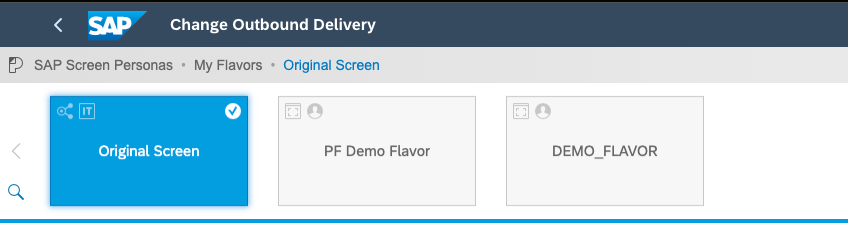
For this scenario, previously created business users having the business roles Shipping Specialist and Personas Flavor Consumer now see the adapted version of the Create Outbound Delivery application by default when opening the application tile:
- Log in to the SAP Fiori launchpad of the test system, client 100 using the business user credentials.
- Open the Create Outbound Delivery
- The previously created adaptation DEMO_FLAVOR is now activated by default
The business users have several options to manage adaptations that are assigned to their business role(s). All users that have the User Interface – Personas Usage Display business catalog assigned have the Adapt UI option in the user action menu of SAP Fiori launchpad when any classic application is opened. This is regardless of assignment category restrictions. By selecting the Adapt UI menu item in any classic application such as Create Outbound Delivery, the Flavor Manager opens and provides the following main options:
- Overview of the assigned adaptations for the given classic application. There are two collections of assigned adaptations:
- Flavor Manager
- Flavor Gallery
Administrators configure where the flavor should appear by default.
- Move assigned adaptations between Flavor Gallery and Flavor Manager. For example, it is convenient to have the most frequently used adaptations in the Flavor Manager.
- Freely change the default adaptation for the given application or switch back to the original screen.