Introduction:
Most of our community members might have already worked on integration scenarios involving G-Suite integration which requires complex modeling and process modelling. In this blog will discuss how to we can simplify G-Suite with SuccessFactors by leveraging SAP Cloud Platform Integration Suite services , SAP CPI and Open Connectors.
Also Read: What is SAP Cloud Platform Integration Certification?
High Level Design Overview:

New Employee Created /Employee Terminated in SAP SuccessFactors will be captured using Intelligent Service Center ( Using New Hire and Termination Event ) and sent to SAP CPI using Integration Center ( which sends all the required data for G-Suite ).Then SAP CPI perform necessary transformation to send the data to G-Suite using SAP Cloud Platform Open Connectors.
G-Suite Configuration:
Create G-Suite Trial Account ( if you dont have one ) by following below threads
Enable G-Suite with your own domain
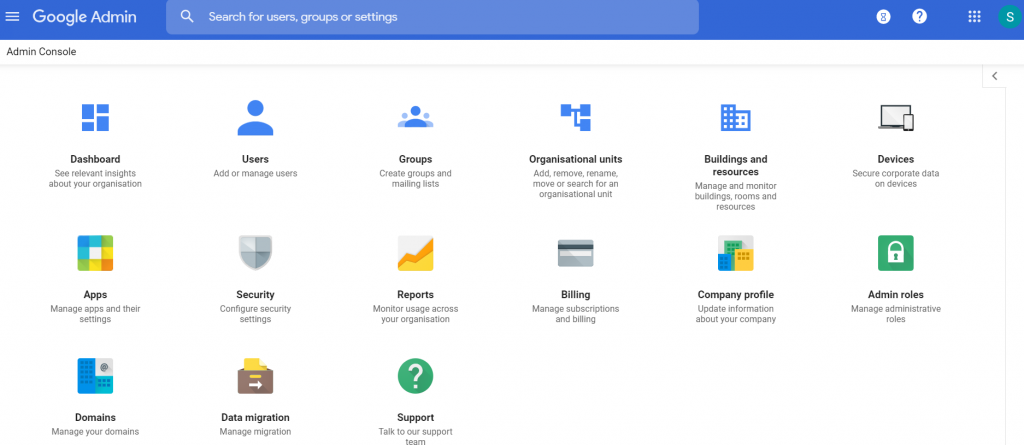
Once you have access you will be able to login into G-Suite Admin Page which looks like below.
Now login into Google Developer Console to enable Google Admin SDK API and create OAuth Credential to create or delete user accounts [ Directory APIs ] using SAP Open Connectors.
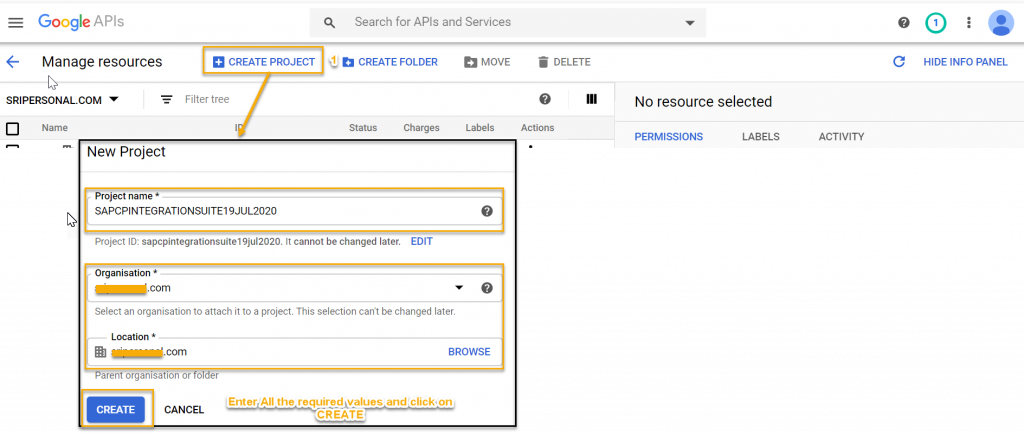
Step 1:
Create Project by navigating to IAM&Admin –> Manage Resources

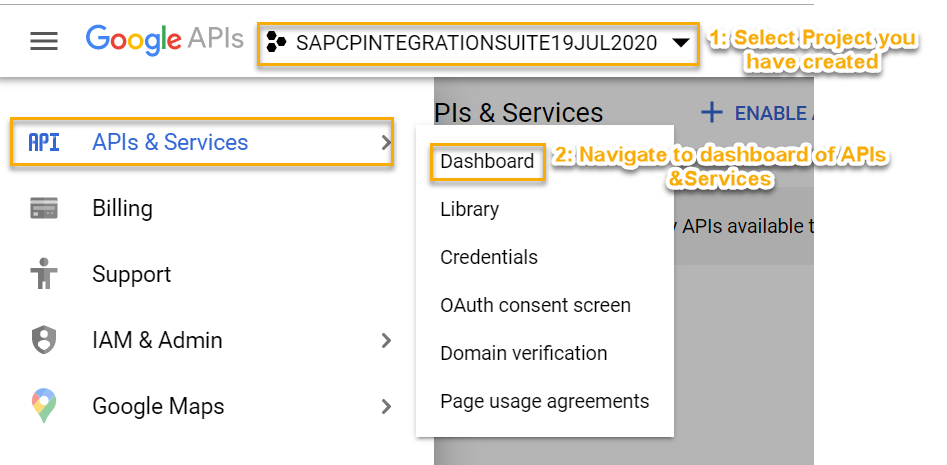
Step 2:
Navigate to APIs & Services to create OAuth Consent and Credentials required to connect from SAP Open Connectors.
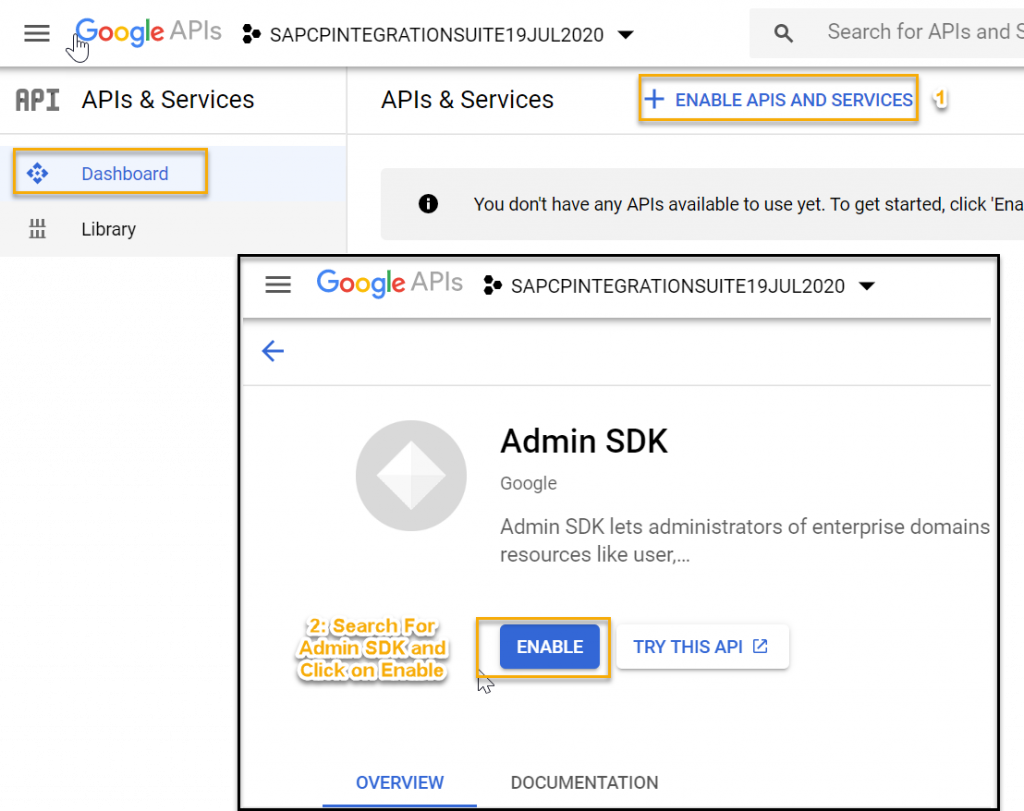
Step 3:
Enable Google Admin SDK and Directory APIs required to create User Accounts in G-Suite
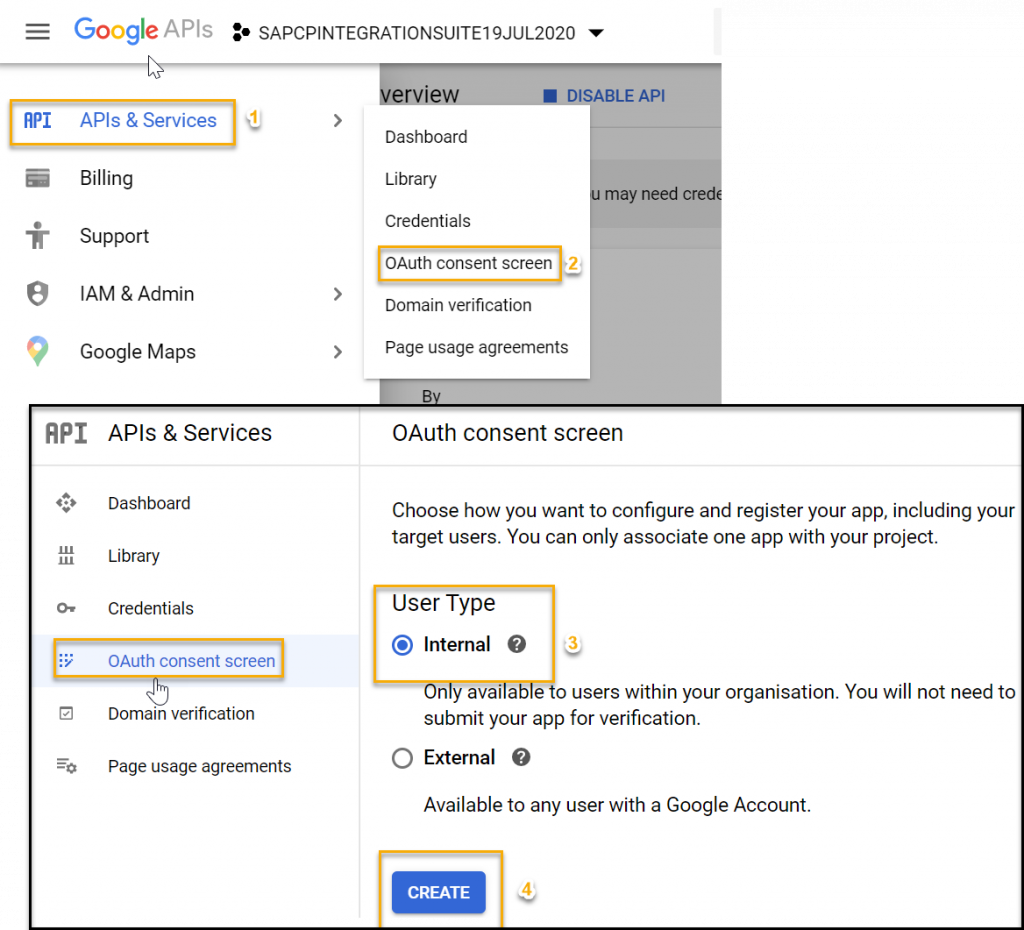
Step 4:
Update OAuth Consent which is required further to create OAuth 2.0 credentials.
Create an application by manually adding additional scope “https://www.googleapis.com/auth/admin.directory.user” as shown below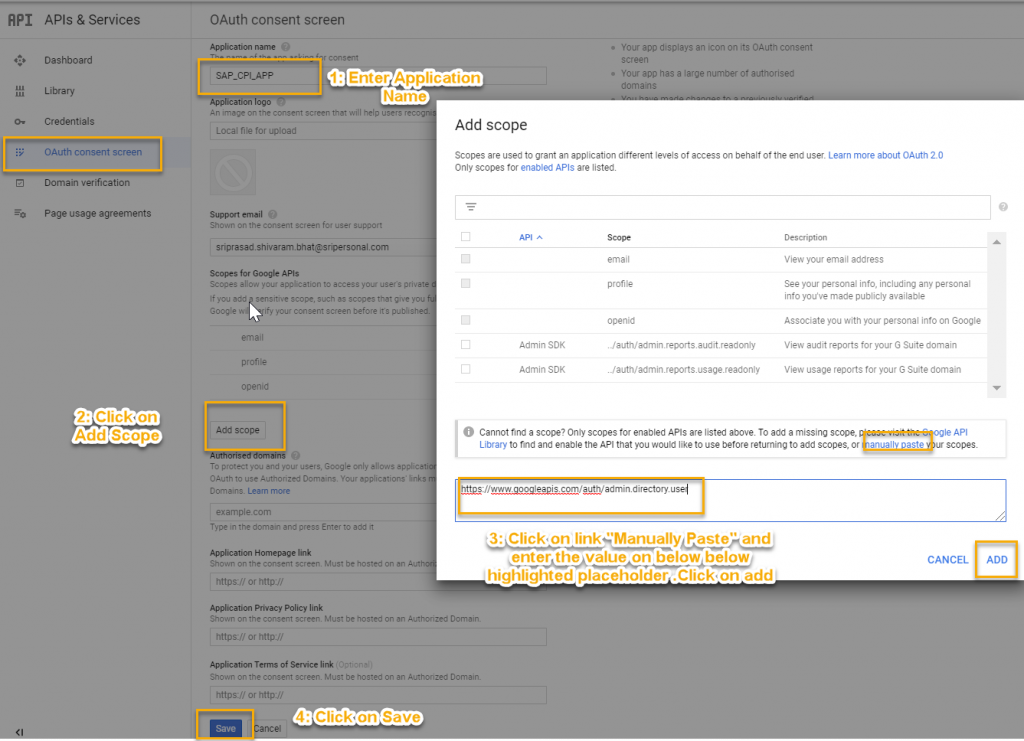
Step 5:
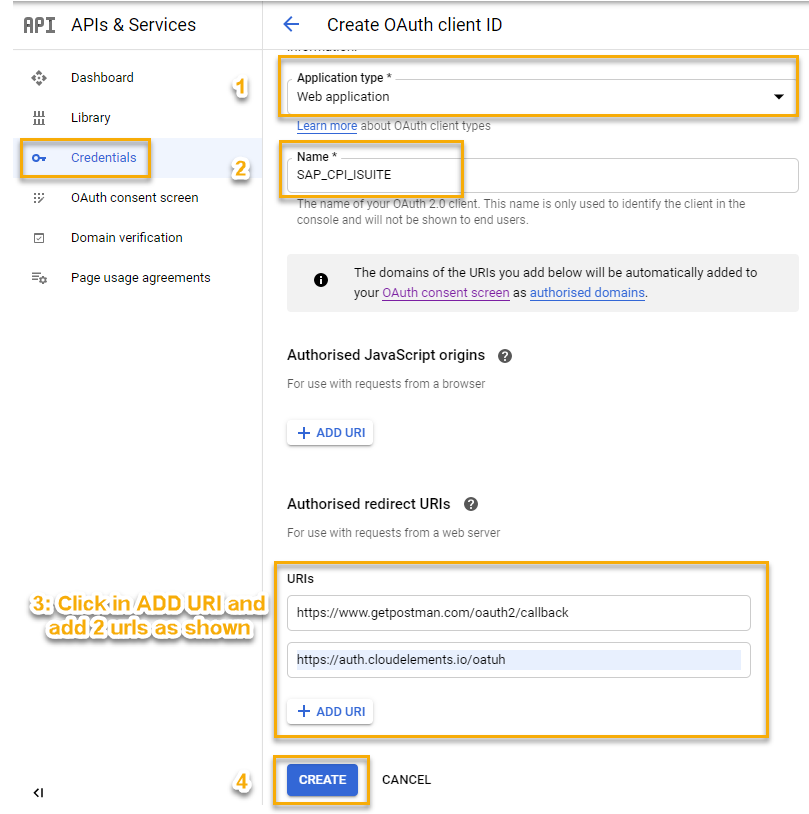
Navigate to Credentials and Click on Create Credentials of the type OAuth Client ID.
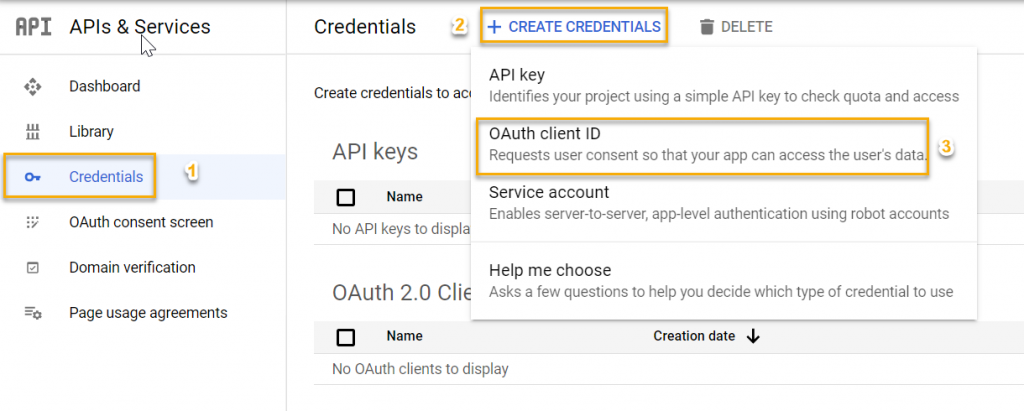
Name your Credential and update the Redirect Urls ( one for POSTMAN and one for Open Connectors ) as shown below.
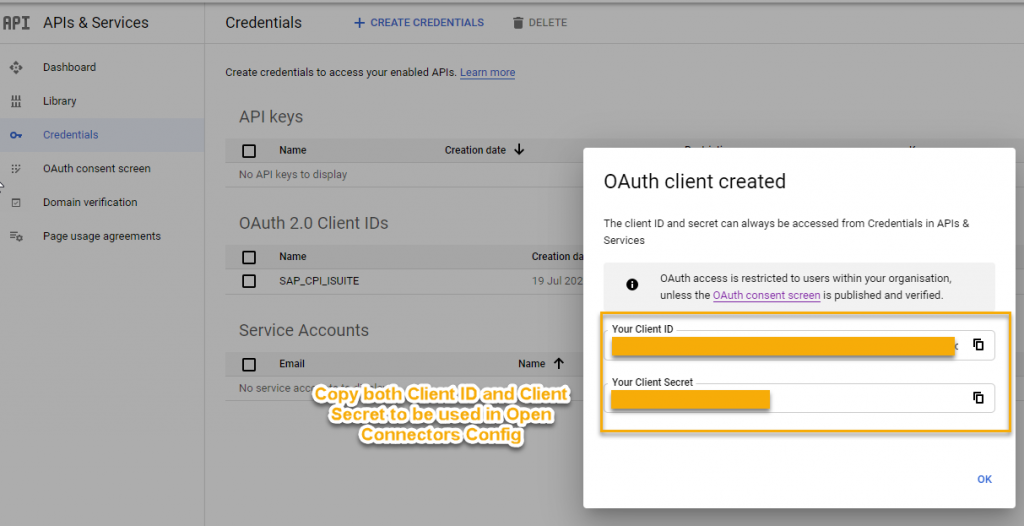
Step 6:
Now you have Client ID and Client Secret .Copy these details and keep it handy for further configurations we do in POSTMAN and Open Connectors.
SAP Cloud Platform Integration Suite- Open Connector Configuration
Bypassing regular flow of using already built Open Connector element this time we will create an G-Suite Open Connector element from scratch using working POSTMAN collection.
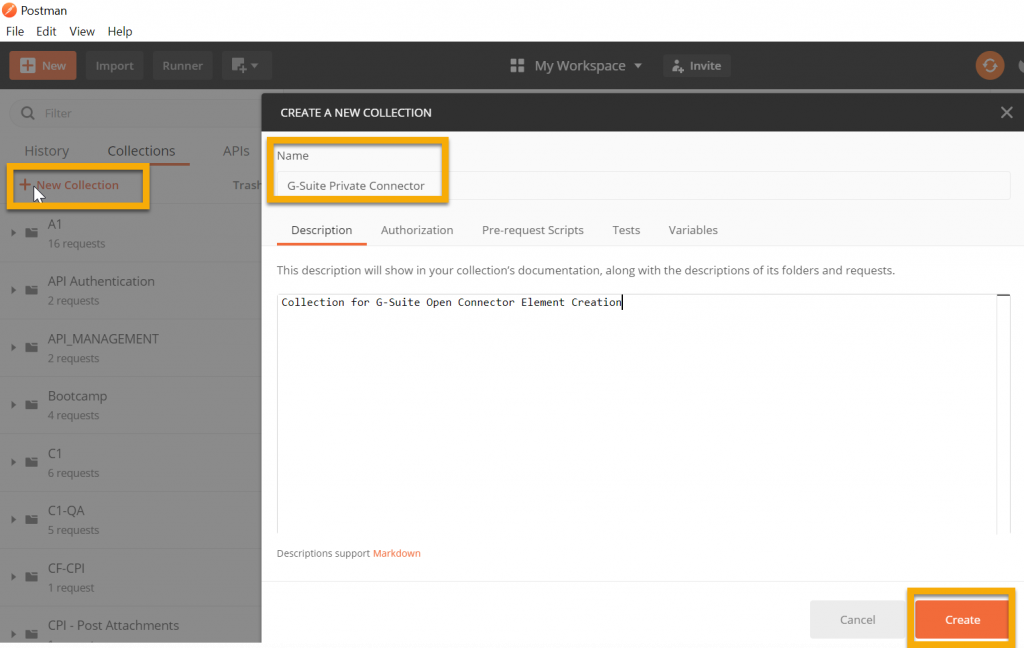
Open your postman and create New Collection to have 3 operations GET,POST and DELETE operations.
Add all the 3 Operations for connecting to G-Suite( have shown only GET here )
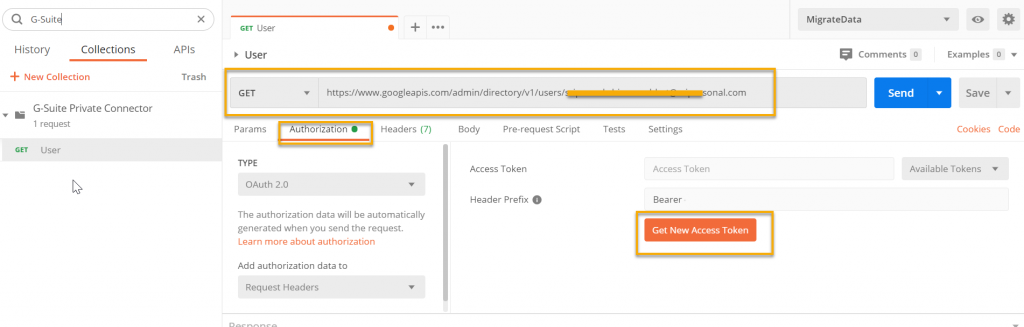
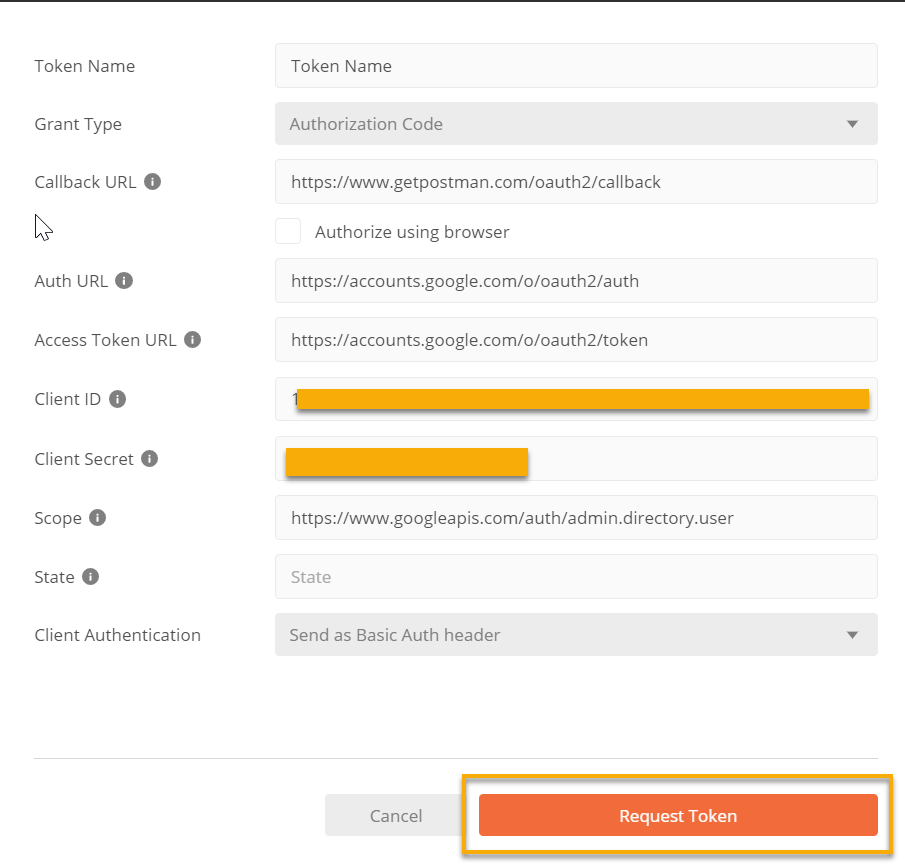
Click on Get New Authorization Code to configure details required for Access token ( This step will be again focused during SAP CP Open Connector Config ).
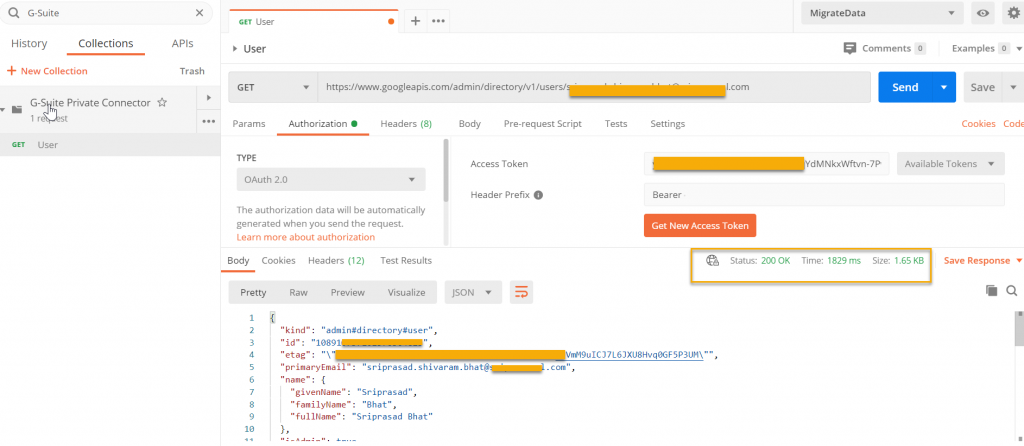
Now use this token to send a request to G-Suite to get details of user.
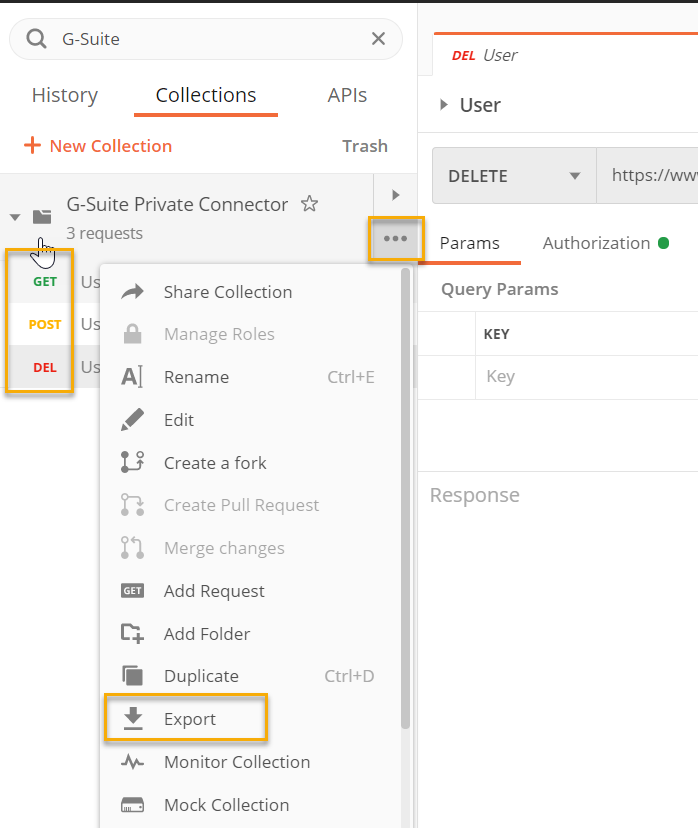
Now repeat the same for all the 3 operations and export the Postman Collection as JSON.
You can use below JSON export of the POSTMAN Collection for try out .
{
	"info": {
		"_postman_id": "9553f61d-88e8-4b6d-a1f9-55f9e8a6ef4b",
		"name": "G-Suite Private Connector",
		"description": "Collection for G-Suite Open Connector Element Creation",
		"schema": "https://schema.getpostman.com/json/collection/v2.1.0/collection.json"
	},
	"item": [
		{
			"name": "User",
			"request": {
				"auth": {
					"type": "oauth2",
					"oauth2": [
						{
							"key": "accessToken",
							"value": "",
							"type": "string"
						},
						{
							"key": "tokenType",
							"value": "Bearer",
							"type": "string"
						},
						{
							"key": "headerPrefix",
							"value": "Bearer ",
							"type": "string"
						},
						{
							"key": "addTokenTo",
							"value": "header",
							"type": "string"
						}
					]
				},
				"method": "GET",
				"header": [],
				"url": {
					"raw": "https://www.googleapis.com/admin/directory/v1/users/<GSUITE_ADMIN_USER_EMAIL>",
					"protocol": "https",
					"host": [
						"www",
						"googleapis",
						"com"
					],
					"path": [
						"admin",
						"directory",
						"v1",
						"users",
						"<GSUITE_ADMIN_USER_EMAIL>"
					]
				},
				"description": "Get User from G-Suite Console- Operation:GET"
			},
			"response": []
		},
		{
			"name": "User",
			"request": {
				"auth": {
					"type": "oauth2",
					"oauth2": [
						{
							"key": "accessToken",
							"value": "",
							"type": "string"
						},
						{
							"key": "tokenType",
							"value": "Bearer",
							"type": "string"
						},
						{
							"key": "headerPrefix",
							"value": "Bearer ",
							"type": "string"
						},
						{
							"key": "addTokenTo",
							"value": "header",
							"type": "string"
						}
					]
				},
				"method": "POST",
				"header": [
					{
						"key": "Authorization",
						"value": "Bearer [YOUR_ACCESS_TOKEN]"
					},
					{
						"key": "Accept",
						"value": "application/json"
					},
					{
						"key": "Content-Type",
						"value": "application/json"
					}
				],
				"body": {
					"mode": "raw",
					"raw": "{\"name\":{\"familyName\":\"Bhat2\",\"givenName\":\"sri5\"},\"password\":\"Test$#!123\",\"primaryEmail\":\"srbhat9@EMAIL.COM\"}"
				},
				"url": {
					"raw": "https://www.googleapis.com/admin/directory/v1/users",
					"protocol": "https",
					"host": [
						"www",
						"googleapis",
						"com"
					],
					"path": [
						"admin",
						"directory",
						"v1",
						"users"
					]
				}
			},
			"response": []
		},
		{
			"name": "User",
			"request": {
				"auth": {
					"type": "oauth2",
					"oauth2": [
						{
							"key": "accessToken",
							"value": "<YOUR_ACCESS_TOKEN>",
							"type": "string"
						},
						{
							"key": "tokenType",
							"value": "Bearer",
							"type": "string"
						},
						{
							"key": "headerPrefix",
							"value": "Bearer ",
							"type": "string"
						},
						{
							"key": "addTokenTo",
							"value": "header",
							"type": "string"
						}
					]
				},
				"method": "DELETE",
				"header": [
					{
						"key": "Authorization",
						"value": "Bearer [YOUR_ACCESS_TOKEN]"
					},
					{
						"key": "Accept",
						"value": "application/json"
					},
					{
						"key": "Content-Type",
						"value": "application/json"
					}
				],
				"body": {
					"mode": "raw",
					"raw": "{\"name\":{\"familyName\":\"Bhat2\",\"givenName\":\"sri5\"},\"password\":\"Test@1!123\",\"primaryEmail\":\"srbhat5@test.com\"}"
				},
				"url": {
					"raw": "https://www.googleapis.com/admin/directory/v1/users/<EMAIL_ID_GSUITE_USER>",
					"protocol": "https",
					"host": [
						"www",
						"googleapis",
						"com"
					],
					"path": [
						"admin",
						"directory",
						"v1",
						"users",
						"<EMAIL_ID_GSUITE_USER>"
					]
				}
			},
			"response": []
		}
	],
	"protocolProfileBehavior": {}
}
Now you have POSTMAN collection ( in JSON format ) will see how to build connector out of it.
Step 1:
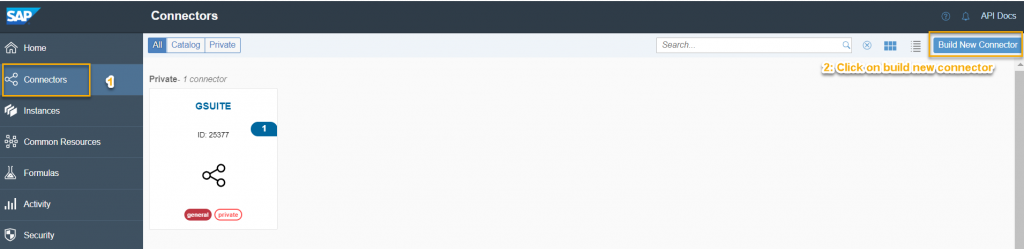
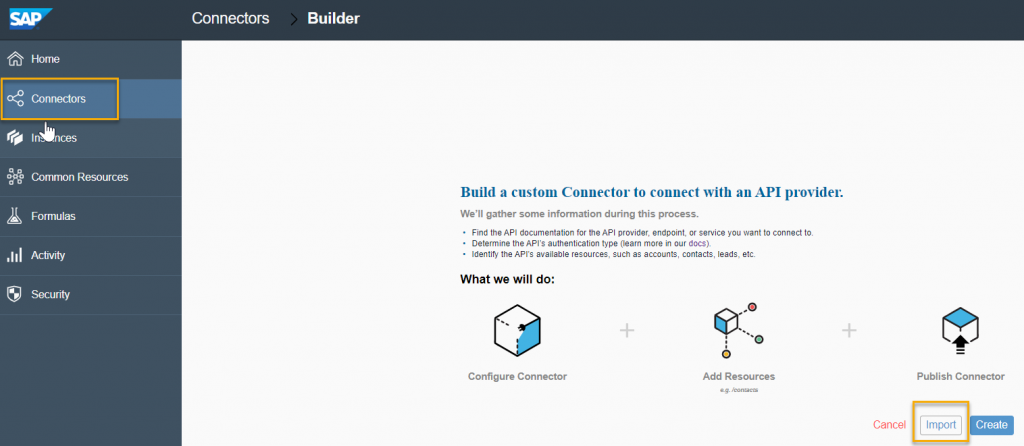
Login to your Open Connectors instance and navigate to Connectors-> Click on Build New Connector
Step 2:
Click on Import to select JSON you have exported from POSTMAN
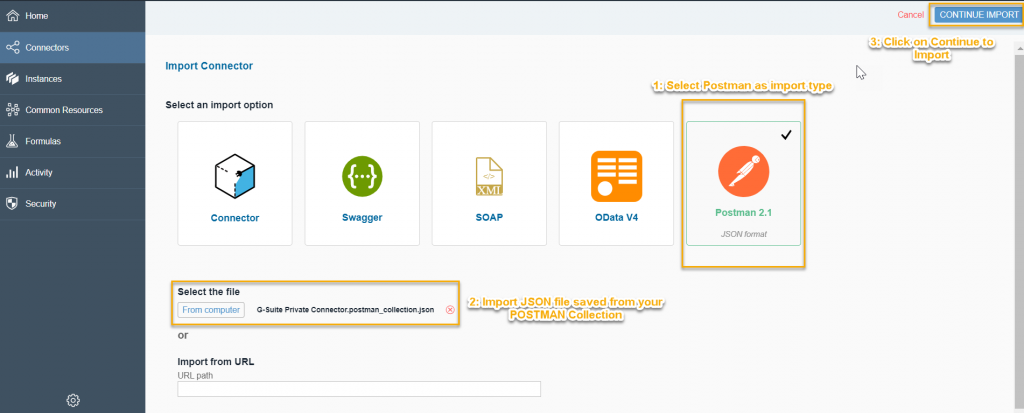
Step 3:
Select Postman 2.1 as import option and select the file from your local machine.Click on CONTINUE IMPORT once you are done.
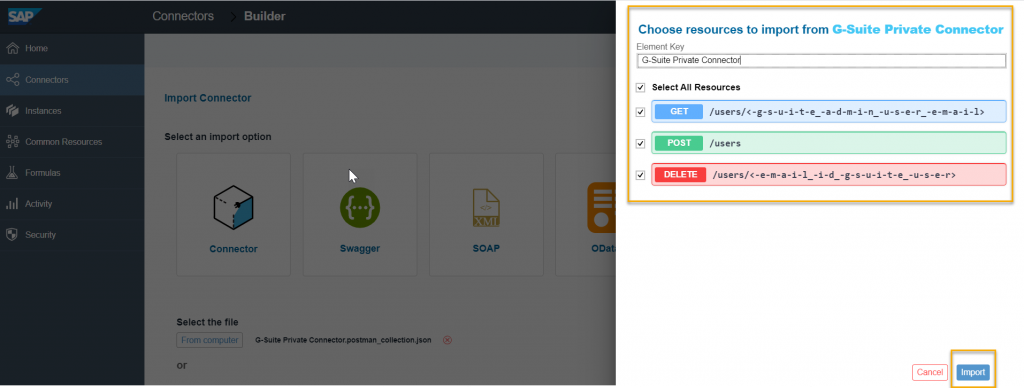
Step 4:
Rename your element ( if you want ) and Select All Resources as shown below
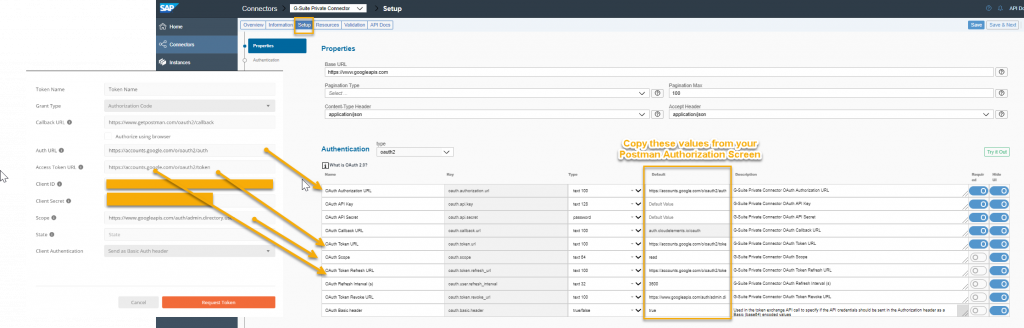
Step 5:
Now Setup Screen appears and copy paste the values from your POSTMAN as per mapping shown below.Save it once done.
Step 6:
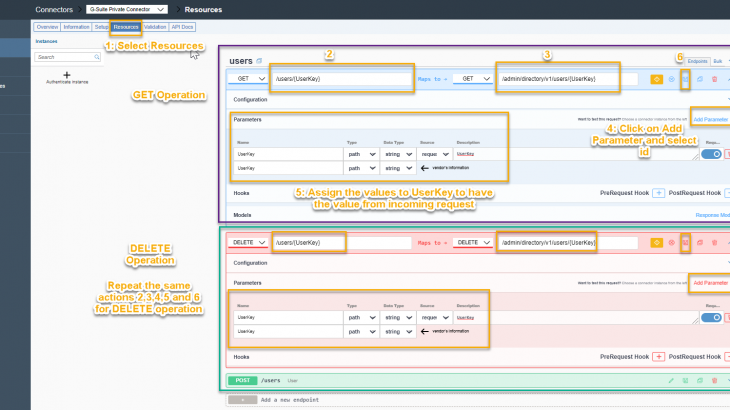
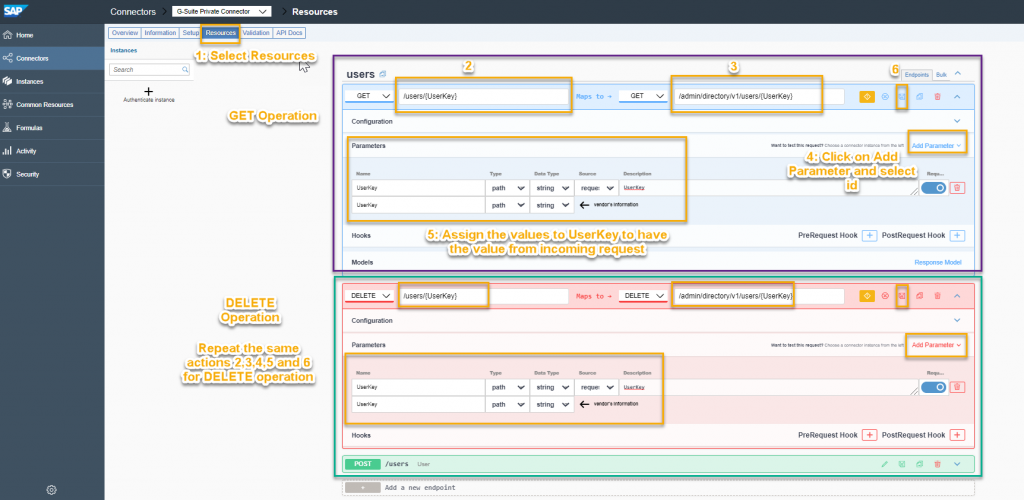
Now Navigate to Resources and update the GET and DELETE operation to take input from your request ( User email id to be read or to be deleted ) .
Step 7:
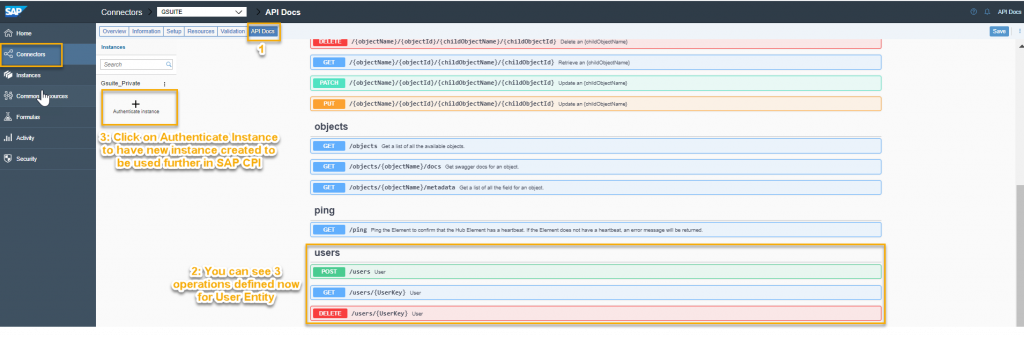
Navigate to API Docs to visualize your newly created APIs look and click on Authenticate Instance to create new instance
Step 8:
New window opens and populate Client ID and Client Secret you have generated from G-Suite Developer console.

Step 9:
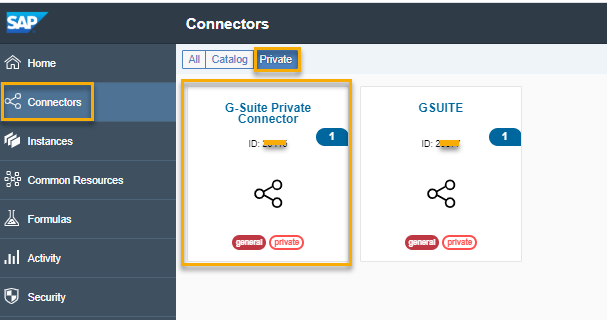
Now you have successfully created G-Suite Element from your POSTMAN and it will be visible in Private section of overview page.
Make sure you have copied User,Organization and Element secret from instance you have created to configure SAP CPI Open Connectors Adapter.


