Overview
Identity providers like Auth0 allow companies to “outsource” the hard work of hosting an own identity provider solution by leveraging open standards like Oauth2 and JWT (JSON Web tokens).
By that you could establish a trust between your API and Auth0 as authentication service. An API client would then authenticate itself in Auth0 and obtain a JWT (JSON Web) token.
The client would then invoke your service with the token holding all its claims and your service would verify that token and grant/deny access to the API according to the claims.
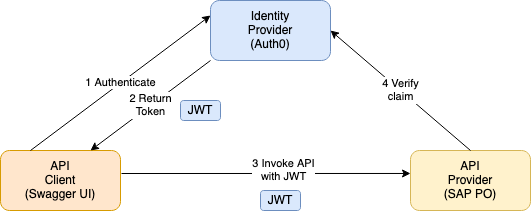
This blog shows how to implement such a scenario with a JWT token provider like Aut0 to safeguard Open APIs hosted on SAP PO with the KaTe RESTful adapter.
As Identity provider we’ll use Auth0 for this example but keep note that this would work with any identity provider that supports the JWT standard (e.g. WSO2 Identity server, Keycloak or Azure AD).
This architecture could serve as a viable alternative to publish on premise SAP APIs with the OpenAPI standard independent of any product stack as it works with any API management and/or identity solutions.
Setup Auth0
First we set up our solution on Auth0.
Auth0 let’s you define a so called domain (subdomain of Auth0 or if you have own DNS names a custom domain name).
Within that domain you can define an API artifact that should be secured (here our API hosted on SAP PO) and a client application that wants to authenticate against Auth0 and invoke the service on SAP PO.
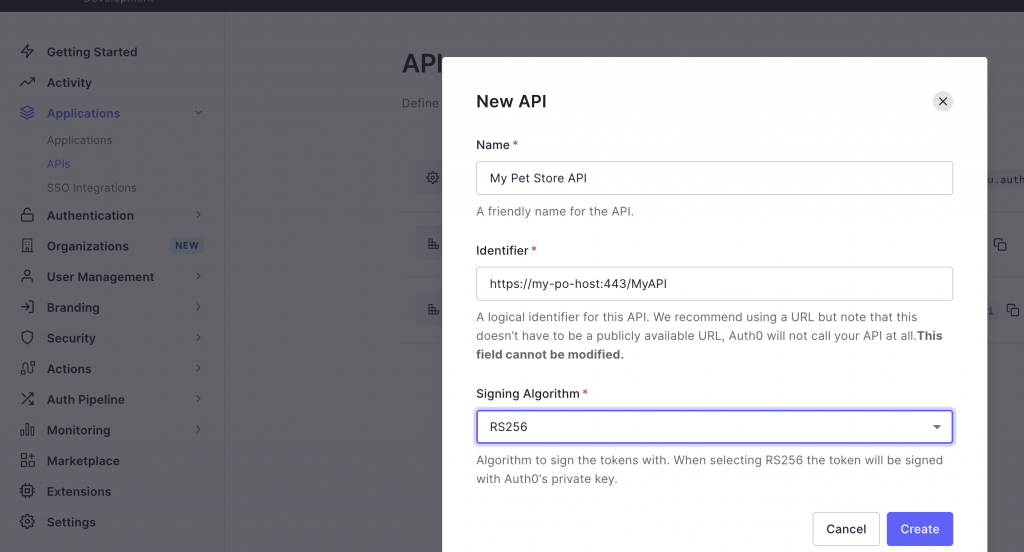
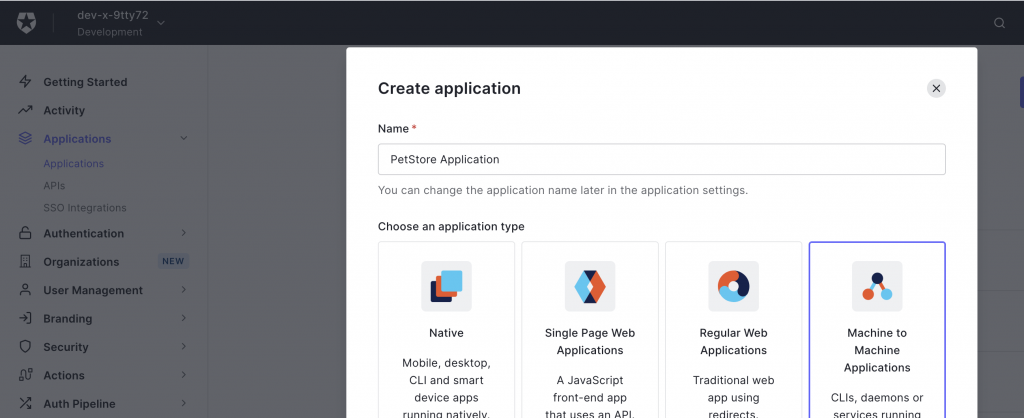
Create API
In the Auth0 UI, we first need to create an API artifact that represents the API we want to secure (here Petstore API) and we use the RS256 (SHA 256) signing algorithm and “https://my-po-host:443/MyAPI” as audience identifier.
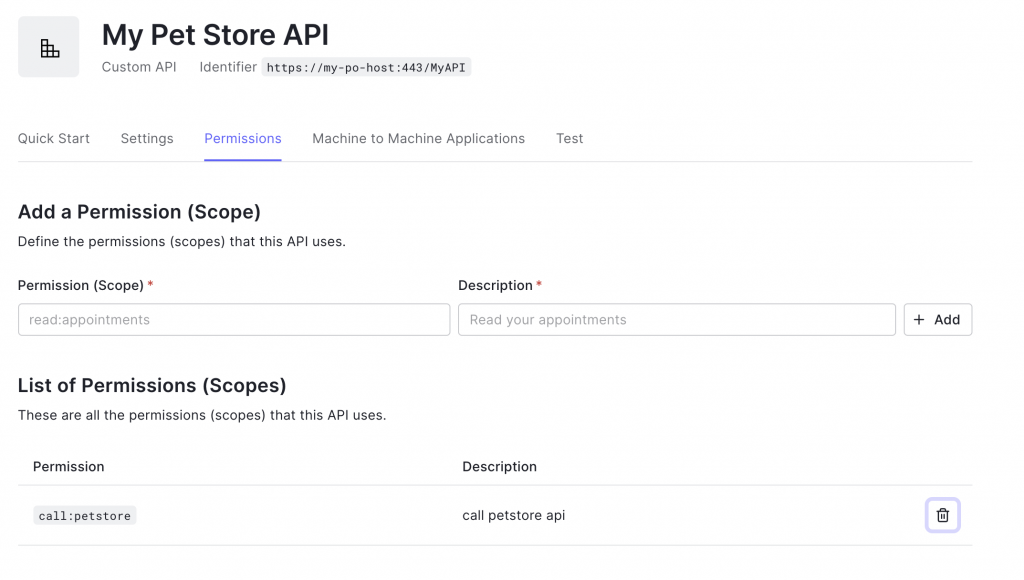
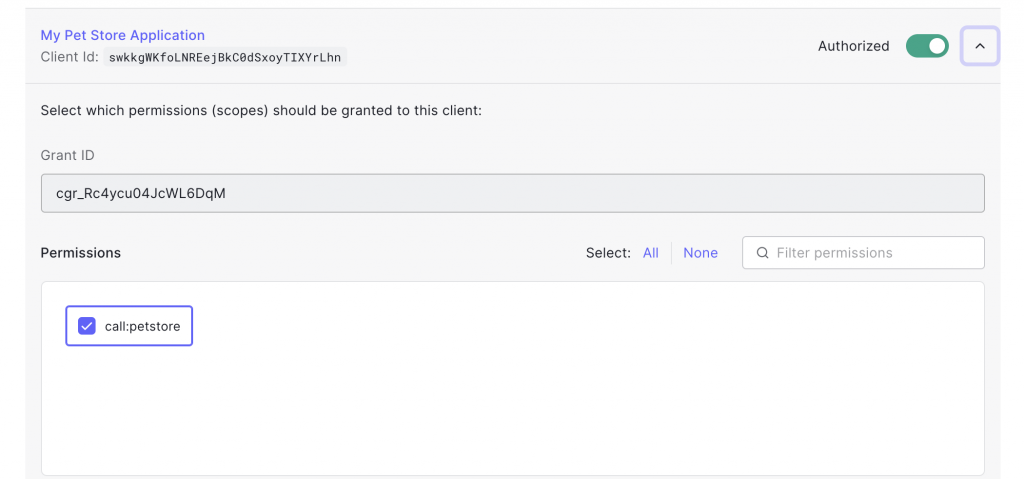
Under the permissions tab we also create one scope called call:petstore for accessing the API which we’ll use at a later stage to narrow permissions on API and operation level.
Then we create an application artifact in Auth0 that references this API. The application itself is a representation of a client application that wants to invoke our API (here for Machine to Machine communication).
We assign the API to the application with its scope call:petstore checked.
This enables us at a later stage to obtain the JWT tokens including the scope call:petstore that our API will check to allow or to deny API access.
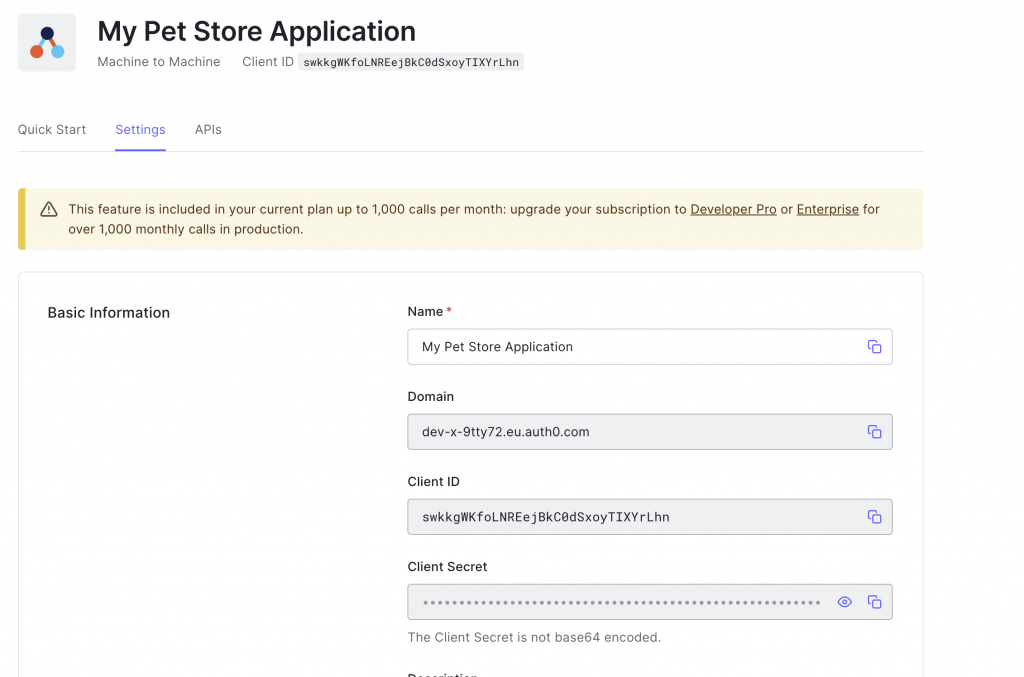
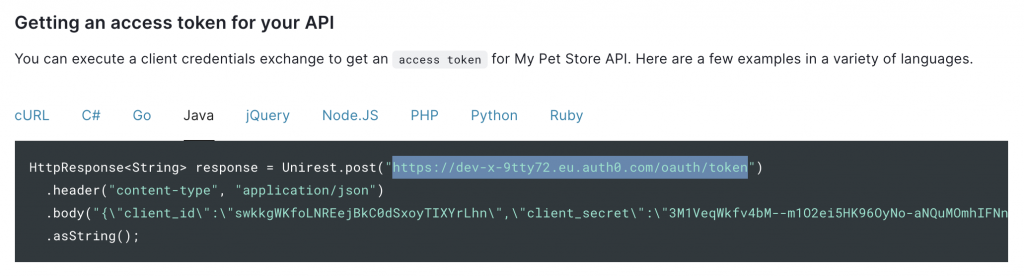
The next page gives us all the credential information that our client needs in order to fetch a token via an Oauth2 client credentials grant
- client Id
- client secret
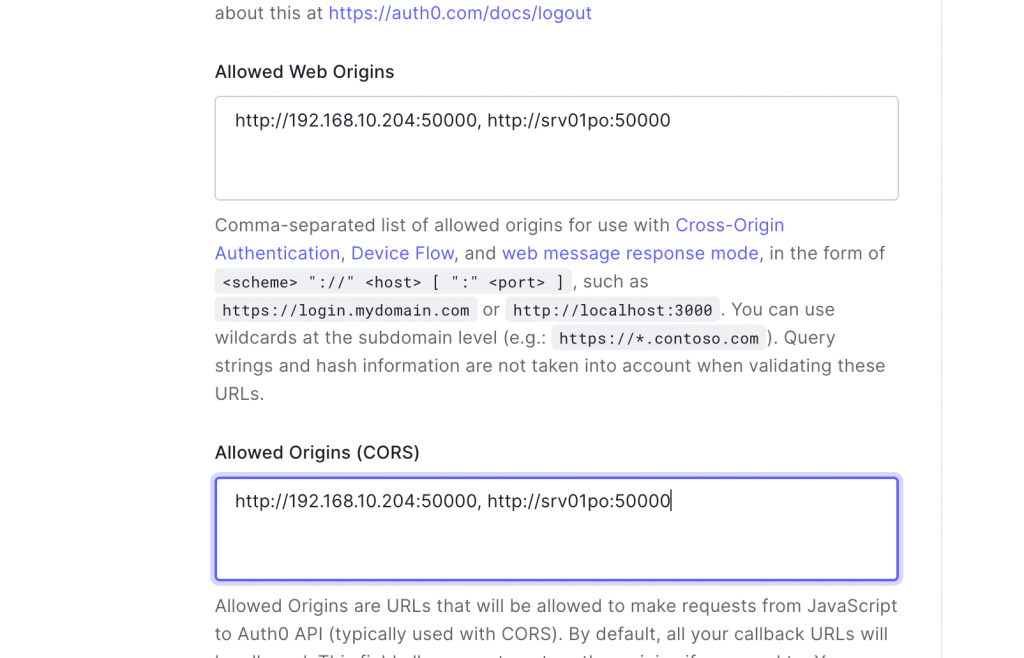
As we would like to test with our Swagger UI running on top of SAP PO instead of a full blown client application, we’ll include its hostname/IP in the CORS/Allowed Web Origins (Swagger UI is loaded from SAP PO and requests access from there to Auth0 via XMLHttpRequest from the WebUI).
Configure a RESTful sender channel
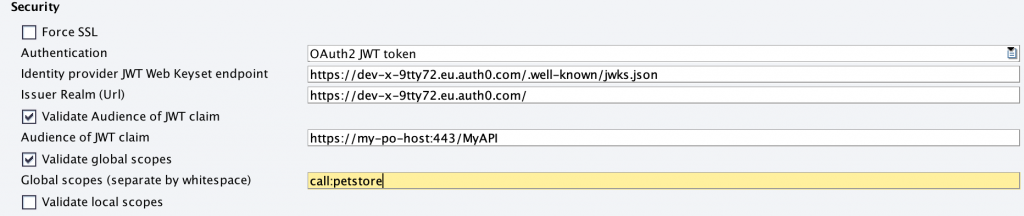
We change the authentication option to “OAuth2 JWT token”.

This allows us to configure
- The JWT Web key set URL of Auth0 (“Where can i verify tokens”?)
- Issuer Realm URL (“Who issued the token”?)
- Audience (“Who is allowed for this token usage”?)
The Web key set URL in Auth0 is composed of your domain name and the path “/.well-known/jwks.json”.
The domain name is setup initially during setup of your Auth0 account.
https://YOUR_DOMAIN/.well-known/jwks.jsonIn our example https://dev-x-9tty72.eu.auth0.com/.well-known/jwks.json
The Issuer Realm URL is simply the domain name itself as an URL (here: https://dev-x-9tty72.eu.auth0.com/), the audience is the audience that we want to allow in our API and we set in our Aut0 API configuration (https://my-po-host:443/MyAPI)

For now we leave all other finer grained validation check boxes empty as we just want to verify the JWT token is from the right origin in Auth0 and for the right audience.
Security of OpenAPI definition
In order to test the API directly (simulating a client) we also need to instruct our Swagger UI via Open API definition to show us to this option.
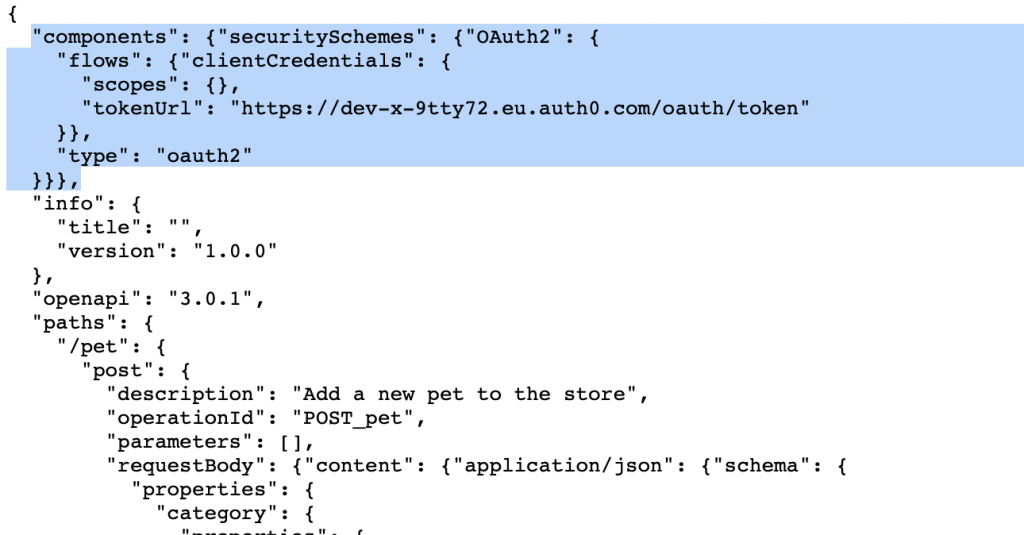
In order to let the adapter include the security information in the Open API definition, we additionally check the checkbox “Add Security to OpenAPI description”. This will add the necessary security mechanisms to invoke this API automatically to the OpenAPI definition published from SAP PO.
The channel configuration shows an option to configure the oauth2 grant type & token endpoint a client should use (and will show up then in the API definition security section)

Auth0 provides us this information under the “quick start” tab of the application
Note that Auth0 uses a field audience additionally specific to Auth0 that is needed to fetch the token in a client credentials grant.
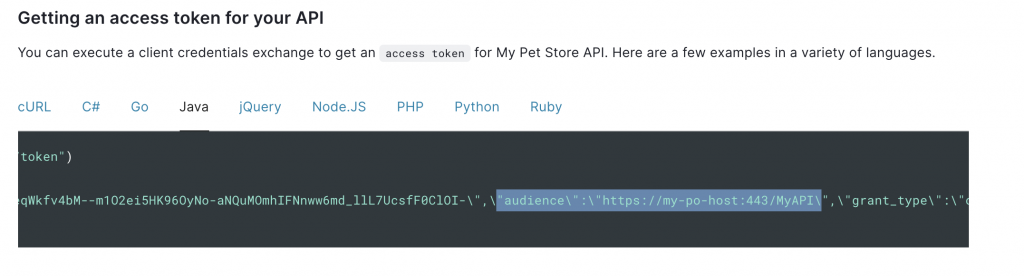
We use this information to configure the channel publishing options with an additional audience parameter.

Open the Swagger UI and authenticate
Now we open our published Open API definition on PO again which will show us the “Authorize” symbol on the upper right

If we click the link for our JSON open API definition we see the security section included into the definition
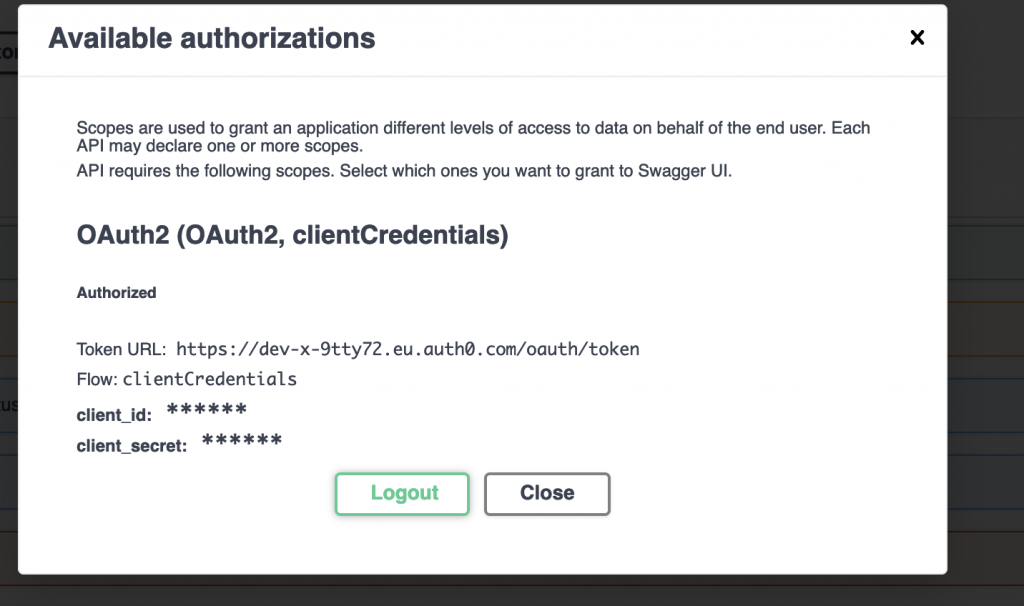
If we click on it, it will ask us to submit our client credentials to authenticate against Auth0 as any client would be required to. Swagger UI then caches the generated access tokens for a our test calls.

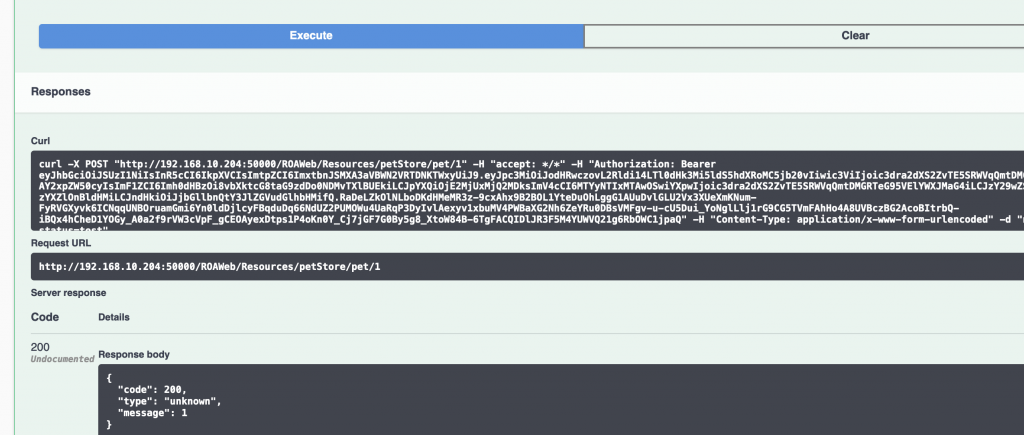
Now we invoke the service GET /pet/{petId}
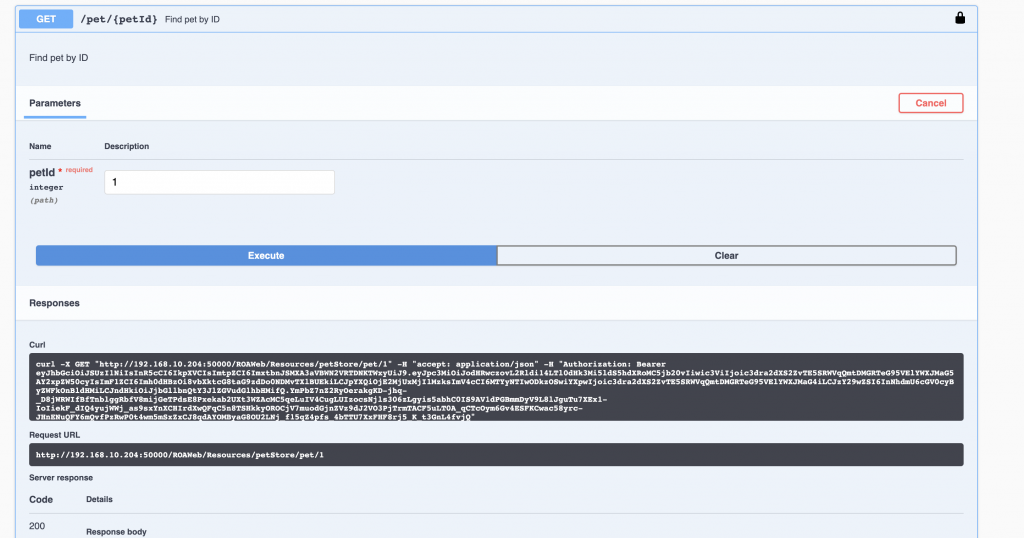
We see it worked!
The swagger UI used the fetched token and added the authorization header with the token from Auth0 when invoking the service (see curl line)
At invocation time the sender channel verifies the token’s signature to the public key obtained from the JSON Web key set URL of Auth0 and then validates the issuer and audience passed.
Depending on the output it will allow or deny access.
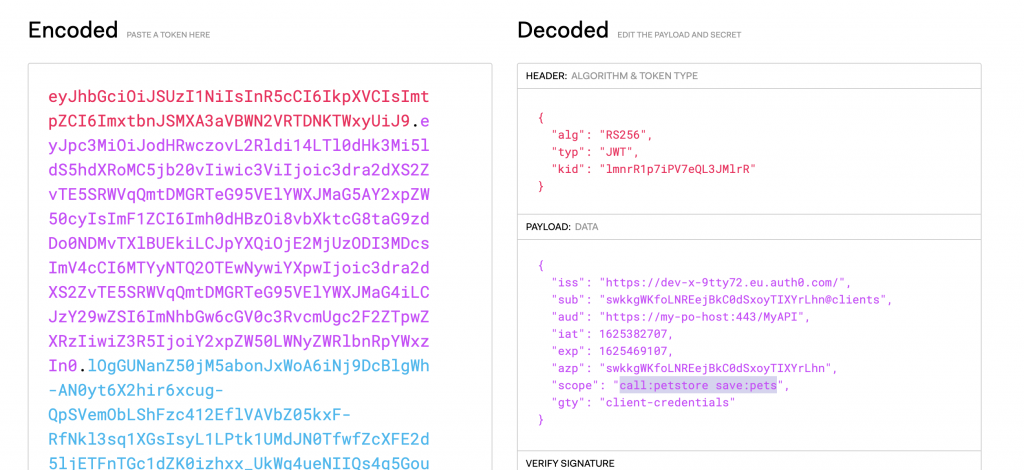
Now let’s have a look at the token itself and the details of validation:

If we copy and paste it into the JWT debugger on https://jwt.io/ we can analyze all of its contents.
A JWT token is nothing less then a Base64 encoded string with 3 sections:
- header
- payload
- signature of its contents
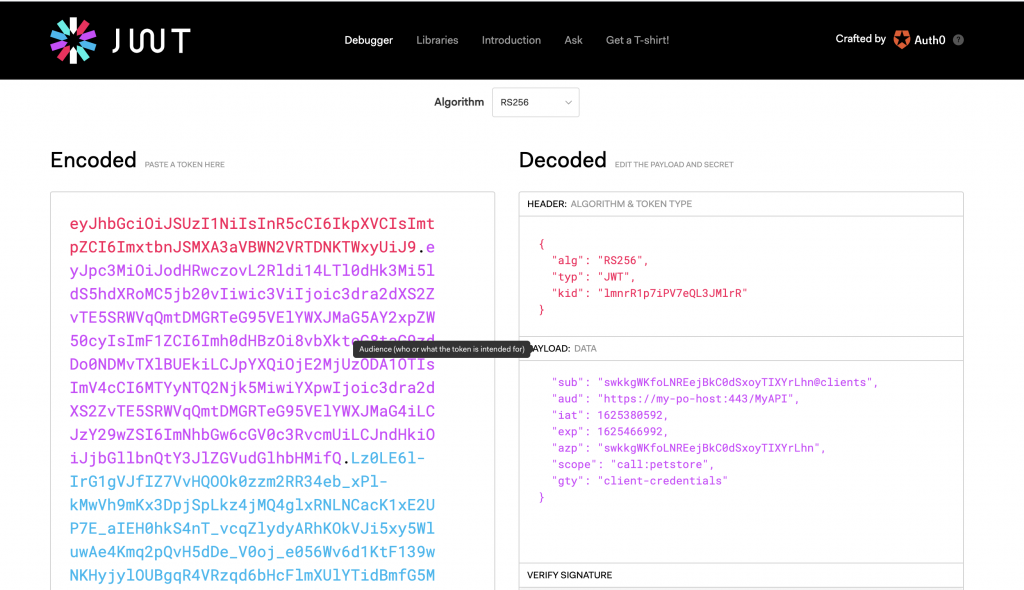
The header tells us the signing algorithm and public key id (kid). The payload shows the issuer realm (iss) audience (field aud), scope (call:petstore) and a few other things.
At runtime the adapter uses this information to lookup (and cache) the public key and verify the token signature first. If the signature is valid it will validate the issuer field and audience and then allow or deny access.
Then depending on your settings in your channel it will further validate
- scope on global level (for the whole API)
- scope on API operation level
Restrict an API to a scope
Now let’s do something more sophisticated and let our adapter validate the scope of the tokens.
Without setting any scope validation settings in our channel, the token would allow us to invoke any API operation on this API as long as its valid.
As we saw the token already contains a scope we defined in Aut0: call:petstore that we could use.
Now we want to restrict the API:
- to verify the scope “call:petstore” for any API operation
- (2nd step) verify to write a pet (e.g. POST /pet/{petId}) only with a special scope
We set now call:petstore as global scope in our channel(global means applicable for the whole API):
If we invoke the API again it will be successful again as the token already contains the scope “call:petstore”.
Restricting an API operation on a scope
Now let’s additionally define which scope is needed to write to pets.
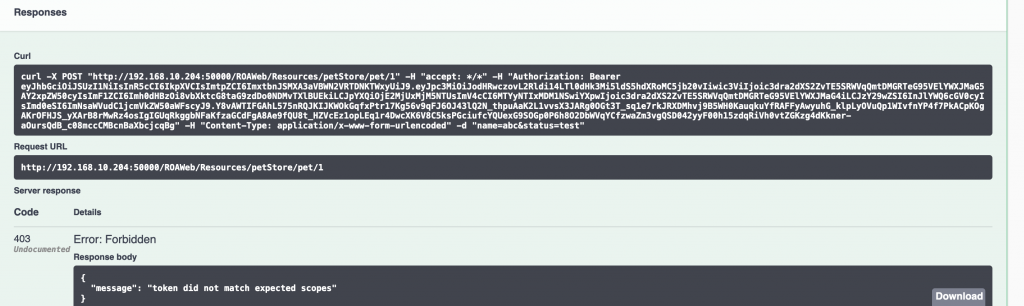
By that we define a scope save:pets to restrict the operation POST /pet/{petId} as a local scope. A caller would then need the save:pets scope to invoke this operation or is otherwise denied.

If we invoke now any other API operation, e.g. GET /pet/{petId} again, it will still work as the global scope “call:petstore” is applicable.
If we invoke POST /pet/{petId} it doesn’t work as our token only holds the call:petstore scope, but not the new save:pets scope. The API returns 403 “token did not match expected scope”.
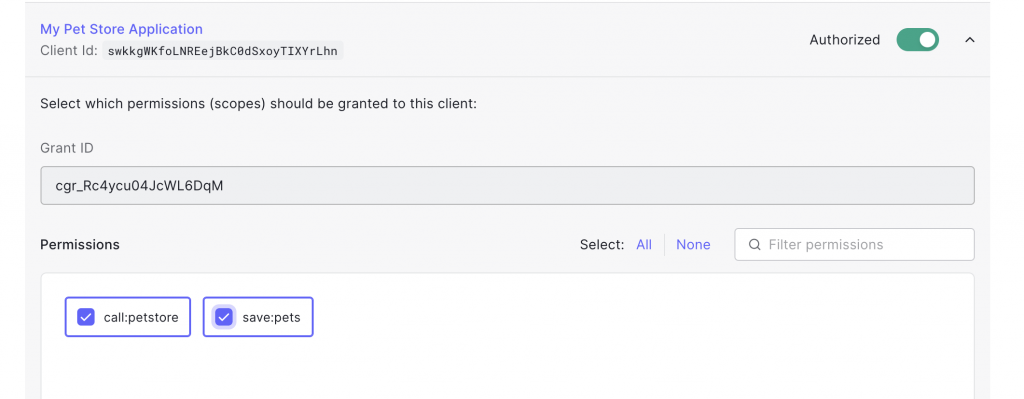
Now let’s go back to Auth0 and add a “save:pets” scope permission to the API.
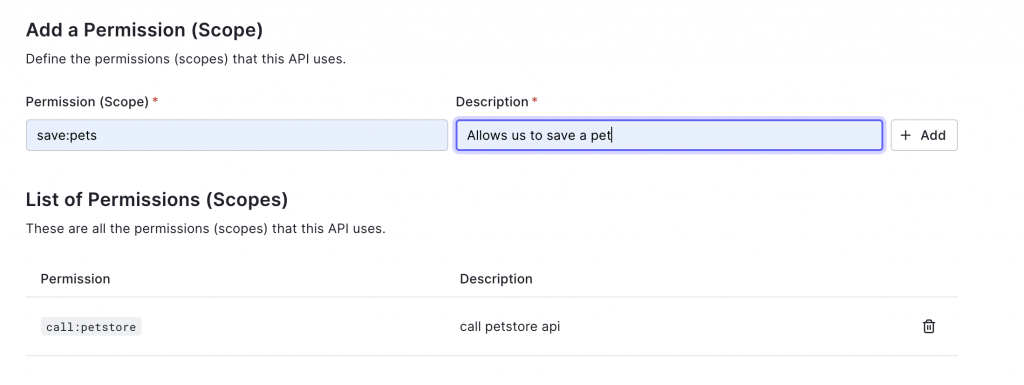
And let’s allow the application as client also to use it.
Then let’s hit logout from our Swagger UI Authorize button as otherwise our old token with only one scope is still held in the SwaggerUI browser cache as long as its not expired.
Now we login again with the same credentials. This will force a new logon and thereby a new token that contains the updated settings (both scopes that we just added)
If we invoke the POST /pet/{petId} operation again it’s now successful as the token contains now the added scope.
The sender channel can validate the POST /pet/{petId} invocation as valid with the scope save:pet and let’s it pass
If we look at our raw token again we can also see the added scope save:pets that allowed us this operation