This blog post is on regarding how to develop SAP Fiori Elements (List Report Page/Object Page) using Northwind OData service in visual studio and creating an extension and adding annotations in detail.
1. Introduction to Fiori:
Fiori is a streamlined application, delivering a role-based user experience that can be personalized across all lines of business, tasks and devices.
SAP Fiori elements generates SAP Fiori apps at runtime from existing OData services. It uses annotations to define attributes and relationships among your data. It is built on top of SAPUI5.
You can use app extensions to extend your app. These are made by developers during the creation of an SAP Fiori elements-based app, using framework extension points provided by SAP Fiori elements. The extensions are made, for example, using manifest changes or SAPUI5 extension points, depending on the floorplan.
2. Use of Fiori Elements(List report/object page)
SAP Fiori elements is a framework that comprises the most commonly used floorplan templates and is designed to:
⦁ Speed up development by reducing the amount of frontend code needed to build SAP Fiori apps.
⦁ Drive UX consistency and compliance with the latest SAP Fiori design guidelines.
List report:
users can view and work with a large set of items searching, filtering, sorting, and grouping.. It is often used as an entry point for navigating to the item details, which are usually shown on an object page.
Main Elements of the List Report:
⦁ Application header
⦁ Filter bar with variant management and a generic Share menu that includes the following actions:
⦁ Send Email
⦁ Save as Tile
⦁ Table
⦁ Footer toolbar that can include optional actions.
Object Page:
The object page lets you display, edit, and create objects, as well as save drafts. It is suitable for both simple objects and more complex, multi-faceted objects.
users can switch from display to edit mode to change the content. To create a new object, users can switch to create mode.
Main Elements of object Page:
⦁ Dynamic page header
⦁ Navigation bar
⦁ Content area
⦁ Shell bar
⦁ Breadcrumbs
⦁ Global actions
⦁ Header content
⦁ Footer toolbar.
3. Steps to create Development of Sap fiori Elements Apps (list report and object page)
- Supported tool to develop SAP Fiori Elements App- Visual Studio.
- Create Northwind destination on Sap Cloud Platform.
- Goto Visual studio, click on view-command Palette->Fiori:Open Application Generator
⦁ select floorplan-List report object page
⦁ Configure the data source and select a service.
Data Source : Connect to an OData Service
OData service URL: https://services.odata.org/V2/Northwind/Northwind.svc/
⦁ Select entity i.e., Main entity and navigation entity.
⦁ Configure the main project attributes.
Explanations To add some of the annotations and Extensions to list report page
1. Adding column to a table using annotation.
2. For adding custom action in list report page.
3. Adding custom filter to filter bar.
4. Add a new filter field to the Filter Bar.
5. Adding custom column to table using extensions.
In visual studio->click on view->command palette->Fiori:Open Guided development->Select Project name
1. Add a new column to a table:
Select Add new Column to table -> Select entity name and property name and click on apply.
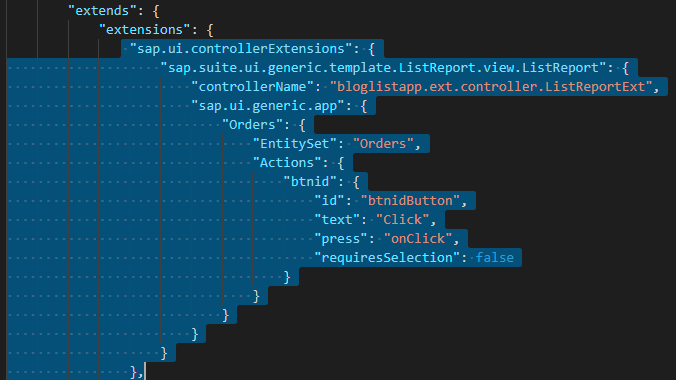
2. For adding custom action in list report page:
Select custom action to a page using extension->
step 1: Give page type and function name and click on apply. new extension entry for the controller created.
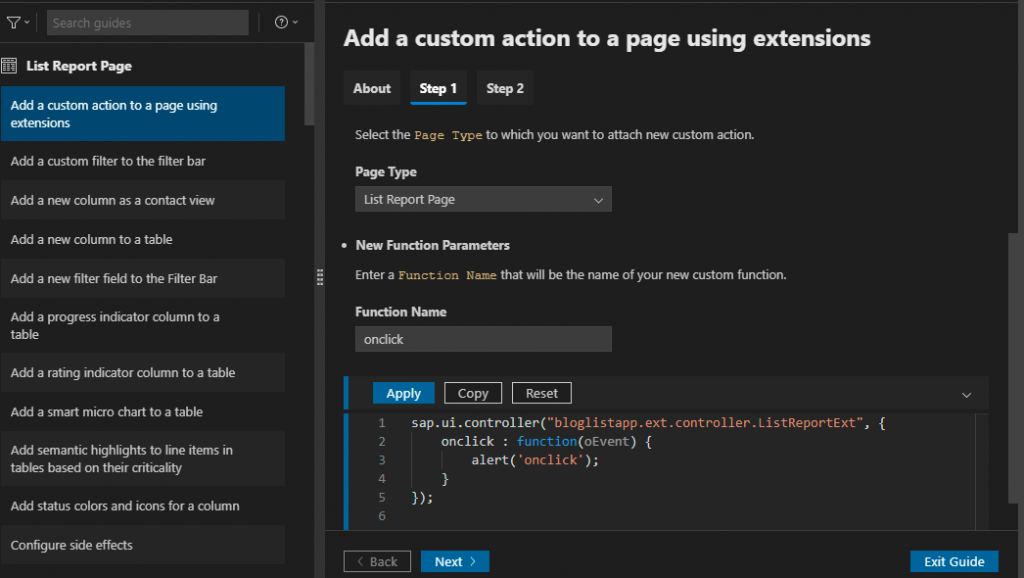
step 2: Give entity set and New action parameters and click on apply.
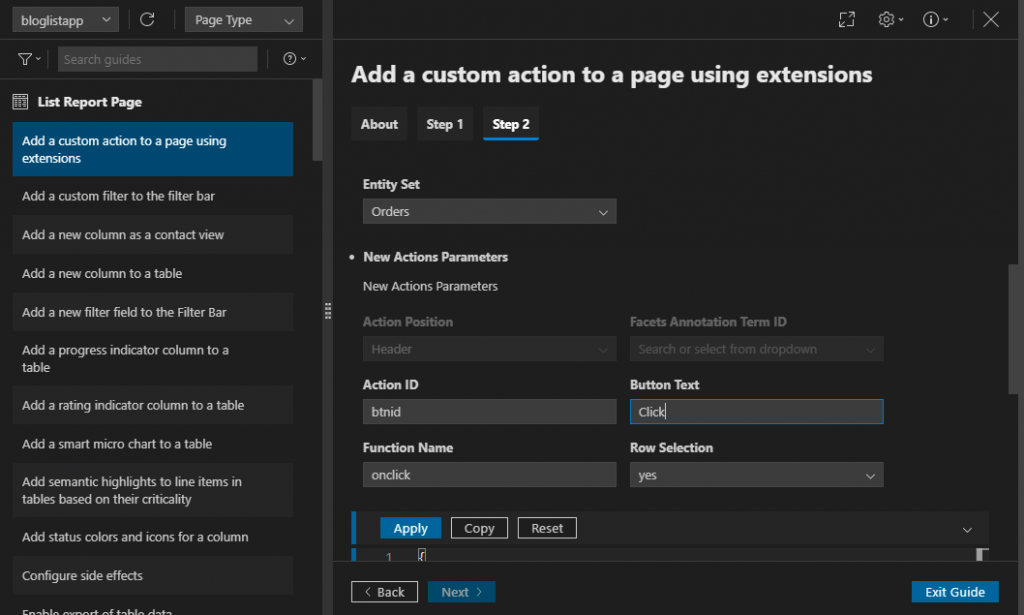
step 3: New extension entry will be created in manifest and make requiresSelection:false
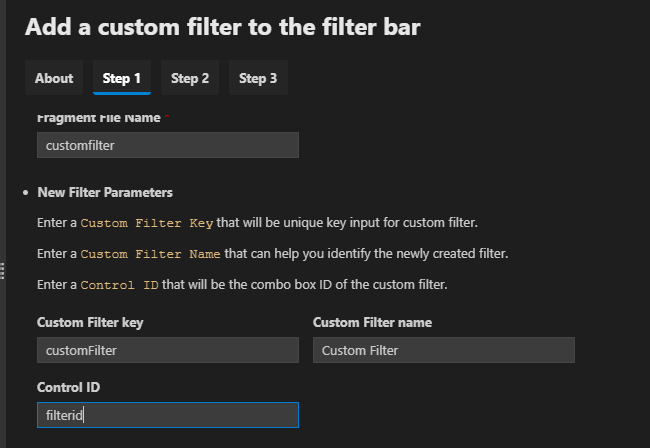
3. Adding custom filter to filter bar:
step 1: Enter name of fragment and new filter parameters
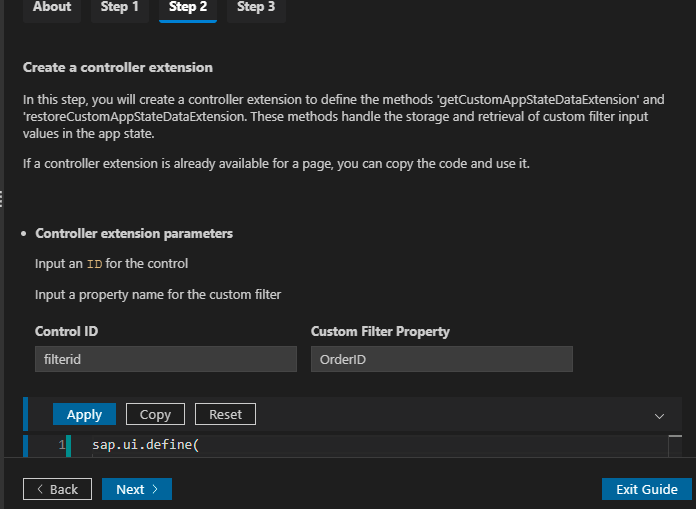
step 2: Create a controller extension Parameters
Input an ID for the control
Input a property name for the custom filter
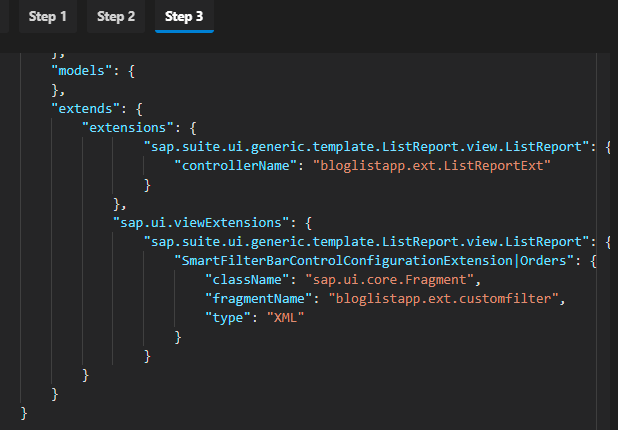
step 3: Add extensions to the manifest
In this step, you will add the newly created filter fragment and controller extension to the manifest.
To do filtering for custom filter below is the code
<core:FragmentDefinition xmlns="sap.m" xmlns:smartfilterbar="sap.ui.comp.smartfilterbar" xmlns:core="sap.ui.core">
<smartfilterbar:ControlConfiguration groupId="_BASIC"
key="customFilter"
label="Custom Filter"
visibleInAdvancedArea="true">
<smartfilterbar:customControl>
<ComboBox id="filterid" items="{/Orders}">
<core:Item key="{OrderID}" text="{OrderID}"/>
</ComboBox>
</smartfilterbar:customControl>
</smartfilterbar:ControlConfiguration>
</core:FragmentDefinition>
In controller file:
onBeforeRebindTableExtension:function(oEvent){
debugger;
var tableData = oEvent.getParameters().bindingParams;
var oSeletControl = this.byId("filterid").getSelectedItem();

if(oSeletControl){
let sVal = oSeletControl.getText();
var newFilter = new sap.ui.model.Filter( "OrderID",
sap.ui.model.FilterOperator.EQ,
sVal );
tableData.filters.push( newFilter );
}
}
4. Add a new filter field to the Filter Bar:
step1:Select an Entity Type and New Selection Field Parameters

code will be generated in annotation file
<Annotations Target="NorthwindModel.Order">
<Annotation Term="UI.SelectionFields">
<Collection>
<PropertyPath>ShipName</PropertyPath>
<PropertyPath>ShipName</PropertyPath>
</Collection>
</Annotation>
</Annotations>
In controller file for filtering setting value as default:
onInitSmartFilterBarExtension: function (oEvent) {
debugger;
var filter = this.getView().byId("listReportFilter");
var data = filter.getControlByKey("ShipName");
data.setValue("Hanari Carnes");
}
5. Adding custom column to table:
step 1: create a fragment file for custom column

step 2: create fragment file for custom cell adding for custom column

step 3: In manifest file define fragment file for column and cell extension

Here is the following extension list report page output screens:
output 1:
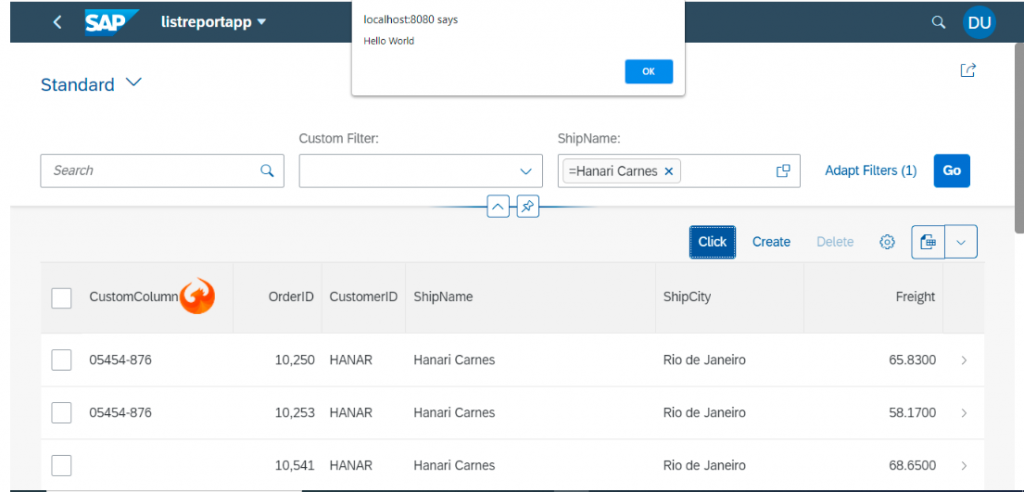
output 2:

Explanation To add some of the annotations and Extensions to object page
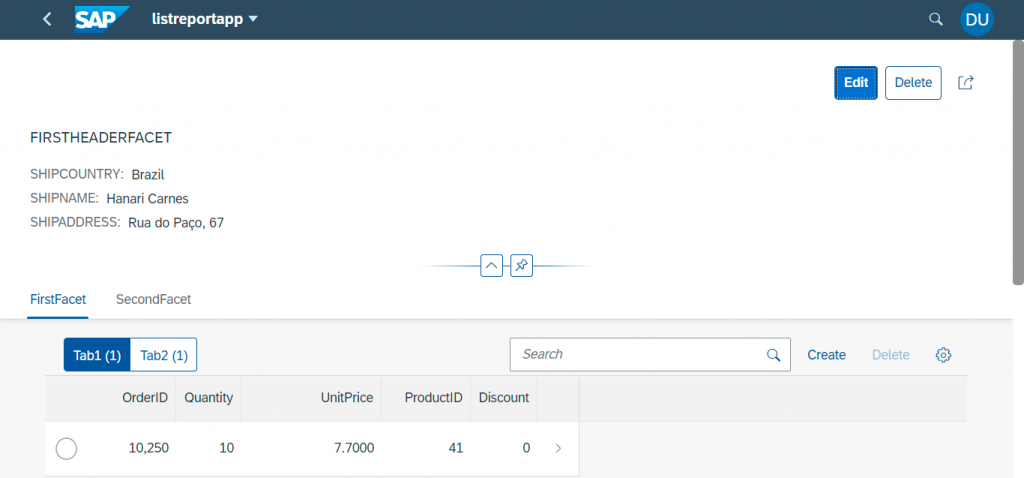
1.Adding header facet using annotation.
2.Defining two tables with filtered data.
3.Creating section using facet annotation.
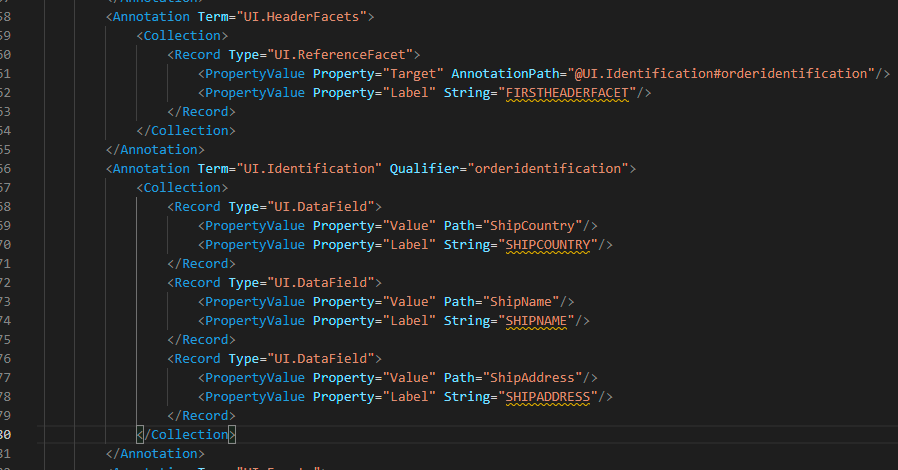
1. Adding header facet using annotation:
Using UI.Identification act as container for displaying data and UI.HeaderFacets and giving reference facet and annotation path to UI.Identification,Below is the code.
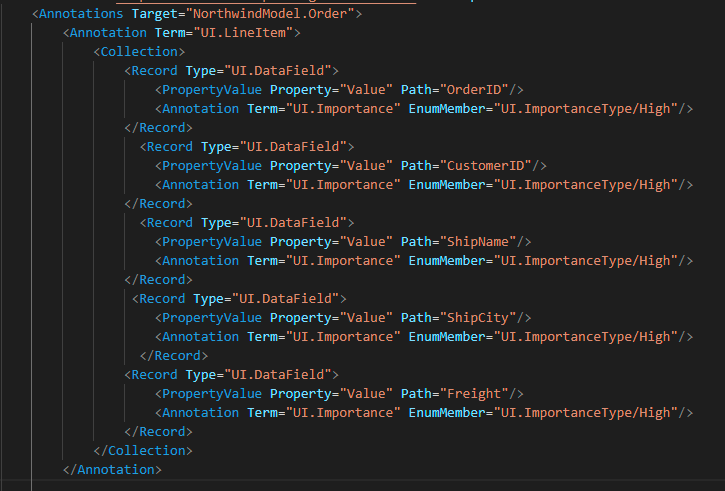
2. Defining two tables with filtered data:
<Annotations Target="NorthwindModel.Order_Detail">
<Annotation Term="UI.LineItem">
<Collection>
<Record Type="UI.DataField">
<PropertyValue Property="Value" Path="OrderID"/>
</Record>
<Record Type="UI.DataField">
<PropertyValue Property="Value" Path="Quantity"/>
</Record>
<Record Type="UI.DataField">
<PropertyValue Property="Value" Path="UnitPrice"/>
</Record>
<Record Type="UI.DataField">
<PropertyValue Property="Value" Path="ProductID"/>
</Record>
<Record Type="UI.DataField">
<PropertyValue Property="Value" Path="Discount"/>
</Record>
</Collection>
</Annotation>
<Annotation Term="UI.SelectionVariant" Qualifier="QLT">
<Record Type="UI.SelectionVariantType">
<PropertyValue Property="SelectOptions">
<Collection>
<Record Type="UI.SelectOptionType">
<PropertyValue Property="PropertyName" PropertyPath="Quantity"/>
<PropertyValue Property="Ranges">
<Collection>
<Record Type="UI.SelectionRangeType">
<PropertyValue Property="Sign" EnumMember="UI.SelectionRangeSignType/I"/>
<PropertyValue Property="Option" EnumMember="UI.SelectionRangeOptionType/LT"/>
<PropertyValue Property="Low" Int="15"/>
</Record>
</Collection>
</PropertyValue>
</Record>
</Collection>
</PropertyValue>
<PropertyValue Property="Text" String="Tab1"/>
</Record>
</Annotation>
<Annotation Term="UI.SelectionVariant" Qualifier="QGT">
<Record Type="UI.SelectionVariantType">
<PropertyValue Property="SelectOptions">
<Collection>
<Record Type="UI.SelectOptionType">
<PropertyValue Property="PropertyName" PropertyPath="Quantity"/>
<PropertyValue Property="Ranges">
<Collection>
<Record Type="UI.SelectionRangeType">
<PropertyValue Property="Sign" EnumMember="UI.SelectionRangeSignType/I"/>
<PropertyValue Property="Option" EnumMember="UI.SelectionRangeOptionType/GT"/>
<PropertyValue Property="Low" Int="15"/>
</Record>
</Collection>
</PropertyValue>
</Record>
</Collection>
</PropertyValue>
<PropertyValue Property="Text" String="Tab2"/>
</Record>
</Annotation>
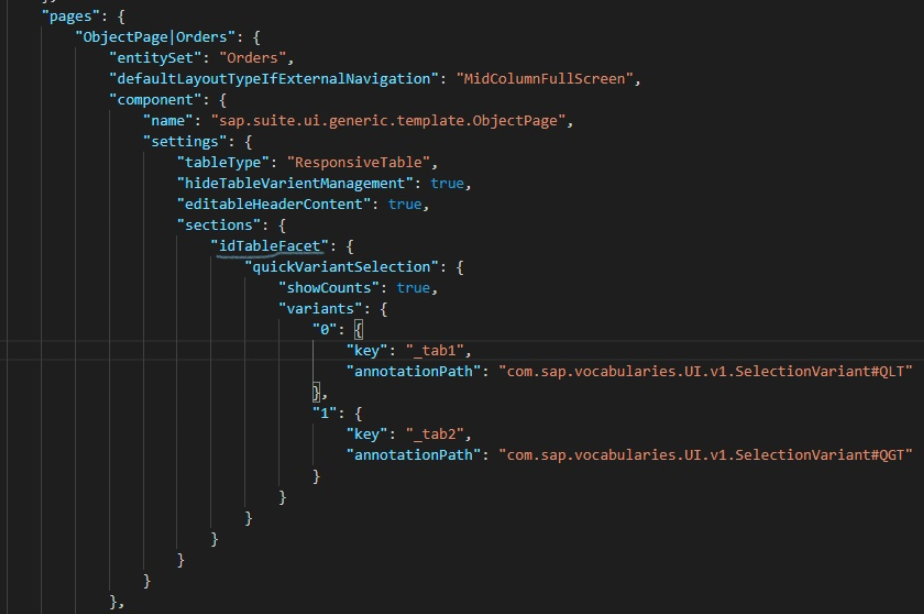
</Annotations>step 2: In manifest file define the below code in order page using sections part and give id of reference facet
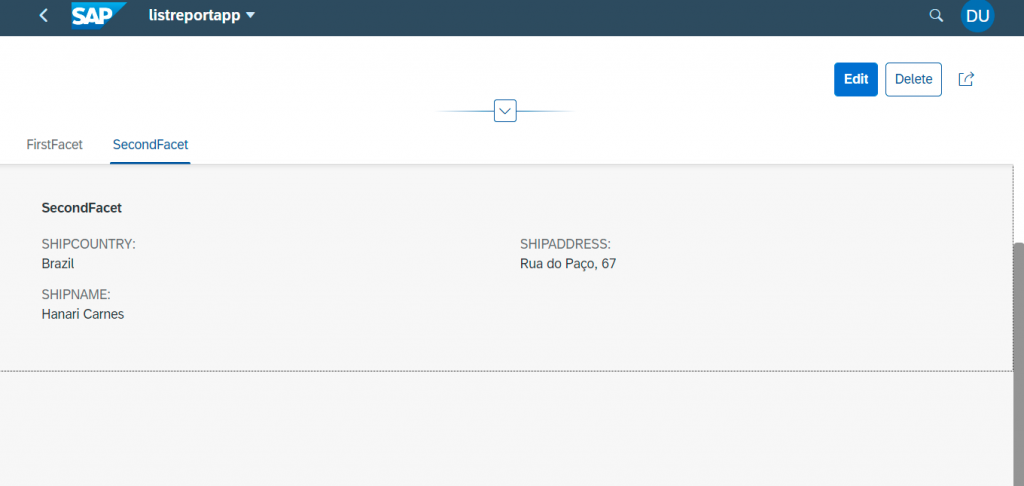
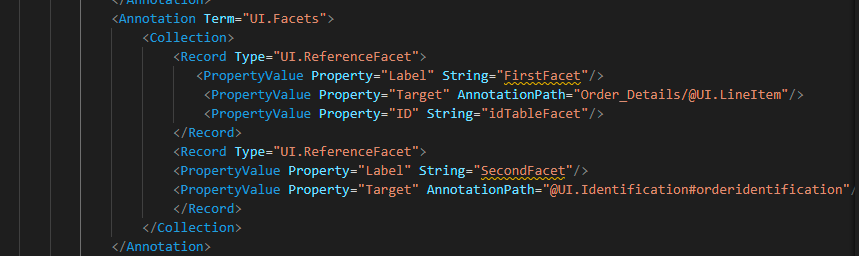
3. Creating section using facet annotation.
Here is the following object page extension output screen on navigating from list report to object page.
output 1:
output 2: