Prerequisites
SAP Data Quality Management, version for SAP Solutions
You will need an ABAP Add-on to enable the SAP Data Quality Management capabilities.
First check your S/4HANA version you have.
If you are using S/4HANA version 1809 or later, the ABAP Add-on we need is already installed, so you are good to go there. If not, you can download the Add-on and install it as instructed here.
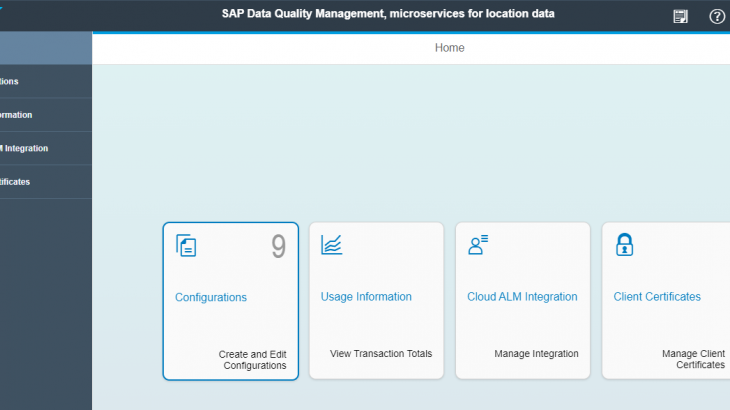
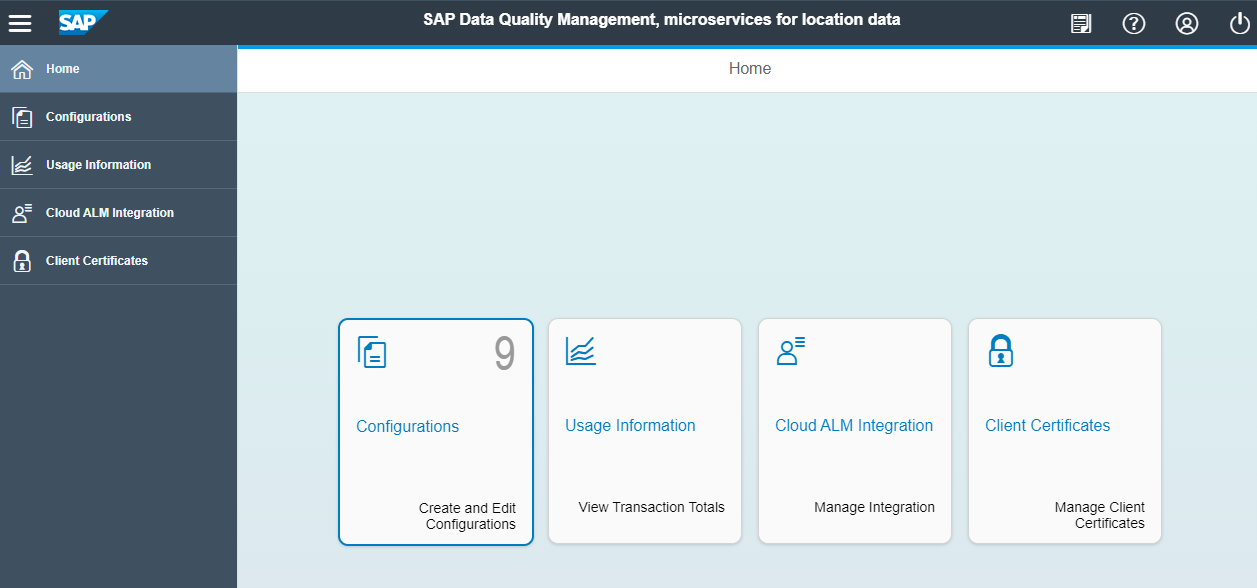
SAP Data Quality Management, microservices for location data
To use the microservices for location data, you will need to enable it within your SAP BTP subaccount. You can follow its documentation for the Neo environment or Cloud Foundry environment for the steps.
Next check your SAP_BASIS Component version on your SAP system.
Run the transaction code SPAM and check the Package level to show the installed software component versions and find the SAP_BASIS version.
The microservices for location data supports two types of authentication methods: OAuth 2.0 and Client Certificate. If you want to use OAuth 2.0 for authorization, you will need the SAP_BASIS version 756 or later. If you want to use a client certificate authentication, the SAP_BASIS version 740 or later should be enough, but you will be limited to use the microservices for location data in the Neo environment on SAP BTP.
The following steps describe the configuration to enable the microservices for location data in the Neo environment. The steps for the Cloud Foundry environment are similar but not exactly the same. Please follow the corresponding documentation.
Configuring Communication with the microservices for location data
We will be following along with the steps described in the documentation.
The first step prepares a client certificate used to communicate to the microservices for location data. Creating or reusing the existing client certificate can be determined by the ABAP administrators, hence I will not get into it here.
Once you have a correct client certificate, you can continue to the next steps.
Importing the certificate from your SAP system to SAP BTP subaccount
If you use client certificate authentication to connect to the microservices for location data, a client certificate needs to be exported from your SAP system and imported into the SAP BTP Neo subaccount. If you use OAuth for authentication, you can skip this step in place for OAuth 2.0 Settings in the later section.
Export the client certificate from your SAP system
Run the transaction code STRUST.
Double click SSL client SSL Client (Standard) and change to edit mode.
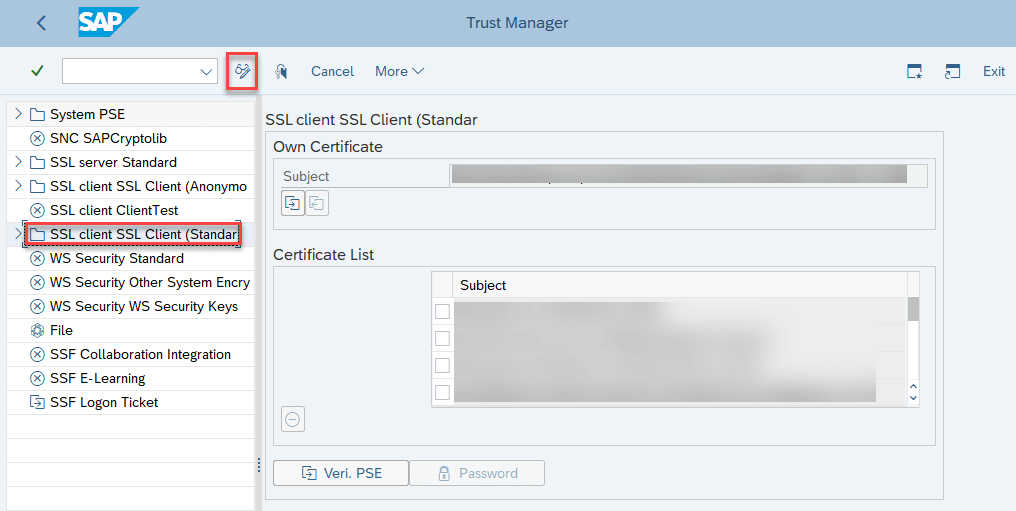
Double click the Subject under own Certificate will load the certificate under the Certificate section. Now you can export it.

Import the client certificate to SAP BTP subaccount
To import a client certificate to SAP BTP subaccount, the OAuth Client needs to be setup first.
Create API Client
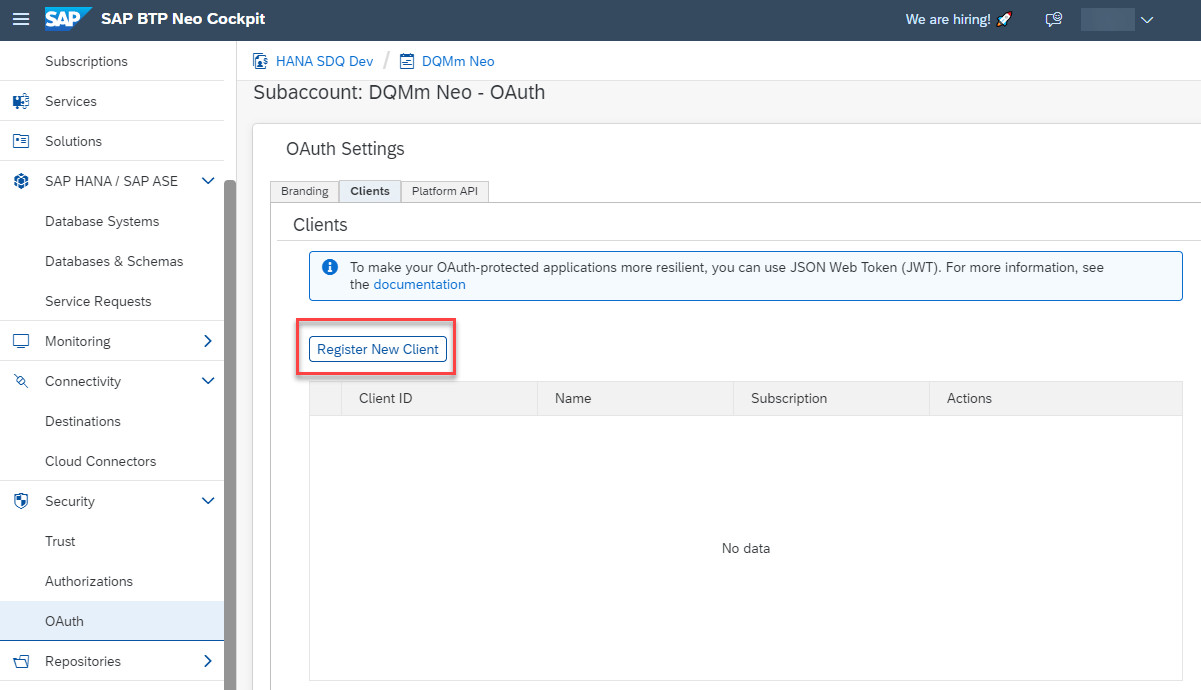
Go to the SAP BTP Net Cockpit, and navigate to the subaccount and the OAuth section.
Click Platform API and click Create API Client.
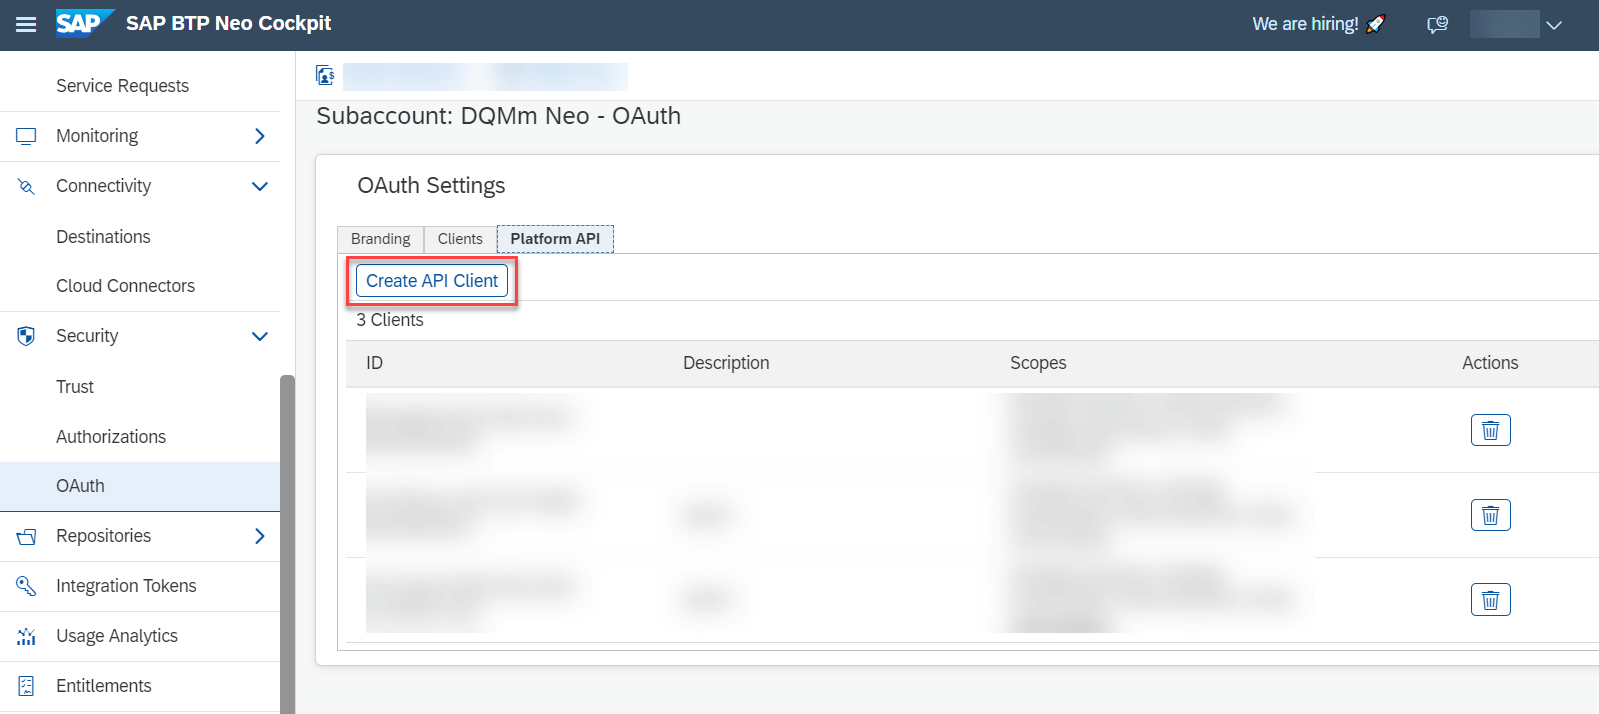
Check Keystore and Authorization Management. Save to close the dialog.
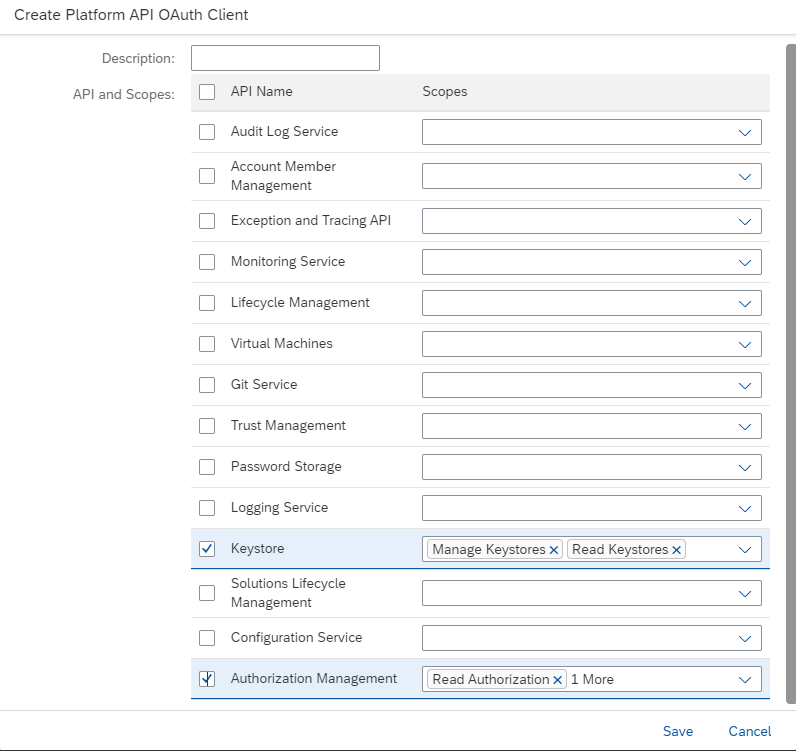
After the API Client is created, it will show the Keystore credentials only once. Note down the Client ID and Client Secret and do not lose it. These values will not show again.
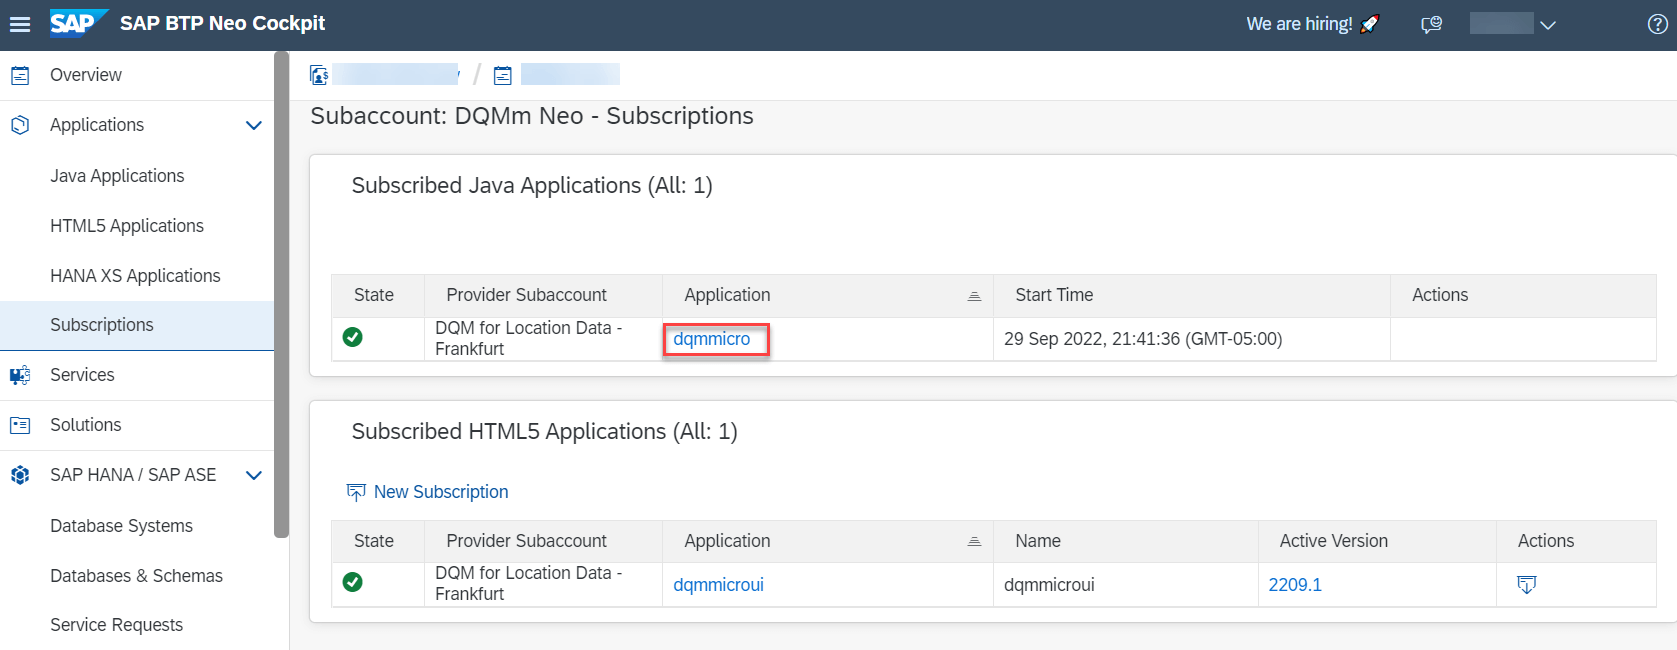
Open the UI Application for the microservices for location data
Go to the subaccount and the Subscriptions section. Click the link to the UI application.
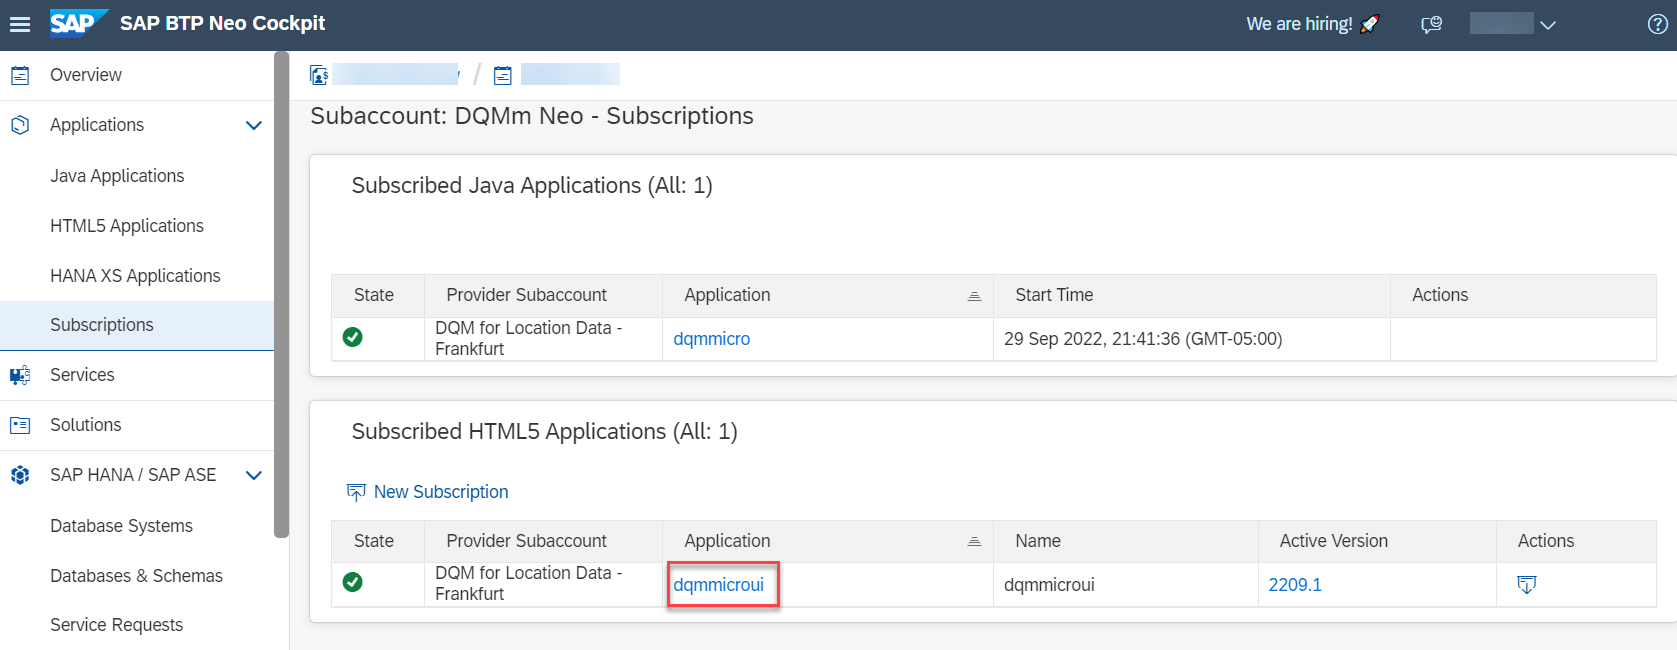
Click the Application URL to open the UI application.

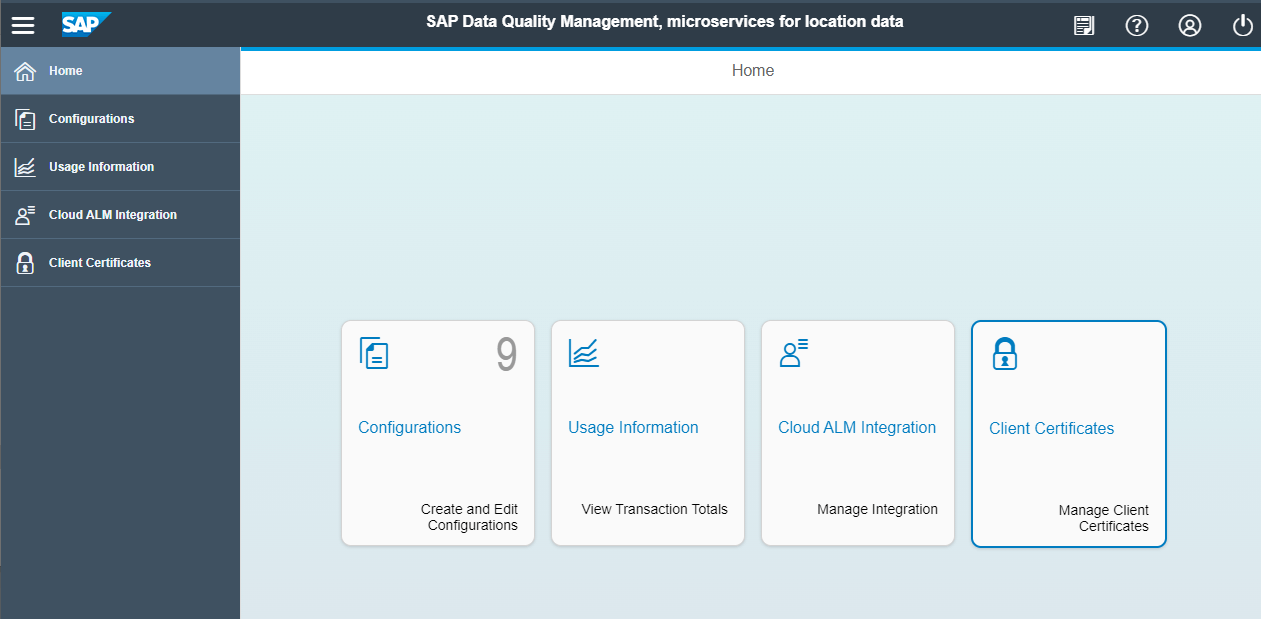
Import the client certificate to SAP BTP subaccount
From the UI application, go into the Client Certificates.
It will prompt you to enter the Keystore credentials you saved previously.
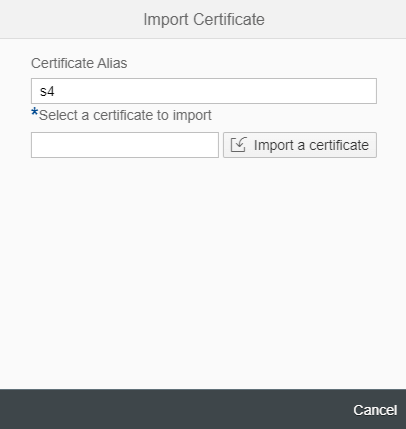
Click the Import a certificate icon to import a certificate.
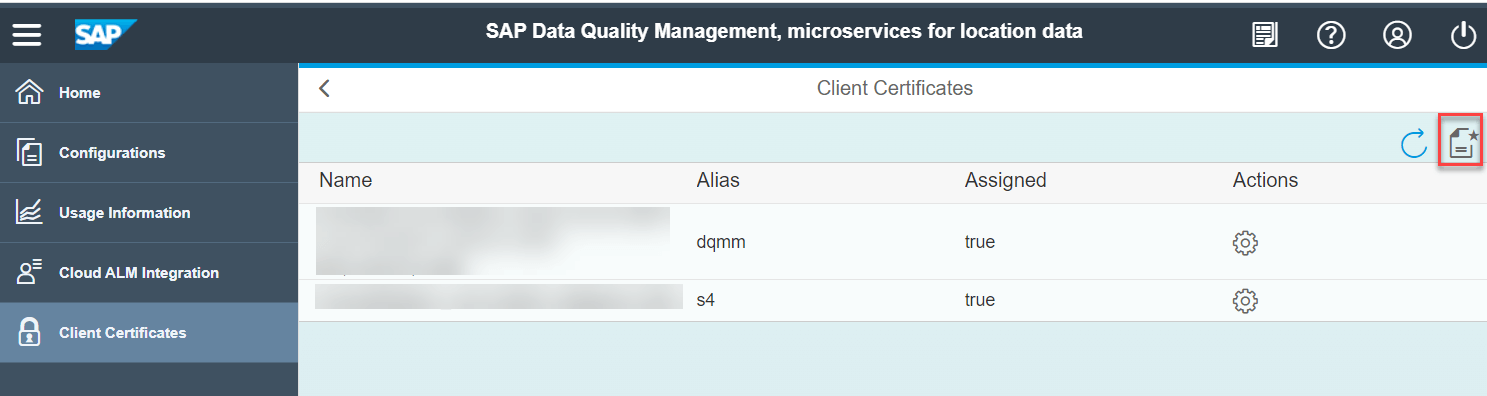
Name an alias and select the certificate you exported from your SAP system. Then click Import a certificate.
Importing the certificate from SAP BTP subaccount to your SAP system
To prepares your SAP system to trust the microservices for location data, a server certificate needs to be downloaded from the SAP BTP cockpit and imported into your SAP system.
Download the server certificate from the SAP BTP subaccount
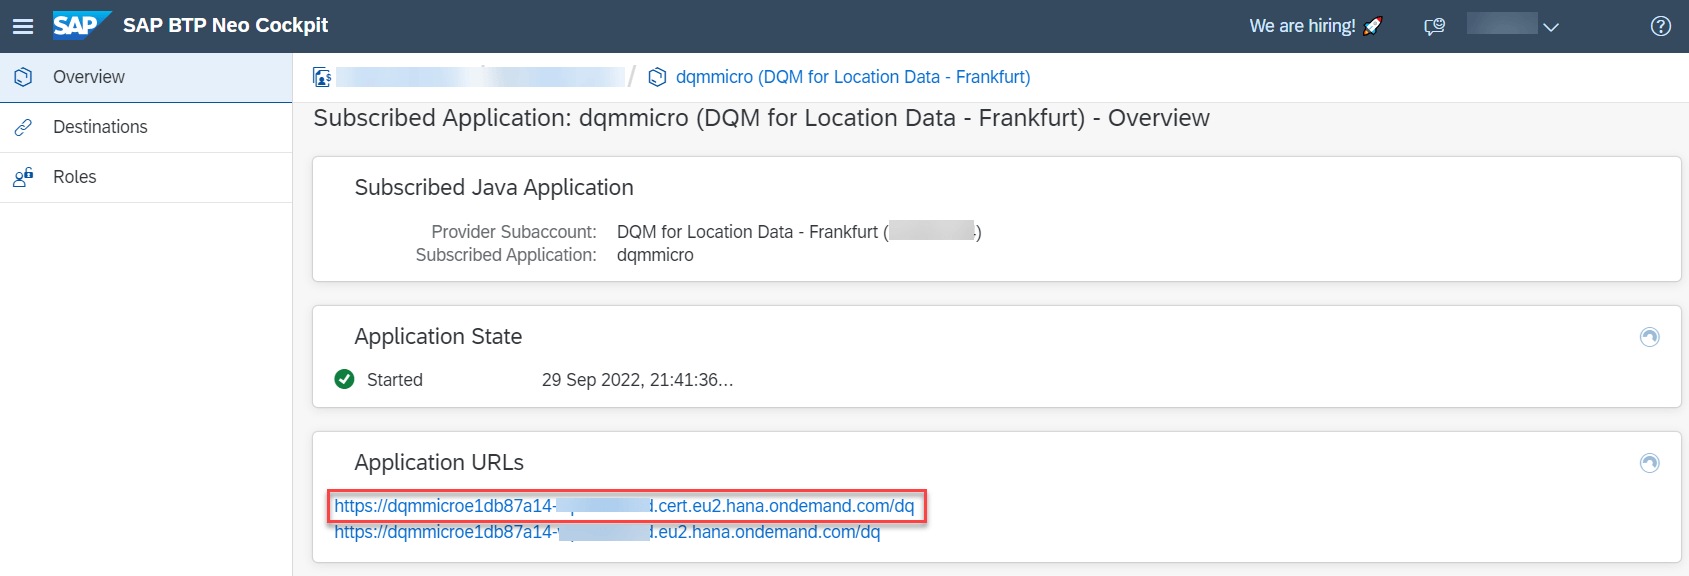
Go to your subaccount where the microservices for location data is subscribed.
Click the link for the Java application.
Click the link for the URL with [cert] in the path for client certificate authentication.
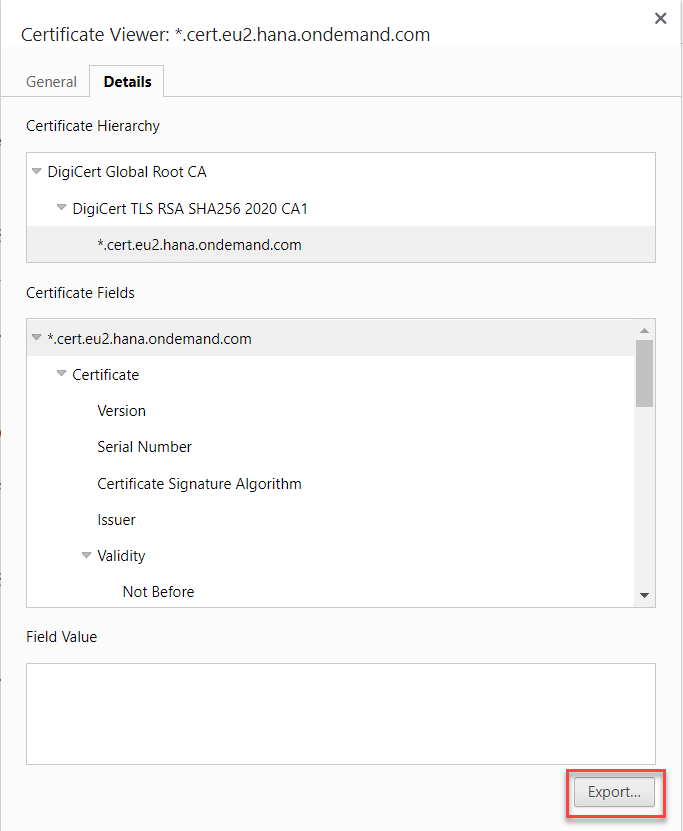
Now download the certificate from the browser.
Click the lock icon, go to Connection is secure, and Certificate is valid.
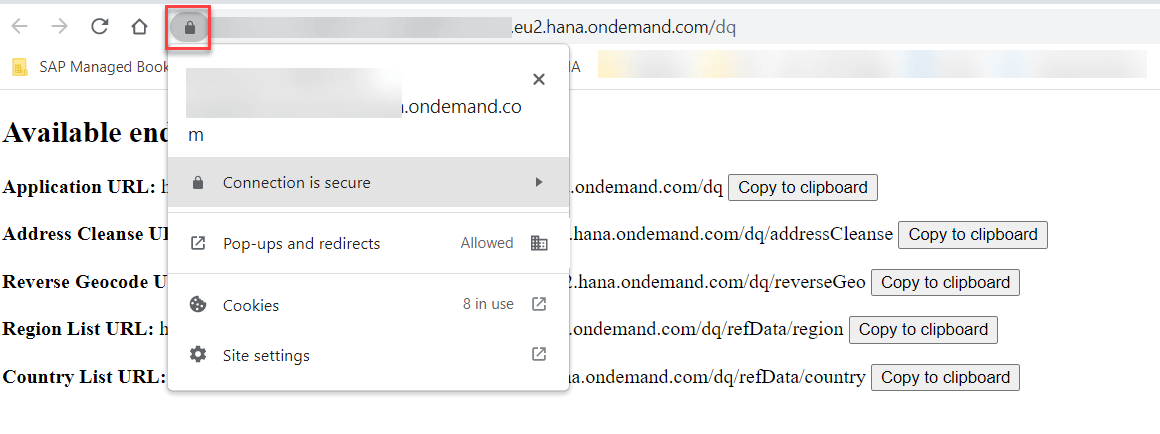
You will get to the Certificate Viewer dialog. Go to Details and Export the certificate.
Import the server certificate to your SAP system
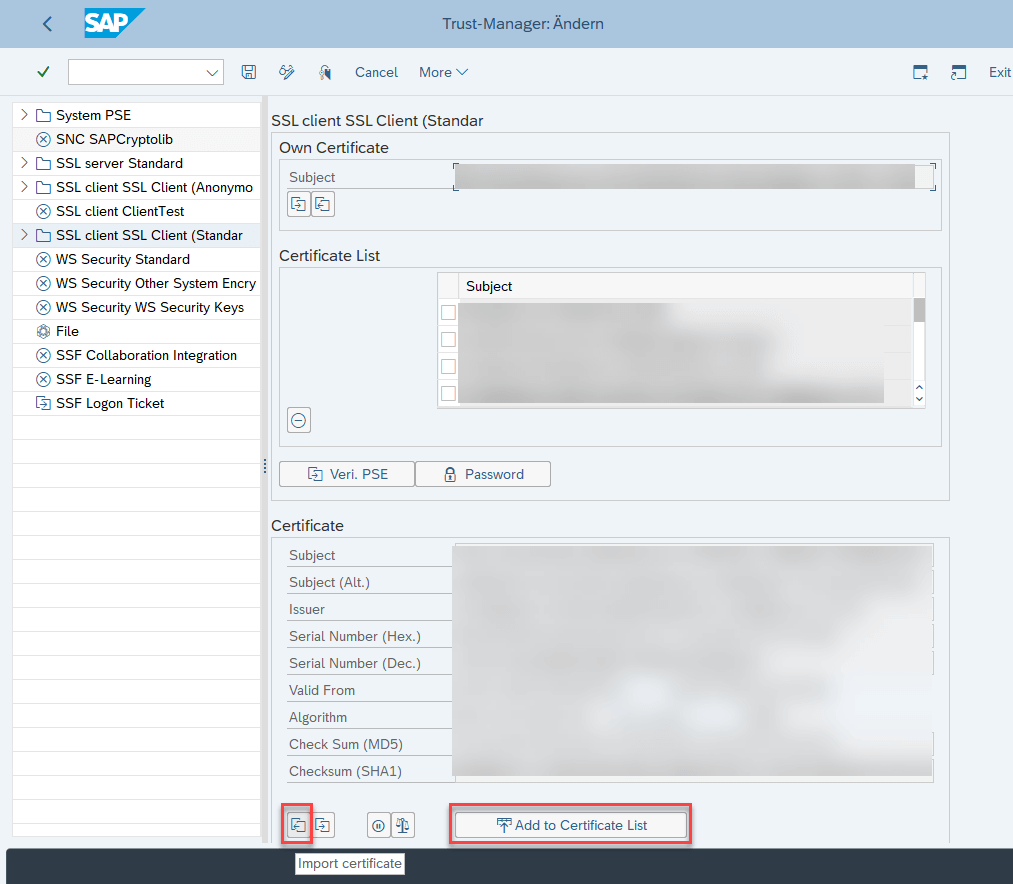
Go back to your SAP system where you ran the transaction code STRUST.
While still in the edit mode, import the certificate you just downloaded. Then click Add to Certificate List and Save.
Set up an RFC Destination
Now you can set up the RFC destination to connect to the microservices for location data. You can follow this page.
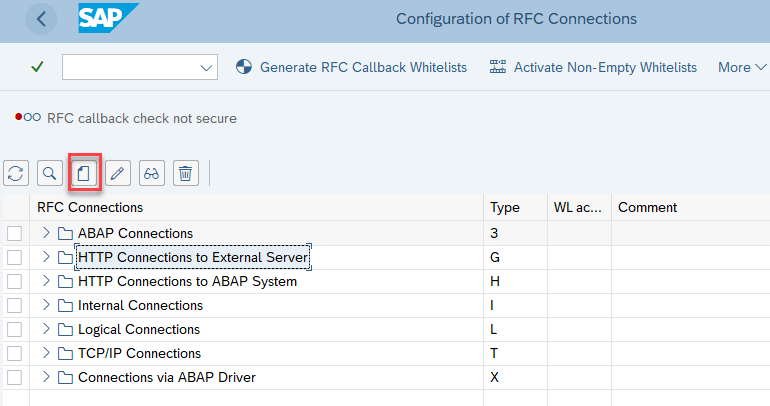
Run the transaction code SM59, and create an RFC destination with the Connection Type HTTP connection to external server.
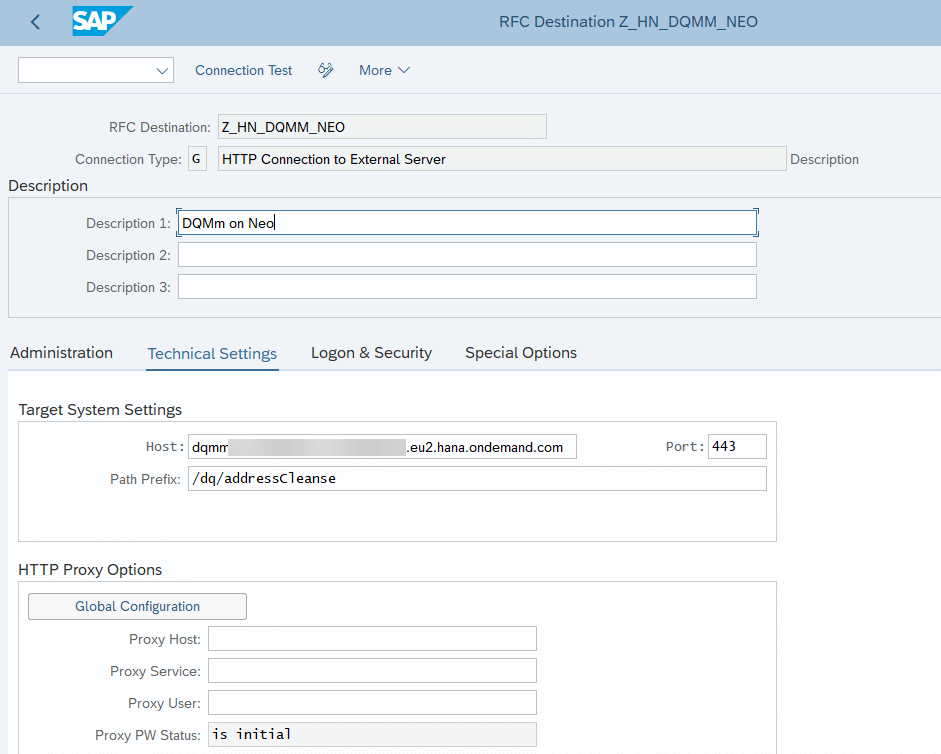
You can find the supported the microservices for location data endpoints on the SAP BTP cockpit or from the documentation.
You can click Connection Test to check the connection is established.
With successful setup, you get the code 405 Method not allowed because the HTTPS connection was made but there is no GET/HEAD method for /dq/addressCleanse endpoint.
OAuth 2.0 Settings
If you choose to use OAuth 2.0 for authentication, you will need to follow additional steps to set up an OAuth 2.0 client.
First make sure to check the necessary authorization to do so here.
Register an OAuth Client on SAP BTP
Next you will need to register a new OAuth Client on SAP BTP Neo Cockpit. Follow the instructions here.
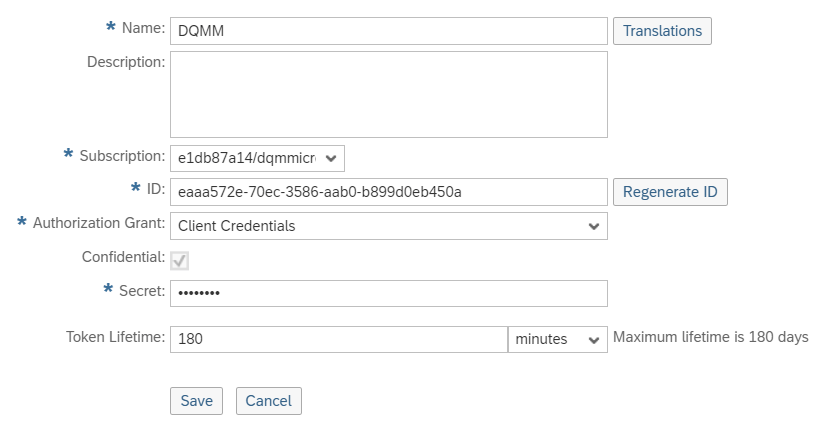
Navigate to Security – OAuth. Click Register New Client.
Enter a name, select the Subscription to your Data Quality Services instance, change the Authorization Grant to Client Credentials, and enter your secret you create. You can optionally change the token lifetime also.
Create an OAuth 2.0 Client profile and OAuth 2.0 Client on your SAP system
Now you will set up the OAuth 2.0 Client for your SAP system. Follow the instructions here.
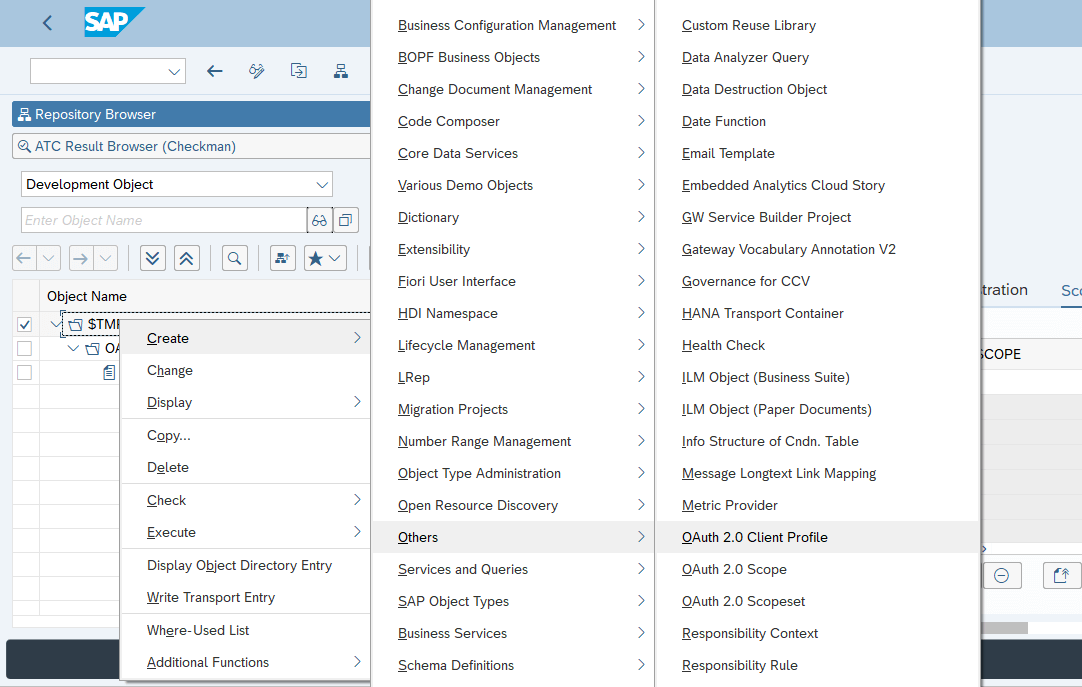
To create an OAuth 2.0 Client profile using transaction SE80, navigate Create > Others > OAuth 2.0 Client Profile from your development object.
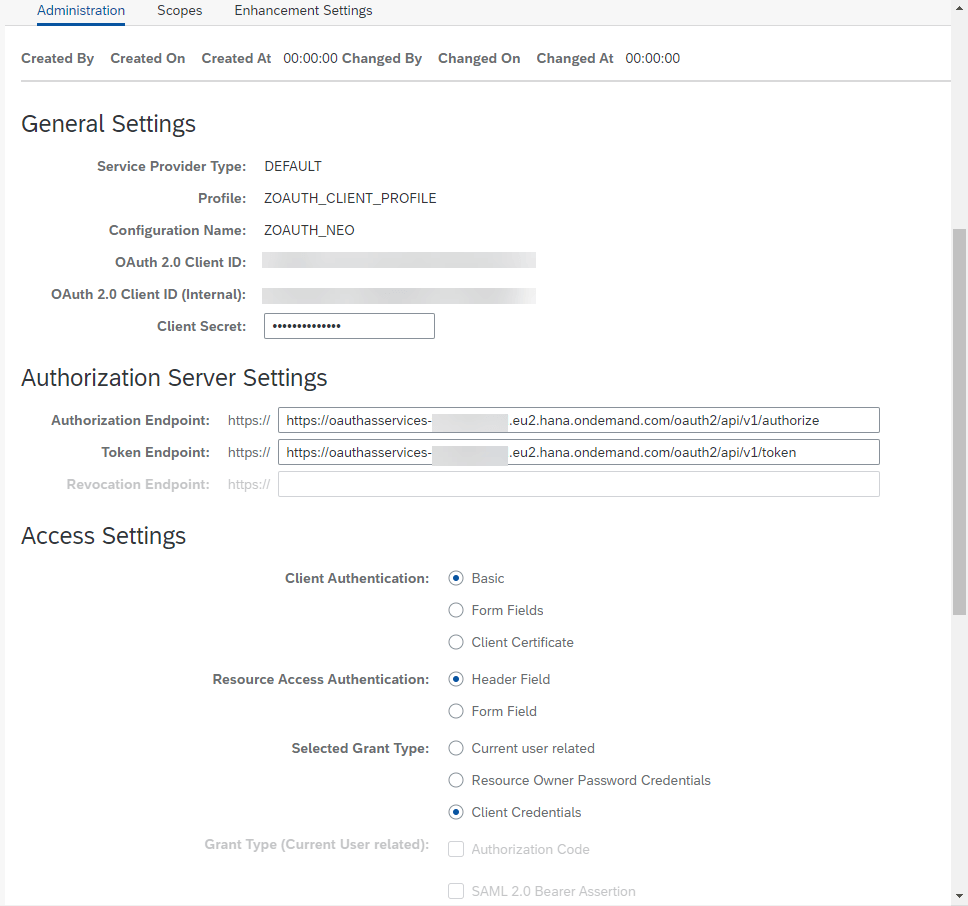
To create an OAuth 2.0 client using transaction OA2C_CONFIG, click Create button and enter the values for OAuth 2.0 Client ID, Client secret, Authentication Endpoint, and Token Endpoint, You can find the correct values from the OAuth 2.0 Client you just set up on SAP BTP Neo Cockpit. Choose Client Credentials for Selected Grant Type.
Set the OAuth 2.0 Client profile on your RFC destination
Go back to your RFC destination. In the edit mode, click the OAuth Settings in the Logon & Security tab, and select your OAuth 2.0 Client profile.
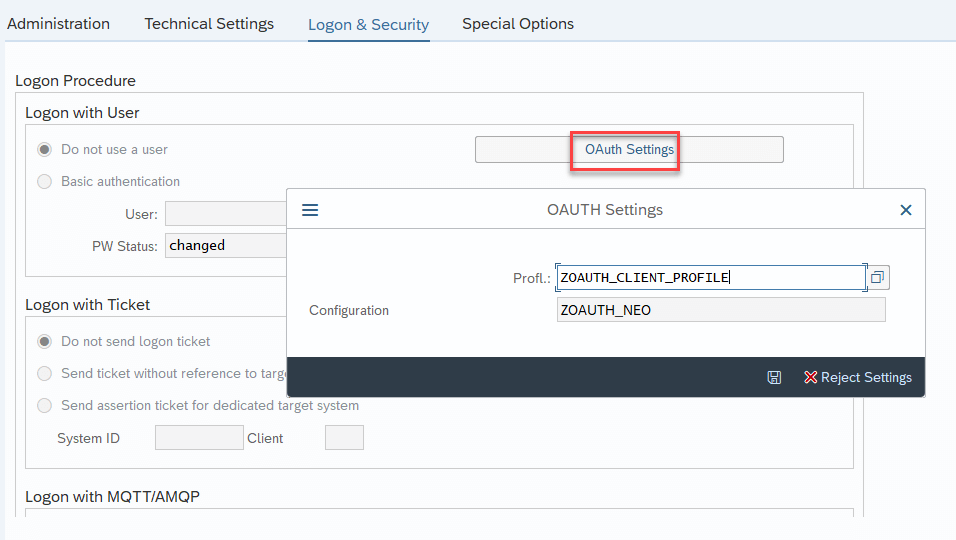
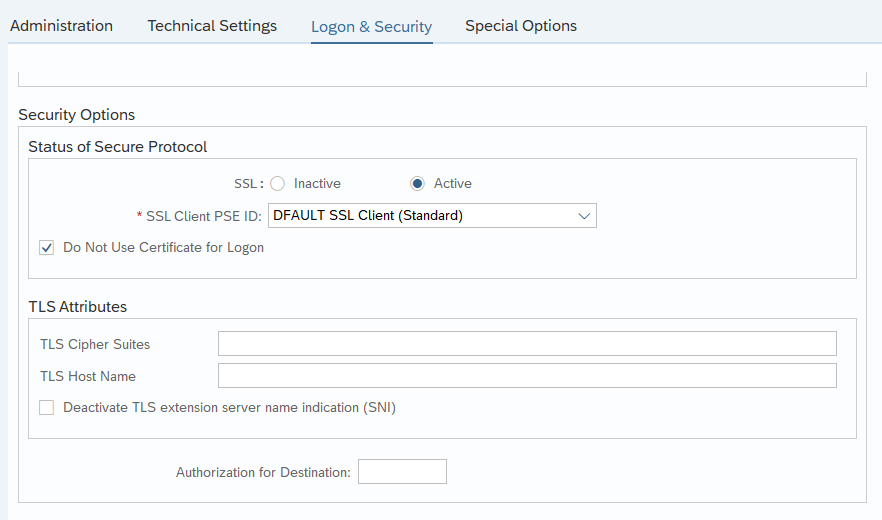
Under Security Options where you set DEFAULT SSL Client (Standard) for SSL Client PSE ID, you should also check Do not use Certificate for Logon option when using OAuth with client credentials.
Save the changes.
Set the RFC Destination to the configuration for the microservices for location data
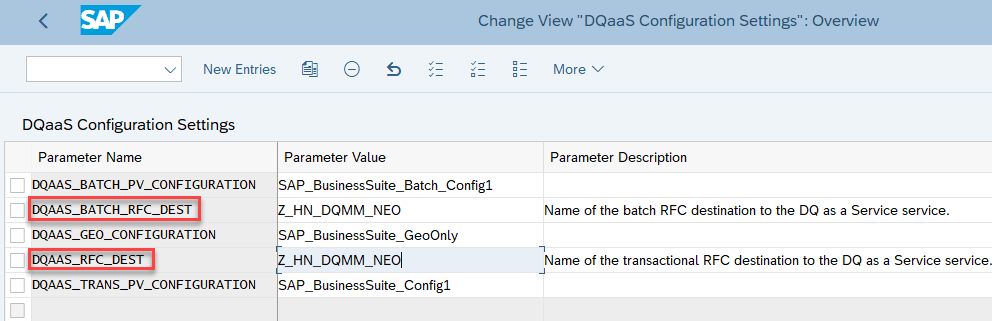
Using the transaction SM30, set the Parameter Value to your RFC destination for DQAAS_RFC_DEST (for transactional calls) and DQAAS_BATCH_RFC_DEST (for batch reports).
Activate Business Configuration (BC) Sets and Configure the Backend Engines
Activate BC Sets
Follow the documentation link Activating Business Configuration Sets.
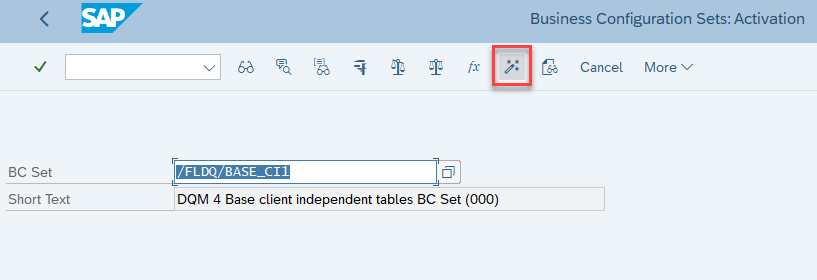
Using the transaction code SCPR20, Activate the BC Sets:
On the Administrator Client: /FLDQ/BASE_CI1
On the Target Client: /FLDQ/BASE_CD1 and /FLDQ/DQAAS_CD1
Then continue with the rest of IMG Activities in the documentation.
Configure Engines
Now you may have noticed the microservices for location data only supports address cleansing and geocoding. It does not currently support person and firm cleansing and matching. Therefore, you may want to use other backend engines for your complete data quality process.
To configure different backend engines of your choice, you can follow these steps.
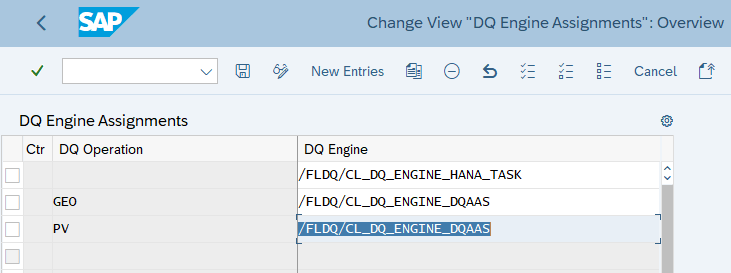
Using the transaction code SM30, go to /FLDQ/DQ_ENGINES to view the backend engine configuration.
For example, I have configured my backend engines to use SAP HANA Smart Data Quality, which is already included in your S/4HANA database layer. Then I configured to use the microservices for location data for PV (postal validation) and GEO (geocoding).
Of course, if you want to use other engines, you must go through the similar steps to enable them. Please follow the respective documentation links: SAP HANA Smart Data Quality and SAP Data Services.
Configuring Geocoding
You can optionally configure Geocoding if you want to get the latitude and longitude data to go with business partner addresses.
Run the transaction code SPRO, select SAP Reference IMG button to display IMG menu.
Navigate to SAP NetWeaver – General settings – Set Geocoding.
We will go into the first two settings under Set Geocoding.

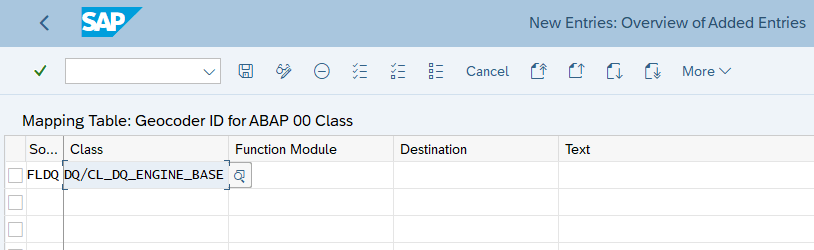
Register the Geocoding program in the SAP System
Execute – Register Geo-Coding Program in the System
Go to New Entries to register the Geocoding program to use the SAP Data Quality Management.
Add an entry to map to the class: /FLDQ/CL_DQ_ENGINE_BASE
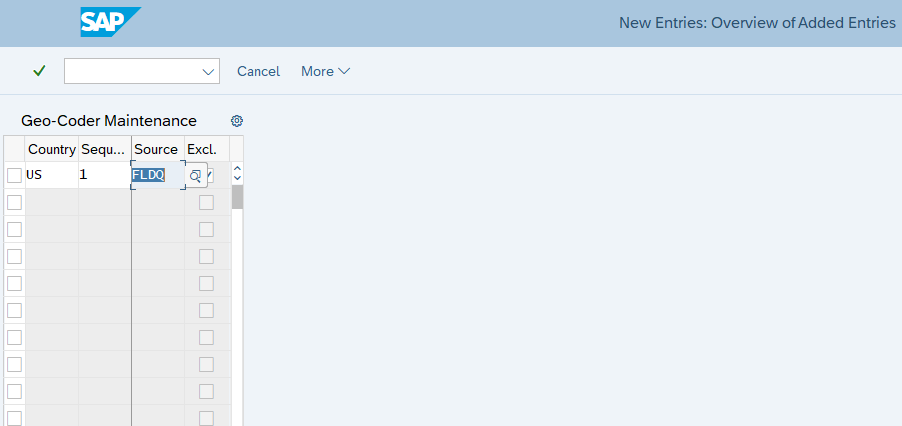
Configuring Each Country for Geocoding
Execute – Assign Geo-Coding Program to Countries
Go to New Entries to add the countries you want to use the SAP Data Quality Management instead of the default Geocoding program.
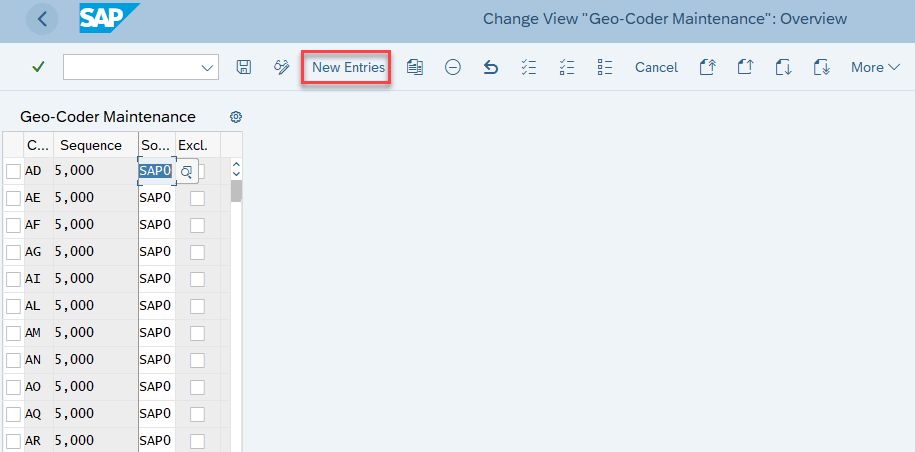
Configure your countries to point to the Geocoding program you created above.
Set the configurations for the microservices for location data
The default configurations for the microservices for location data is already set out of the box. If you want to change this setting, you can do so.
Using the transaction code SM30, go to /FLDQ/DQAAS_CFG to view the configuration mapping.
Here you can map the PV (postal validation) and GEO (geocoding) configurations to those defined in the microservices for location data.
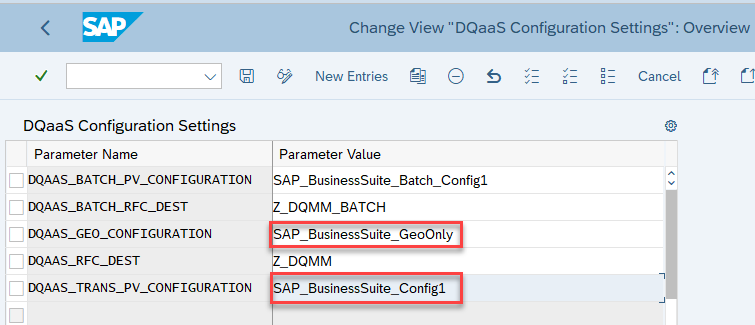
You can view and edit the configurations from the Configuration UI that you can access from the SAP BTP cockpit.
Validate the results
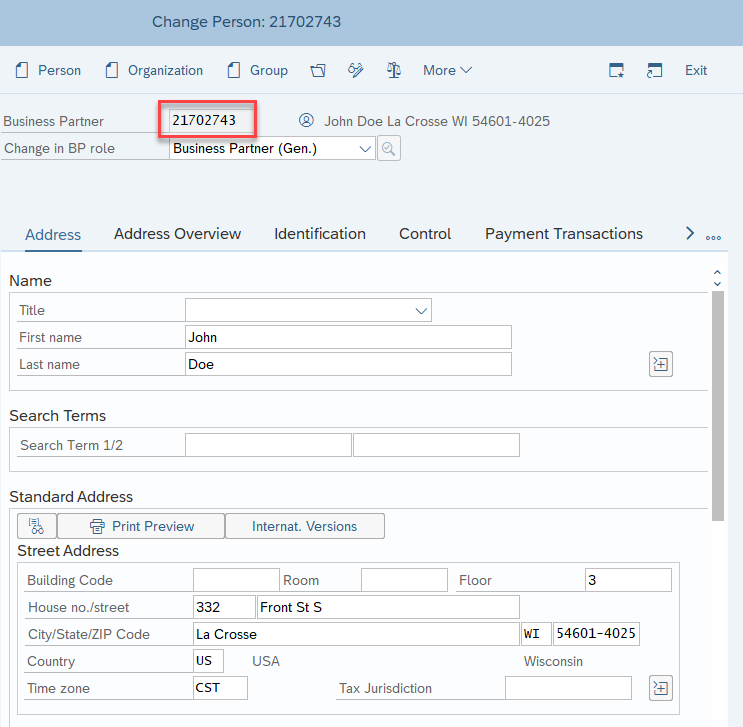
To check if the above setups are done correctly, let’s test it by creating a Business Partner.
Using the transaction code BP, go to the Maintain Business Partner screen and create a partner. If you click the Check button, it should validate the address and pop up the Address Validation viewer. If not, you will see some error message.
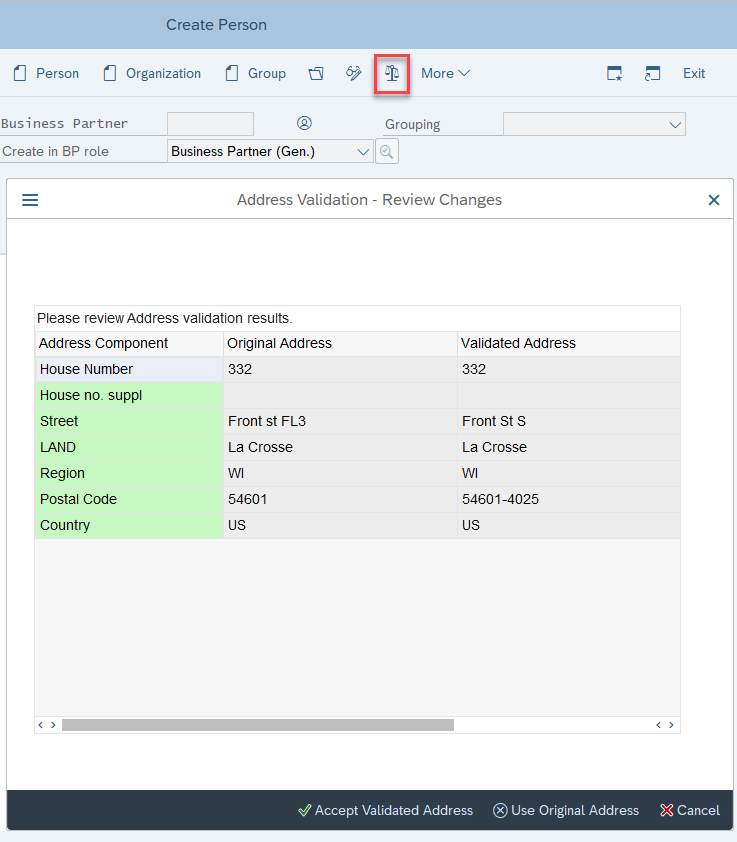
Accept the validated address, save the Business Partner, and note the Business Partner ID.
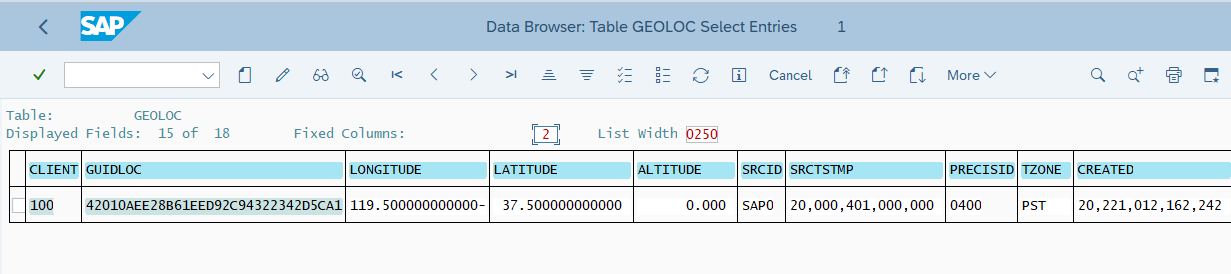
Now you can run the transaction code SE16 and open the BUT020 table to get the ADDNUMBER that is associated with the Business Partner.
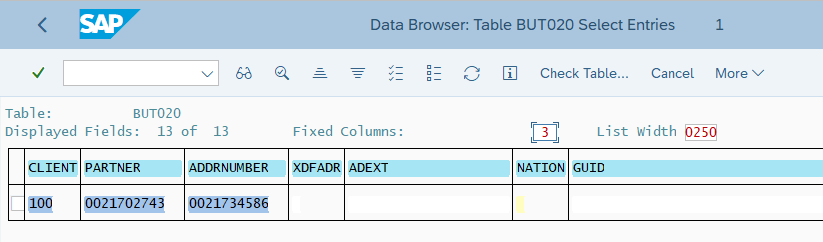
Using the ADDRNUMBER, you can find the content of the related tables for this Business Partner such as the ADRC and GEOLOC tables.