To use the transport capabilities of SAP Cloud ALM in conjunction with the SAP Cloud Transport Management Service (CTMS), you’ve to establish a connection between SAP Cloud ALM and the SAP Cloud Transport Management service.
This guide will lead you through the steps that are needed to establish the connection for the SAP Cloud Integration use case.
Note
Please note that all the steps below only refer to an exemplary setup for Cloud Integration as part of the SAP Integration Suite. For other integration solutions, the steps are similar but may differ in certain aspects. In this case, refer to the documentation of your integration solution.
Subscribe to SAP Cloud Transport Management Service
Note
For newly provisioned SAP Cloud ALM tenants the SAP Cloud Transport Management Service is already subscribed in your SAP BTP subaccount. In this case you can skip the following steps for manual subscription.
To use the SAP Cloud Transport Management Service in SAP Cloud ALM, you have to subscribe to the service in your SAP Cloud ALM subaccount in SAP BTP. Before you subscribe, check if you’re entitled to use the SAP Cloud Transport Management service.
1) Go to your SAP BTP global account and choose your SAP Cloud ALM subaccount.
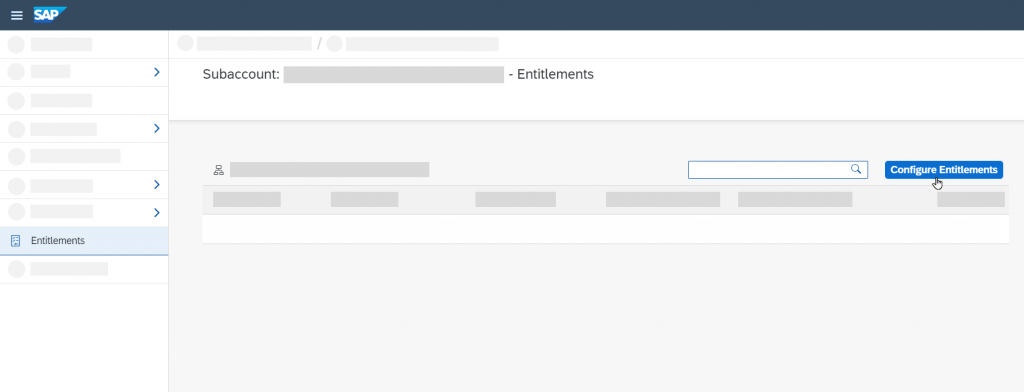
2) To check your entitlements, go to Entitlements and choose Configure Entitlements.
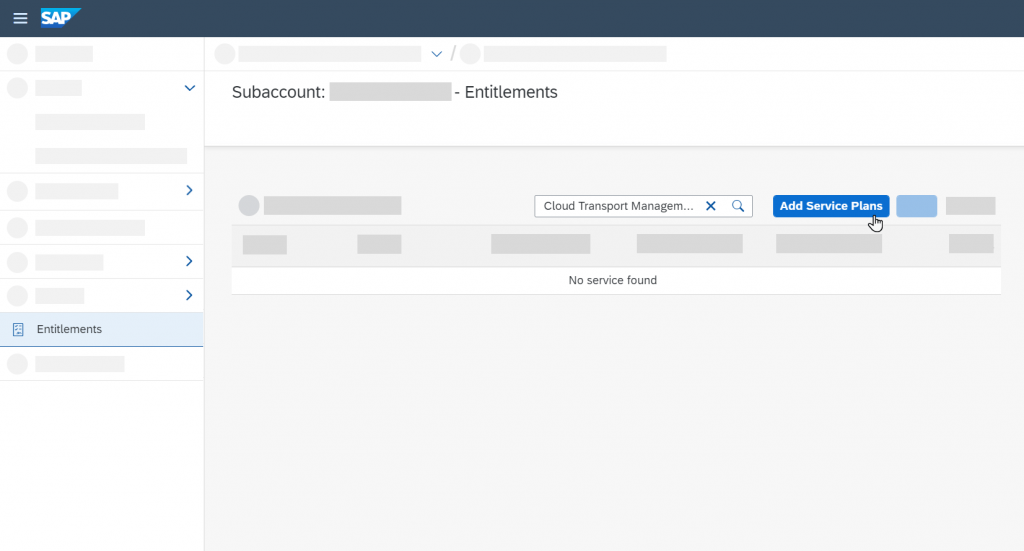
3) Search for the Cloud Transport Management Service in the search bar. If no results are shown in the service list, choose Add Service Plans.
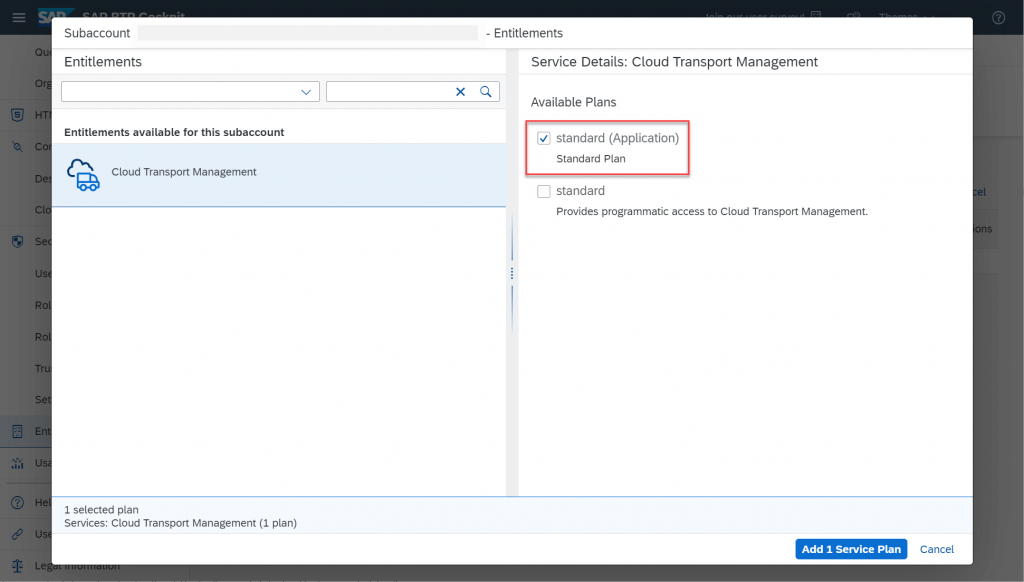
4) Select Cloud Transport Management, check the Standard (Application) Standard Plan checkbox and choose Add 1 Service Plan.
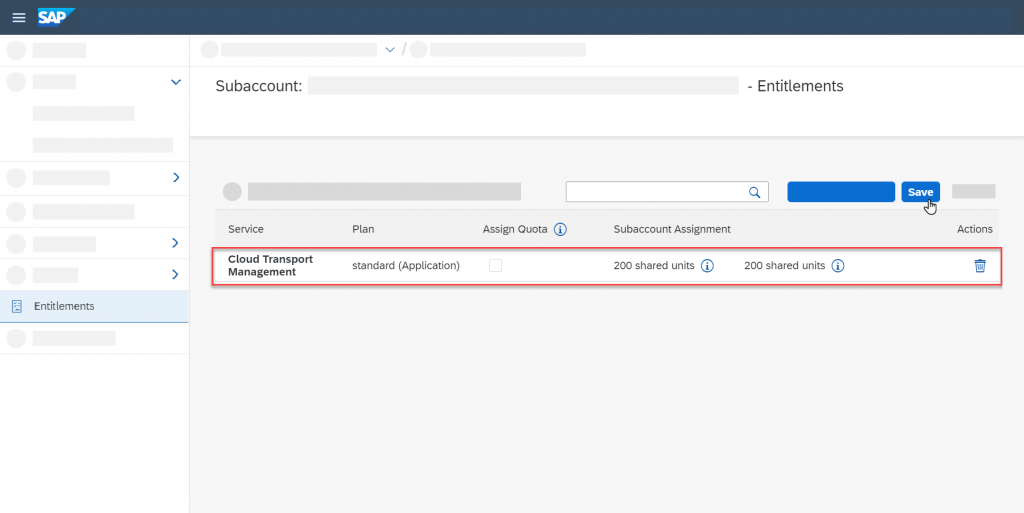
5) Now, the Cloud Transport Management service appears in the service list. Choose Save.
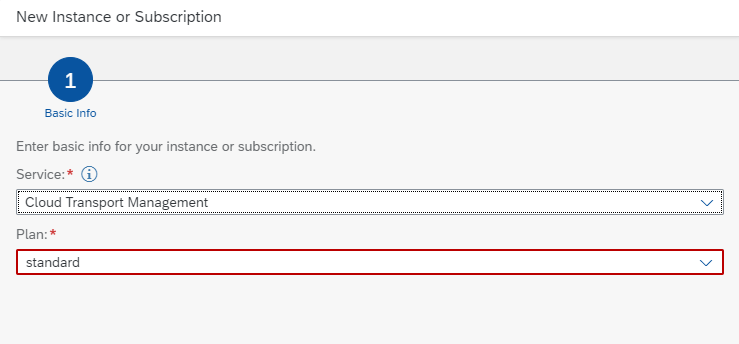
6) Go to Instances and Subscriptions and choose Create.
In the New Instance or Subscription, select service Cloud Transport Management and the standard plan. Then choose Create.
7) You’re now subscribed to the SAP Cloud Transport Management service.
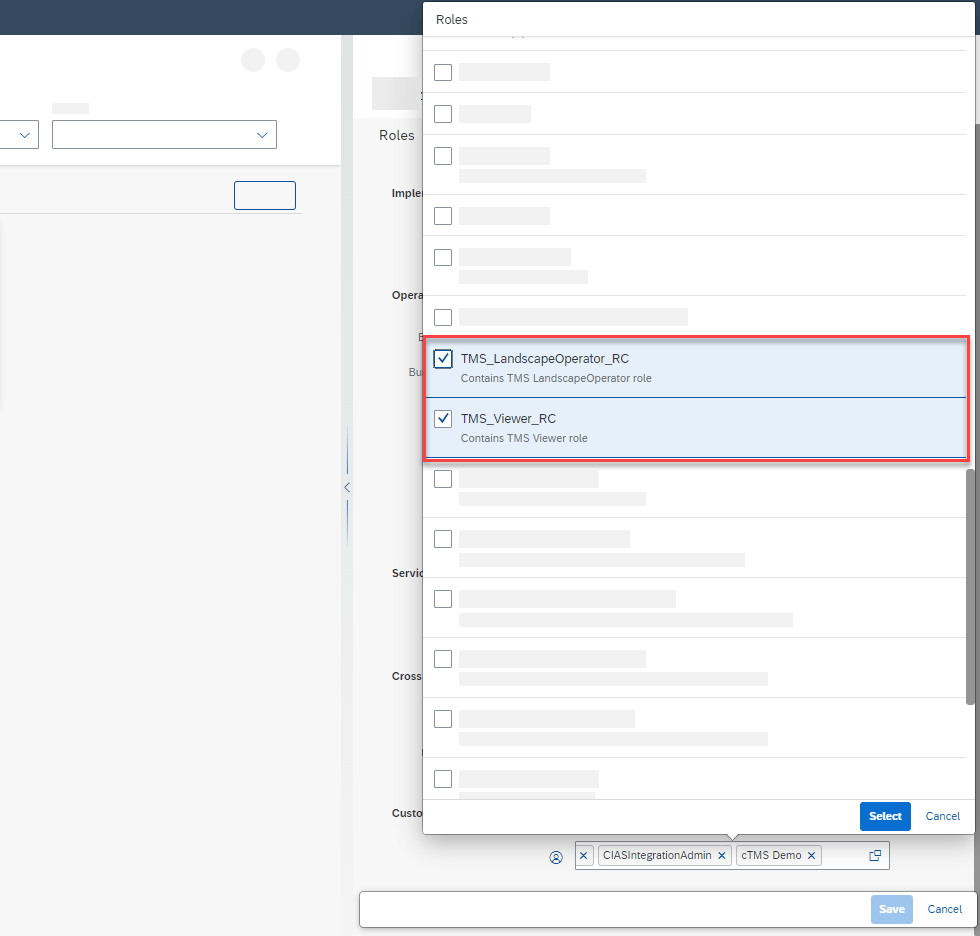
8) Now, you can assign members of your team to roles. Usually, the two roles you need are TMS_Viewer_RC and TMS_LandscapeOperator_RC and can be found in the Custom Roles section.
You can assign the roles in the User Management app in SAP Cloud ALM.
9) You can access the Cloud Transport Management service from within your subaccount in the SAP BTP cockpit by choosing “Go to Application”.

Set Up Cloud Integration
Create Service Instances
As a first step, you’ve to enable content transport in the Cloud Foundry environment by subscribing to the Content Agent (using the ContentAssemblyService) and Service Broker (using the Process Integration Runtime).
Note
Not every step is required in every case. For example, if you already created a space for transport management within your subaccount, you can skip certain steps.
After you’ve followed all the steps in this guide, please proceed with the next step.
Creating HTTP Destinations, Cloud Foundry Environment
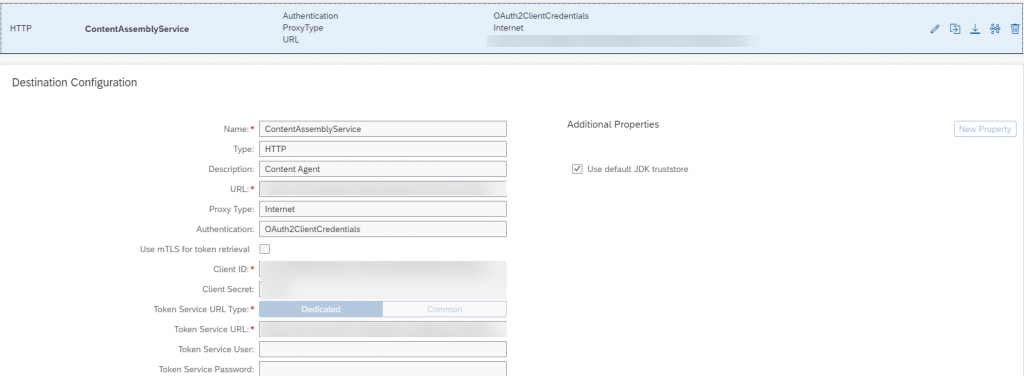
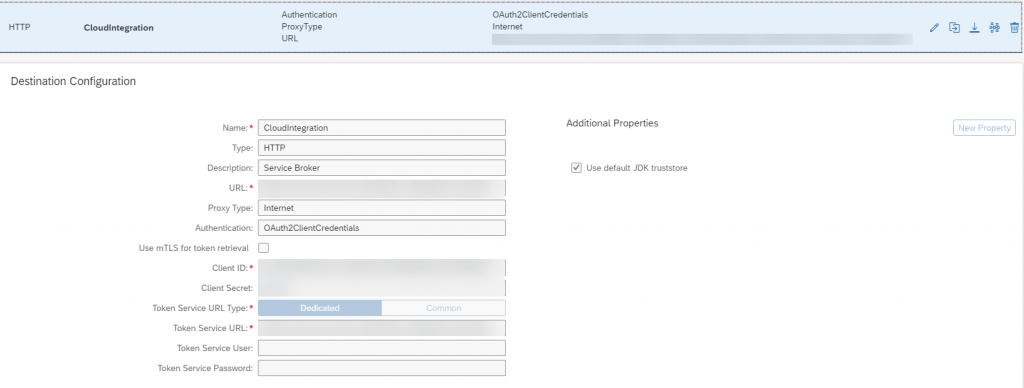
In the next step, you need to create destinations in your SAP BTP subaccount where your source Cloud Integration tenant is hosted, in order to transport integration packages from a source tenant to the target tenant.
Important
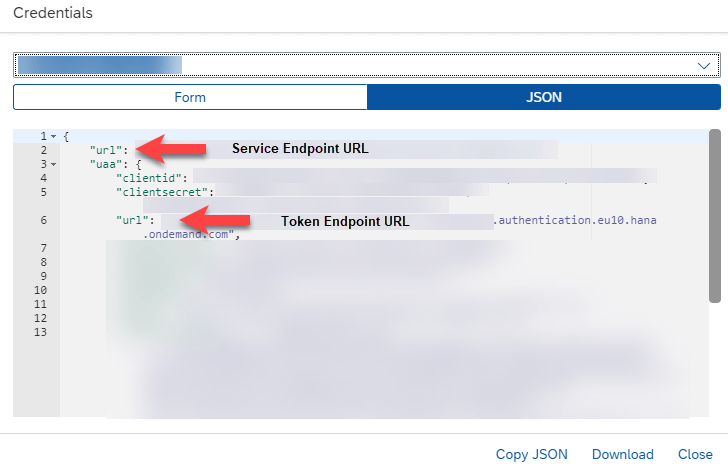
The URLs you’ve extracted in step a. and that you’ve to use in step b. are structured in the following way:The URL you can find in the section uaa in the JSON file relates to the token endpoint. You can identify this URL by checking if the term “authentication” is included in the URL. The URL above the uaa section of the JSON file relates to the service endpoint. (see screenshot below)
Make sure that the following destinations are available now:
Set Up SAP Cloud ALM API Instance
In order to perform the following steps please make sure that your user has the role Global Account Administrator in the global account that was created when you requested SAP Cloud ALM, and is a member of the subaccount containing your SAP Cloud ALM subscription.
Create a Space
1) Open the SAP BTP cockpit.
2) Select the global account that contains your SAP Cloud ALM entitlement, which was created when you requested SAP Cloud ALM.
3) Under Subaccounts, select the subaccount that contains your SAP Cloud ALM subscription.
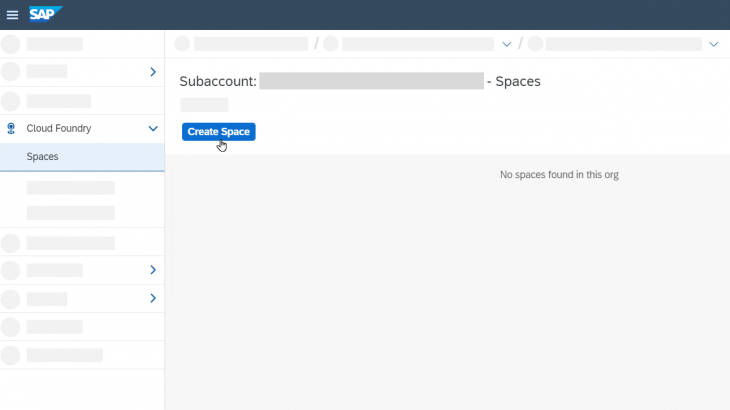
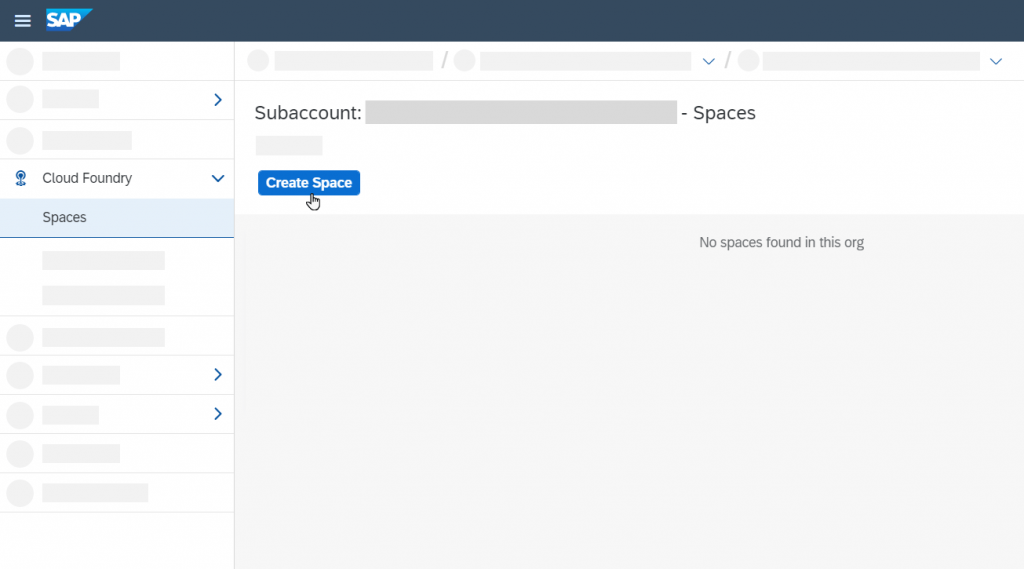
4) Choose Cloud Foundry > Spaces.
5) Choose Create Space in case no space available yet.
6) Enter a space name, such as sap_cloud_alm_space, and select the roles that you want to assign to your user for this space. To perform the following steps, your user needs at least Space Developer.
7) Choose Create.
Configure Entitlements
An entitlement is your right to provision and consume a resource.
1) Choose Entitlements and check for Service SAP Cloud ALM API. In case you are already entitled to that service you can move to Create a New Instance.
Note: You can increase your global quota, that is, your maximum allowed consumption of this service plan, in the control center.
2) If the service is missing you can click Configure Entitlements.

3) Choose Add Service Plans.
4) Add the required service plan as follows:
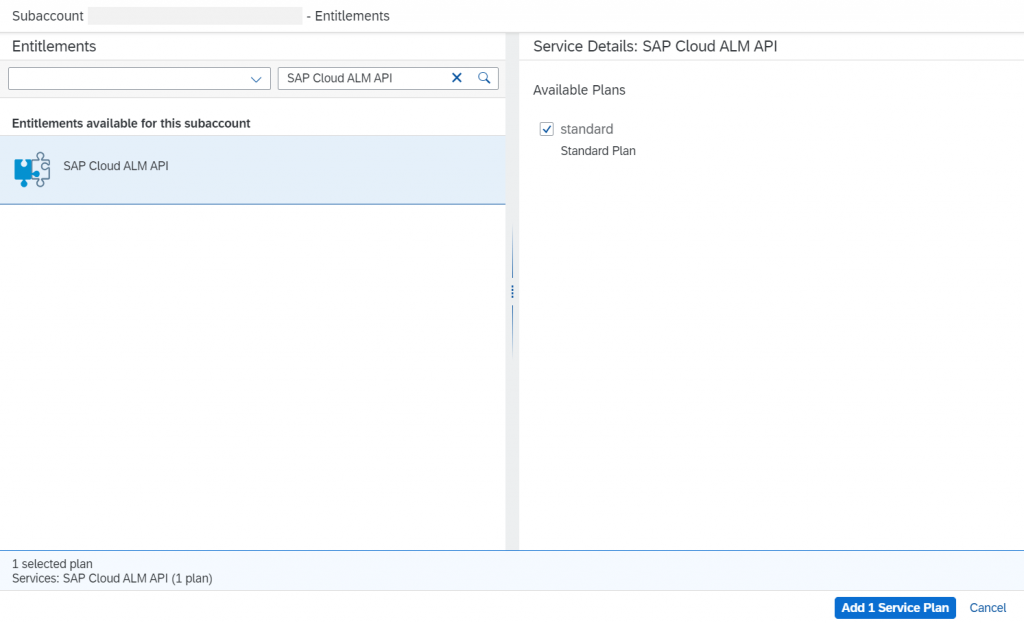
- Select the entitlement SAP Cloud ALM API.
- Under Available Plans, check the option standard.
- Choose Add 1 Service Plan.
4) Choose Save.
Create a New Instance
1) Choose Cloud Foundry > Spaces.
2) Select the created or already existing space. You now see the application list of your created space.
3) Choose Services > Instances.
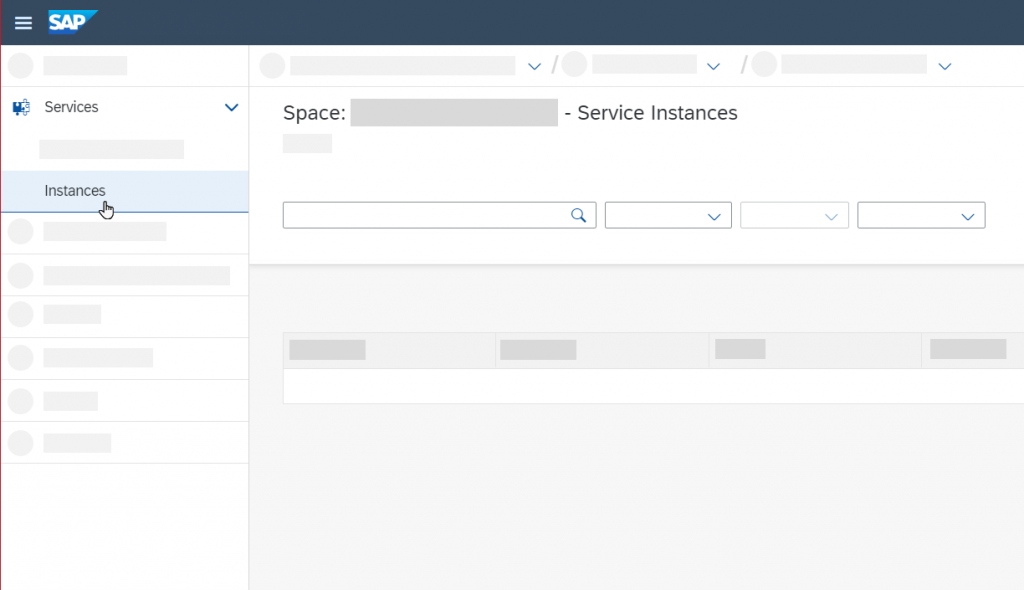
4) Choose the Create dropdown and click on Service Instance.

5) Under Basic Info provide the following details:
- Service: SAP Cloud ALM API
- Plan: standard
- Instance Name: Enter a meaningful name, e.g. CALMFeatureDeployment
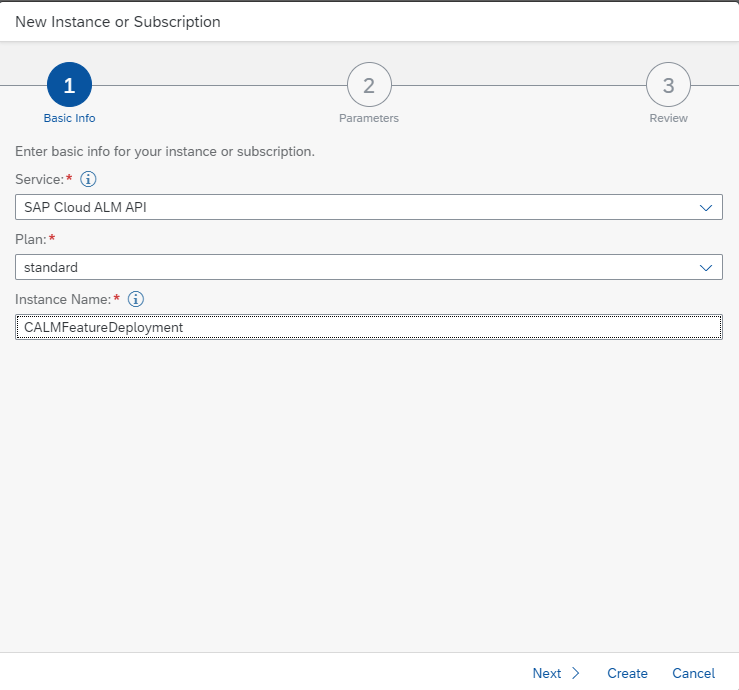
6) Choose Next.
7) When creating a service instance for feature deployment, the following configuration in json format is needed in order to assign the required scopes to the service instance.
- Paste the following json code into the text editor:
{
    "xs-security": {
        "xsappname": "<Your Instance Name>",
        "authorities": [
			"$XSMASTERAPPNAME.imp-cdm-feature-display-ui",
			"$XSMASTERAPPNAME.imp-cdm-feature-manage-ui"
        ]
    }
}- Replace <YourInstanceName> with your actual instance name. Make sure it’s not already used in another service instance and doesn’t contain spaces or special characters.
- Authorities: Make sure to use exactly the string provided above.
8) Choose Create.
9) When your instance has been created, it’s added to the instance list. To show the details of the instance click on the newly created instance.
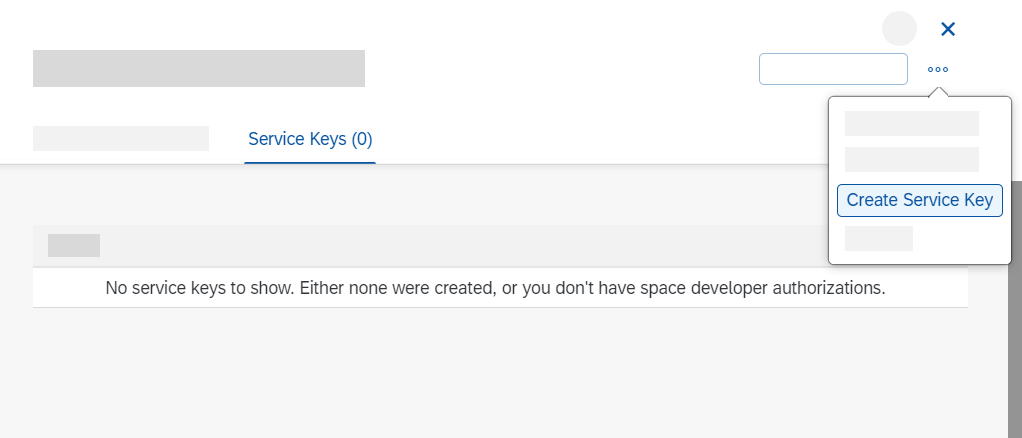
Create a Service Key
The service key allows you to configure the transport management in the managed system so that it can connect to an SAP Cloud ALM API service instance.
1) Choose the Actions icon and select Create Service Key.
2) Enter a name for your service key, such as sap_cloud_alm_key.
3) Choose Create.
4) Next to your newly created service key, choose the Actions icon and select View.
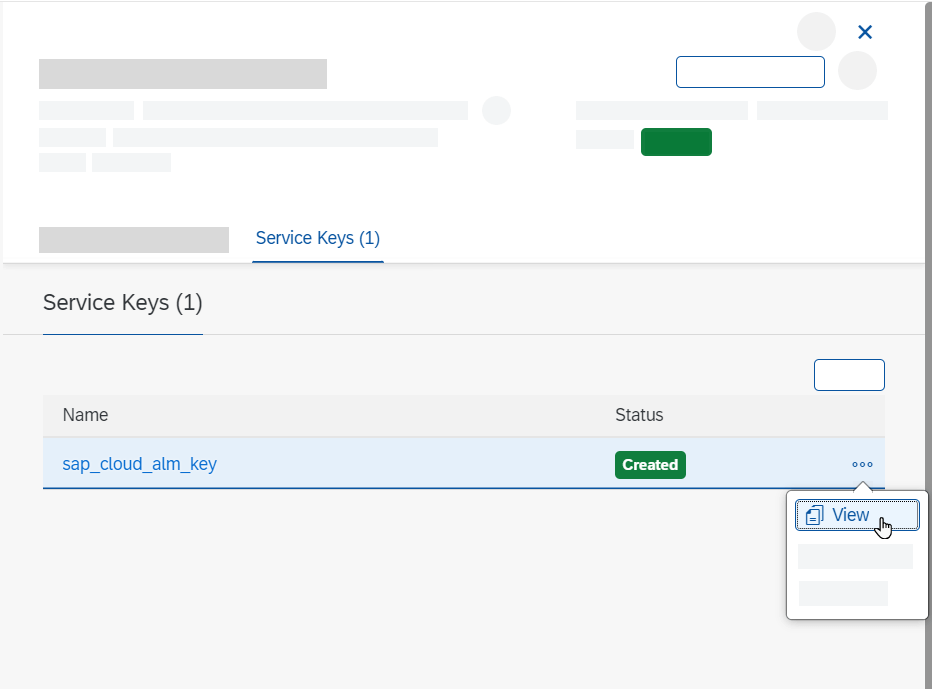
5) You can now see your service key in JSON format.
- The service key is structured in the following way:
- Endpoints: e.g., alm.cloud.sap
- OAuth URL: Service Key parameter
- Client ID: Service key parameter clientid
- Client secret: Service key parameter clientsecret
- Endpoints: e.g., alm.cloud.sap
Copy this newly created service key in JSON format to the clipboard because it’s needed later in the Maintain HTTP Destination section of this guide.
Caution
Outside of the SAP BTP cockpit, service keys must be stored securely. If you need a service key, create the service key directly in the SAP BTP cockpit, and access it from there whenever you need it.
Set Up HTTP Destinations and Transport Routes with SAP Cloud ALM Pass-through
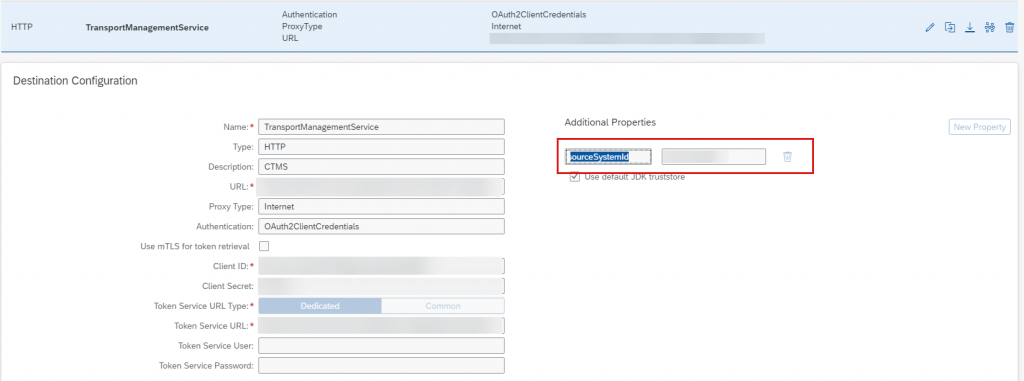
In the SAP BTP subaccount where your source Cloud Integration tenant is hosted, create a destination targeted at the Cloud Transport Management service.
In the Destination Configuration section, enter values in fields based on the description provided in the following table.
| Field | Description |
| Name | TransportManagementService (this value is case-sensitive) |
| Type | HTTP |
| Description (optional) | You can provide a description for your reference. |
| URL | Enter the URL (“Api”) of the service key of your SAP Cloud ALM API instance and append /imp-cdm-transport-management-api/v1. That follows a pattern like this: https://eu10.alm.cloud.sap/api/imp-cdm-transport-management-api/v1 |
| Proxy Type | Internet |
| Authentication | OAuth2ClientCredentials |
| Client ID | clientid from the service key of your SAP Cloud ALM API instance. |
| Client Secret | clientsecret from the service key of your SAP Cloud ALM API instance. |
| Token Service URL | Enter the value of url (uaa section) from the service key of your SAP Cloud ALM API instance. Append /oauth/token at the end of URL fetched from the service key. |
| Additional Properties | Choose New Property. Enter sourceSystemId (this value is case-sensitive) as the key and provide a value of your choice. Reuse the same value as the name of the source transport node in a later step. |
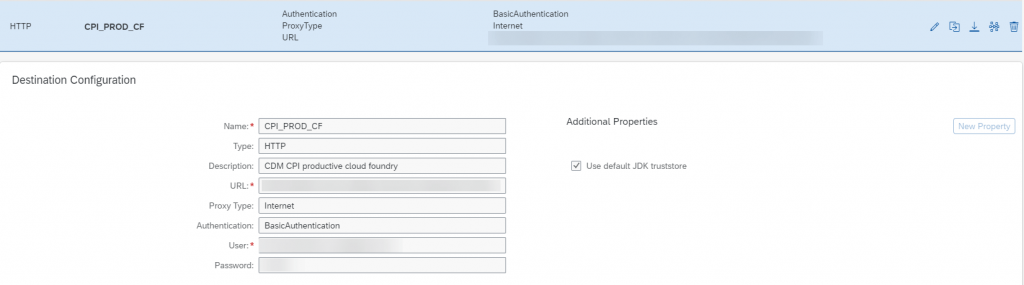
In your SAP BTP Cloud Foundry subaccount (where you’ve subscribed to Cloud Transport Management service), create a new destination to create a destination targeted at the SAP BTP subaccount where your target Cloud Integration tenant is hosted.
In the Destination Configuration section, enter values in fields based on the description provided in the following table.
| Field | Description |
| Name | Provide a name for the destination. |
| Type | HTTP |
| Description (optional) | You can provide a description for your reference. |
| URL | Enter the URL of the SLM service endpoint in the target subaccount. URL format: <https://slservice.<landscape-host>/slservice/slp/basic/<Technical Name of the Neo subaccount>/slp>. |
| Proxy Type | Internet |
| Authentication | Basic Authentication Remember |
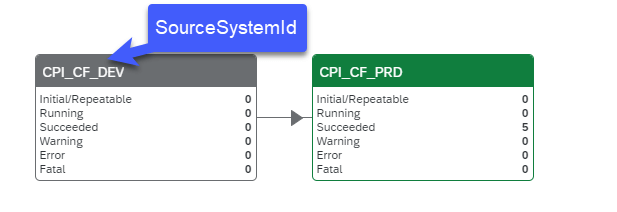
You’ve created the necessary destinations. The next steps are to create transport nodes and routes.
- In Cloud Transport Management service, create the source node. The name for the source node must be the same as the value of the additional property SourceSystemId you defined in your TransportManagementService destination.
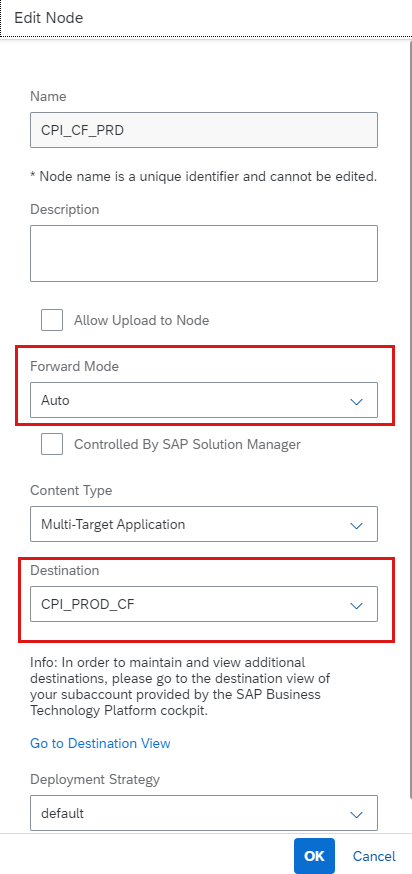
- Then create the target transport node and select the destination you created for your target tenant / subaccount before. (CPI_PROD_CF in screenshot above)
- In a last step you define your transport routes in your Cloud Transport Management.
Important
– You have to configure auto forward mode for the transport nodes in order to make use of Cloud ALM in conjunction with Cloud Transport Management.
– SAP Cloud ALM currently only supports linear landscapes.
It could look like this:
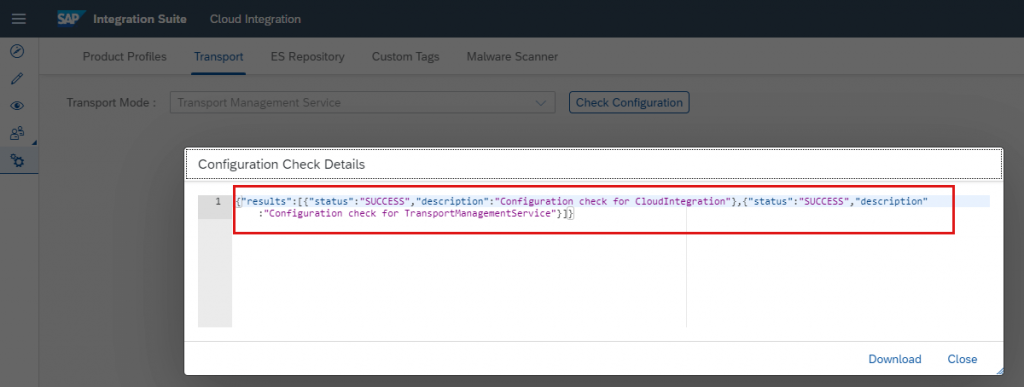
Wrap-Up
To check whether your scenario works you can do a configuration check for the “Transport Mode: Transport Management Service” in your “Settings” area in Cloud Integration.