Introduction
During development of Fiori apps, you may want to test app-to-app navigation in SAP Business Application Studio (BAS).
Enable App-to-App Navigation from between Fiori elements app
If the source and target apps are both Fiori elements apps, it’s easy. The only prerequisite is that the both apps are located in the same workspace.
1. Create source and target apps with Fiori elements
In the example below, the source app shows the a of orders and the target app shows a list of customers. The data source is Northwind OData V2 service.
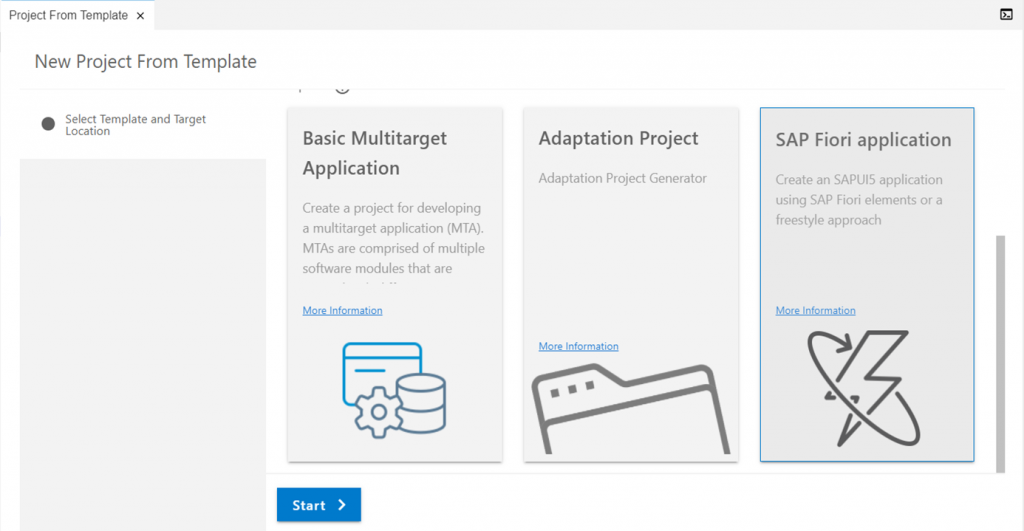
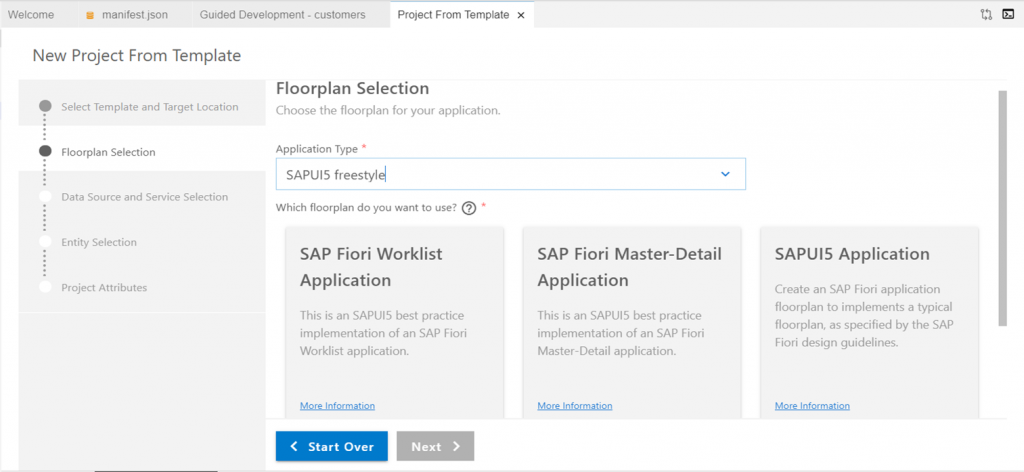
1.1. Create the source and the target apps using SAP Fiori application template.
1.2. Select “List Report Object Page” floorplan.

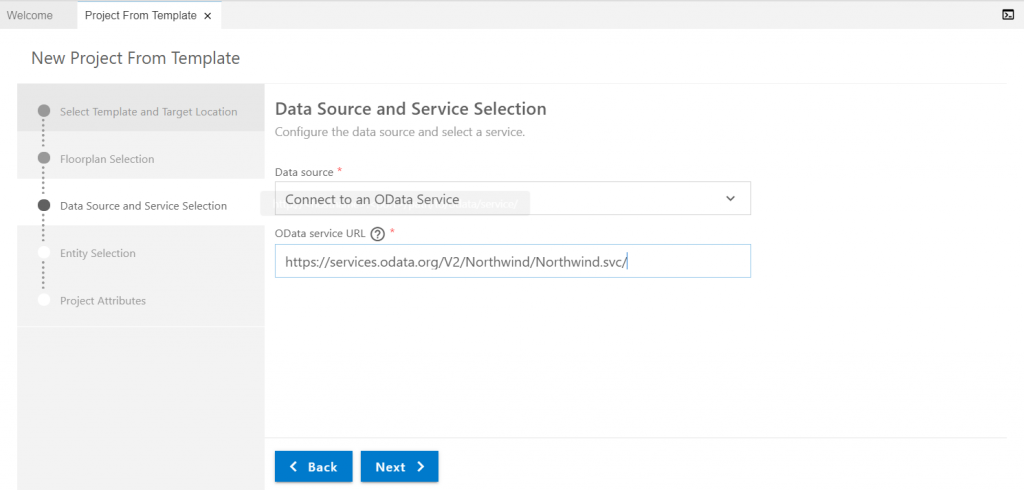
1.3. Select Data Source and Service URL.
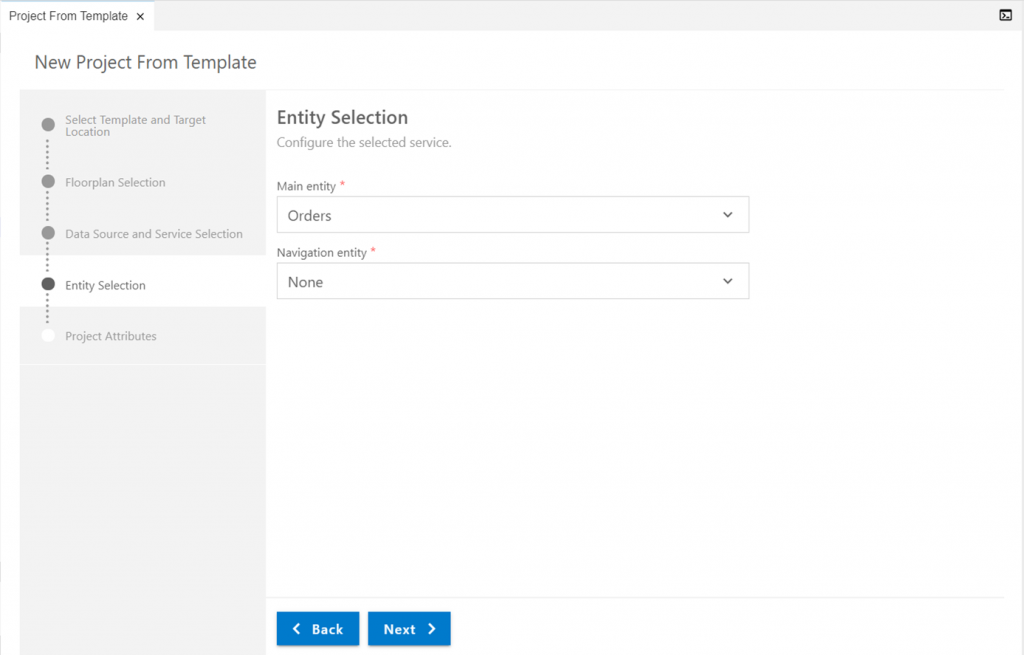
1.4. Select main entity. I have selected “Orders” for the source app and “Customers” for the target app.
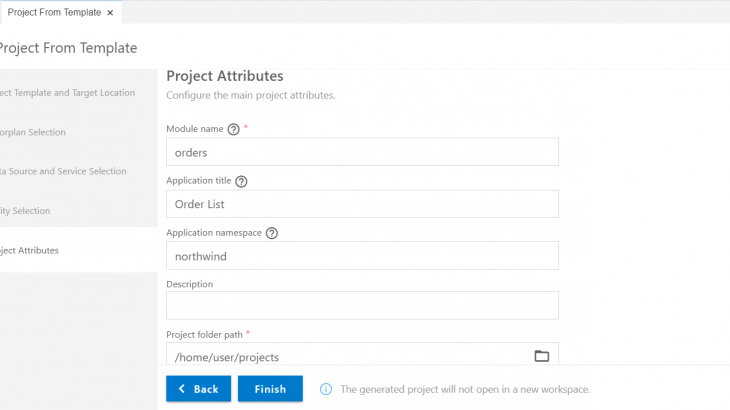
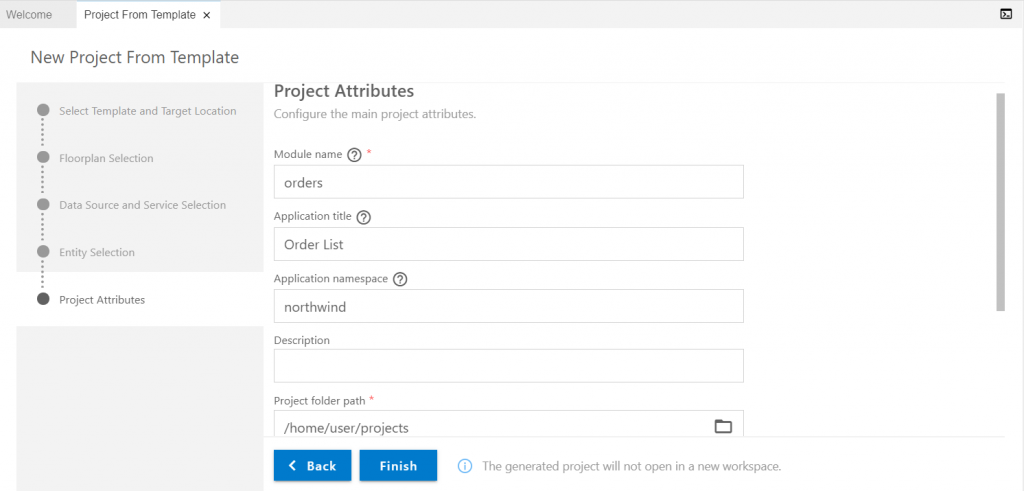
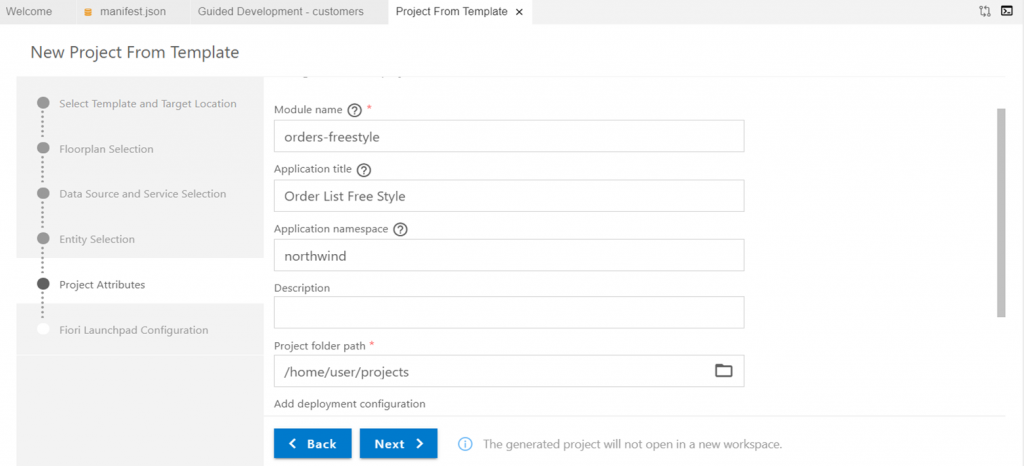
1.5. Specify Project Attributes.
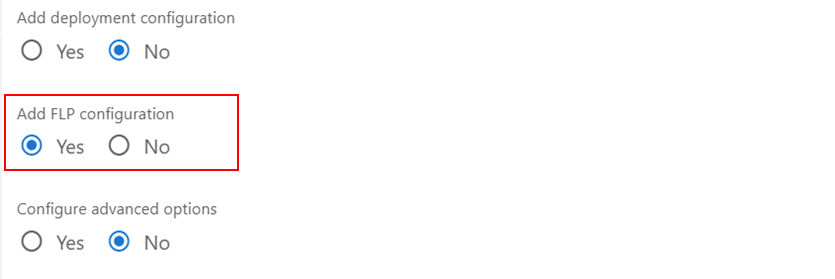
Select “Yes” for “Add FLP configuration”.
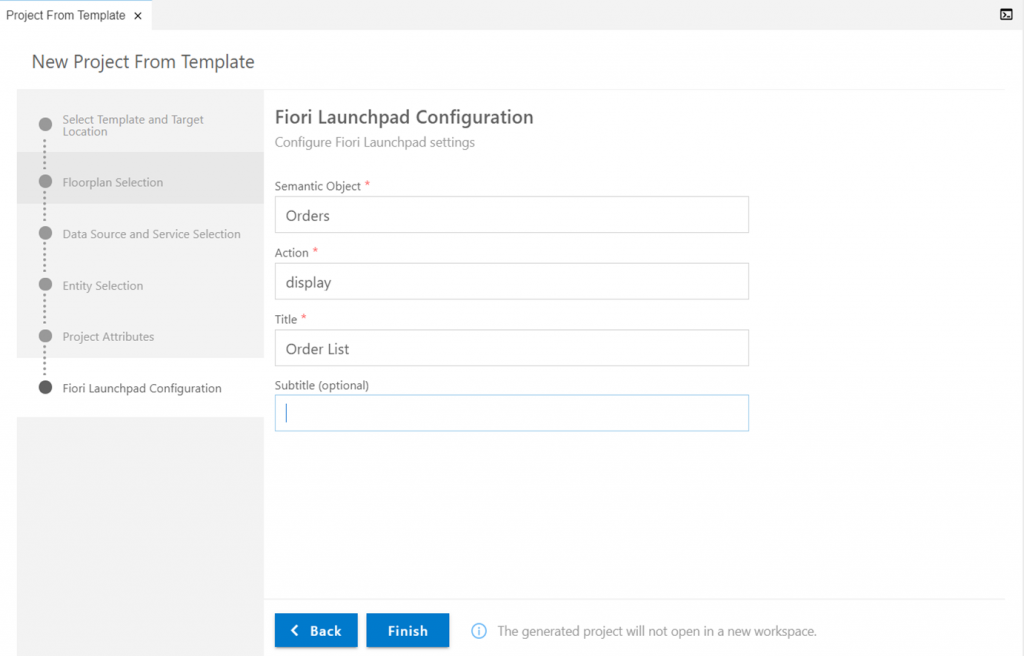
1.6. Maintain Fiori Launchpad Configuration. Semantic Object and Action are necessary for app-to-app navigation.
1.7. To enable intent-based navigation, add the following annotation to the source (Orders) app.
<Annotations Target="NorthwindModel.Order">
                <Annotation Term="UI.LineItem">
                    <Collection>
                        <Record Type="UI.DataField">
                            <PropertyValue Property="Value" Path="OrderID"/>
                            <Annotation Term="UI.Importance" EnumMember="UI.ImportanceType/High"/>
                        </Record>
                        <Record Type="UI.DataField">
                            <PropertyValue Property="Value" Path="OrderDate"/>
                            <Annotation Term="UI.Importance" EnumMember="UI.ImportanceType/High"/>
                        </Record>
                        <Record Type="UI.DataFieldWithIntentBasedNavigation">
                            <PropertyValue Property="Value" Path="CustomerID"/>
                            <PropertyValue Property="SemanticObject" String="Customers"/>
                            <PropertyValue Property="Action" String="display"/>
                            <Annotation Term="UI.Importance" EnumMember="UI.ImportanceType/High"/>
                        </Record>
                    </Collection>
                </Annotation>
            </Annotations>
Also, I have added the following annotation to the target (Customers) app so that Customer ID and Company Name are displayed in the Object Page header.
<Annotations Target="NorthwindModel.Customer">
<Annotation Term="UI.HeaderInfo">
<Record Type="UI.HeaderInfoType">
<PropertyValue Property="TypeName" String="Customer"/>
<PropertyValue Property="TypeNamePlural" String="Customers"/>
<PropertyValue Property="Title">
<Record Type="UI.DataField">
<PropertyValue Property="Value" Path="CustomerID"/>
</Record>
</PropertyValue>
<PropertyValue Property="Description">
<Record Type="UI.DataField">
<PropertyValue Property="Value" Path="CompanyName"/>
</Record>
</PropertyValue>
</Record>
</Annotation>
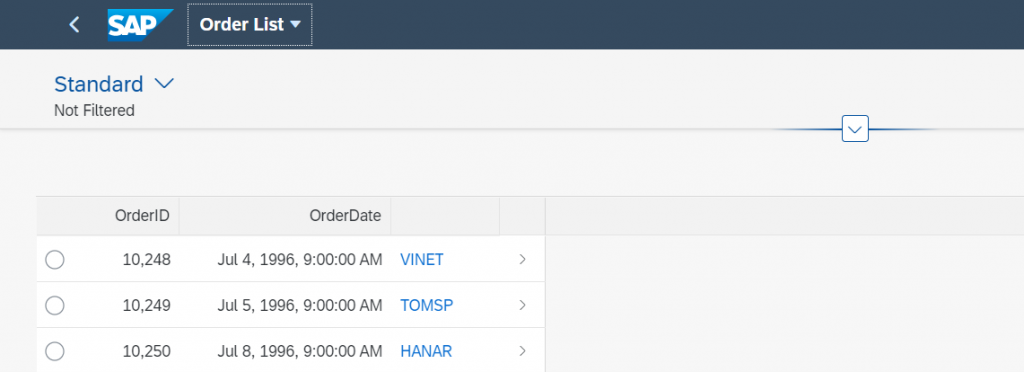
</Annotations>1.8. Test the source app. It looks like below picture and the Customer ID is displayed as a link.
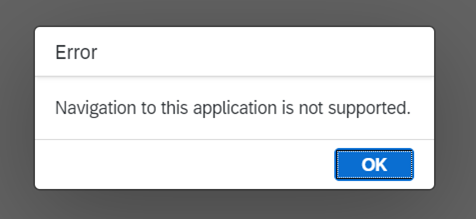
However, navigation is not possible yet.
2. Enable App-to-App Navigation
Next, let’s enable app-to-app navigation.
2.1. Open Command Palette and enter Fiori: Enable App-to-App Navigation Preview.

2.2. Select the source application.

2.3. Select the target application.

As a result, the following message is displayed: App-to-App Navigation enabled.

2.4. Execute the source app and this time the navigation should work.
If you select customer “VINET” for example,
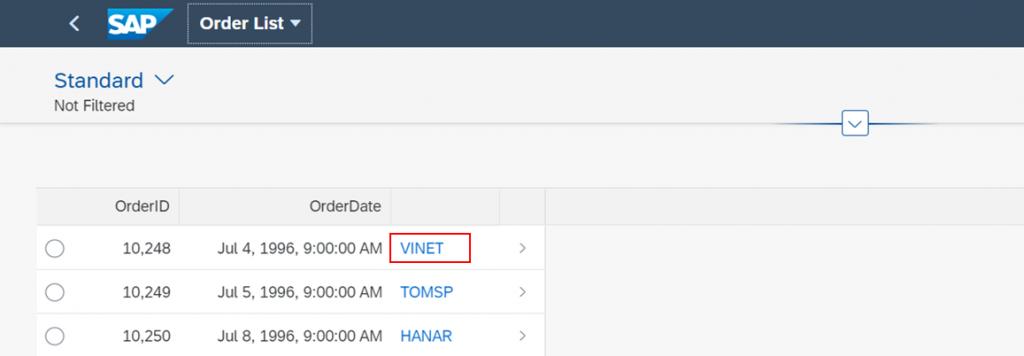
Customers app opens in the Object Page.

3. Behind the scenes
When you enable app-to-app navigation with the command described above, a file named appconfig/fioriSandboxConfig.json is generated.
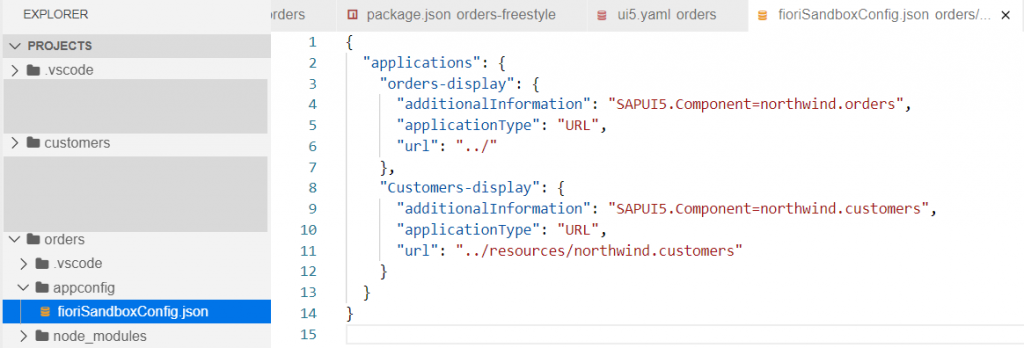
Also, the following section is added to ui5.yaml.

These settings need to be manually added if you want to enable navigation for freestyle apps.
Enable App-to-App Navigation from Free style app
Freestyle apps don’t appear in the source and target app list when you execute “Enable App-to-App Navigation Preview” command. So you need to add some manual configurations to enable navigation.
1. Create a Freestyle app
In the example below, I will create a freestyle app as a source app which shows a list of orders. The target app is the same as the previous example.
1.1. Create a freestyle app using SAP Fiori application template. Here I have chosen “SAPUI5 Application”.
1.2. Select Data Source and Service URL.

1.3. Specify Project Attributes and Launchpad Configuration.

1.4. Maintain the view code as follows.
<mvc:View
controllerName="northwind.ordersfreestyle.controller.App"
xmlns:mvc="sap.ui.core.mvc"
displayBlock="true"
xmlns="sap.m"
>
<Shell id="shell">
<App id="app">
<pages>
<Page id="page" title="{i18n>title}">
<content>
<Table id="table"
items="{path: '/Orders'}" mode="SingleSelectLeft">
<headerToolbar>
<OverflowToolbar>
<content>
<Title text="Orders" />
<ToolbarSpacer/>
<Button text="Nav to Customer" press="onNavToCustomer" />
</content>
</OverflowToolbar>
</headerToolbar>
<columns>
<Column>
<Text text="Order ID"/>
</Column>
<Column>
<Text text="Order Date"/>
</Column>
<Column>
<Text text="Customer ID"/>
</Column>
</columns>
<items>
<ColumnListItem>
<Text text="{OrderID}"/>
<Text text="{path: 'OrderDate', type: 'sap.ui.model.odata.type.DateTime'}"/>
<Text text="{CustomerID}"/>
</ColumnListItem>
</items>
</Table>
</content>
</Page>
</pages>
</App>
</Shell>
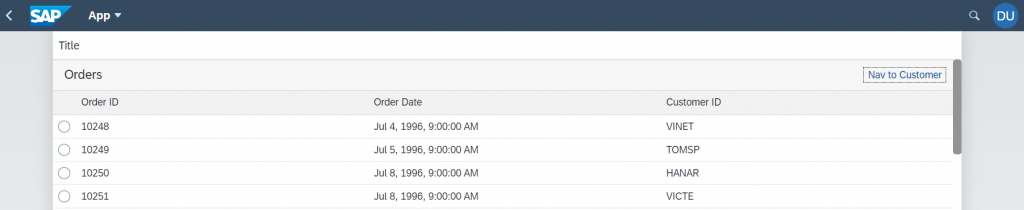
</mvc:View>The view will show a list of orders and “Nav to Customer” button as below.
1.5. Maintain the controller code that triggers navigation.
sap.ui.define([
	"sap/ui/core/mvc/Controller"
],
	/**
	 * @param {typeof sap.ui.core.mvc.Controller} Controller
	 */
	function (Controller) {
		"use strict";

		return Controller.extend("northwind.ordersfreestyle.controller.App", {
			onInit: function () {

            },

            onNavToCustomer: function (oEvent) {
                var customerId = this.byId("table").getSelectedContexts()[0].getObject().CustomerID;
                if (sap.ushell && sap.ushell.Container && sap.ushell.Container.getService) {
                    var oCrossAppNav = sap.ushell.Container.getService("CrossApplicationNavigation");
                    oCrossAppNav.toExternal({
                        target : { semanticObject : "Customers", action : "display" },
                        params : { CustomerID : [ customerId ] }
                    })
                }

            }
		});
	});
2. Enable App-to-App Navigation
Here you will add some configurations manually which would be generated if you use “Enable App-to-App Navigation Preview” command.
2.1. Create test/flpSandbox.html file.
<!DOCTYPE html>
<html>

<head>
	<meta http-equiv="X-UA-Compatible" content="IE=edge" />
	<meta http-equiv="Content-Type" content="text/html;charset=UTF-8" />
	<meta name="viewport" content="width=device-width, initial-scale=1.0" />
	<title>Fiori Launchpad Sandbox</title>

	<script>
		window["sap-ushell-config"] = {
            defaultRenderer: "fiori2",
            bootstrapPlugins: {
                "KeyUserPlugin": {
                    "component": "sap.ushell.plugins.rta"
                },
                "PersonalizePlugin": {
                    "component": "sap.ushell.plugins.rta-personalize"
                }
            },
            applications: {
                "masterDetail-display": {
					title: "Order List",
					description: "",
					additionalInformation: "SAPUI5.Component=northwind.ordersfreestyle",
					applicationType: "URL",
					url: "../"
                },
            }
        };
	</script>

	<script id="sap-ui-bootstrap" src="/test-resources/sap/ushell/bootstrap/sandbox.js">
	</script>

    <script id="sap-ui-bootstrap"
        src="/resources/sap-ui-core.js"
		data-sap-ui-resourceroots='{"northwind.ordersfreestyle": "../"}'
        data-sap-ui-theme="sap_fiori_3"
        data-sap-ui-compatVersion="edge"
        data-sap-ui-async="true"
		data-sap-ui-frameOptions="allow">
	</script>

	<script>
		sap.ui.getCore().attachInit(() => sap.ushell.Container.createRenderer().placeAt("content"));
	</script>
</head>

<body class="sapUiBody" id="content"></body>

</html>
2.2. Create appconfig/fioriSandboxConfig.json file.
{
  "applications": {
    "Orders2-display": {
      "additionalInformation": "SAPUI5.Component=northwind.ordersfreestyle",
      "applicationType": "URL",
      "url": "../"
    },
    "Customers-display": {
      "additionalInformation": "SAPUI5.Component=northwind.customers",
      "applicationType": "URL",
      "url": "../resources/northwind.customers"
    }
  }
}
2.3. Add the following section to ui5.yaml.
 - name: fiori-tools-servestatic
    afterMiddleware: compression
    configuration:
      paths:
        - path: /resources/northwind.customers
          src: /home/user/projects/customers/webapp
        - path: /appconfig
          src: /home/user/projects/orders-freestyle/appconfig
Finally, start the app and open test/flpSandbox.html.
When you select a row and press “Nav to Customer” button, the Customers app will open and navigate to the Object Page.


