This blog is an end-to-end guide to development and deployment process, from creating ABAP RAP OData service, generate a Fiori element report as Multi-Target Application (MTA) and deploy it to Launchpad service in BTP.
Prerequisites:
- BTP trial/enterprise account(step 3 not possible with trail)
- Create ABAP environment instance in BTP
- Setup Business Application studio in BTP
- Add Launchpad subscription in BTP
Since the tutorial focuses on the end-to-end process, the application we will create a super simple application.
1. Create ABAP RAP business service
Create package and database table
Access your BTP ABAP environment (Steampunk) on ADT. Create a package, which I’ve named Z001_AY. Create a database table ‘zuser_master’ under the package. Save and activate it. When transport request is prompted, create a new transport or assign to the transport request of your choice.
@EndUserText.label : 'User master'
@AbapCatalog.enhancement.category : #NOT_EXTENSIBLE
@AbapCatalog.tableCategory : #TRANSPARENT
@AbapCatalog.deliveryClass : #A
@AbapCatalog.dataMaintenance : #RESTRICTED
define table zuser_master {
  key client : abap.clnt not null;
  key userid : abap.char(10) not null;
  first_name : abap.char(20);
  last_name  : abap.char(20);
  address    : abap.char(20);
  tele_num   : abap.char(10); }
Next, create class method zcl_data_generate. Copy paste the below code, save and activate. Execute this code and you can see that sample data is inserted to zuser_master. Go to data preview of the table and check if two records are displayed.
CLASS zcl_data_generate DEFINITION
  PUBLIC
  FINAL
  CREATE PUBLIC .
  PUBLIC SECTION.
    INTERFACES if_oo_adt_classrun.
  PROTECTED SECTION.
  PRIVATE SECTION.
ENDCLASS.

CLASS zcl_data_generate IMPLEMENTATION.
  METHOD if_oo_adt_classrun~main.
    DATA:lt_user_master TYPE STANDARD TABLE OF zuser_master.

    delete FROM zuser_master.

    lt_user_master = VALUE #( ( userid = '1' first_name = 'Aocheng' last_name = 'Yang' address = 'Somewhere' tele_num = '123456' )
                            ( userid = '2' first_name = 'Bocheng' last_name = 'Yang' address = 'Next door to Alice' tele_num = '987654'  )
                             ).

    INSERT zuser_master FROM TABLE @lt_user_master.
  ENDMETHOD.
ENDCLASS.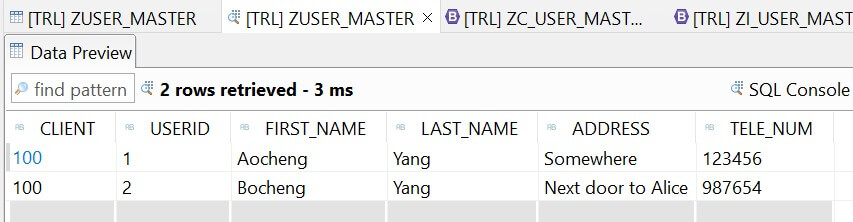
Create data definition
Create data definitions. Create base CDS view entity zi_user_master and projection view entity zc_user_master. Save and activate them.
@AccessControl.authorizationCheck: #NOT_REQUIRED
@EndUserText.label: 'Data definition view entity user master'
define root view entity zi_user_master
  as select from zuser_master
{
  key userid     as Userid,
      first_name as First_name,
      last_name  as Last_name,
      address    as Address,
      tele_num   as Tele_num
}
@AccessControl.authorizationCheck: #NOT_REQUIRED
@EndUserText.label: 'Projection view entity user master'
@Metadata.allowExtensions: true
define root view entity zc_user_master
provider contract transactional_query
as projection on zi_user_master
{
key Userid,
First_name,
Last_name,
Address,
Tele_num
}Create metadata extension for zc_user_master. This defines the UI features of Fiori Element List report. Save and activate them.
@Metadata.layer:#CUSTOMER
annotate view zc_user_master with
{
  @UI.identification: [{ position:1, label: 'User ID' }]
  @UI.lineItem: [{ position:1, label: 'User ID' }]
  Userid;
  @UI.identification: [{ position:2, label: 'First name' }]
  @UI.lineItem: [{ position:2, label: 'First name' }]
  First_name;
  @UI.identification: [{ position:3, label: 'Last name' }]
  @UI.lineItem: [{ position:3, label: 'Last name' }]
  Last_name;
  @UI.identification: [{ position:4, label: 'Address' }]
  @UI.lineItem: [{ position:4, label: 'Address' }]
  Address;
  @UI.identification: [{ position:5, label: 'Telephone number' }]
  @UI.lineItem: [{ position:5, label: 'Telephone number' }]
  Tele_num;

}
Create behavior definition
Create behavior definitions for zi_user_master. Here we define which CRUD operations are used, fields attribute and validations and custom logics associated to the fields. Save and activate it.
managed implementation in class zbp_i_user_master unique;
strict;

define behavior for zi_user_master alias root_user_master
persistent table zuser_master
lock master
authorization master ( instance )
{
  mapping for ZUSER_MASTER
  {
    userid = Userid;
    first_name = First_name;
    last_name = Last_name;
    address = Address;
    tele_num = Tele_num;
  }
}
Create behavior definitions for zi_user_master. Here we define which CRUD operations and actions are exposed. Save and activate it.
projection;
strict;

define behavior for zc_user_master alias user_master
{ }
Create service
Create service definition from projection view zc_user_master. Save and activate it.
@EndUserText.label: 'Service definition for ZC_USER_MASTER'
define service ZUI_USER_MASTER {
  expose zc_user_master;
}
Create service binding from service definition. Choose OData V4 – UI as the binding type. Activate it and publish the service.
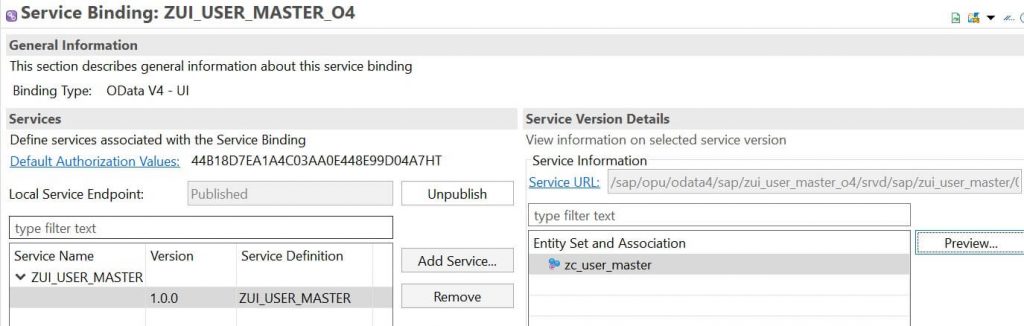
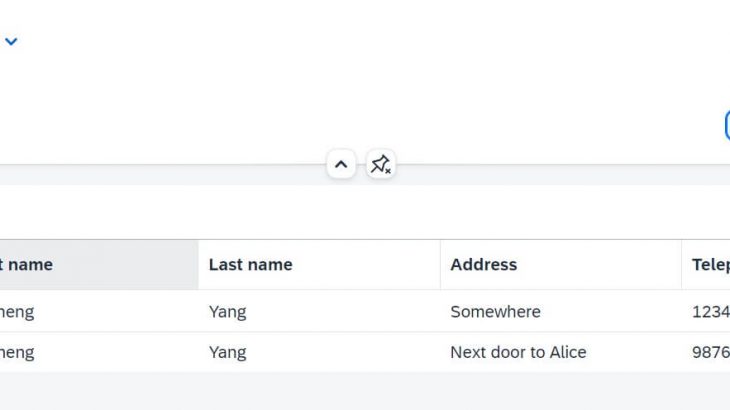
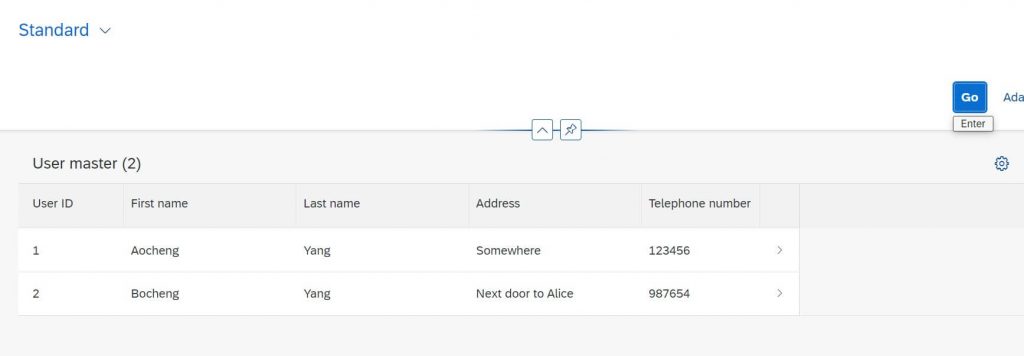
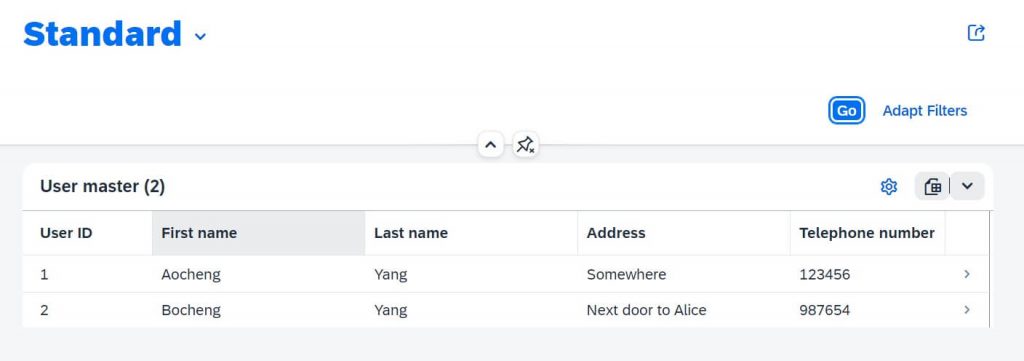
Select entity set zc_user_master and click Preview. Browser will show empty list report page. Click Go and two records should be displayed.
If you are looking for a more structured certification preparation guide that walks you through SAP ABAP Cloud and backend development best practices, you can refer to this detailed SAP ABAP Cloud Developer Certification Guide.
2. Create Multi-Target Application in BAS
Access Business Application Studio and create a dev space with Fiori development(tutorial).
Login to cloud foundry space
In your BAS development space, run command ‘cf login’ and enter your credential to login. Make sure to choose the right CF space in you have more than one.
Create MTA project
Go to View->Find command and run ‘Fiori: Open CF Application Router Generator’. Enter the parameter as follows and finish.
| Parameter | Value |
| Application router project path | /home/user/projects (default) |
| MTA ID | ZUSER_MASTER_MTA (or your own ID) |
| MTA Description | User master MTA project |
| Add route module | Managed Approuter |
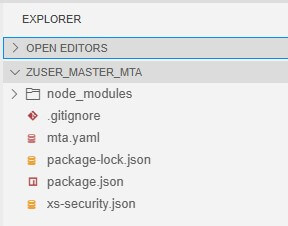
Go to File->Open workspace and choose the MTA project just got created. It should look something like this.
Create Fiori element project
Next, generate an app based on ABAP RAP Odata. View->find command and ‘Open Template Wizard’ Choose Fiori application from template and choose Fiori element. Choose List report object page and enter the followings.
| Parameter | Value |
| Data source | Connect to a system |
| System | ABAP Environment on SAP Business Technology Platform |
| ABAP Environment | Your ABAP Environment |
| Service | ZUI_USER_MASTER_O4 > ZUI_USER_MASTER (0001) – OData V4 |
| Main entity | ZI_USER_MASTER |
Project attribute
| Parameter | Value |
| Module name | ZUSER_MASTER |
| App title | User master app |
| Project folder name | /home/user/projects/ZUSER_MASTER_MTA |
| Minimum UI5 version | 1.102.7(source system version) |
| Add deployment configuration to MTA project (/home/user/projects/ZUSER_MASTER_MTA/mta.yaml) | Yes |
Deployment configuration
| Parameter | Value |
| Target | Cloud Foundry |
| Destination | Your CF name |
Now your Fiori element project should be displayed under your MTA project.
Build and deploy MTA
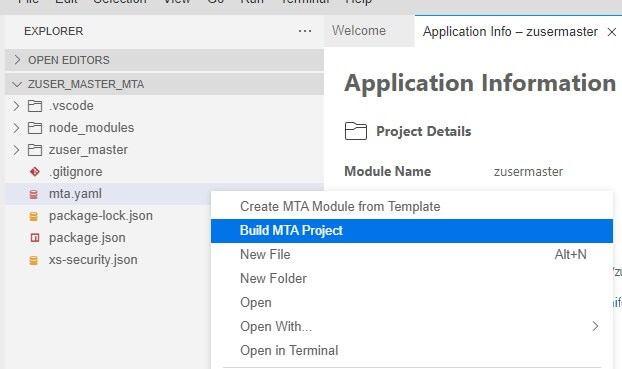
Build MTA project by right clicking mta.yaml file and choose Build MTA project.
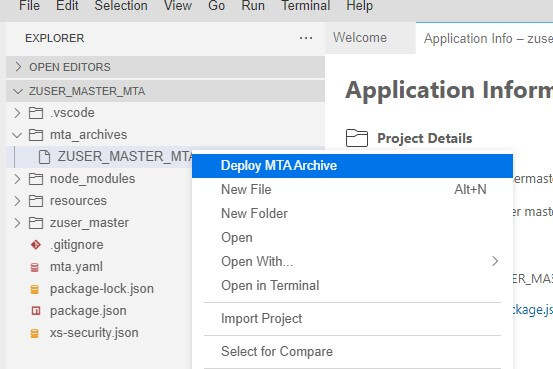
Build proces should end like this and mta_archives folder should be generated with ZUSER_MASTER_MTA_0.0.1.mtar file under it.

Deploy mtar file by right clicking the file and choose Deploy MTA archive.
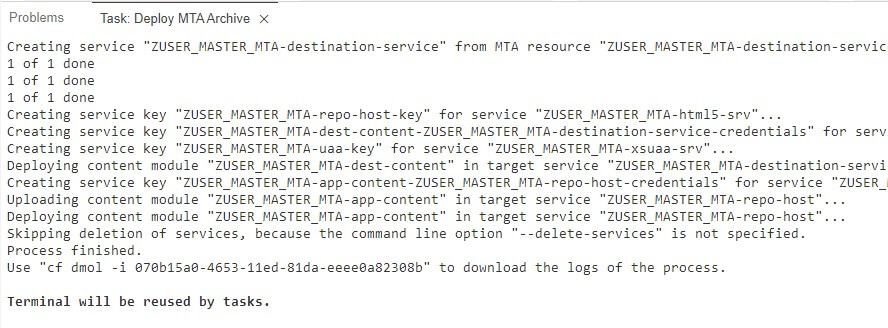
Go back to BTP cockpit. As result of deployment, you can see in the HTML5 section, your application is displayed. In addition, if you payed attention to the log, new services associated to your new HTML5 application are created.
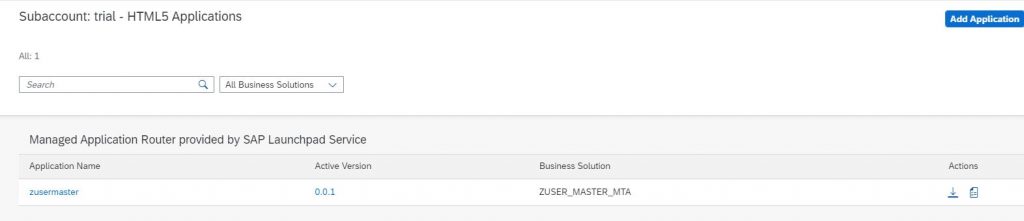

Click on the HTML5 application to see the app.
3. Add HTML5 app to Launchpad service
It seems that trail account does not allow assignment of application coming from HTML5 app repository in cloud foundry. Therefore this step is not possible with trail account.
Open launchpad service and from the left side pane, go to Site Directory and create a new site.
Go to content manager, change to content explorer, select HTML5 apps and add your app.(if your app is not there, go to channel manager and update HTML5 apps)
Go back to My Content tab and go to Role Everyone and assign your application into the role.
Create a new Group and assign your application in the same manner. Open the launch pad site and now your app should be displayed there.


