Introduction:
In this blog, we will see the steps required for the creation of Defects and Solving them by the 8-Dimensioal Methodology (by using Process Defects and Resolve Internal Problems Fiori apps) for Quality Management into the Rise with SAP 2302.
Defects:
Defects are recorded with the help of predefined defect codes maintained in the inspection catalog, as a defect is any property or attribute of a material, product, or process that does not meet the inspection characteristic specifications.
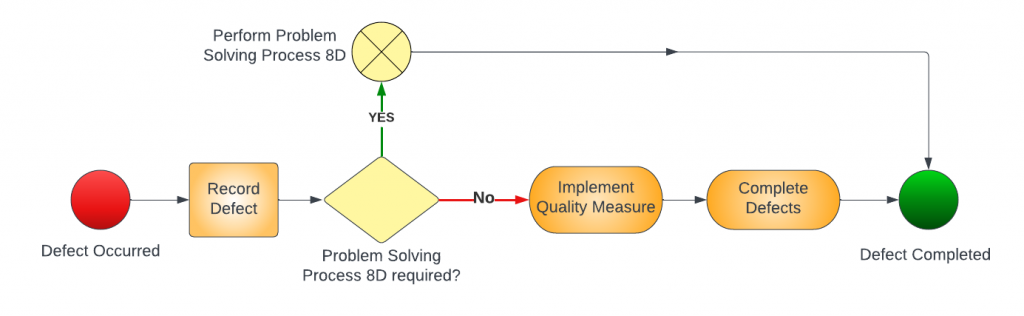
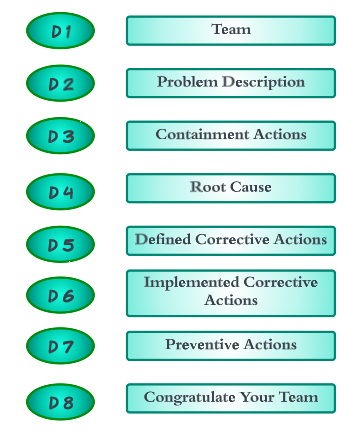
8 Disciplines:
The Eight Disciplines Methodology (8D) is a method or model developed at Ford Motor Company and typically employed by quality engineers or other professionals to approach and resolve problems. Focused on product and process improvement, its purpose is to identify, correct, and eliminate recurring problems. The 8D steps are sequential and build on each other, and if you have the discipline to stay on track, you will optimize the use of the 8D process.
Process Defects:
The defects can be processed using the 8D methodology or by using process defect and manage defects tiles. Here in this blog, we will see how defects will be processed using the 8D methodology.
Contents Discussed in this Blog:
- How to Create Defects.
- How to Resolve the defect by using 8 Discipline process
I: Creation of Defects:
When any defect is identified by a Quality technician or Quality engineer, they will create a defect by using the “Process Defects” Fiori app and upload the relevant documents and pictures if required.
STEP 1:
Select the “Process Defects” Tile,
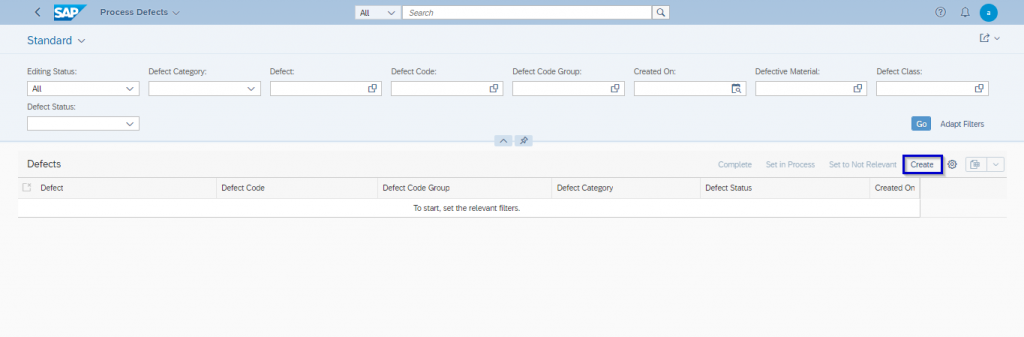
In this Screen click on Create icon for Defects Creation.
Note: Defects can be created by using Process Defects, Record Defects, and Record Production Defects, Tiles.
STEP 2:
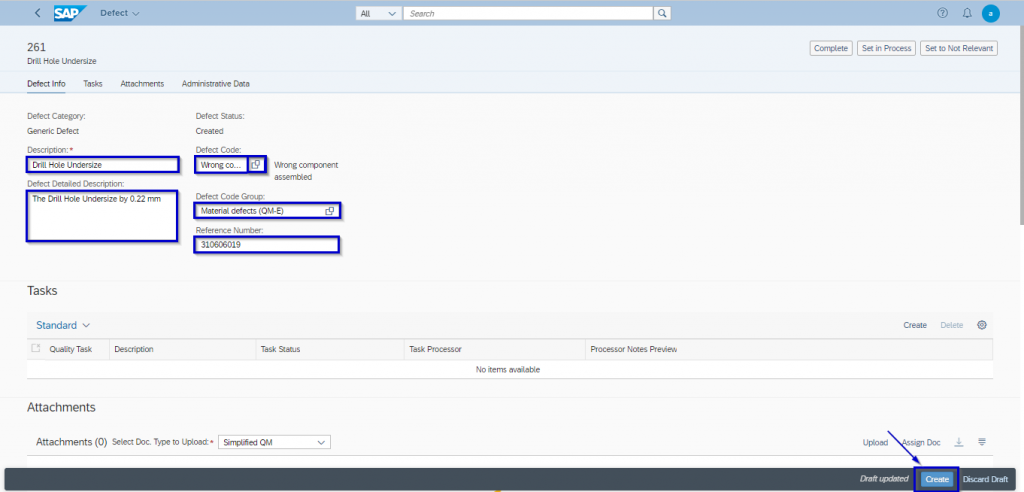
Create the Defects by using the Process Defects tile, In the initial screen, enter the relevant details like “Description”, “Defects Detailed Description”, “Defect Code”, “Defect Code Group” and “Reference Number” etc…then click “Create” button.
STEP 3:
Then go to the Task tab, and click the “Create” icon to Create a Task.
Note: In order to create the task, the defect has to be created first and then Click Edit Icon.

When you click the “Create Task” button, the system will navigate to the Quality Task screen. In this initial screen, enter the relevant details like “Task Code”, “Task Code Group”, “Description”, “Task Processor”, “Time Effort” etc… and then click the “Create” button.
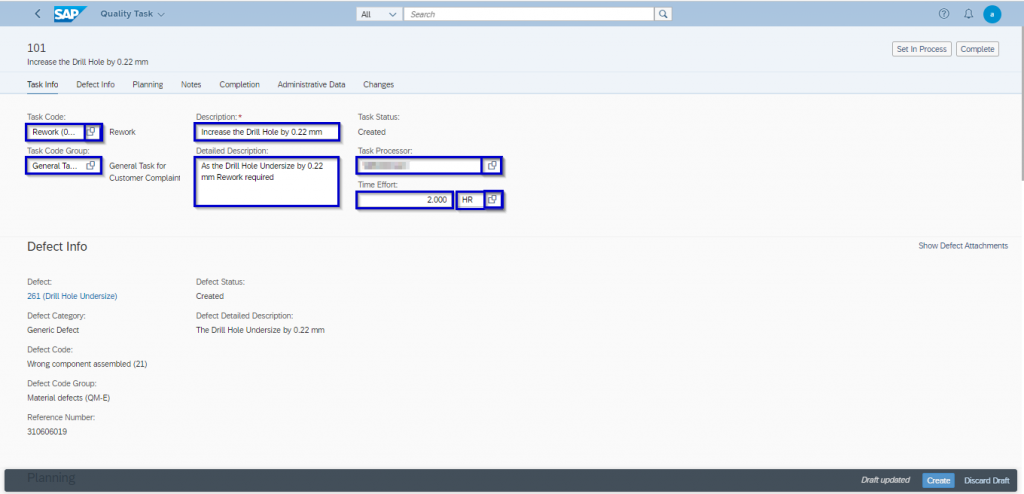
Notification will be sent to the respective processor.
Note: In order to send notifications to the task processor, we have to create a workflow by using Manage workflows for Quality Task processing.
Now the assigned task processor receives the notification for the defects in his initial screen as shown in the below image.
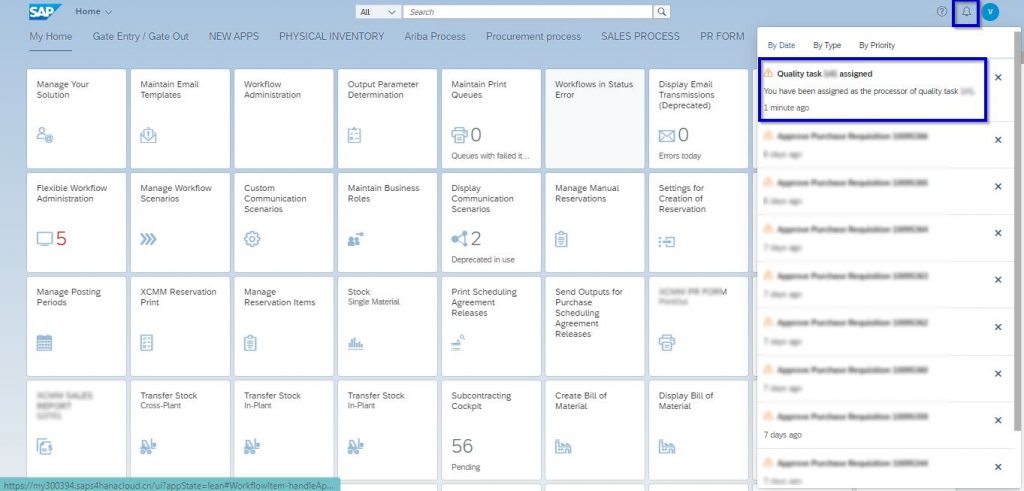
Now the processor will open the Task by using the open task button.

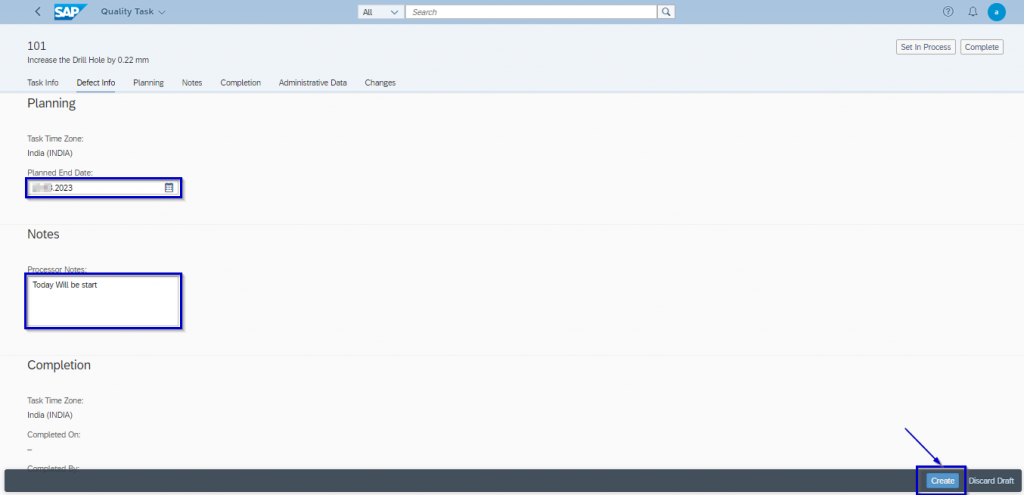
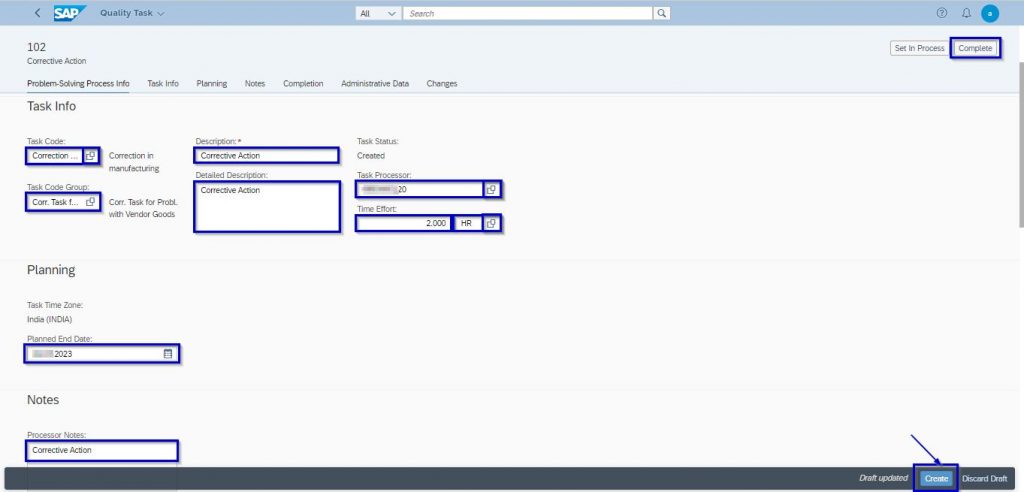
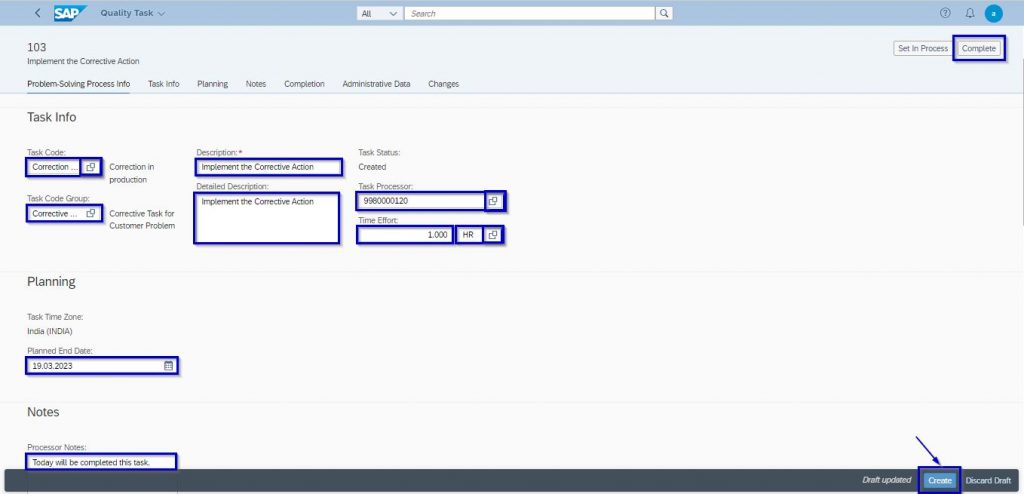
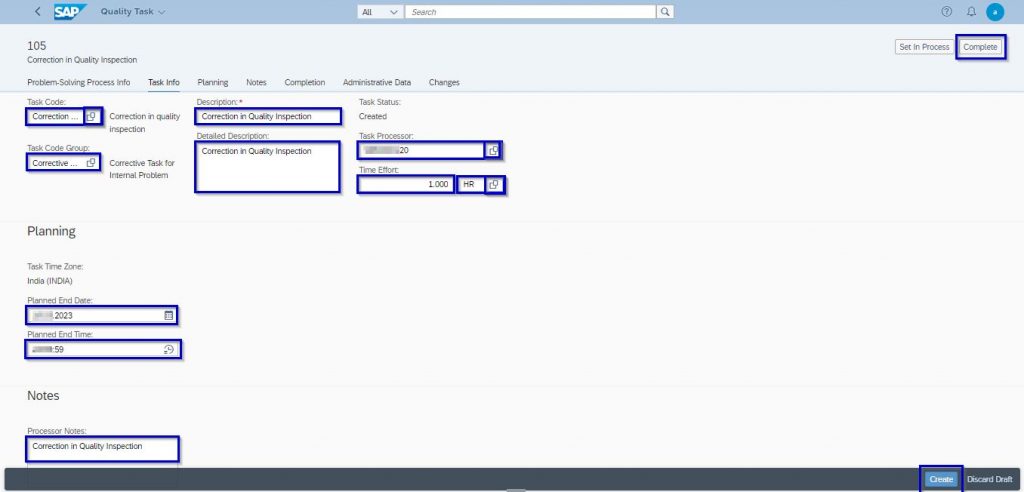
STEP 4:
In this screen, the processor will enter the “Planned End Date” and “Processor Notes”. Then click Create icon.
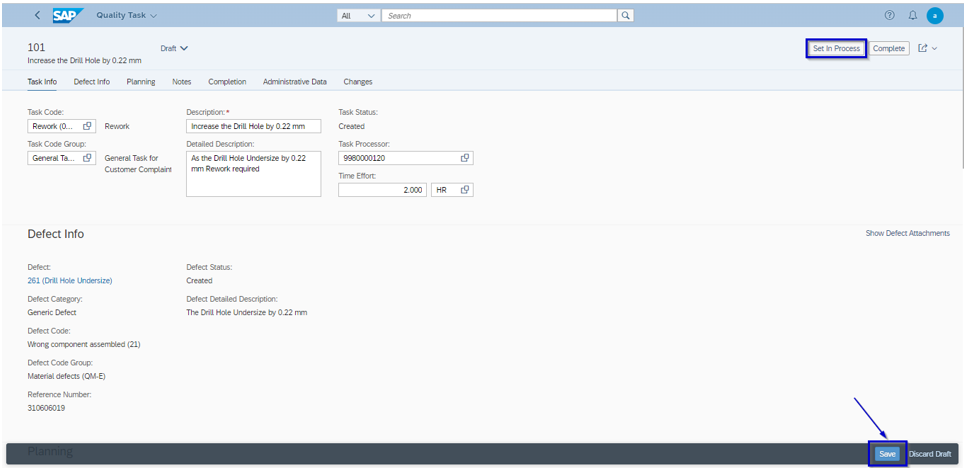
Then click the “Set in Process” Icon
STEP 5:
This tab gives provision to attach some evidence for the Defect. Select the appropriate document type from “Select Doc. Type to Upload” and select the document to be attached by clicking on the “Upload” button.

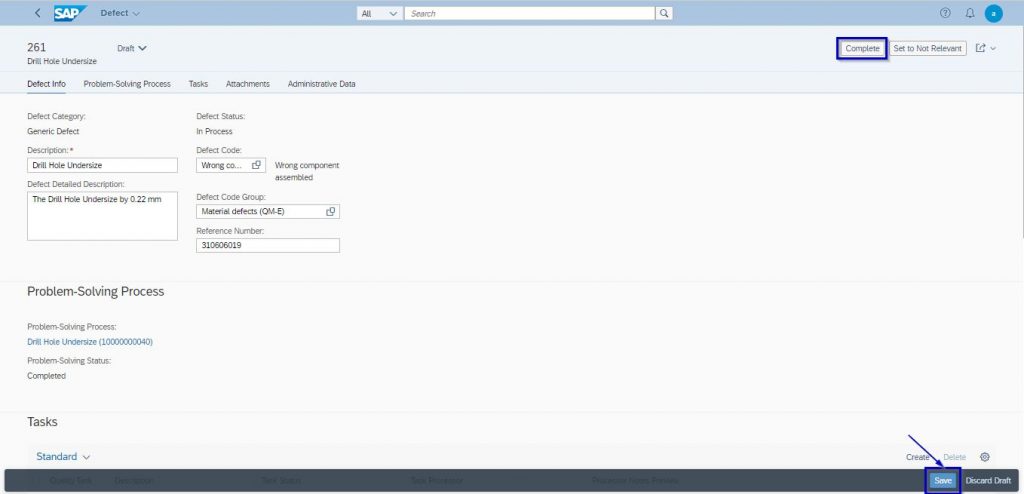
Verify the status of the Defect and Click the “Save” button.
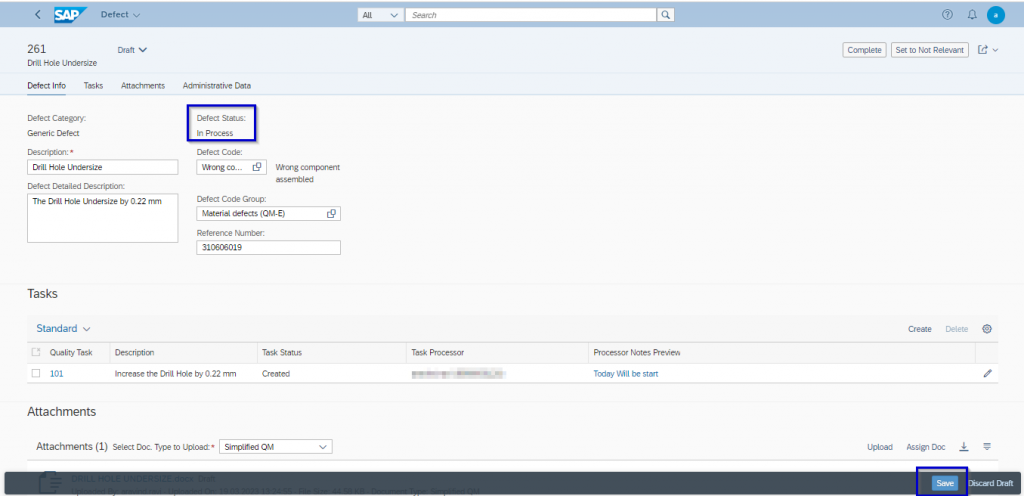
Click the “Start Problem-Solving Process” icon. Problem-solving process number will get generated automatically.

II: 8-Dimensional Methodology:
Process:
- An 8D report is a structured approach to problem-solving, in which a team is formed and commissioned to investigate the underlying causes of a manufacturing issue, using the eight disciplines (8D methodology -an eight-step problem-solving process designed to address manufacturing nonconformances and implement continuous improvement).
- The goal of 8D is to eliminate the root causes that may lead to the recurrence of non-conformance. The 8D report provides a record of the problem, the root cause(s) identified, and the corrective and preventive actions taken to eliminate the circumstances under which the problem occurred.
Start Problem-Solving Process:
- When a defect is identified, the Quality Engineer would trigger an 8D process. Currently, we can create a Problem-Solving Process from Generic and Production defects, but it is only possible to create one Problem Solution Process per Defect.
- As soon as the Quality Engineer triggers the Problem-solving process, a Problem-solving number is generated, which is then linked to the defect.
- In general, problem-solving processes should support the definition and processing of several actions of different types, such as containment, preventive or corrective actions in an 8D process.
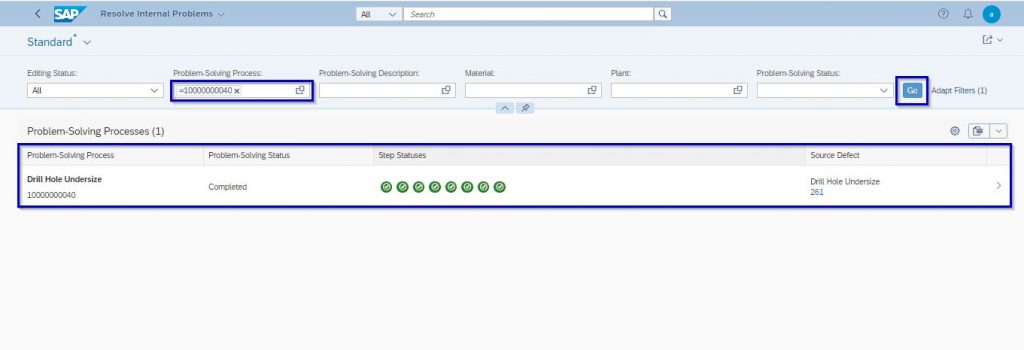
Select the “Resolve Internal Problems” Tile.
Enter the “Problem-Solving Process Number” and click the “GO” Icon. Now select the required problem-solving process.
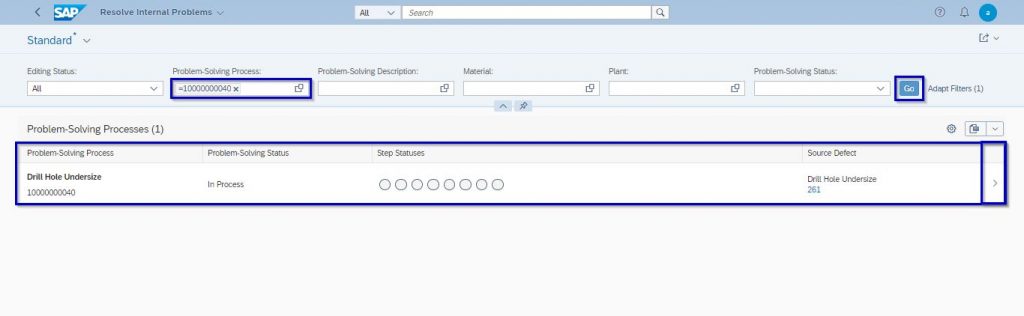
we can see the 8 Problem-solving Steps. Click the “Edit” Icon.
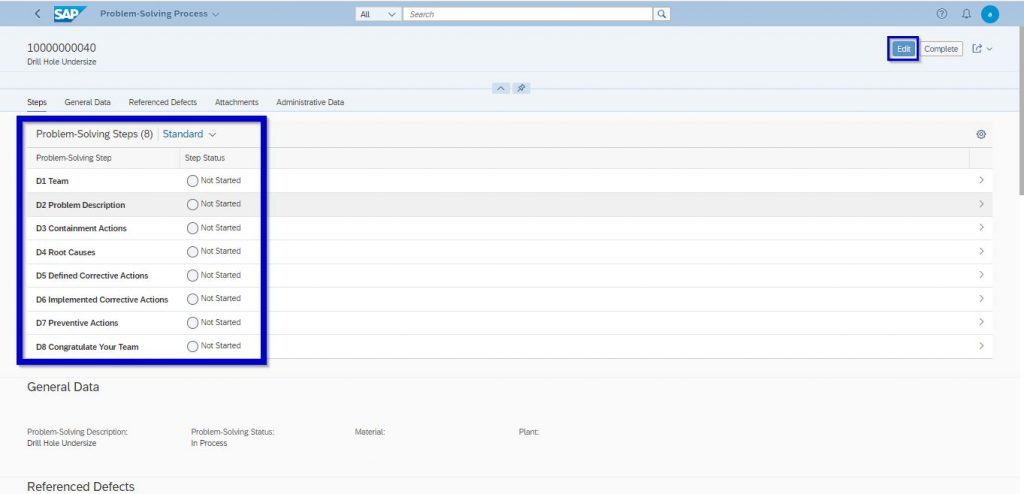
STEP 1: D1-TEAM
Establish and select a team of people with product/process knowledge.
In this step, you will define a team to solve the problem. Enter the required details.
Note: The team will have a team leader and team members, along with details such as email
ID and phone number.
This team will be responsible for performing the subsequent steps in 8D.
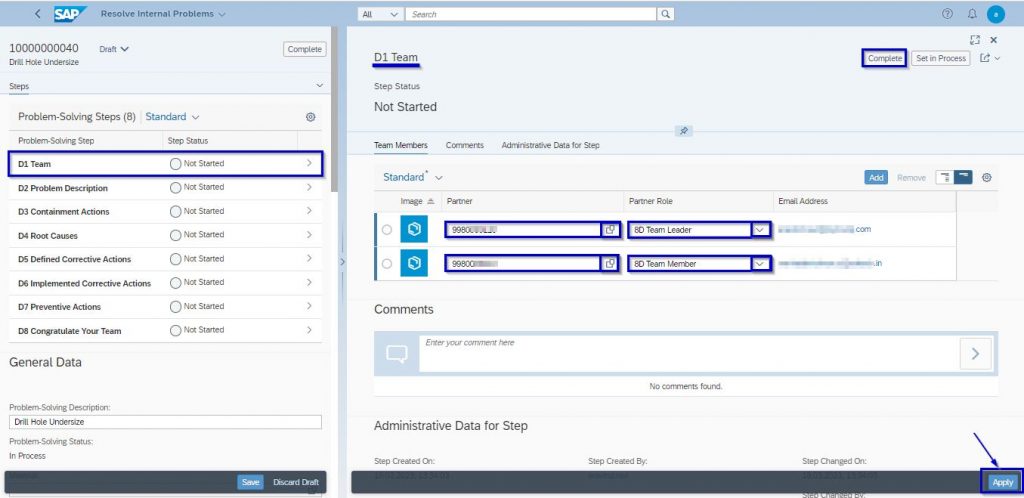
Once all Team members are assigned click the “Apply” and “Complete” Icon.
Now we can see that this, status of the step “D1” Changed to Completed. Go to Step 2.
STEP 2: D2-PROBLEM DESCRIPTION:
In this step, we have to clearly define the problem. The Problem description will have the defect “Code Group” and “Defect code”. This step also displays details relating to the original source defect.
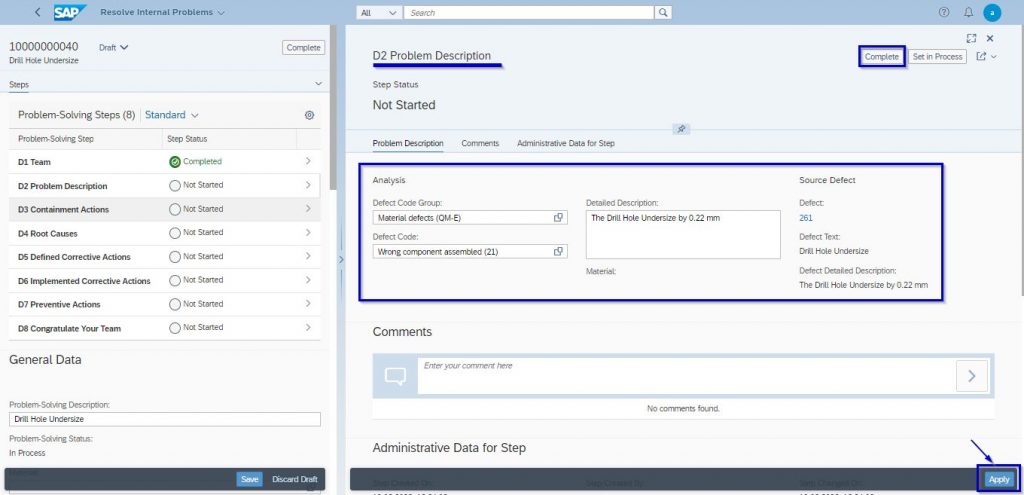
Step 2 Process is Completed and go to Step 3.
STEP 3: D3-CONTAINMENT ACTIONS:
In order to resolve the problem, you can define immediate actions as tasks. These immediate actions serve as provisional measures for damage limitation, and it is crucial to ensure that containment actions do not create any new problems. At this stage, you can create a Quality Task that is linked to your Problem-solving Process number.
Click the “Create” Icon in order to create the Task.
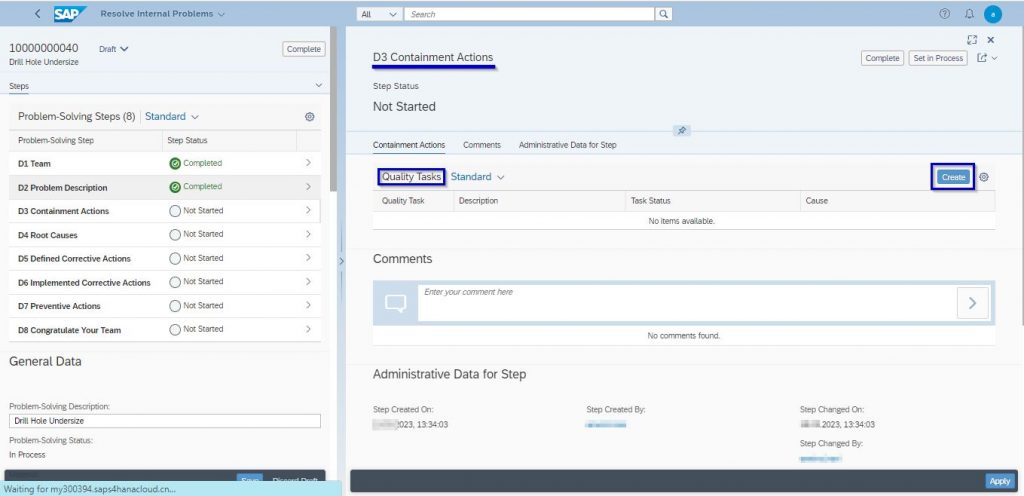
In this screen, enter the relevant details like “Task Code”, “Task Code Group”, “Description”, “Task Processor” and “Time Effort” etc…then click the “Create” button.
After entering the required details. Click the “Apply” and “Complete” Icon.
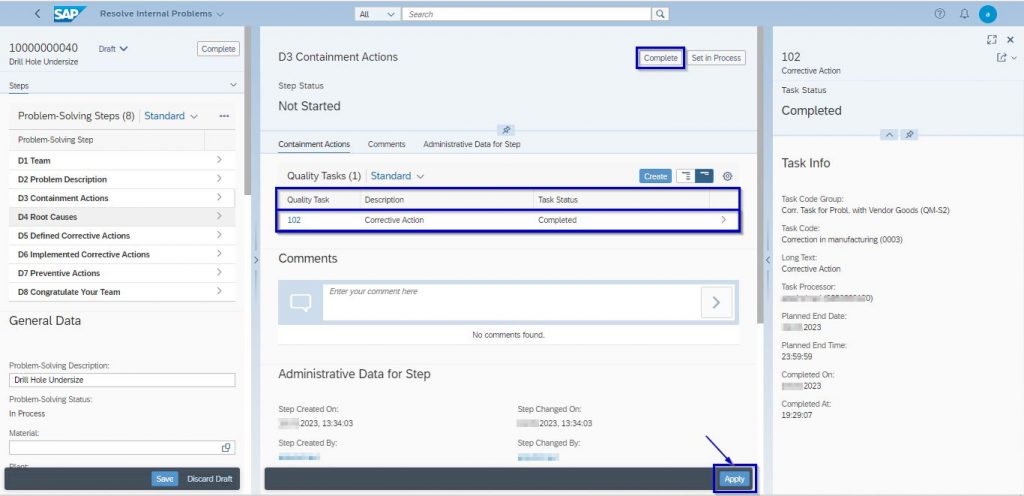
Step 3 Process is Completed and go to Step 4.
STEP 4: D4-ROOT CAUSES:
Identify all applicable causes that could explain why the problem occurred.
Enter the “Cause Description” and “Detailed Description”.
Click the “Apply” button.
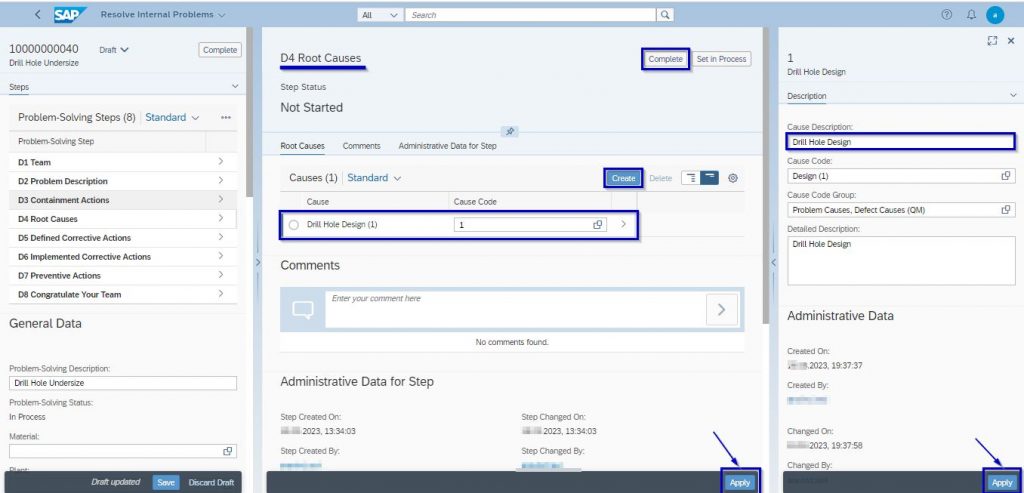
Click the “Apply” and “Complete” Icon
Step 4 Process is Completed and go to Step 5.
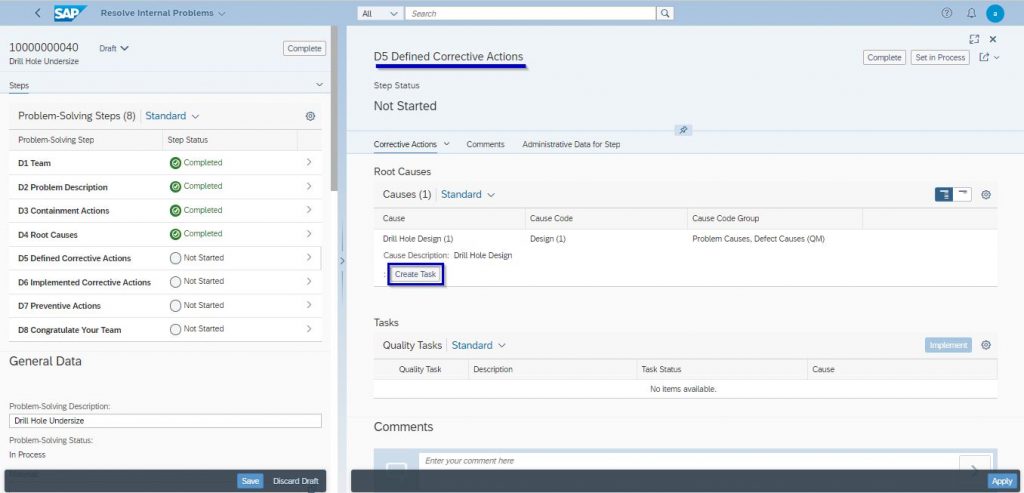
STEP 5: D5-DEFINED CORRECTIVE ACTIONS:
In this step, you can define a remedy for each cause, which will help to avoid the recurrence of the problem and remove the root cause. You can implement the corrective actions at this stage.
Click the “Create” Icon in order to create the Task.
In the initial screen, enter the relevant details like “Task Code”, “Task Code Group”, “Description”, “Task Processor” and “Time Effort” etc…then click the “Create” and “Complete” button.
Select the Quality task line item and then click the “Implement” Button. Click the “Apply” and “Complete” Icon.
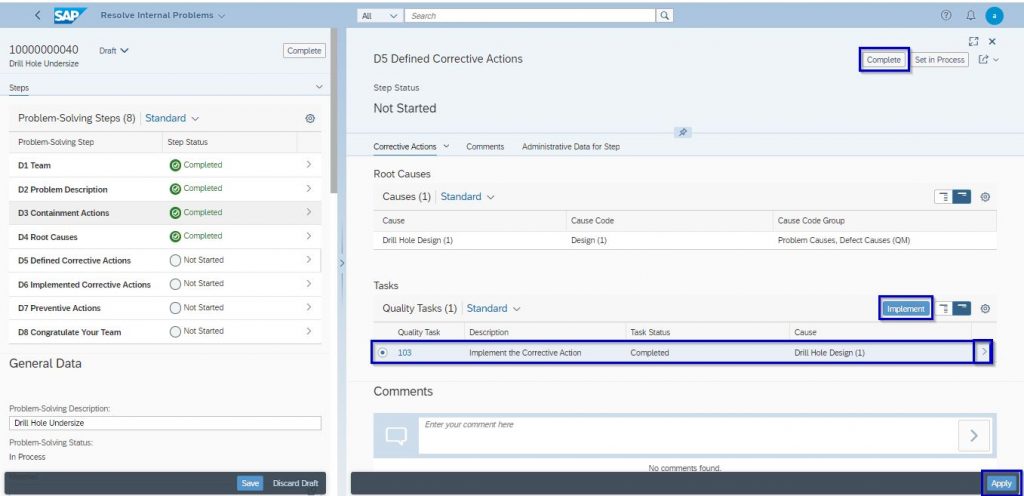
Step 5 Process is Completed and go to Step 6.
STEP 6: D6-IMPLEMENTED CORRECTIVE ACTIONS:
At this stage, you can edit the implemented corrective actions that were created from a defined corrective action. The main purpose of this step is to verify the actions taken in step D5.
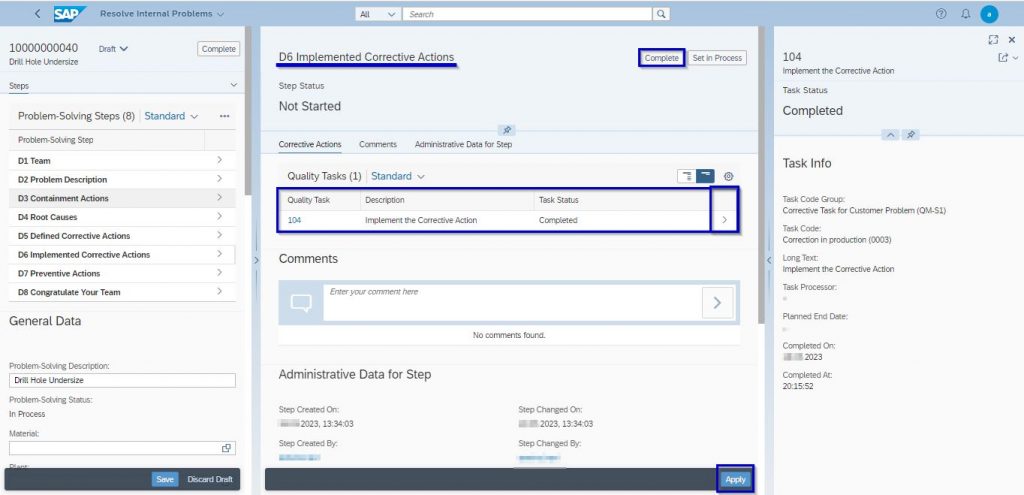
Click the “Apply” and “Complete” Icon.
Step 6 Process is Completed and go to Step 7.
STEP 7: D7-PREVENTIVE ACTIONS:
Modify the management systems, operation systems, practices, and procedures to prevent the recurrence of this and all similar problems.
Click the “Create” Icon in order to create the Task.
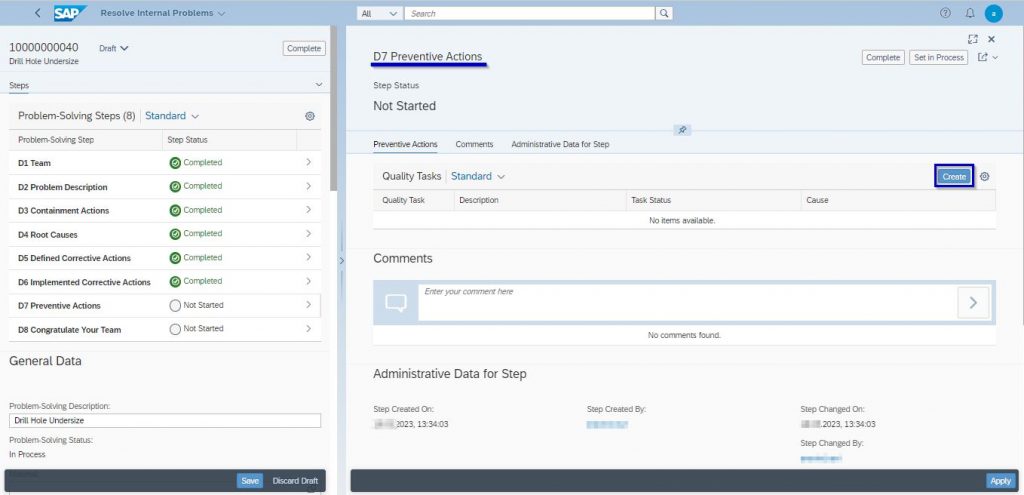
Create the Task by using the Quality Task tile, In the initial screen, enter the relevant details like “Task Code”, “Task Code Group”, “Description”, “Task Processor” and “Time Effort” etc…then click “Create” and “Complete” button.
Click the “Apply” and “Complete” Icon.

Click the “Apply” and “Complete” Icon.
Step 7 Process is Completed and go to Step 8.
STEP 8: D8-CONGRATULATE YOUR TEAM:
Recognize the collective efforts of the team. The team needs to be formally thanked by the organization.
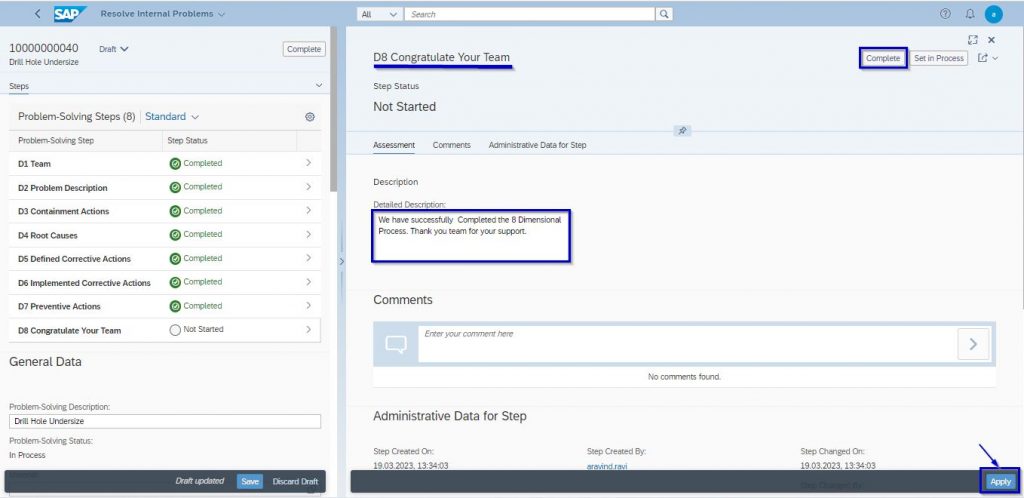
Click the “Apply” and “Complete” Icon.
Step 8 Process is Completed.
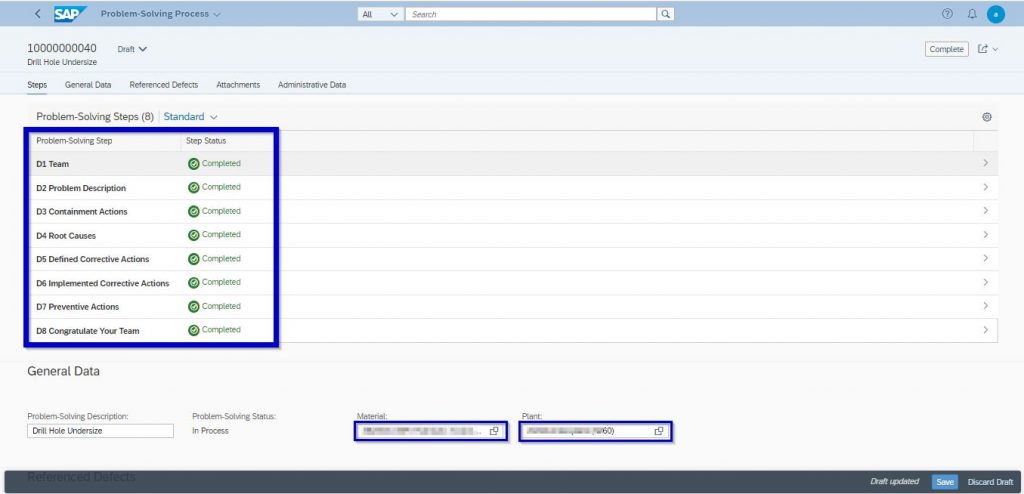
We can see the 8 Problem-solving Steps are Completed. Enter the “Material Number” and “Plant”.
This tab gives provision to attach some evidence of the 8 Dimension report. Select the appropriate document type from “Select Doc. Type to Upload” & select the document to be attached by clicking on the “Upload” button.
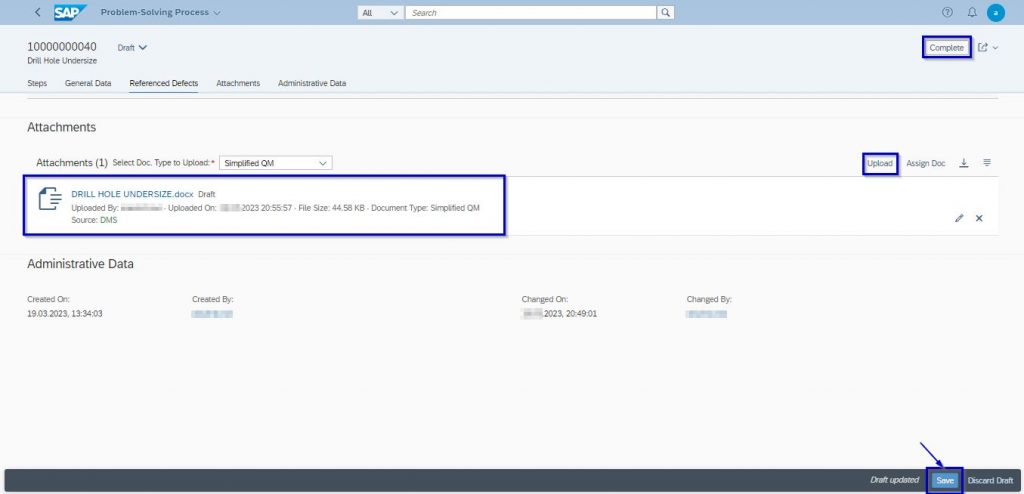
Finally, click the “Save” and “Complete” Icon.
Problem-Solving Process is Successfully Completed.
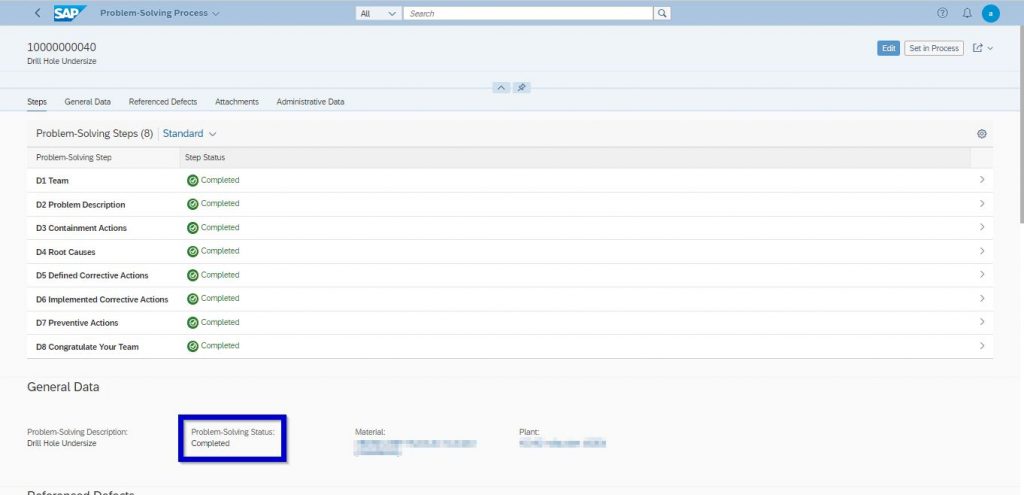
In the Resolve internal Problems screen, check the Status for Problem Solving Process.
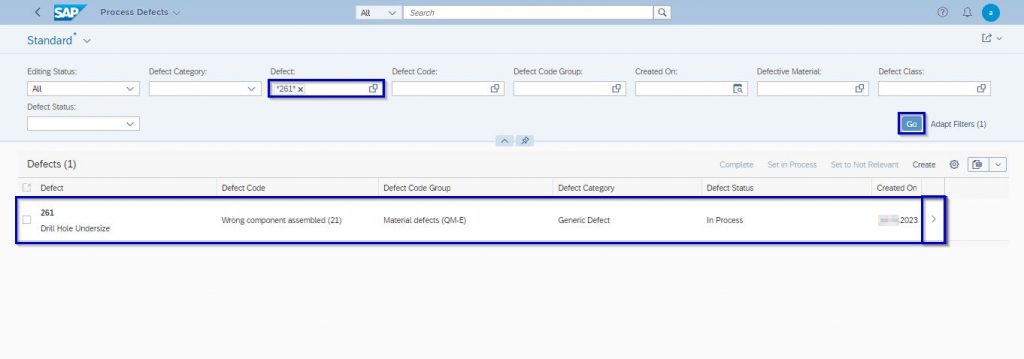
Move to the process Defects Screen.
Enter the “Defects” and “Defects Status” and click the “GO” Icon
Click the “Edit” Icon.
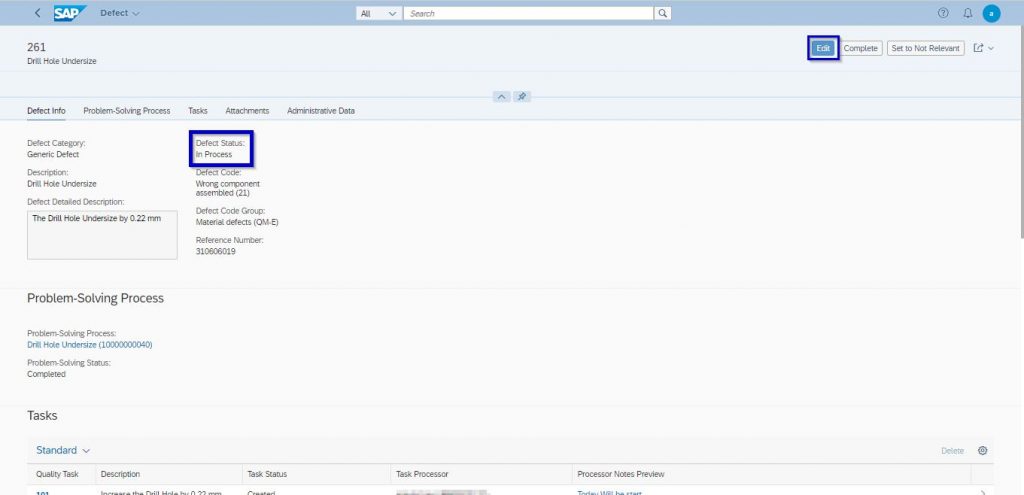
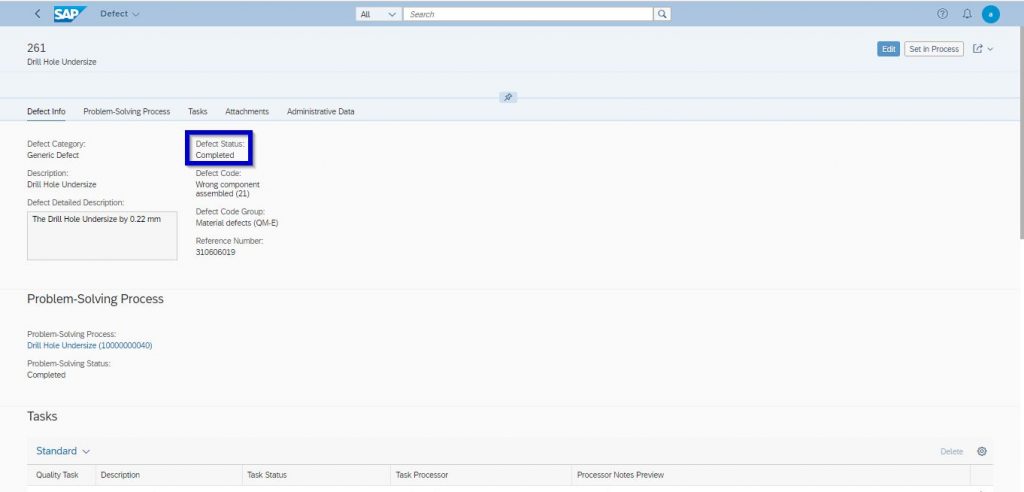
Click the “Complete” Icon, The Defect is Completed, and Click the “Save” Icon.
Now we can see that the status of the defect has been changed to complete.
Conclusion:
- In conclusion, the creation of defects in SAP QM is an important step in ensuring product quality and identifying potential issues early on in the production process. By accurately documenting defects and their associated information such as defect codes and inspection characteristics, companies can improve their overall quality management systems and reduce the likelihood of defects recurring in the future.
- Properly utilizing SAP QM for defect creation can also lead to better communication and collaboration between quality engineers, production teams, and other stakeholders involved in the manufacturing process.
- The resolution of internal problems in SAP requires a systematic approach using the 8D problem-solving methodology. This involves defining a team with product/process knowledge, identifying the problem and its root cause, implementing corrective and preventive actions, and verifying the effectiveness of the actions taken.
- The SAP system provides various tools and functionalities to manage the entire problem-solving process, including defining tasks, assigning responsibilities, and tracking progress. Finally, it is important to recognize the efforts of the team and formally thank them for their contributions to the resolution of the internal problem.


