In this blog, I will create a service from CDS views and implement an application using various annotations. I hope it will be a fun and an informative blog.
Prerequisites
- Creating CDS view.
- SAP Development tools for Eclipse.
Procedures
- Creating a service definition from CDS view
- Creating a service binding from service definition
- Developing App using annotations
Creating a Service From CDS View
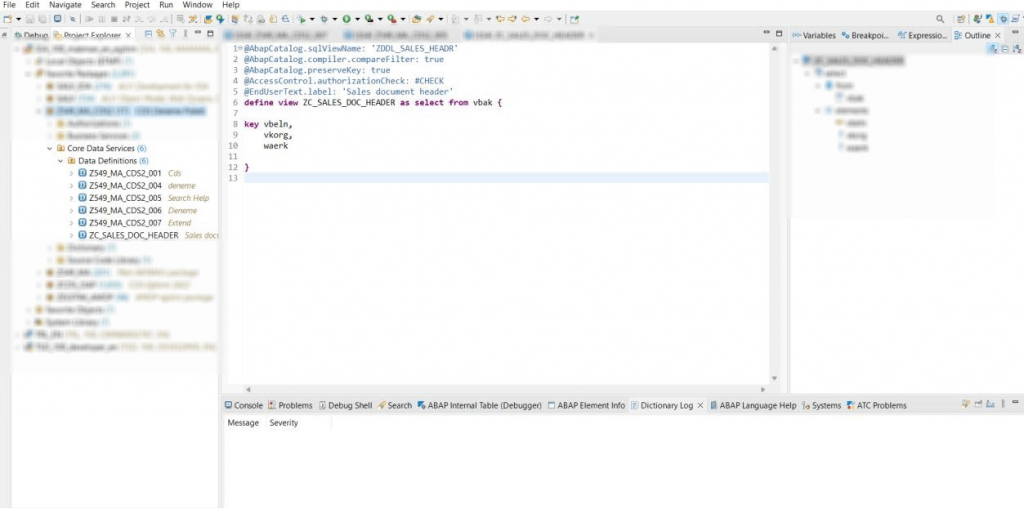
In this example, a simple CDS view was created using the VBAK table.
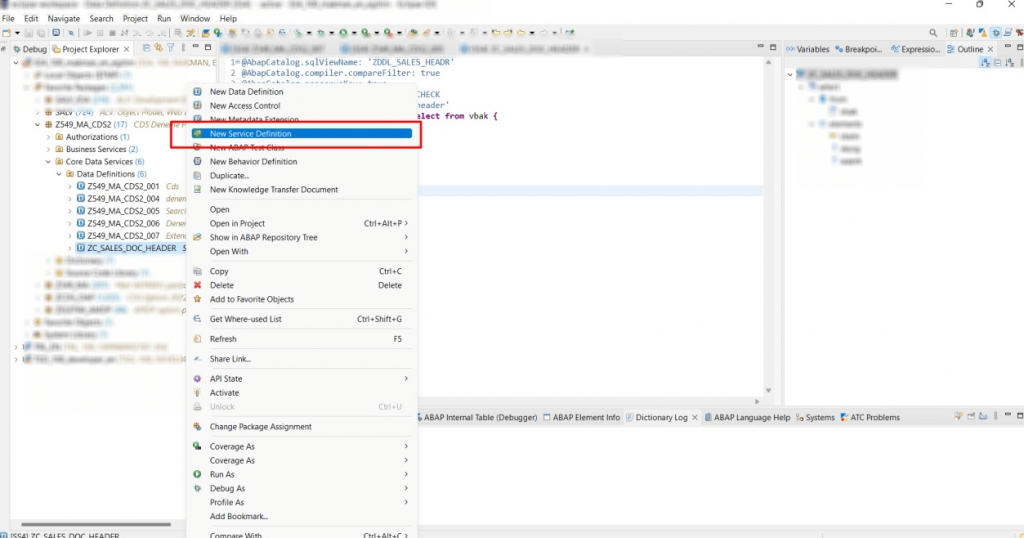
To create a service from CDS, more than one method can be used; in this example, we created a new service using the “New Service Definition” feature.
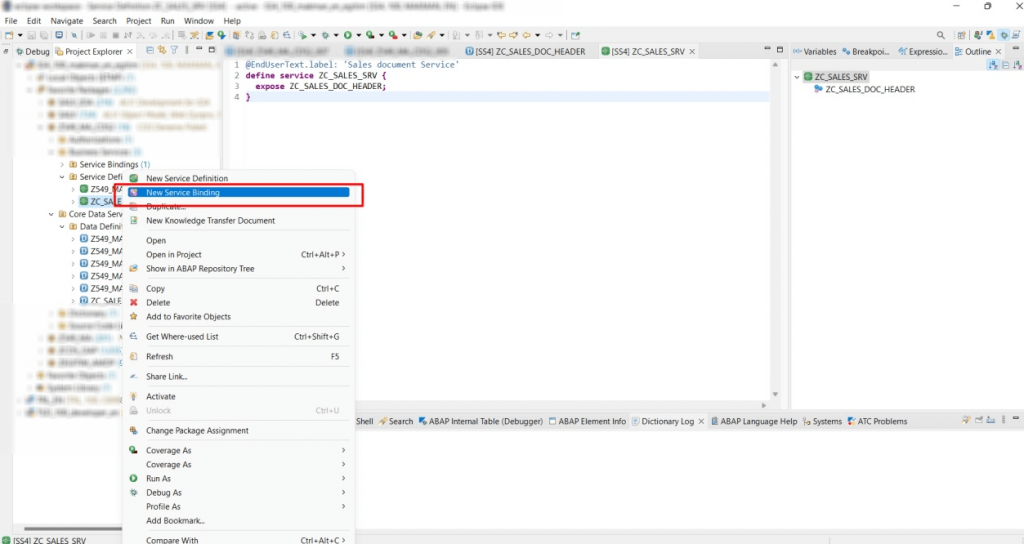
Right click on the CDS (previously created) and click on “New Service Definition”.
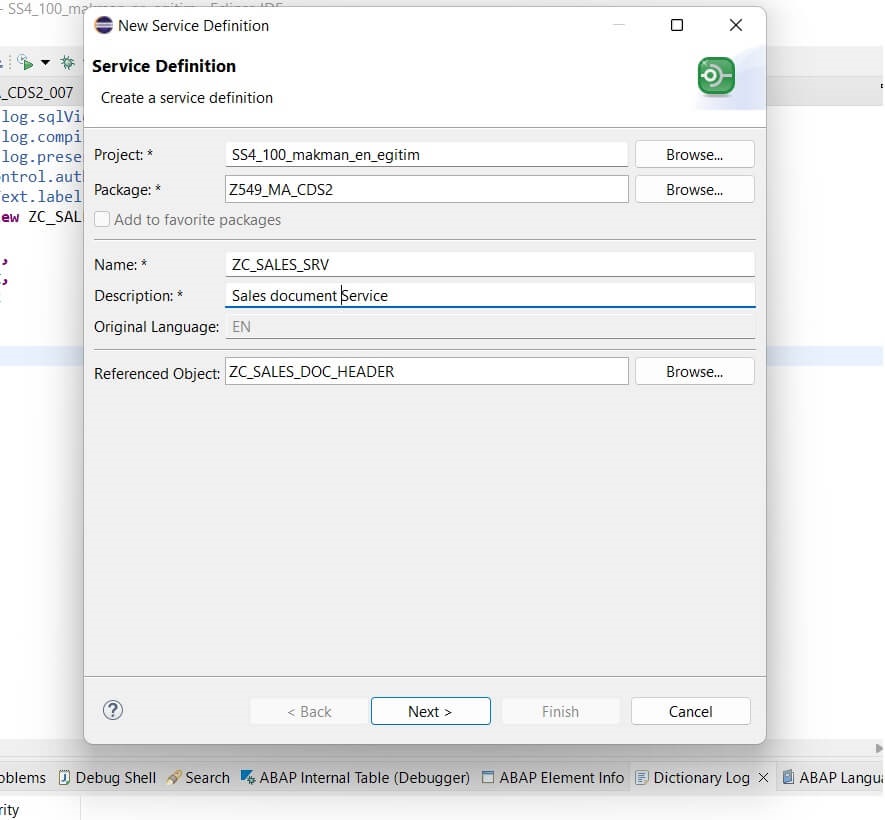
You will need to enter the name and description of the service you will create. You will find the ‘Referenced Object’ field automatically filled.
Right click on the service we created in the previous step and select ‘New Service Binding’.
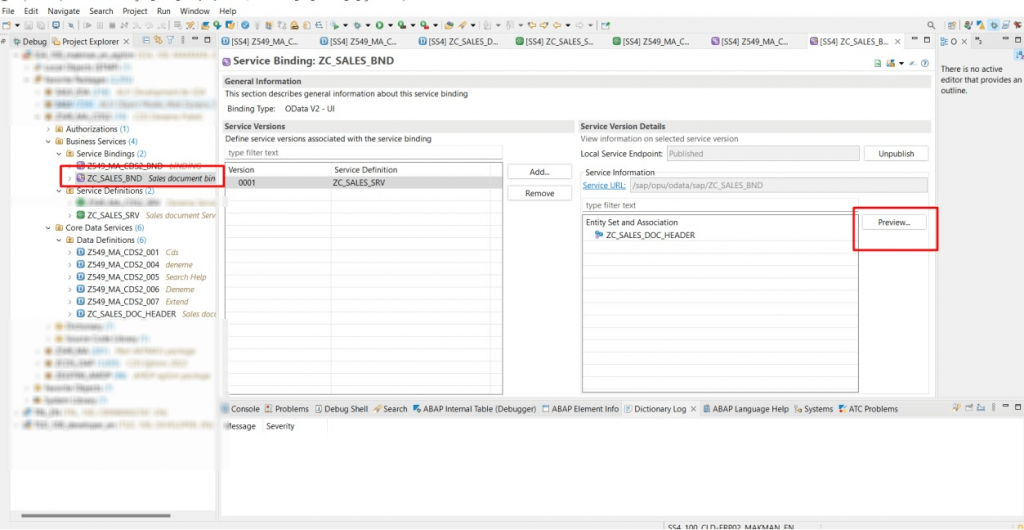
Click the ‘Publish’ button in the created binding service and click ‘Preview’ to try the created service in your internet browser.
Please note: Since we have not added any annotation, no data will be received when the ‘GO’ button is pressed.
Congratulations. If you’ve made it this far with me, you’ve now created a service from CDS. In the following actions we will make various changes to our service using annotations. Get ready. The fun starts now 🙂
Annotations
Many things can be said about annotations. In short, annotation is an enabler that allows you to add code to the source code of CDS.
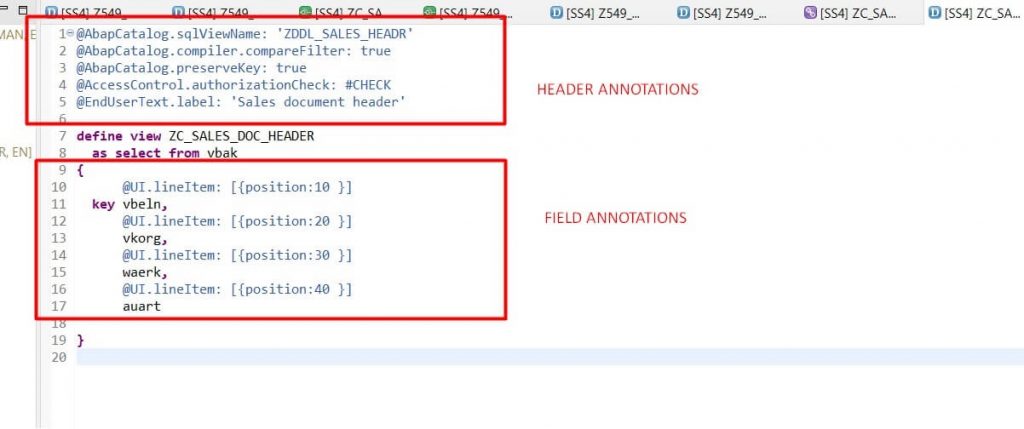
The annotations that can be written in the fields above the ‘define view’ are referred to as ‘HEADER ANNOTATIONS’, and the area below is referred to as ‘FIELD ANNOTATIONS’.. I will specify this when explaining each annotation.
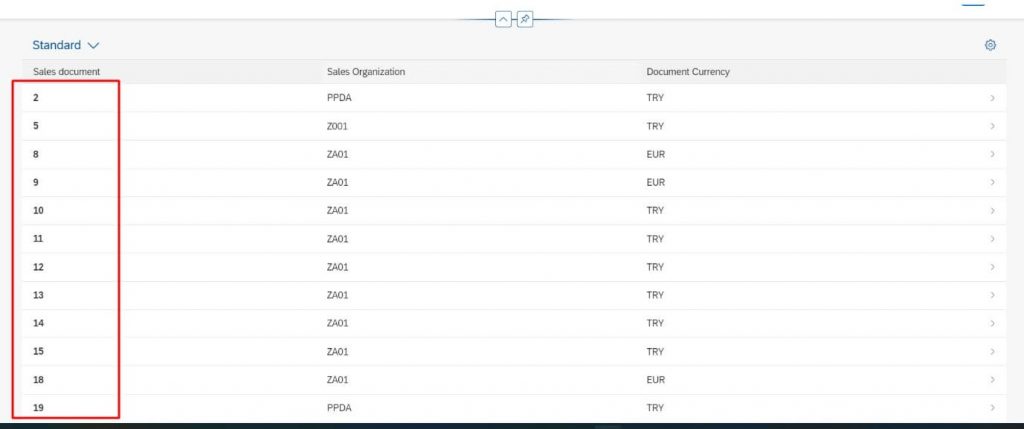
1) Getting data
Field annotation:
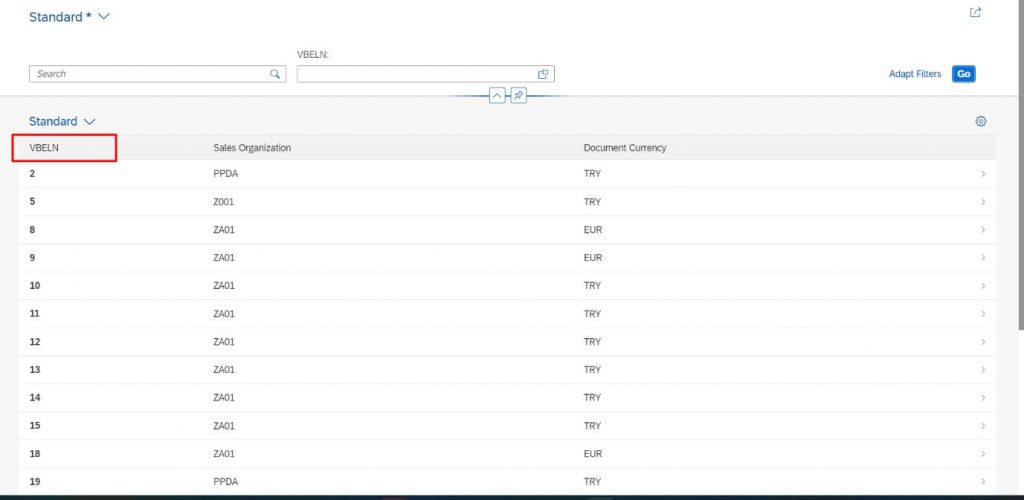
@UI.lineItem: [{ {position:10 }]
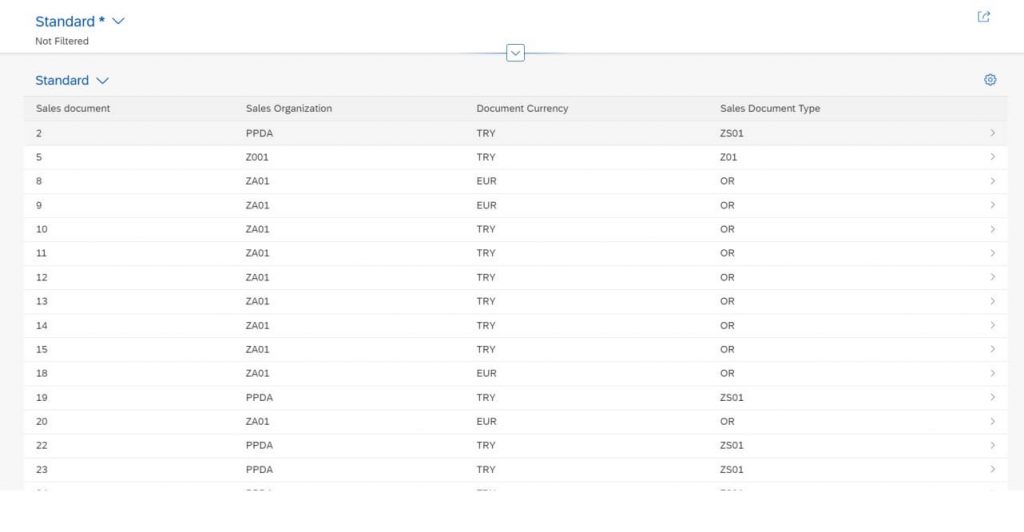
For each column that you want to see in the table, you need to write this annotation at the top of the data element as shown in the picture above. Position allows you to specify the column order.
You’ve done a great job so far. You got your first data using annotations. We will continue to make changes with other annotations in the next stages.
2) Changing the key area to a darker colour
Header Annotation:
@ObjectModel.semanticKey: [‘vbeln’]
Sometimes we want some columns to appear in dark color. In such cases, we can find a solution by using the annotation above.
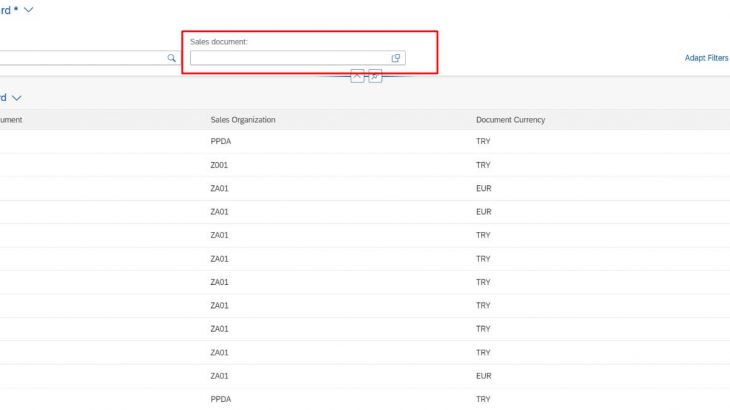
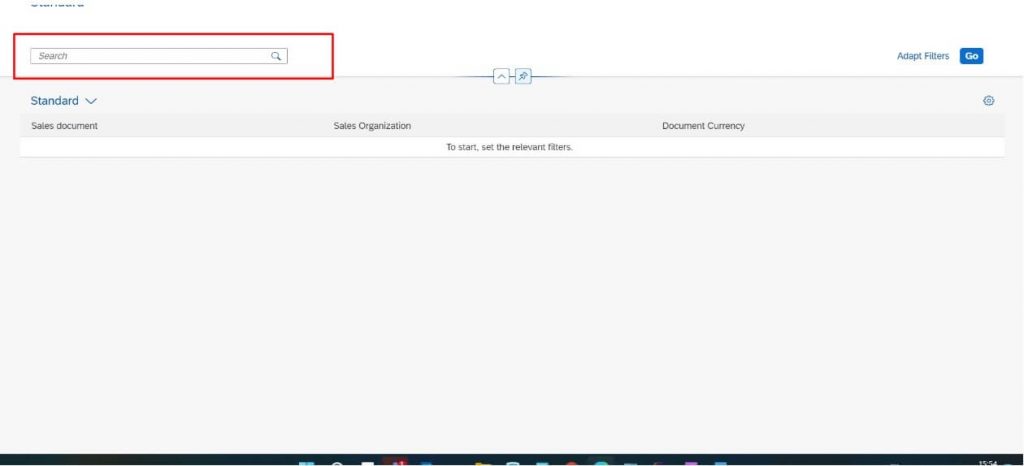
3) Adding a search field
Header Annotation
@Search.searchable: true
Field Annotation
@Search.defaultSearchElement: true
By using the header annotation, the search field becomes active. This field annotation (@Search.defaultSearchElement: true), should be written above the field in which we want to search in.
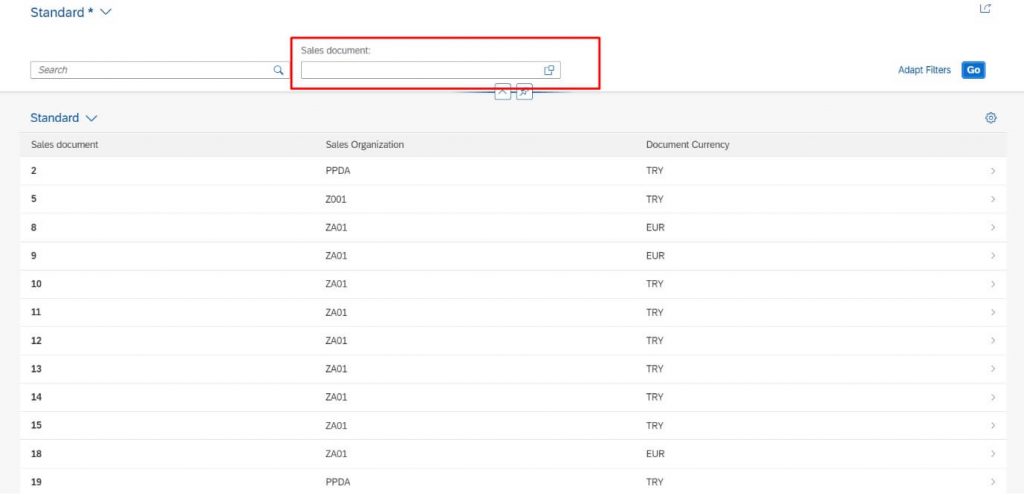
4) Adding Selection field
Field Annotation
@UI.selectionField: [{ {position: 10 }]
The field in which you want to use this annotation, you need to put it above that field.
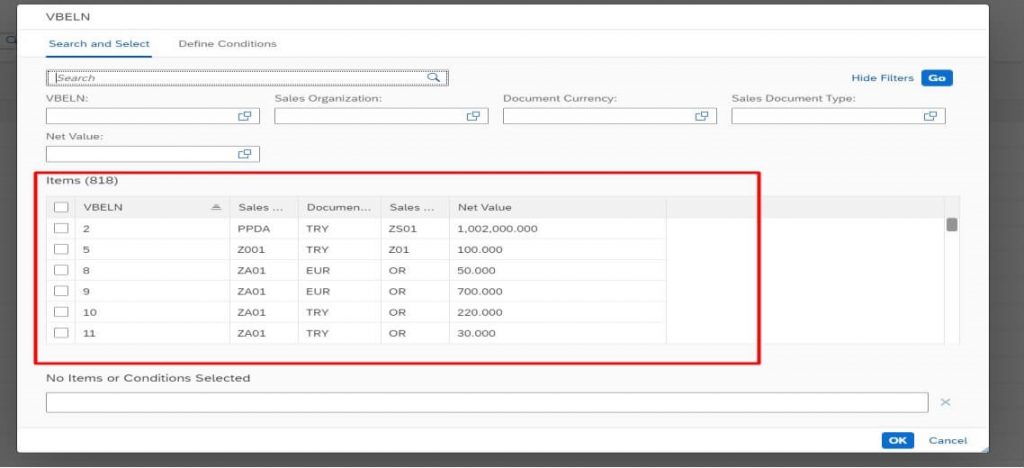
5) Adding search help in Selection field
Field Annotation
@Consumption.valueHelpDefinition: [{entity:{ name:’ZC_SALES_DOC_HEADER’, element:’vbeln’ }}]
The name of the CDS view is given above as the ‘name’ – (I used the same view in order to not create a view again. If you want different fields to show up, you need to create a new CDS view. ZC_SALES_DOC_HEADER view will be shared at the end of the blog). The element part was given as vbeln because the selection field is vbeln.
6) Changing the name of table columns
Field Annotation
@EndUserText.label: ‘VBELN’
Sometimes we may want to change the text that comes as default. It makes it possible to change the text as we want using the above annotation.
7) Creating collection on detail page
Field Annotation
@UI.facet: [
{id: ‘idGeneral’,
position: 10,
type: #COLLECTION,
label: ‘General’},
{id: ‘idGeneral2’,
position: 20,
type: #COLLECTION,
label: ‘General2’, }]
//
As seen in the picture below, 2 collections have been created. In the next step, data will be put into the collections. The id name we give here is important!!!

8) Adding data into Collection
Field Annotation
@UI.facet: [
{id: ‘idGeneral’,
position: 10,
type: #COLLECTION,
label: ‘General’},
{id: ‘idGeneral2’,
position: 20,
type: #COLLECTION,
label: ‘General2’ },
{ type: #IDENTIFICATION_REFERENCE,
label: ‘General Info’,
parentId: ‘idGeneral’,
position: 10 } ,
{ type: #LINEITEM_REFERENCE,
label: ‘Table’,
parentId: ‘idGeneral2’,
position: 20 }]
This example was created using Lineitem and identification references.
When assigning data with #IDENTIFICATION_REFERENCE, we also need to use an extra @UI.identification: [{position: 10 }] annotation. When assigning data with #LINEITEM_REFERENCE, it automatically assigns all the data with the @UI.lineItem: annotation which we used in the first collection.

CDS View Code
@AbapCatalog.sqlViewName: 'ZDDL_SALES_HEADR'
@AbapCatalog.compiler.compareFilter: true
@AbapCatalog.preserveKey: true
@AccessControl.authorizationCheck: #CHECK
@EndUserText.label: 'Sales document header'
@Search.searchable: true
@UI.headerInfo:{title: {value: 'vbeln'},
                description.value: 'deneme'
              }

define view ZC_SALES_DOC_HEADER
  as select from vbak

{

      @UI.facet: [

                {id: 'idGeneral',
                position: 10,
                type: #COLLECTION,
                label: 'General'},

                  {id: 'idGeneral2',
                position: 20,
                type: #COLLECTION,
                label: 'General2'    },

               { type: #IDENTIFICATION_REFERENCE,
                label: 'General Info',
                parentId: 'idGeneral',
                position: 10 } ,
                   { type: #LINEITEM_REFERENCE,
                label: 'Table',
                parentId: 'idGeneral2',
                position: 20 },

               { purpose: #HEADER,
                position:10,
                type:#DATAPOINT_REFERENCE,
                targetQualifier: 'SalesOrg'
                 },
                  { purpose: #HEADER,
                position:20,
                type:#DATAPOINT_REFERENCE,
                targetQualifier: 'Netvalue'}]


      @Search.defaultSearchElement: true
      @UI.lineItem: [{position:10 }]
      @UI.identification: [{position: 10 }]
      @ObjectModel.text.element: ['WAERK']
      @EndUserText.label: 'VBELN'
      @UI.selectionField: [{position: 10 }]
      @Consumption.valueHelpDefinition: [{entity:{ name: 'ZC_SALES_DOC_HEADER', element:'vbeln' }}]
  key vbeln,
      @UI.lineItem: [{position:20 }]
      @UI.dataPoint:{qualifier: 'SalesOrg' ,title: 'Sales Organisation'}

  key vkorg,
      @UI.lineItem: [{position:30 }]
      waerk,
      @UI.lineItem: [{position:40 }]
      @UI.multiLineText: true
      auart,

      @UI.lineItem: [{position:50 }]
      @UI.dataPoint:{qualifier: 'Netvalue' ,title: 'Net Value'}
      netwr

}


