Introduction
In this post, we will learn how to configure the iFlow ‘Replicate Business Partner to SAP Marketing’, in the SAP Marketing Cloud integration with SAP Cloud for Customer for the transfer of information with custom (extension) fields by SAP Marketing Cloud and SAP Cloud for Customer.
Following one of the SAP Cloud Platform Integration updates, the standard iFlows feature Pre-Exit Post-Exit in the integration flows. This means that the previously delivered standard integration flows remain intact as you extend them. And that obviously means you no longer need to worry about updates and perform your extension activities over and over again. But in this case, we are going to make the adjustments within the standard iFlow so that the connection is established correctly because after trying to create a new iFlow for these extensions, but the connection was not established correctly.
Overview
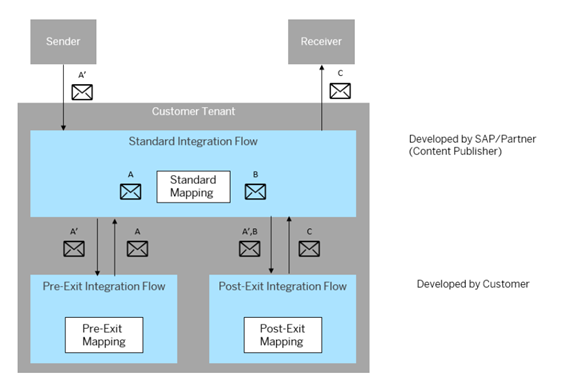
This standard integration flow figure has both pre-Exit post-Exit, we will focus on the post-output concept because almost all SAP Marketing integration flows only have post-Exit.
Business context
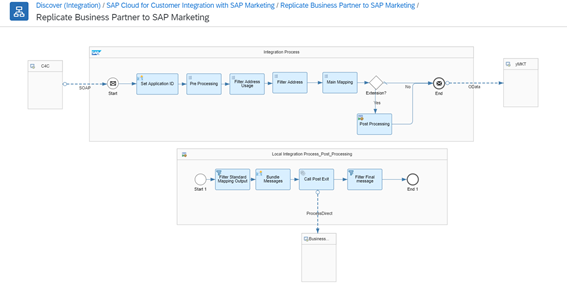
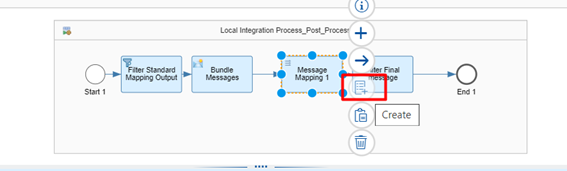
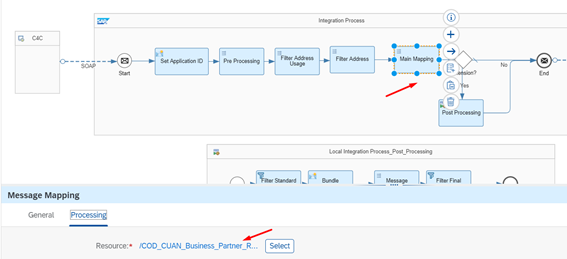
For this scenario, we will use the standard integration package “SAP Cloud for Customer Integration with SAP Marketing” in SAP Cloud Platform Integration. And we’ll extend the “Replicate Business Partner to SAP Marketing” integration flow. This integration flow has a process flow like the one below.
In our case, the call to a new iFlow will be modified by a new mapping with the new fields.
So the iFlow would look like this:
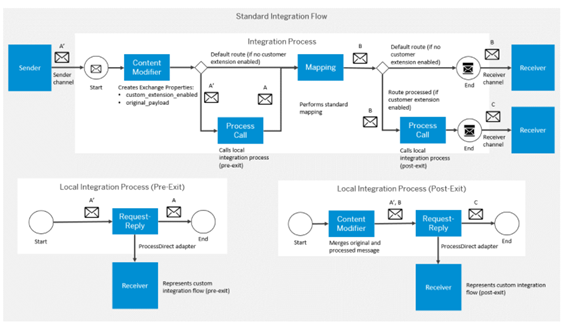
Seen in a simpler way it would be like that:
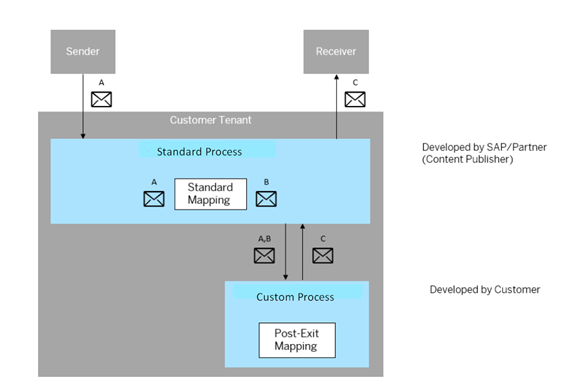
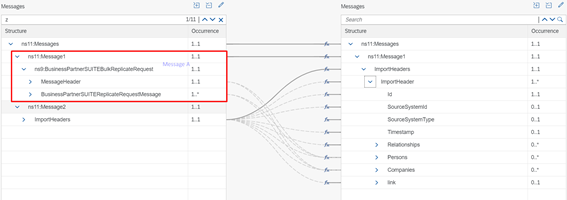
Considering this image, we will follow the figure’s notations, so we need to know the meaning of each one of them:
Message A: this message represents the original (extended) payload from the source system. In our scenario, the source system (Sender) is C4C. Therefore, this message must have the extended metadata of the SOAP BusinessPartnerReplicationSelfIniticatedOut service.
Message B: This message represents the result of the standard mapping operation in the standard integration flow. Therefore, it is only standard metadata of the SAP Marketing OData service.
Message A, B: This message is the combination of messages A and B. Remember that message B represents the mapped message (standard metadata of the OData service in SAP Marketing) after the standard mapping operation in the standard integration flow. This means that it contains only standard mapped fields. On the other hand, Message A also contains unmapped standard fields, as well as custom fields, since it represents the original message (payload) from C4C.
Message C: is the extended metadata of the OData service in SAP Marketing. This extended metadata must include our custom fields in SAP Marketing. And this is exactly what our C message is going to be similar to. In other words, I could roughly say that Message C will be a sort of extended version of Message B.
We shape Message C with our own mapping operation where we also map our custom fields into the post output integration flow. Consequently, this message is basically the final mapped message that we want to deliver to the receiver (SAP Marketing). So that message C is delivered to the receiver (SAP Marketing) instead of message B in an extension scenario.
Configuration Activities
You have to enter your HCI environment and within your package “SAP Cloud for Customer Integration with SAP Marketing” go to the iFlow “Replicate Business Partner to SAP Marketing”.
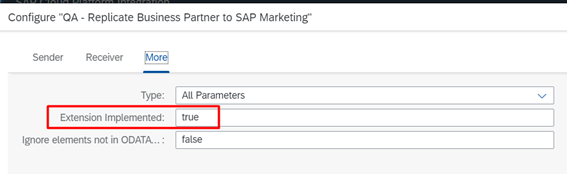
First, you need to configure the extension.
To do this, we will modify “Extension Implemented” to “true”, as shown in the following image:
Within the standard iFlow we will eliminate the call to a new iFlow, as we will make the changes within the standard iFlow. Instead of this call, we will place a new “Message Mapping”
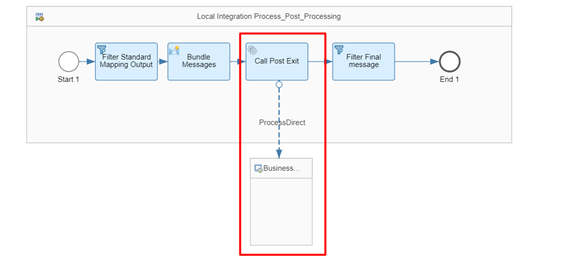
So the new iFlow sub-process would look like this:
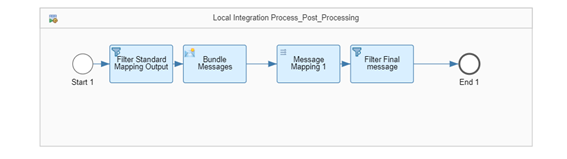
Within this sub-process, we will create the mapping file:
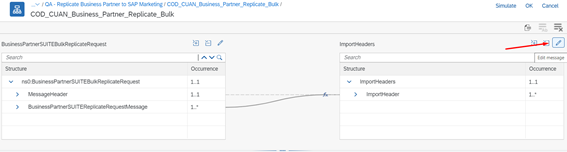
Once created, we have to add the messages A, B and C in order to perform the mapping.
Obtaining the message A
To download the metadata through the SOAP service, we will log into C4C, where from the communication agreements we will download the corresponding iFlow for this iFlow:

Obtaining the message B
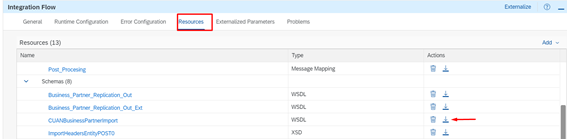
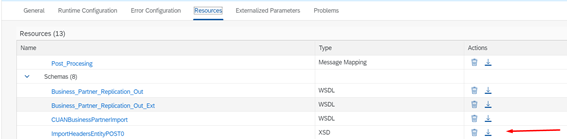
Since we have this message because it comes in the standard integration flow we only have to download it from the “Resources” tab
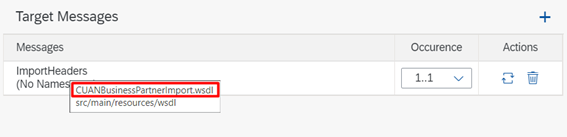
This is the name of the file we need, which we can use from “Resources”
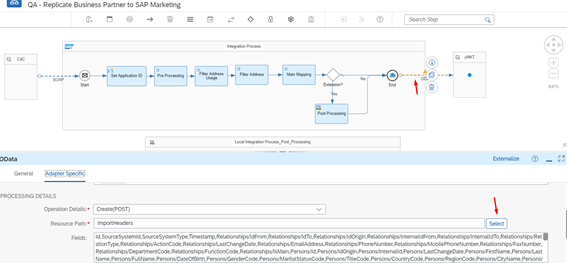
Obtaining the message C
This message will be obtained through the OData Service
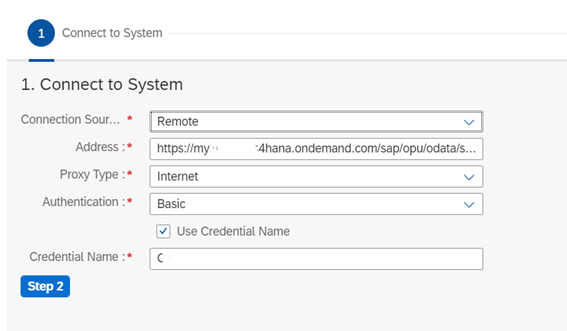
First we establish the connection
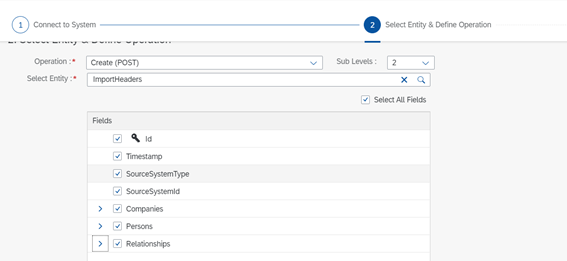
Then we select the fields we need to obtain
Once this is finished it will create a file automatically which will be the one we have to update in the iFlow
Carrying out the mapping
Once we have all the messages, we upload them in the new Mapping.

Uploading the files within the mapping in the following order:

In the mapping of the To message A we will map only the custom fields.
On the other hand, the rest of the standard fields will be mapped with the message B, these fields can be mapped giving the option of auto-mapping, which will be faster.
Once this mapping is finished, it is already possible to save the iFlow and start to make the information transfer.


