Introduction:
Dropdown lists are very helpful when you want the user to select from a set of predefined values. The values can be either static or dynamic based on whether the database table used to implement the dropdown is updated or remains fixed.
Problem Statement:
Suppose that you have a Fiori list report template application for bus booking. You have used Restful Application Programming Model to implement your backend. In your bus booking application, the user can create new bookings. You want that when the user clicks the create action button, he is shown a create new booking page where he needs to enter passenger details which includes a dropdown list for selecting Gender.
Solution Approach:
The solution that has been explained here is based on the assumption that your Dropdown contains fixed values. However, you can follow the same steps with minor modifications for dynamically changing values depending on your logic for the same.
This blog is for beginners to RAP. It assumes that you know the basic RAP architecture and already have a data definition for your main entity. For people who want to just know about the required annotations, you can directly jump to and look at steps 5-7.
We will start by creating a database table, where we will be storing our values which will appear in the dropdown.
Step 1:
Create a Domain with Data Type as “CHAR” and Length equal to maximum length among all values you want to include in your dropdown. Activate it.

Step 2:
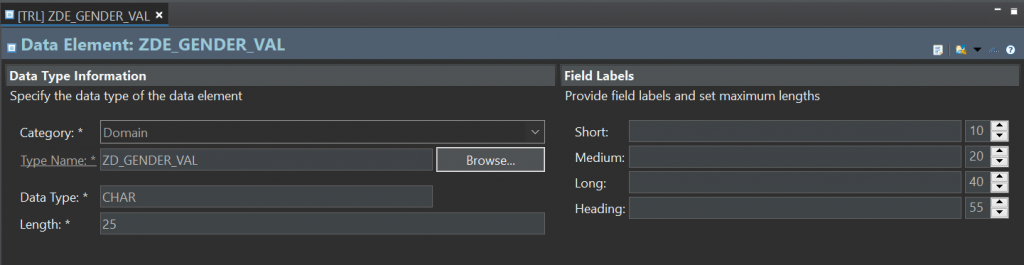
Create a Data Element with Domain as the one you created in Step 1. Activate it.
Step 3:
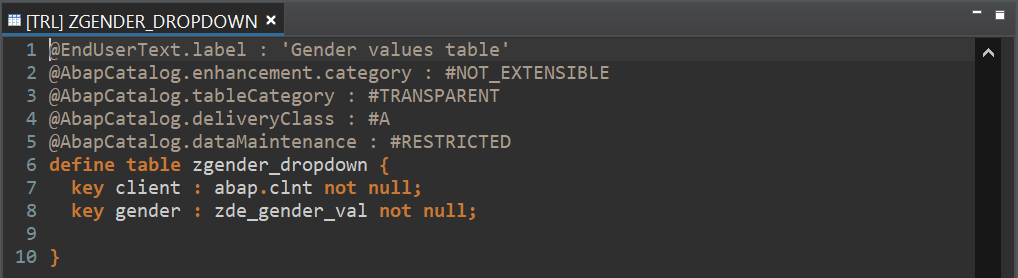
Create a Database Table with one field assigned to the data element you created in Step 2. Activate it.
Step 4:
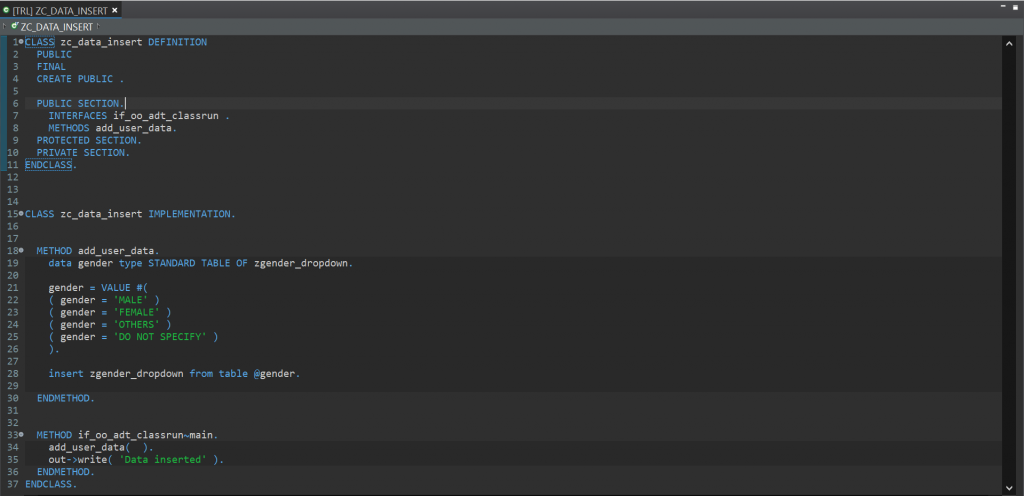
Now that our database table is ready, we need to insert values into it which we want as dropdown. For doing that manually, right click on the package name, click new and select ABAP Class. Enter you preferred name and description. Add “if_oo_adt_classrun” as interface. In the class implementation, define and implement add_user_data method, where we will have our code for inserting manual values. Call it in the implementation of the interface. Look at below sample for clarification. Activate and run it. You will get a message “Data inserted” on the console.
Step 5:
Right click on the Database Table and create a new Data Definition on top of it. Select Define view entity from the list of available templates for data definition while creating. Add the following annotation at the top of the data definition:
@ObjectModel.resultSet.sizeCategory: #XS
Activate and run it.

Step 6:
Now go to the Data Definition or Data Definition projection of your main Entity which contains the Gender field in which you want to display the drop down.
Add the following annotation:
@Consumption.valueHelpDefinition: [{ entity:{name: ‘dd_name’, element: ‘element_name’ } }]
where dd_name: Name of Data Definition created in previous step,
element_name: Name of Field whose values you want to display in dropdown.
Activate both of them.


Step 7:
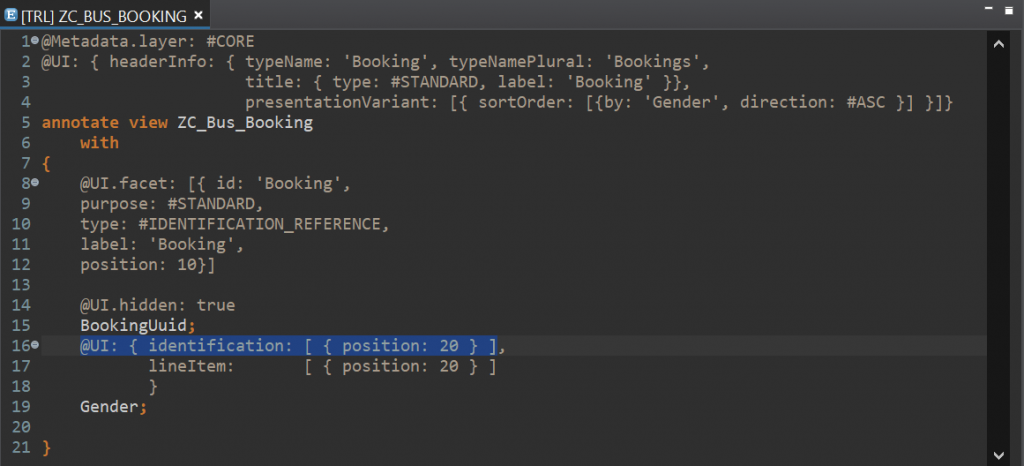
Include the following annotation in either of data definition view, data definition projection or metadata extension of the main entity so that the field appears in the object page of main entity and you get a dropdown for selection while creating new entries.
@UI: { identification: [ { position: num } ] }
where num: the relative position where you want to show the field in UI.
Activate it.
Step 8:
It is to be noted that even though the user gets a dropdown, they can still manually enter values other than the ones shown in dropdown. To stop the user from doing that we need to define a validation for that particular field in the behaviour definition defined on top of the main view entity.
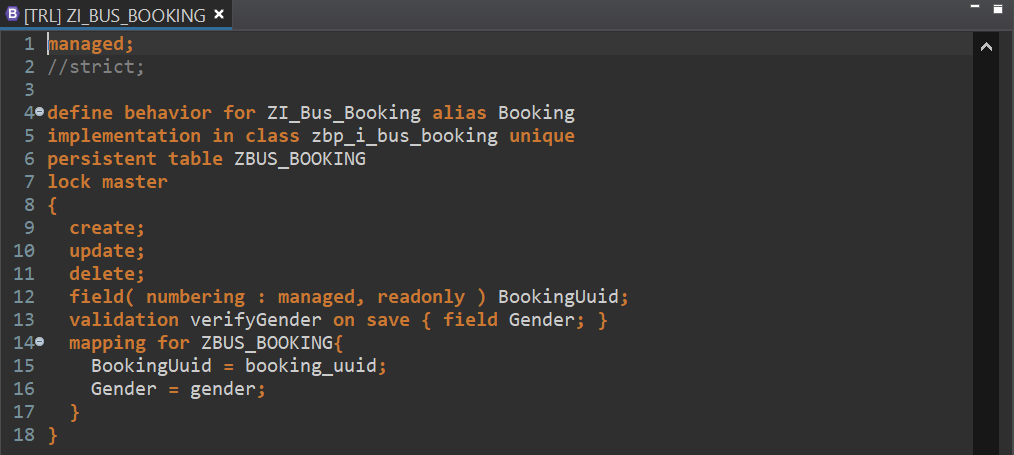
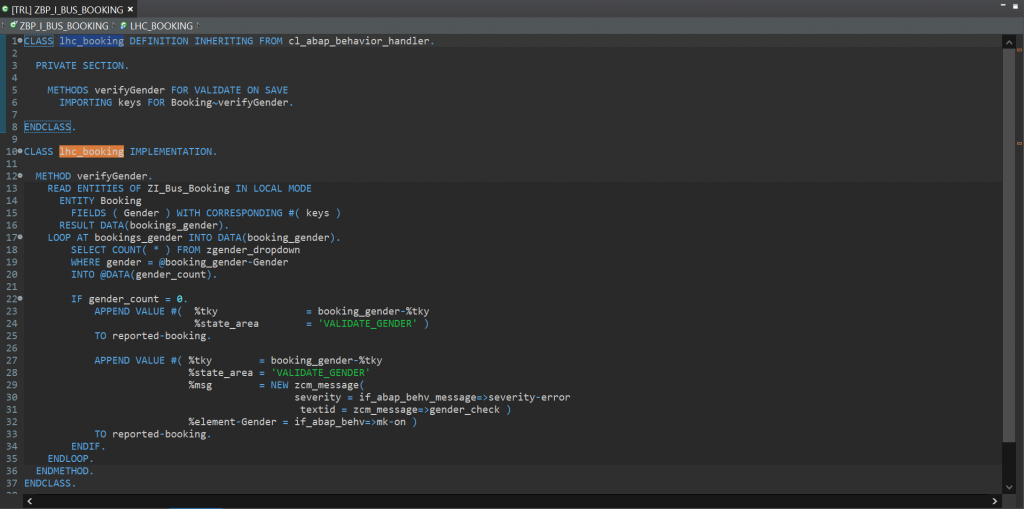
To create a behaviour definition, right click on the data definition view and select new behaviour definition. Mention an alias for the Entity and also the name of the implementation class in the format shown below. Create a mapping with respect to the field names in the table. Now write the validation on the field, by giving a method name as shown in the sample image below. Activate it.
Right click on the implementation class name and apply quick fix, to create a new class of the same name. Activate the class.
Right click on method name in behaviour definition and use quick fix to include its implementation template in the implementation class for the behaviour definition.
Now for displaying proper error messages you need to create a message class and then an exception class. Let’s start by creating a message class.
Right click on the package name, click New, then Other ABAP Repository Object and then search message class and create it by entering desired name and description. Save it.

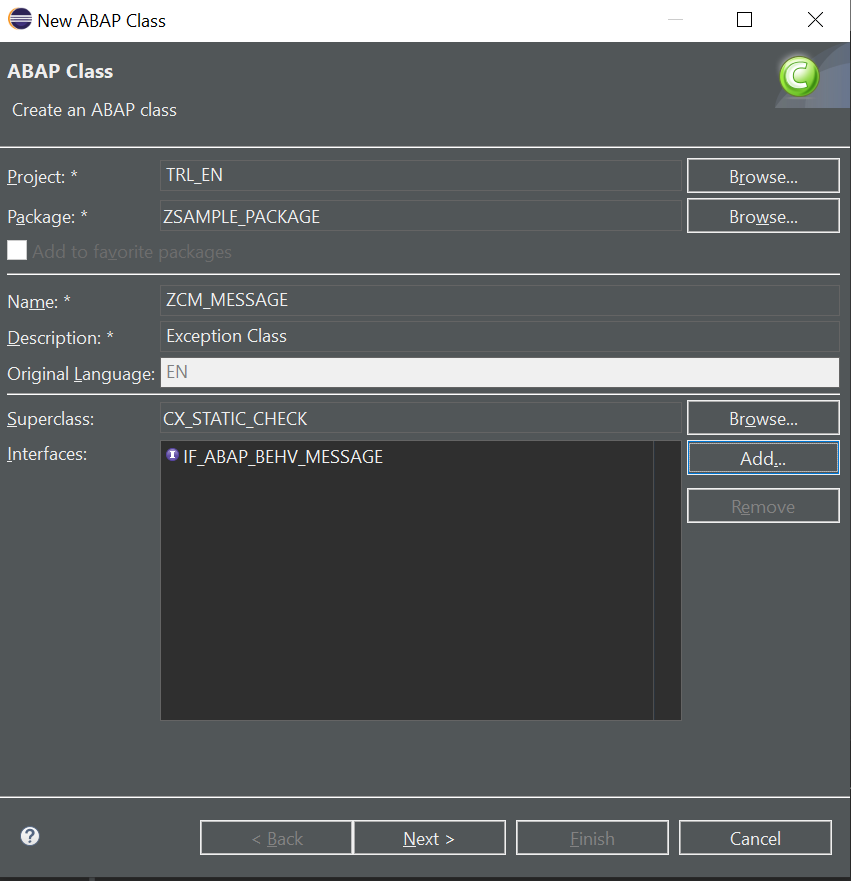
Now let’s create an exception class. Right click on the package name, click New and then click ABAP class. Enter the desired name and description. Add “CX_STATIC_CHECK” as superclass and “IF_ABAP_BEHV_MESSAGE” as Interface.
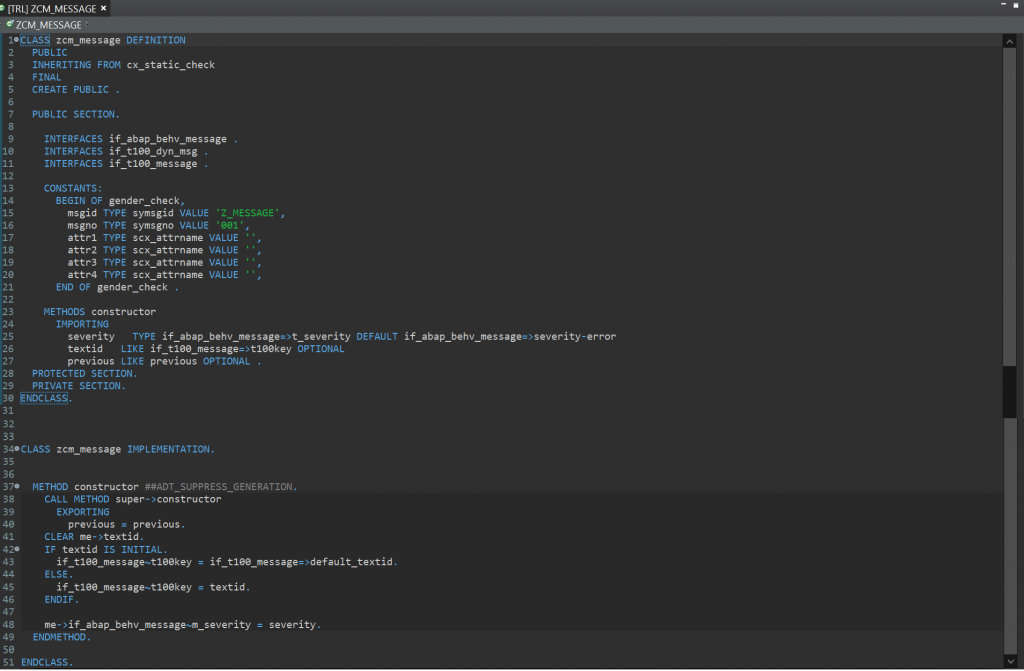
Now you need to make a few changes in the declaration as well as the implementation part of exception class. Use the below image for reference. Activate it.
Now let’s go back to the implementation class of the behaviour definition.
Read the entered value in dropdown field of your Entity. Do a select on the database table where you were storing dropdown values to get the count of rows where value of the dropdown field is equal to currently entered value. If count is zero, then raise an exception. Look at the below sample image for reference. Activate it.
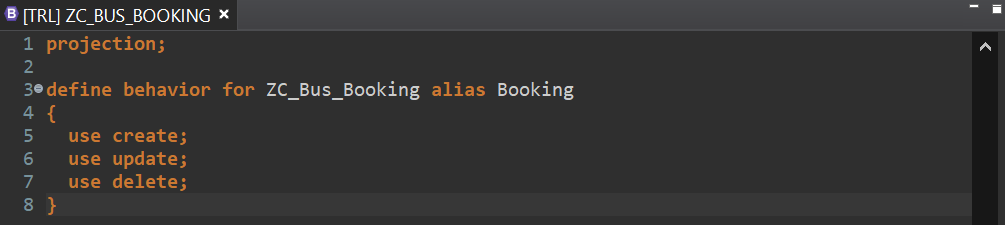
Now right click on the data definition projection and click on new behaviour definition. This will create a new behaviour definition projection. Make the necessary changes and activate it.
Step 9:
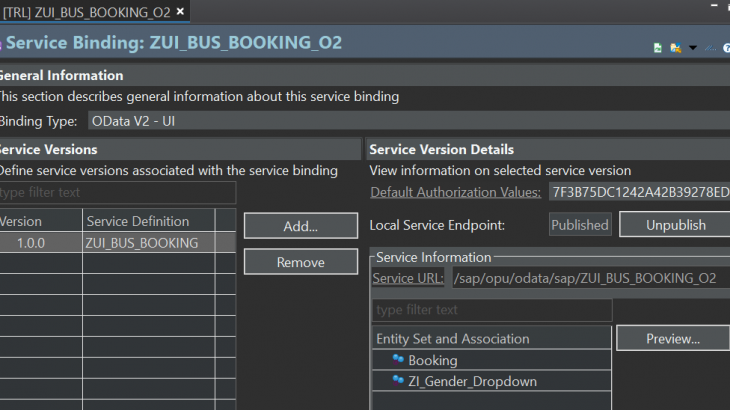
Now right click on data definition projection to create a new Service Definition. Make the necessary changes and save and activate it.

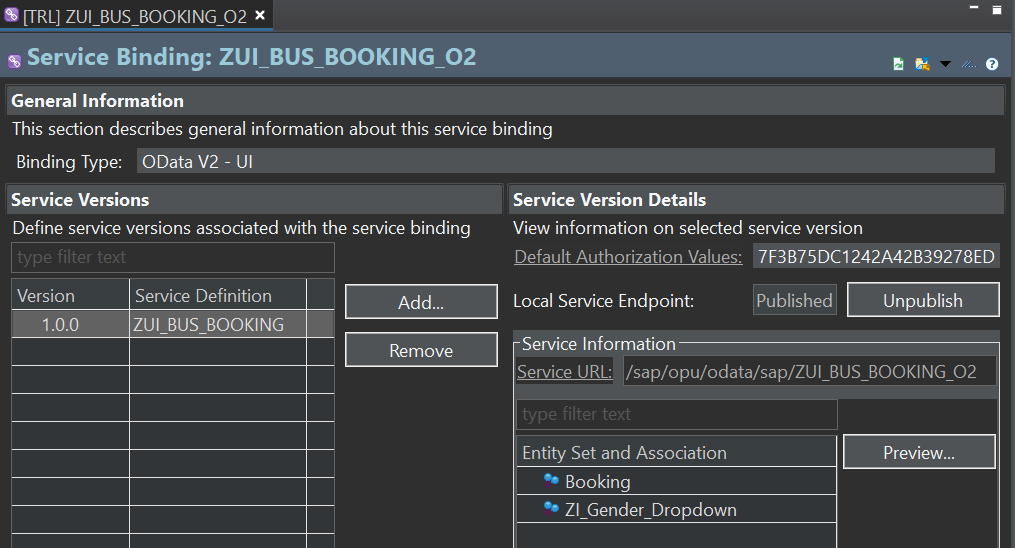
Now right click on the service definition and create a new Service Binding. Select ODATA V2 – UI from the options in Binding type. Activate it.
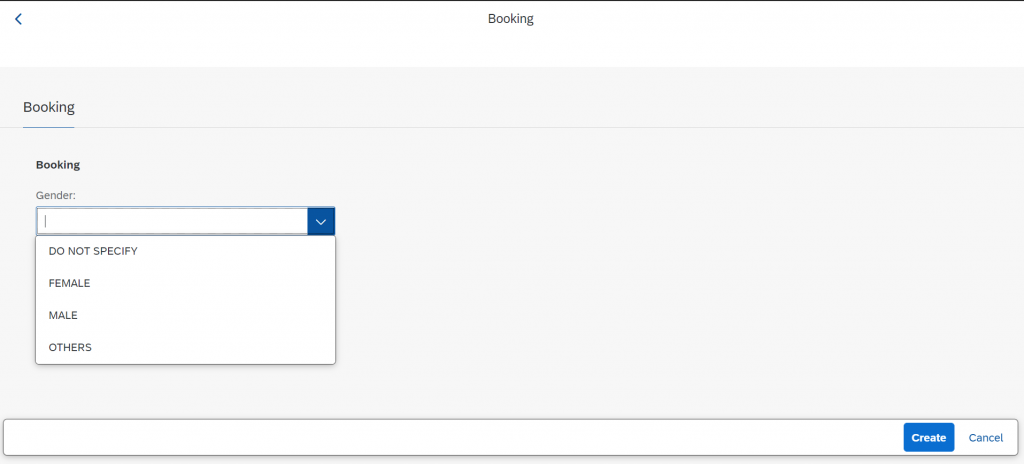
Click on preview. You will get a UI page. Click on Create action in the UI.
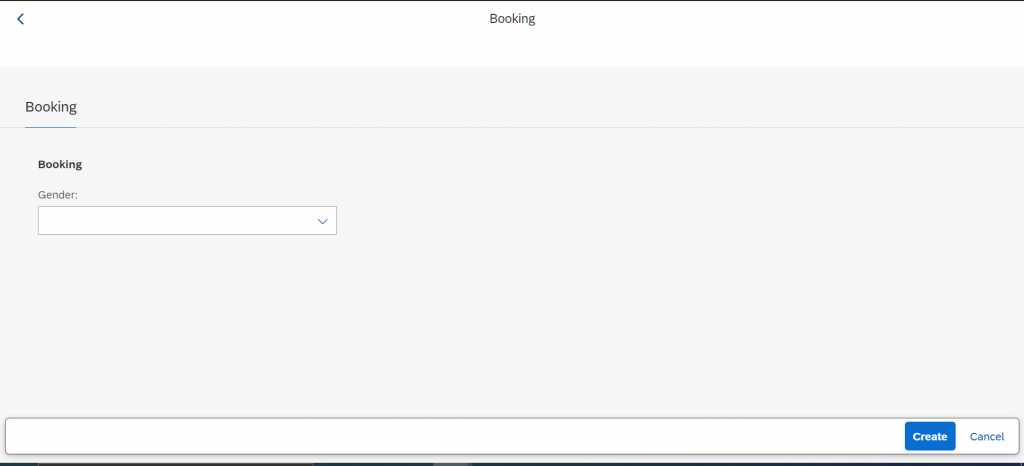
You can see your dropdown in the above image. You can either click on the downward arrow in the dropdown to see all available options, or type to get available suggestions in form of dropdown.
If you type in a wrong value and click on create, you will get an exception message in accordance to the message specified by you.

On entering correct field, and clicking create, a new entry is created in the table as required.


