Whilst Transportation Management is not a foreign concept to SAP S/4HANA Cloud, a game changing functionality was introduced in the 2108 release of SAP S/4HANA Cloud. That functionality is Manual Transportation Planning. Indeed, up until then, any planning capability required integration to a third-party Transportation Management Solution (TMS), which could be realized through the deployment of scope item 3EP – Order based Transportation Consolidation – Outbound, or through the integration to SAP’s own advanced SAP Transportation Management solution (which in addition to 3EP), also required the deployment of scope item 4OZ – Planning of External Transportation Requirements. This latter deployment remains valid if you are already leveraging it and/or have more complex planning requirements requiring more advanced capabilities.
So, what is this game-changing functionality I refer to, you might ask? Well, this means that you can now execute your Supply Chain processes, end-to-end right from within your SAP S/4HANA Cloud system. The fact that you no longer need to implement an integration scenario to exchange master and transactional data, will translate to a lower time to implement and a lower time to value realization.
These manual planning capabilities are delivered through the following scope items:
- Manual Transportation Planning –Outbound (4MO). This covers the planning of outbound requirements, i.e sales order-based requirements, transported from your own locations to your customers.
- Manual Transportation Planning – Inbound (5OS). This covers the planning of inbound requirements, i.e purchase order based requirements, collected from your suppliers and transported to your own locations
- Determination of Geocoordinates, distances and durations(46P). This scope item is more technical and caters to the integration of the SAP HANA Spatial Service. The HANA Spatial Service is a service that resides on the SAP Business Technology Platform (BTP) and is required in order to determine geo-coordinates and distances.
Note that these scope items are not activated by default, and thus you need to request their activation. The steps involved in this process are detailed in the SAP Activate Roadmap, which you can find here. In addition, in order to activate the scope item 46P, you will need to have an SAP Business Technology Platform account enabled for consumption-based commercial models (please consult your Account Executive or Customer Success Partner for more information).
Now that we have laid out the basics, let’s jump into the system.
Checking the configuration.
As indicated above, SAP S/4HANA Cloud now supports both external and internal planning – internal planning being the object of this blog post. Here, internal is synonymous of ‘planned inside the system’.
The first thing you will want to do is check the configuration settings, to make sure that the order based requirements (sales and purchase orders), will indeed produce freight units that will be planned inside SAP S/4HANA Cloud (if we have nothing to plan this would be a short blog post!). At the time of writing this document, the standard freight unit type, for internal requirements is SFU2.
All the main Transportation Management configuration settings can be found by setting Supply Chain and Transportation management as the Application area and Sub Application Area respectively, as shown below.

This will reveal a number of configuration areas, but we are interested in the item named Transportation Order Management.

Within this item, there are two configuration steps that are of interest.
- Define Transportation Relevance of Sales Documents
- Define Transportation Relevance of Purchasing Documents
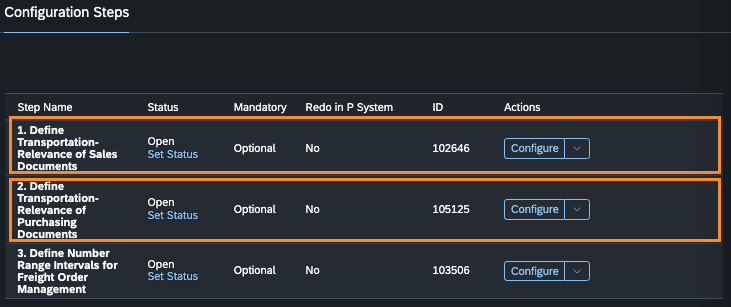
As we can see from the sample configuration data, the influencing parameters are, the Sales Area (Sales organisation, Distribution Channel, Division), the Sales Order type, and the Shipping Conditions. Based on that combination, the system will determine a Logistics Integration profile, that will, in turn, dictate if the freight units produced are to be planned internally (within the system) or externally (in a third-party system).
At the time of writing this blog post, the Logistics integration profile S002 will produce internal freight units, whilst the profile S001 will produce external freight units.
The line in orange, therefore tells us, that sales orders of type ‘OR’, in the Sales Area ‘1710/10/00’ and Shipping Condition ‘05’ will create internal freight units (profile S002). The line in cyan will produce external freight units.

The second item, 2. Define Transportation Relevance of Purchasing Documents, as its name indicates will dictate which purchase orders should produce freight units, and thus be planned via Transportation Management.
Again, here we have a number of parameters that will dictate if a purchase order should be planned via Transportation Management. In this case, the parameters are the Purchasing Organization, the Purchasing Group, and the Purchase Order type. Based on the maintained combinations, the Logistics Integration profile S003 will be determined. Due to the fact that purchase orders can only be planned internally, there is only one Logistics Integration Profile.

Creating Order based requirements
Now that we know what parameters need to be maintained in our Order documents, let’s create a sales order – making sure we use a valid combination!
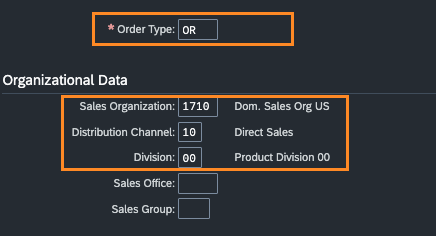
If you recall, the Shipping Conditions, was an additional determining parameter. That can be found in the shipping header information.
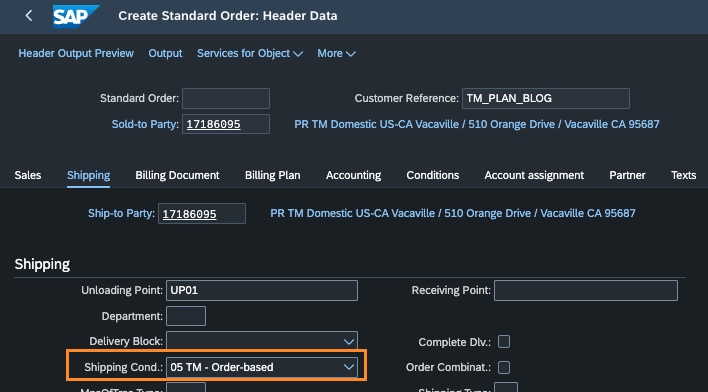
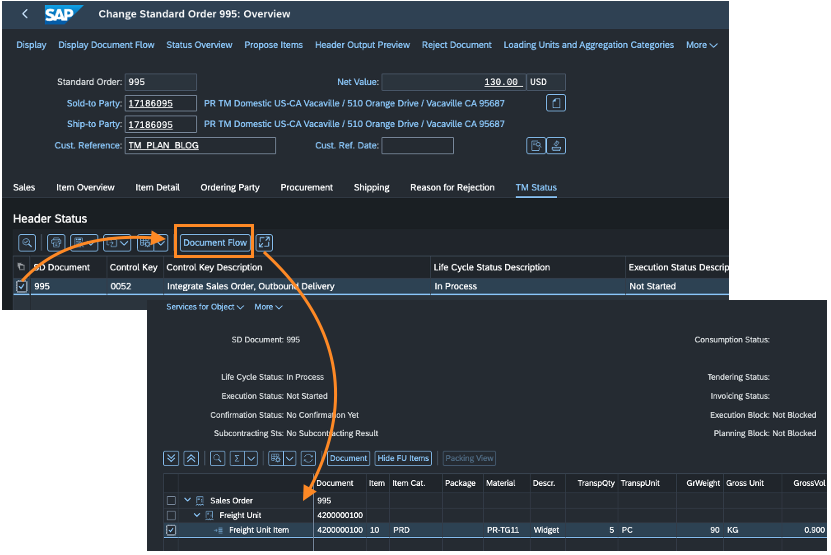
Once I have saved my sales order, and go back into it, I can already see that a new tab ‘TM Status’ has been added to the UI. That is a good sign!

If you click on this tab to navigate to it, you will then be able to navigate to the document flow and see the freight unit(s) and item(s) produced. You can also throughout the lifecycle of the sales order navigate to this tab to stay at a high level, abreast of what is happening in the transportation side of it.
SAP HANA Spatial Services
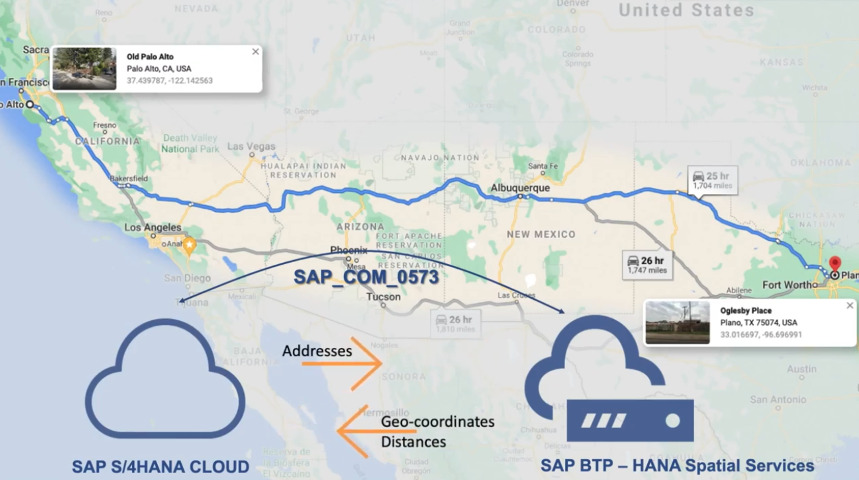
I would be remiss at this point, to omit mentioning the SAP HANA Spatial service, as it provides an important building block to this process: Determining the distance between our shipping point and the customer delivery location. As said this functionality is provided through the integration with scope item 46P.
One has to remember, that in the sales order we have the ‘Ship-to’ party, which provides the postal address of where the goods need to go, and we have the address of the shipping point, which advises us of where the goods are departing from.
In the background, when the freight unit is created, SAP S/4HANA Cloud is passing the departure and arrival postal addresses to the SAP HANA Spatial service, where these are translated to geo locations (latitude & longitude) and then enables for a distance to be traveled to be determined.
The picture below shows this interaction. The standard SAP Communication Scenario SAP_COM_0573 needs to be setup for this (please refer to the setup guide of scope item 46P for more detailed information)
Now that we have freight units created, the rubber hits the road and we can move on to planning.
Manual Transportation Planning
The transportation planning capabilities are accessed through the Fiori app, aptly named Transportation Cockpit (this app is part of the standard SAP role SAP_BR_DISPATCHER).
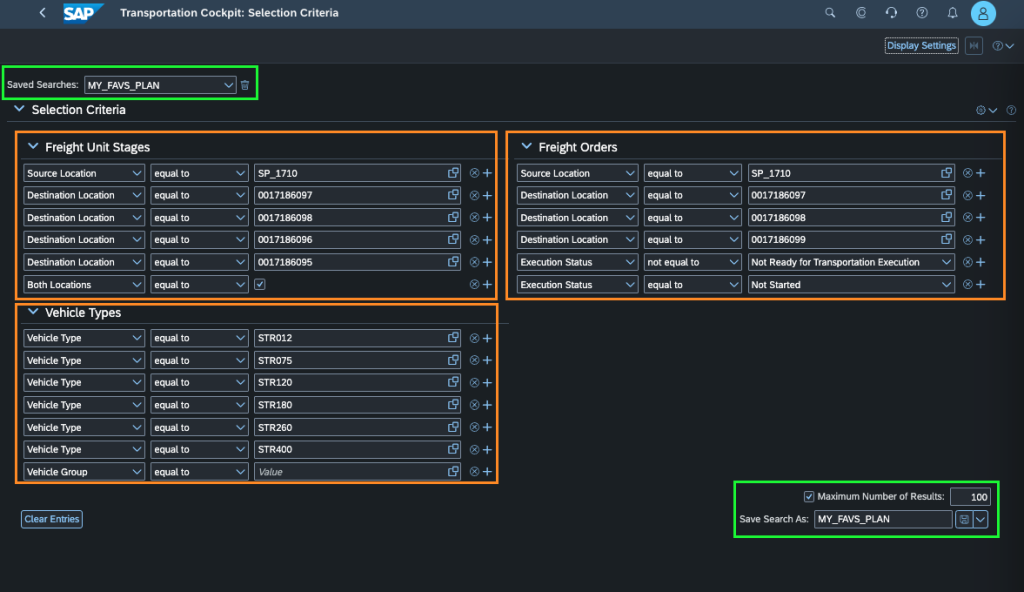
When you first enter the app, you will be presented with a selection screen, that will influence the data that will subsequently be available to you, in the planning cockpit per se.
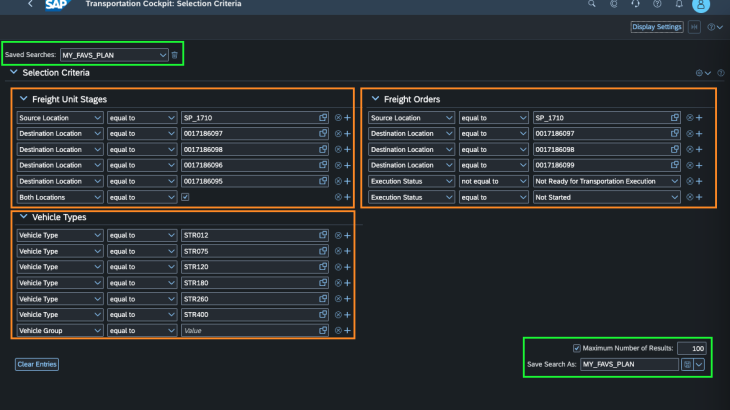
The call-out areas in Green will influence your ability to save your preferred searches or recall them. It will be useful to you to setup different selection options to suit your workflow, for example, inbound vs outbound traffic, deliveries planned this week vs deliveries planned next week, transports related to a specific shipping point, etc.. This will allow you to break down your workload into manageable chunks.
The call-out areas in orange represent the selection criteria that you can use to influence the data you will see in the cockpit – that which you want to plan.
- Freight Unit Stage – allows you to influence the Freight Units you see in the cockpit
- Freight Orders – allows you to influence the Freight Orders you see in the cockpit
- Vehicle types – allows you to influence the Vehicle Types you see in the cockpit (note that these are generic vehicle types – eg: 26 Ton Truck)
Once you click Continue, the system will then select the data corresponding to your criteria, and load it in the cockpit.
The cockpit will be divided into 4 distinct panes.
- In the top left, we have the freight units – this represents the cargo that needs to be loaded into a transportation resource (combining these two will give rise to a freight order). Note that this pane could also show freight units that have been planned (i.e assigned to a freight order).
- In the top right, we have the freight orders. Depending on the planning lifecycle a freight order could be empty, or complete (i.e it has a resource, a carrier, and cargo assigned to it).
- In the bottom left, we have the resource types that you can use to plan your freight orders.
- In the bottom right, we have the road freight hierarchy. This pane is very useful for digging into the details of a given freight order, right from within the cockpit (I.e this is very useful if you want to check that your planning sequence is as you want it)
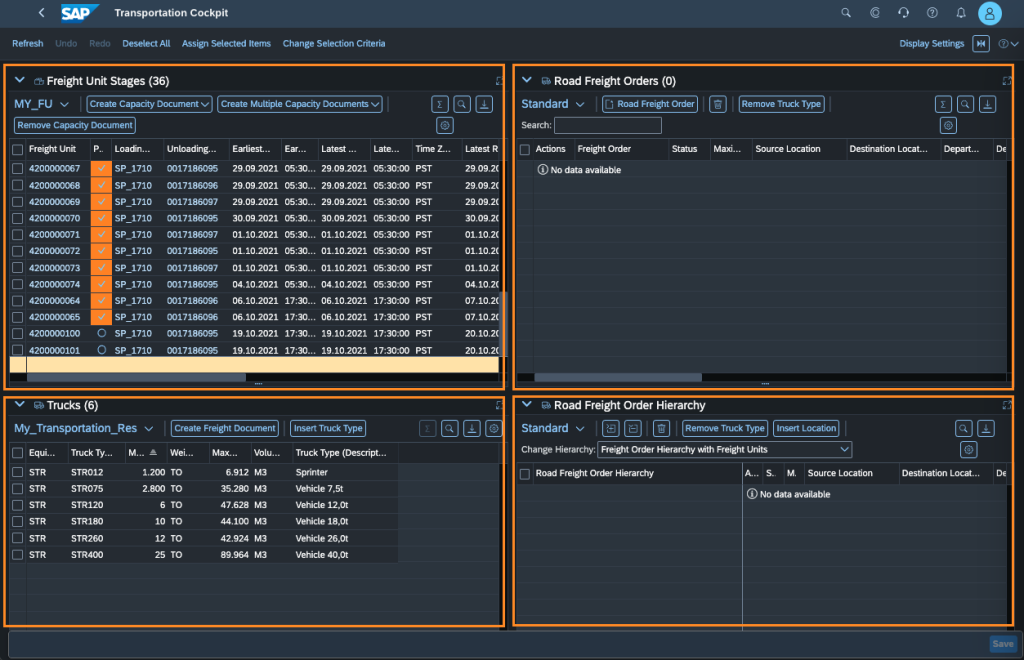
If you find that you are cramped for space, there is no need to worry. Each one of these panes can be maximised to fully utilise your browser window. For example, the freight units pane, maximised could look like this.
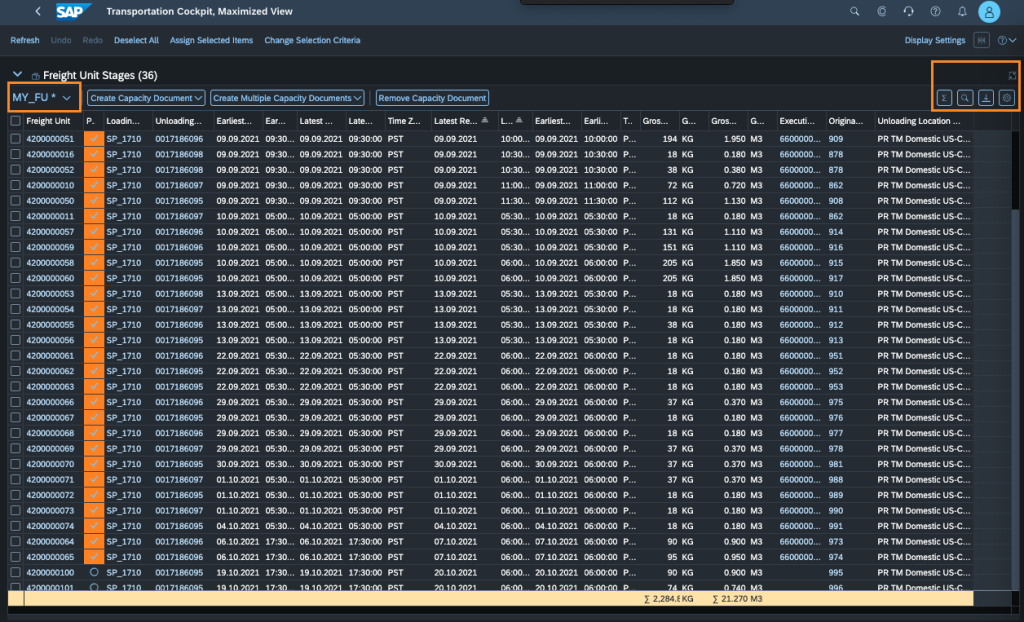
The right call-out shows where you can maximise/minimise each pane, and also where various screen customising options are available to you to show the information you want and tailor the UI with attention-catching colouring, sorts, and totals to suit your workflow.
The left call out shows that you can save different presentation settings to slice and dice the data as you need to.
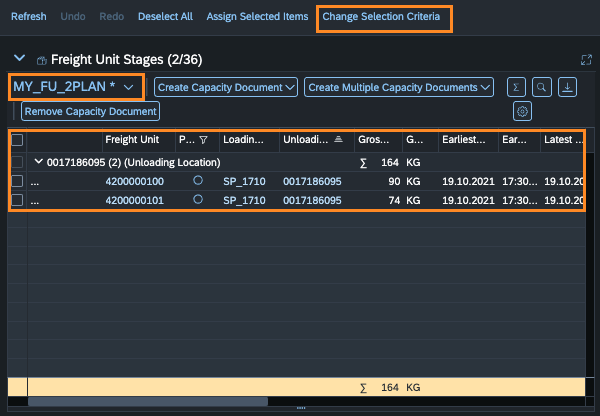
In my case, I have applied a screen variant, that shows only those Freight units that are not yet planned. As you can see this has helped me to narrow down to what I need to do without any noise.
I have also called out the option ‘Change Selection Criteria’ to help speed up your workflow. Say you are in the cockpit, and you find that you want to further refine the selection criteria, to further influence the data you see. Rather than go out of this screen (using the back arrow and have to re-enter all your selections), you can select this option to access your previously chosen selection criteria and further refine them (time saver !).
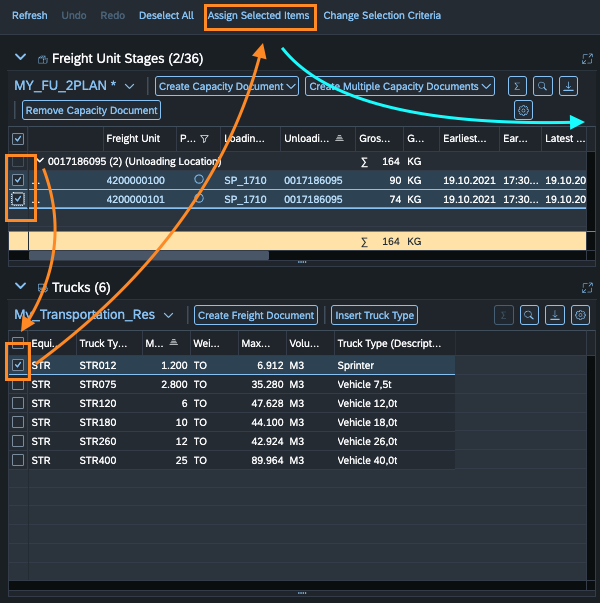
Next, we want to plan our freight units. Again, there are several possibilities that are available to you to plan your freight units, to suit your workflow. These possibilities will involve either doing selections and choosing planning options or using drag and drop gestures to drop cargo onto an object. I will let you explore these!
For the purpose of this blog post, I will proceed as below to plan my freight units.
- I can see that both freight units are to be delivered at the same unloading location, at the same time and the loads total 164 Kg (this tells me that I do not need a 25 Ton truck for the job!)
- I will select both freight units (in the freight units pane)
- I will select the smallest resource type I have at my disposal
- I will select the ‘Assign Selected Items’ options to let the system do the planning.
This has then resulted in the creation of a freight order. The freight order has a temporary number prefixed with a $ sign, meaning that if I do not save my work, my planning will be lost!
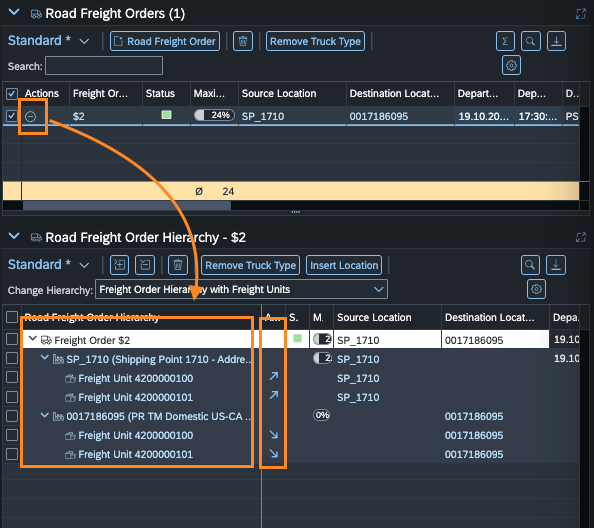
I can also see that I am only utilising 24% of the available capacity. This means that capacity monitoring is possible in Basic Transportation Management and I might later in the day add some more cargo to this freight order before I assign it to a carrier.

At this point, we can also make use of the Road Freight Hierarchy pane to drill into the details of this freight order. To do so, click on the icon shown in the picture below.

This will then ‘explode’ your freight order details in the hierarchy. The hierarchy will allow you to see the details of the stop sequence (the locations and order in which the truck is planned to travel) as well as visibility of the cargo that is being loaded, staying on the truck or unloaded at a given location…and of course the planned departure and arrival times!
Once you are content with your planning, do not forget to press save, so that a unique number can be given to your freight order, and your plan saved!

Before I close off this blog post, there are another couple of aspects that I would like to bring to your attention, that will have an impact on how your planning session goes.
Goods receiving hours of your business partners
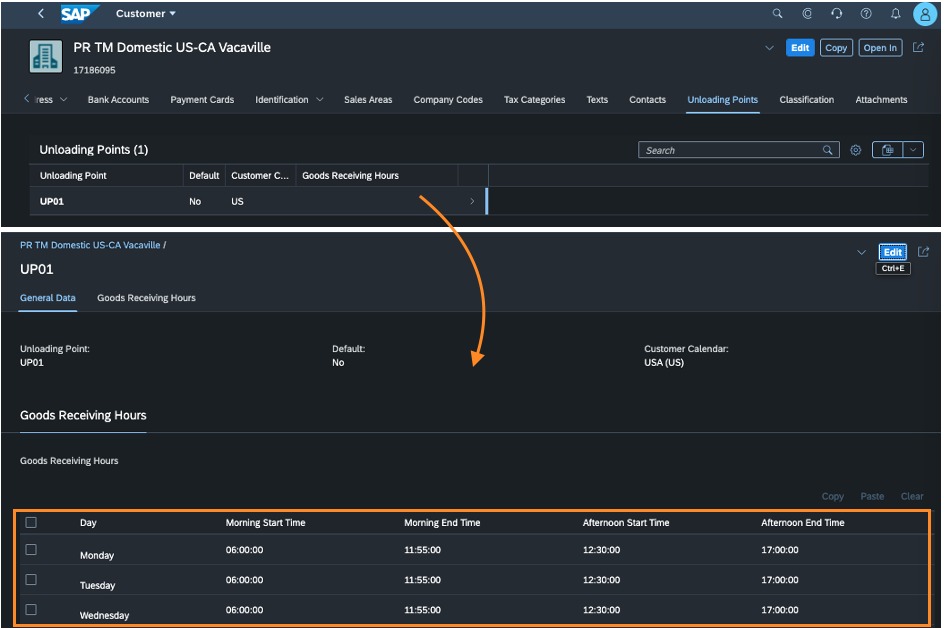
It is quite likely that when sales orders are entered, for example, you will enter the requirement date but seldom enter a specific time (which you can do at the schedule line level, but requires navigating to a different screen). Similarly, it might be that your business partners do not run 24/7 receiving operations. In those cases, to make your planning more accurate it might pay to maintain the goods receiving hours of your business partners in the system so that the scheduling takes those constraints into account.
This information will be stored in the Unloading Points section of your business partner master record.
The Planning Profile
Whenever you start a planning session, there are some – planning – parameters that are applied or taken into consideration. These parameters are fetched from a planning profile.
Currently, with the standard content, there is one default planning profile. Whilst you cannot create new ones, you can of course change the settings of the one provided.
The maintenance of the planning profile is done via a dedicated application named ‘Manage Planning Profiles’. In this app, you can also maintain scheduling settings for which there is coincidentally also a dedicated application.
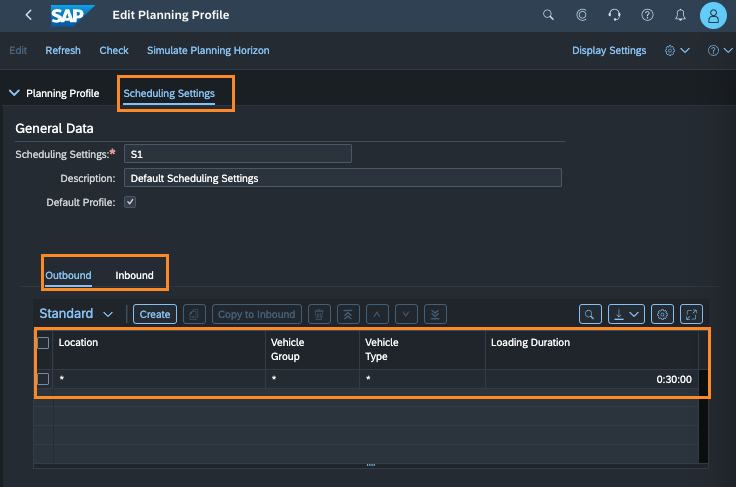
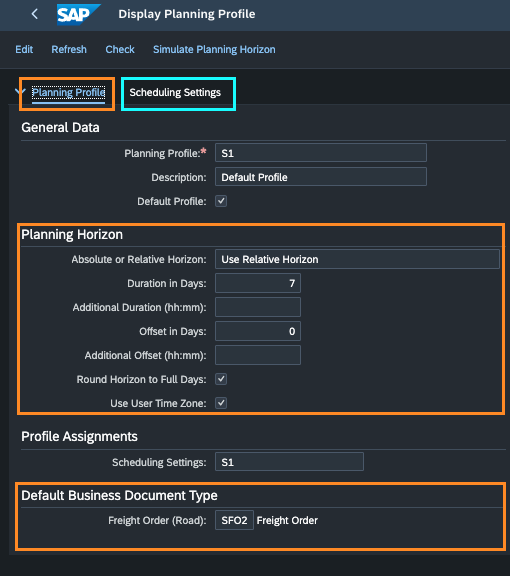
The application presents as below, in one tab the planning profile data, and in another tab, the scheduling settings.
The planning profile is fairly straightforward in that it contains data pertaining to the planning horizon. Important to note is that the planning duration maintained below is not a constraint as far as loading data in the cockpit is concerned. Meaning that you could have maintained a duration of 7 days here, that does not mean that in the planning cockpit you may not find a freight unit that is 14 days out! So beware.
The Scheduling settings are also important settings and can be dependent on the direction of traffic (inbound vs outbound).
The scheduling settings allow you to account more realistically for loading and/or unloading durations, depending on the location and/or the resource type. For example, does it make sense that it takes longer to load a 25 Ton truck vs a 2 Ton truck? Do you have some locations that are maybe short staffed and thus take longer to load or unload trucks? These are durations that are taken into account during the scheduling of freight orders. Similar durations can also be maintained for your shipping points.
