Tired of imports/changes/exports?
Unable to mass update current & future (specific) pay components with X% and maybe some extra logic in a more automated fashion?
Do you want to mass change pay scale levels within a Compensation Cycle based on performance cycle outcomes?
And/or are there employees that do not have the right manager in the system right now?
Then seek no further, because I’ll take you through the possible solutions shortly with integration center.
After some time and moving to McCoy & Partners, it’s now time to help you find some advanced use cases for it that drastically increase accuracy and capabilities within SuccessFactors. I will be taking you through 3 use cases where you can mass update/create data:
- Fixed (CLA) Increase % per DATE and future data records
- Create/Process New Pay Scale Levels based on PM cycle of employees with fixed salaries
- Automatically assign employees to (newly hired) manager
Use Case 1:
Fixed (CLA – in the Netherlands: CAO) % Increase per DATE and future dated records
– Prerequisite general: please ensure you don’t have existing records with errors and/or impactful
onSave business rules turned on during the processing that could block this process.
– Prerequisite when Min/Max of pay ranges need to be respected: Ensure you have the field Pay
Range in Comp Info and that the employees has this data.
Most companies for instance (due to CLA changes) wish to apply a flat increase (i.e. 4%) once per year/every so often and do this via Mass Exports, Changes and Imports, but this error sensitive and not required at all!
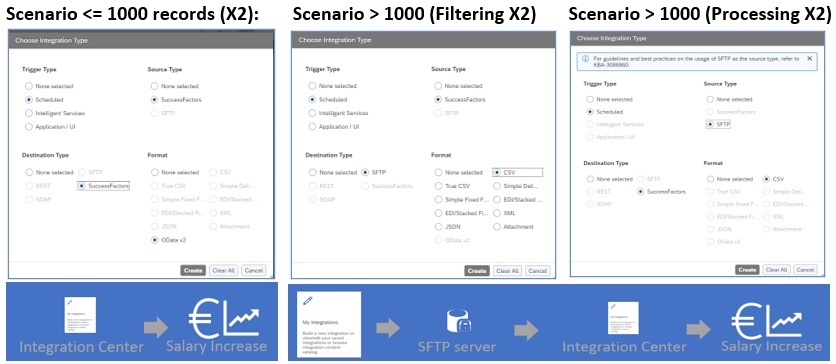
1000 or fewer records to process? –> you could fix this with 2 Integrations via Integration Center.
>=1000? –> you may need 4 (2 for filtering, 2 for processing) Integrations + an SFTP server.
In both situations you basically aim to (also specifically in this order):
I. Create a Compensation Record (to ensure it’s present) per DATE.
II. Update existing pay components per a specific DATE + future dated records
(III. Note! Business Rules (BR) can still perform extra actions based on the integration center data if needed, if you for instance need to adjust salary based on min/max or if you need to use a fixed salary for pay scale levels that can all be used via BR. It could be the case that you need to turn some onsave rules off for the purpose of this exercise).
Create a Compensation Record (i.e. per 1 April):
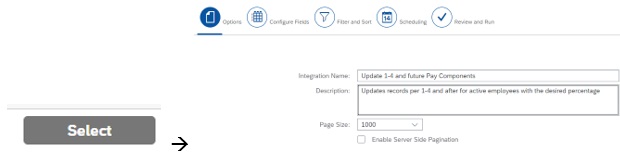
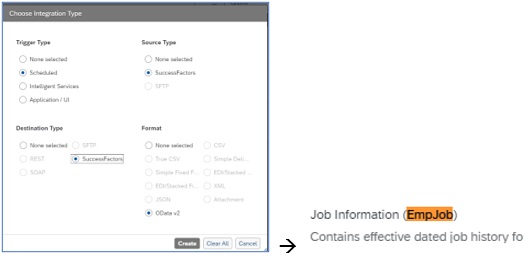
1. After first going to integration center and selecting the right scenario (as shown above), you have to choose: EmpCompensation

2. Dependent on your scenario, you may have to take different steps here:
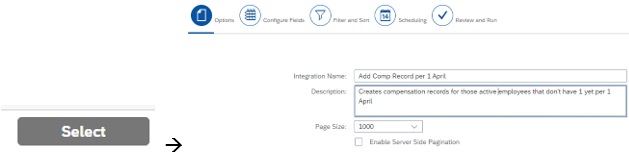
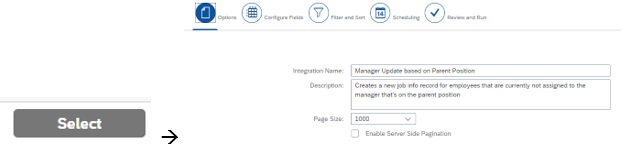
2a. <=1000 records (you could get this up to 2000, but then you need to sort A-Z and Z-A on user-id) – Press Select to Proceed and give the Integration a name (and description) –>
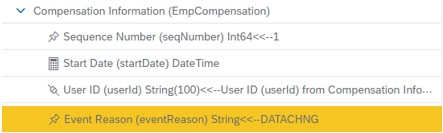
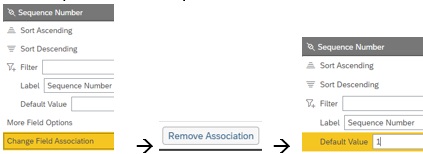
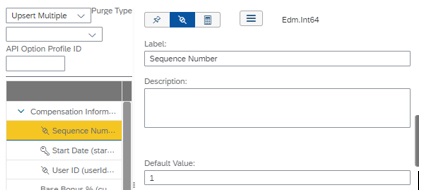
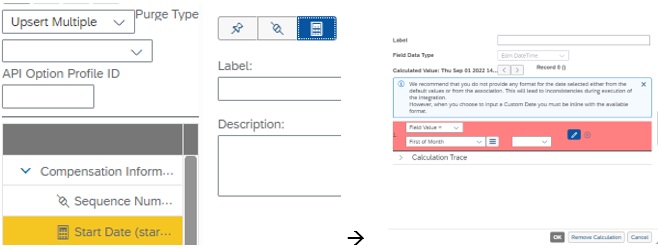
– Add 1 as default value for the sequence (assuming you only want records per 1 April for
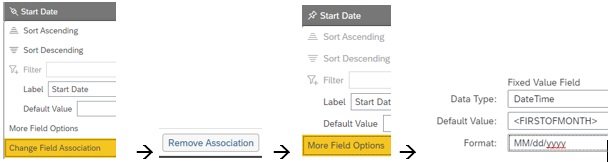
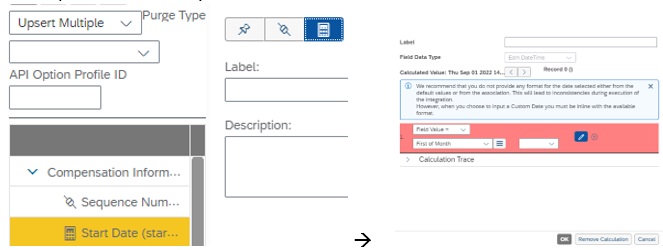
those that don’t have it yet), add i.e. 1 April as start date (I recommend using a calculated
formula as you can for instance select first of the month if it is April), directly map the User
ID and apply a default value for the event reason (in this case DATACHNG)
Note! Dependent on your Mandatory field settings you may need to fill more fields & you can also
leave sequence blank as the system will auto generate it
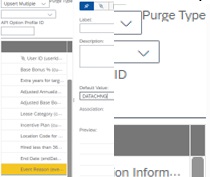
– Apply the right filtering, i.e. Employee Status (I recommend the external code) = Active (A),
no records per 1 April (if you don’t want to create extra comp records), but records that
are Effective As Of: 1 April that lack a record per 1 April (= Time Based Filter)

– Schedule/Save (at least do this)/Run
Example details can be found in the prior mentioned blog (steps 8 and 9)
2bI. >1000 records (filtering)
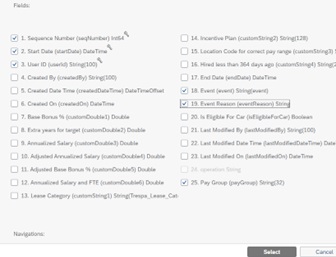
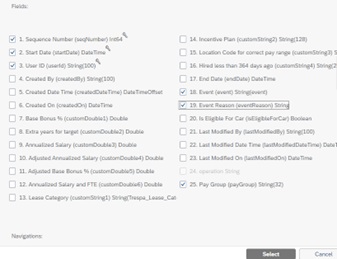
– Select the mandatory fields (note this may differ for your instance) + “Select”
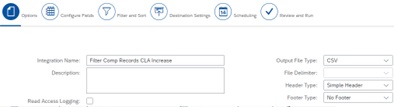
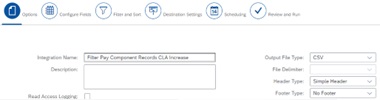
– Give it a valid name (and description) + apply the right settings (simply header):
– You could add fields/transform fields (i.e. default effective date & event reason), but you
can commonly skip this (as you can also do it with the import)
* Example Default Date (assuming you do this in April and want 1 April 2022)
* Example Default Event Reason

* Example Default Sequence
– Apply the right filtering, i.e. Employee Status (I recommend the external code) = Active (A),
no records per i.e. 1 April (if you don’t want to create extra comp records), but records that
are Effecitve As Of: i.e. 1 April that lack a record per 1 April (= Time Based Filter)
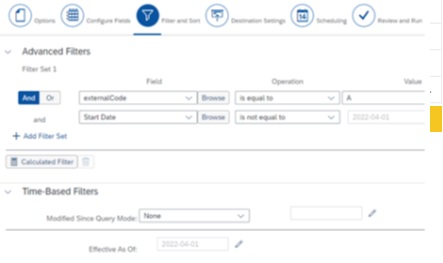
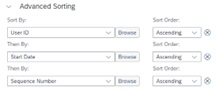
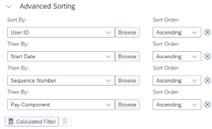
(optional), you can also sort the data:
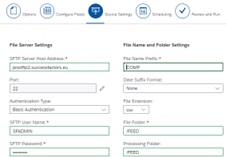
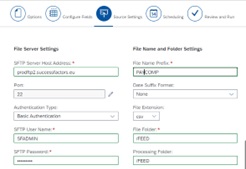
– Fill out the destination details (i.e. SuccessFactors SFTP, FEED folder, filename COMP – note this is sample data and may differ for you)
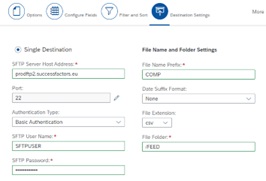
(note! SHOULD have file extension: csv)
– Schedule/Save (at least do this)/Run
Example details can be found in the prior mentioned blog (steps 8 and 9)
2bII. >1000 records (processing)
– Make sure that you’ve completed all steps of 2bI and that you’ve ran the integration &
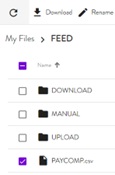
login to the SFTP server, go to the FEED folder and observe & download the file
(hint! If you have exceptions, this is great because you can still download + adjust + re-upload)

– Go to Integration Center, select the right options (3rd picture in 1st screenshot on the top of this blog) & give it a fitting name (and description)

– Upload the file that you’ve downloaded (& accept the warning if you get it)

– On the left hand side, swap to the middle icon

& drag the fields to be mapped to the according places
(note, if you still need to transform/default fields, please don’t map those fields yet
green = always to be mapped, orange = only map if you transformed in the prior file)
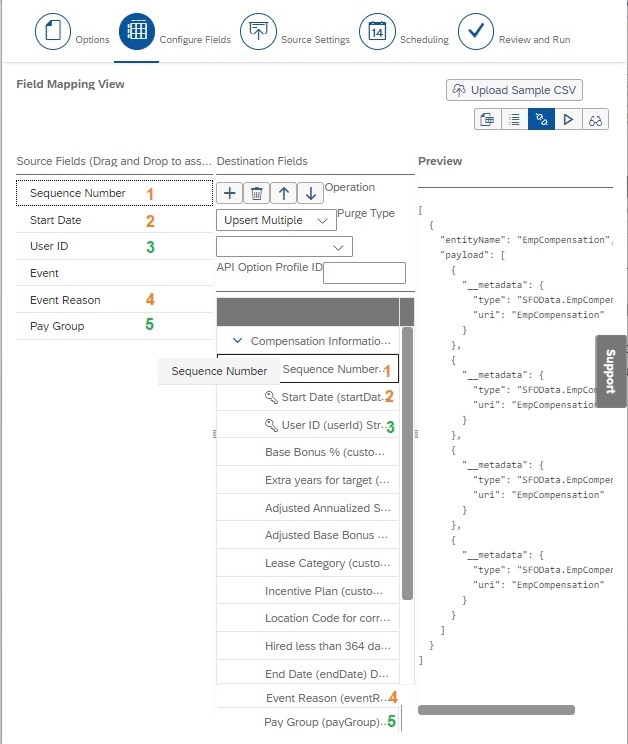
– On the left hand side, swap to the 2nd icon (detailed view) and make changes if needed

* Example Default Sequence – default value 1
NOTE! You can also leave sequence blank as the system will auto generate it
* Example Default 1st day of the month as effective date
* Example Default Event Reason DATACHNG
– Set the SFTP Settings (to pick-up the file – note this is sample data and may differ for you), i.e.
– Schedule/Save (at least do this)/Run
Example details can be found in the prior mentioned blog (steps 8 and 9)
Update Pay Component(s) – Please only take these steps after completing all Compensation steps:
1. After first going to integration center and selecting the right scenario (as shown above), you have to choose: EmpPayCompRecurring
2. Dependent on your scenario, you may have to take different steps here:
2a. <=1000 records (you could get this up to 2000, but then you need to sort A-Z and Z-A on user-id)
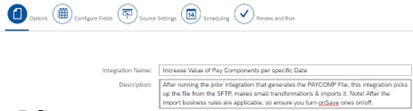
– Press Select to Proceed and give it a name (and description)
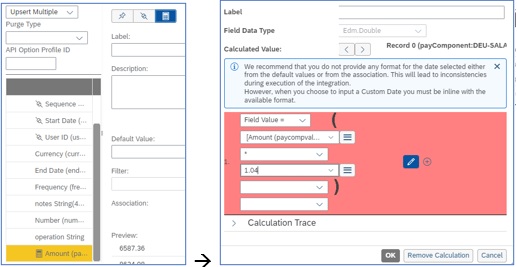
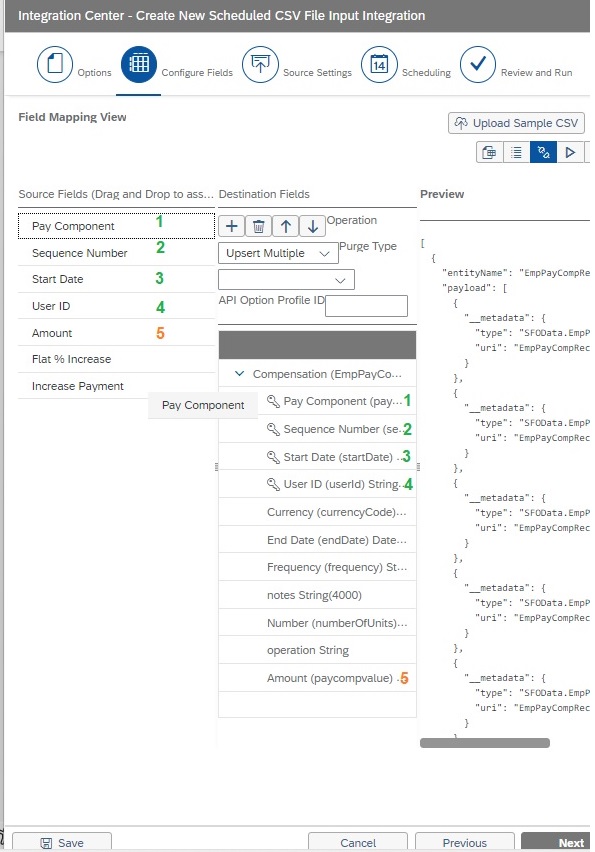
– Go to the Configure fields Tab and select the second icon on the right hand side.

– Most fields can directly be dragged and dropped from the left to the right

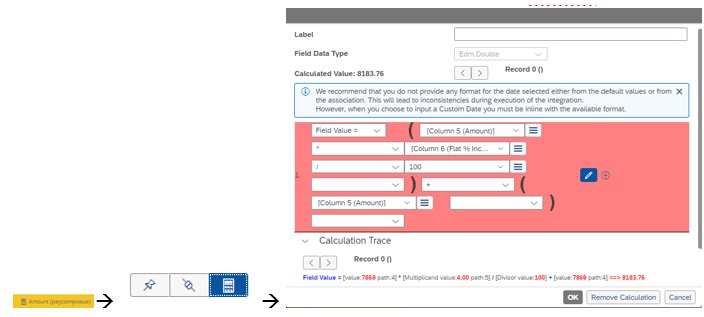
For amount you will however, but on the left hand side first swap to the middle icon

, need to add a calculated field
Note! Dependent on your Mandatory field settings you may need to fill more fields
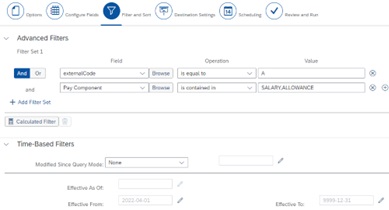
– Apply the right filtering, i.e. Employee Status (I recommend the external code) = Active (A),
Only for the SALARY and ALLOWANCE (in the Netherlands common for extra salary,
personal allowance, shift allowance etc.) pay component , but records that
are active as of 1 April or later (Time Based Filter).
(optional), you can also sort the data:
– Schedule/Save (at least do this)/Run
Example details can be found in the prior mentioned blog (steps 8 and 9)
2bI. >1000 records (filtering)
– Select the mandatory fields (note this may differ for your instance) + “Select”
– Give it a valid name (and description) + apply the right settings (simply header):
– Click on the Configure fields tab and add fields / calculations that make sense, i.e.
* Add the percentage increase (i.e. 4%) directly to the pay component amount
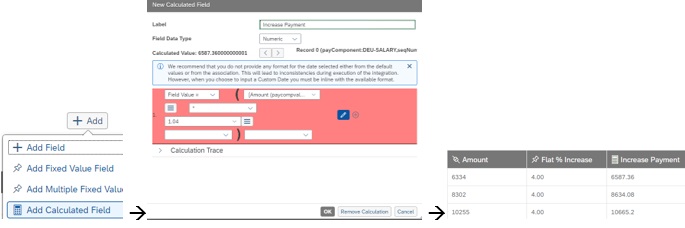
(Note! You can also use IF THEN ELSE if you have up to 4 scenarios!)
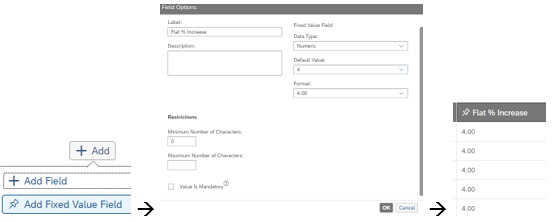
* add a field that indicates the flat increase (i.e. 4%):
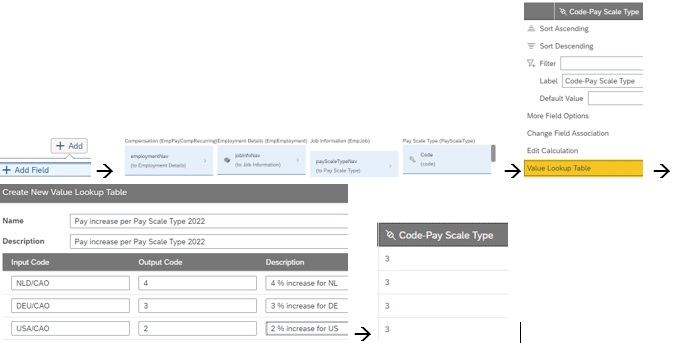
* Assuming different % increase per pay scale type, use a look-up table to get the %
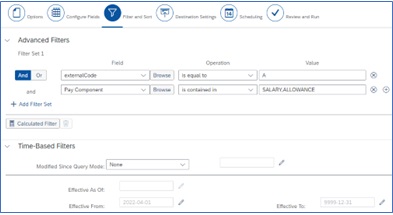
– Apply the right filtering, i.e. Employee Status (I recommend the external code) = Active (A),
Only for the SALARY and ALLOWANCE (in the Netherlands common for extra salary,
personal allowance, shift allowance etc.) pay component , but records that
are active as of 1 April or later (Time Based Filter).
– Fill out the destination details (i.e. SuccessFactors SFTP, FEED folder, filename PAYCOMP – note this is sample data and may differ for you)
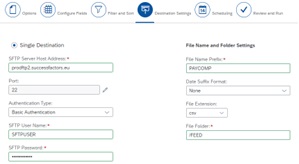
(note! SHOULD have file extension: csv)
– Schedule/Save (at least do this)/Run
Example details can be found in the prior mentioned blog (steps 8 and 9)
2bII. >1000 records (processing)
– Make sure that you’ve completed all steps of 2bI and that you’ve ran the integration &
login to the SFTP server, go to the FEED folder and observe & download the file
(hint! If you have exceptions, this is great because you can still download + adjust + re-upload)
– Go to Integration Center, select the right options (3rd screenshot on the top of this blog) &
give it a fitting name (and description)
– Upload the file that you’ve downloaded (& accept the warning if you get it)

– On the left hand side, swap to the middle icon

& drag the fields to be mapped to the according places
(note, if you still need to transform/default fields, please don’t map those fields yet
green = always to be mapped, orange = only map if you transformed in the prior file)
– On the left hand side, swap to the 2nd icon (detailed view) and make changes if needed
* Example Calculation Pay component amount if you have a % increase
– Set the SFTP Settings (to pick-up the file – note this is sample data and may differ for you), i.e.
– Schedule/Save (at least do this)/Run
Example details can be found in the prior mentioned blog (steps 8 and 9)
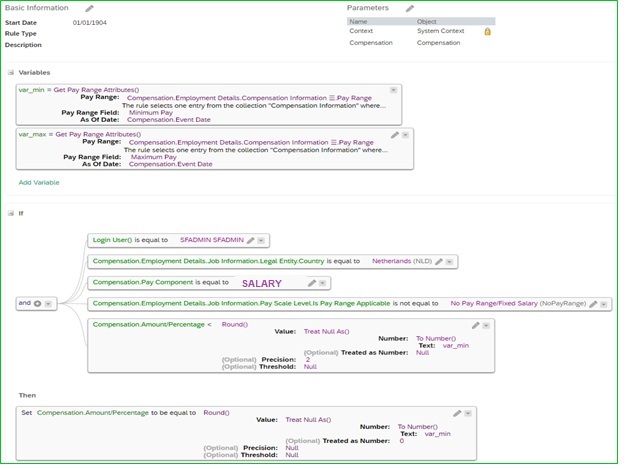
3. When taking the actions above, you could also ensure SuccessFactors performs extra checks
(i.e. based on min/max pay ranges) to correct the new salary. An example below reflects one of the things you could do if you need to consider those (i.e. put SALARY to the minimum if it falls below that). The same could be done for instance based on the maximum (variable visible in the picture below too).
NOTE! As a safety measure, you could include that a specific user must run the integration in the business rule to ensure nothing else could potentially trigger or retrigger the increase.
Use Case 2:
Create/Process New Pay Scale Levels based on PM cycle of employees with fixed salaries
Prerequisites:
– Need to ensure your Compensation Worksheet calculates the new pay scale level based on for instance the Performance Rating
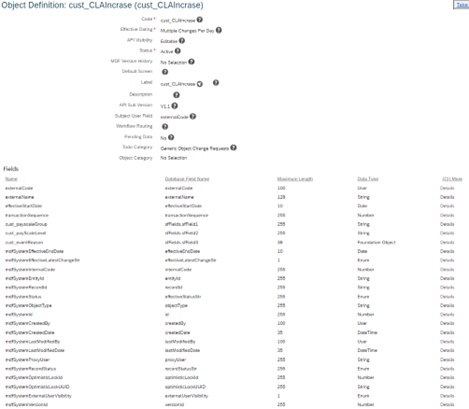
– Need an MDF object to store the new data based on the compensation cycle
– Need to have the minimum mandatory fields in your compensation worksheet to fill your job info
(i.e. Pay Scale Group, new code of pay scale level, user-id etc.)
– Job Info needs to be error free (especially for customers with many employees this can be challenging)
– Need to turn on/off onSave business rules temporarily for final integration center processing
Some companies wish to go through a compensation cycle with their CLA population (often those with pay scale levels and fixed salaries), but may have a lot of logic to determine the amount of pay scale levels that an employee can get (i.e. bad performance = no new pay scale level, very good performance = increase of 2 steps, manual correction of the pay scale level to use, etc.).
To manage this (mainly via compensation) you could:
1. Ensure you have an MDF object with the right fields. Example:
2. Ensure you have the right fields and calculations setup to get to the next pay scale level within
your Compensation Worksheet.
Example:
– Uses various default fields
– Uses some custom fields (i.e. user id, pay scale group and pay scale level) – Marked: Yellow
– The standard & custom fields are used to apply a guideline & default value to: merit field.
(in this case a movement to 0.5 pay scale level up = 1% increase and full = 2% increase)
– In the custom (pink area) fields for the steps to increase the Merit increase could be halved
to get to the number of steps & these are then added to the custom pay scale level to
calculate the new Pay Scale Level).
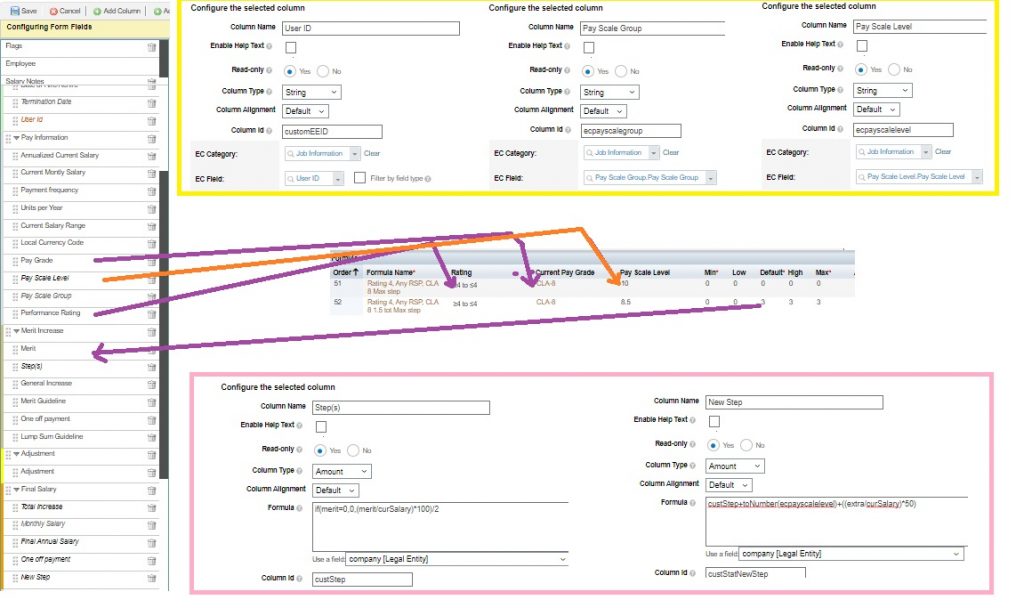
Note! If your pay scale level is not numeric, you may need to get the according one with a lookup instead.
3. Ensure you configure the publishing to the MDF object (+ complete the comp cycle & publish)
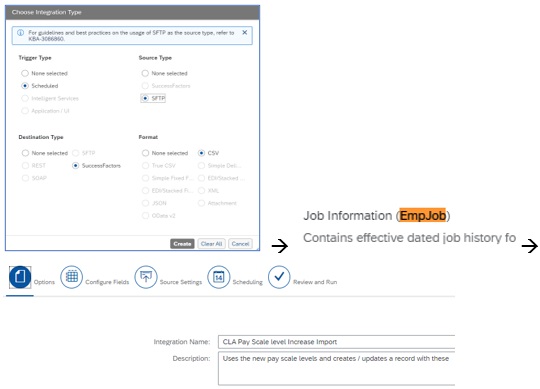
4. Ensure you have an integration center object to export the MDF data to the SFTP
– Go to Integration Center and choose the right options & the custom object:

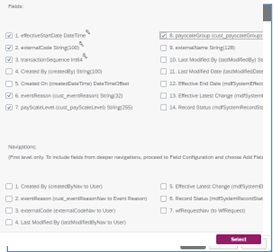
– Select the correct fields (this may differ from those that you have) + press Select
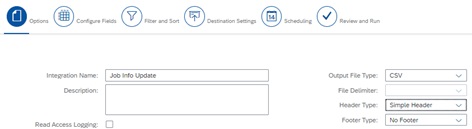
– Give the file a name and apply the correct settings
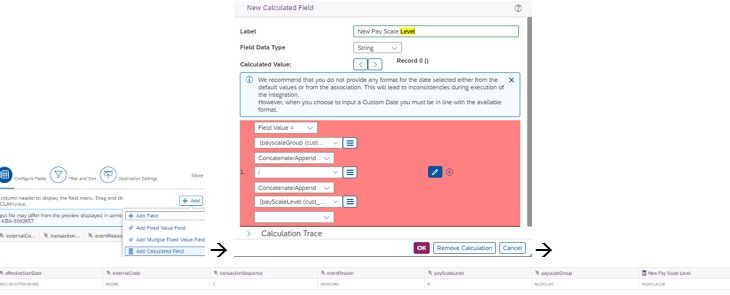
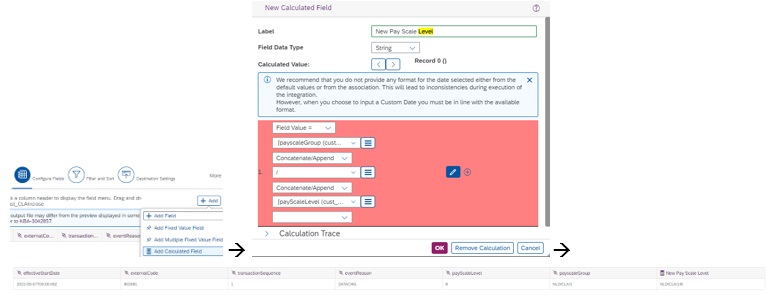
– Go to Configure Fields & concatenate the Pay Scale Group + the new Payscale Level
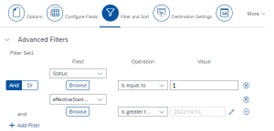
– Filters may not be required, but it could make sense to filter for active employees (t) per a
specific effective date (i.e. 1 April) in the Filter and Sort Tab:
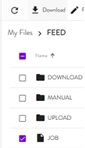
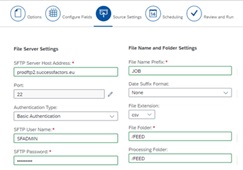
– Fill out the destination details (i.e. SuccessFactors SFTP, FEED folder, filename JOB – note this is sample data and may differ for you)

(note! SHOULD have file extension: csv)
– Schedule/Save (at least do this)/Run
Example details can be found in the prior mentioned blog (steps 8 and 9)
5. Ensure you have an integration center object to import the MDF data from the SFTP to job info
– Make sure that you’ve completed all steps of 1-4 and that you’ve ran the integration &
login to the SFTP server + go to the FEED folder and observe & download the file
(hint! If you have exceptions, this is great because you can still download + adjust + re-upload)
– Go to Integration Center, select the right entity (empJob), select the right options &
give it a fitting name (and description)
– Upload the file that you’ve downloaded (& accept the warning if you get it)

– On the left hand side, swap to the middle icon

& drag the fields to be mapped to the according places
(note, if you still need to transform/default fields, please don’t map those fields yet
green = always to be mapped)
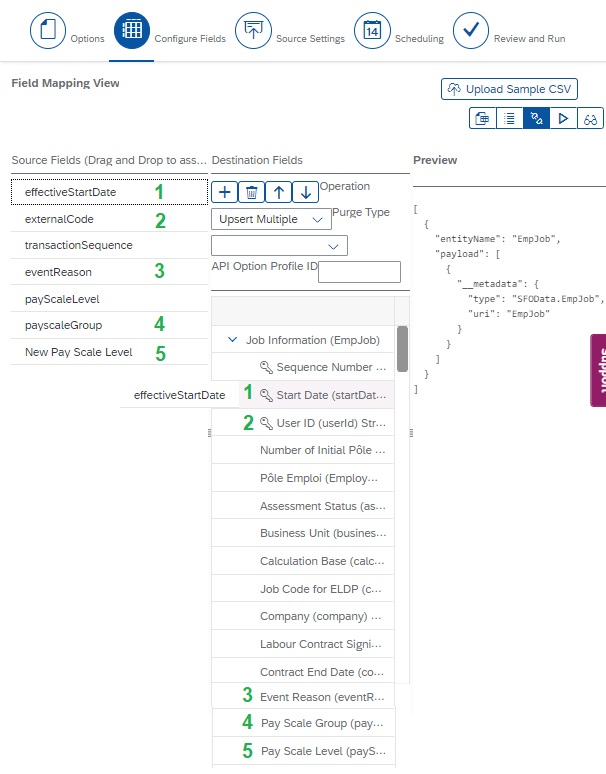
(You may notice I haven’t mapped sequence, I did that deliberately as SF generates it for me now).
– Set the SFTP Settings (to pick-up the file – note this is sample data and may differ for you), i.e.
– Schedule/Save (at least do this)/Run
Example details can be found in the prior mentioned blog (steps 8 and 9)
Use Case 3:
Automatically assign employees to (newly hired) manager
Prerequisites:
– Need to have position management in place
– Ideally you don’t have multiple managers on one position
– the manager on the parent position is always the manager of the employee on the position
– Job Info needs to be error free (especially for customers with many employees this can be
challenging)
– Need to turn on/off onSave business rules temporarily for final integration center processing
– Make sure you have the standard canvas report: “Disparities between Reporting Line and Position” report in your instance (or an equivalent) & that you’ve ran it to identify the mismatches
This is not directly compensation related, but as the compensation module relies a lot on correct manager – employee relationships, this can be crucial. It happens often that a manager leaves the company and that the employees are then temporarily assigned to another manager. When the new manager gets in place, there often isn’t an easy way to mass assign the employees back, until now if I’ll use Integration Center correctly!
– Identify the users where the manager deviates from the one of the parent position.
– Go to Integration Center, select the right entity (empJob), select the right options &
give it a fitting name (and description)
– Press Select to Proceed and give it a name (and description)
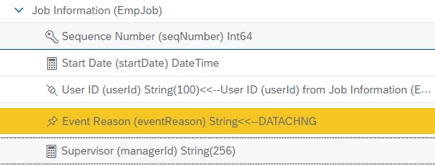
– Leave the sequence blank, add 1 April as start date (I recommend using a calculated
formula as you can for instance select first of the month if it is April), directly map the User
ID, apply a default value for the event reason (in this case DATACHNG) & add the new
Supervisor ID(s)
* Example Default 1st day of the month as effective date
* Example Manager of Parent Position

(In this case I’ve added just 1 manager user ID, but you can also use a lookup table based on the user ID field to update the manager)
Note! Dependent on your Mandatory field settings you may need to fill more fields
You may notice I haven’t mapped sequence, I did that deliberately as SF generates it for me now
– Unfortunately Incumbent is empty for parent positions, hence you have to add the codes
of the respective Parent Positions as a filter (based on the report)

– Schedule/Save (at least do this)/Run
Example details can be found in the prior mentioned blog (steps 8 and 9)


