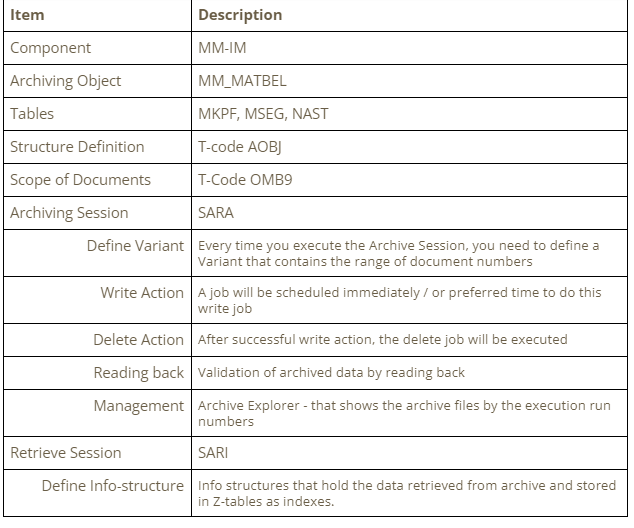
Objective
In this blog, We shall see the steps to archive the Material documents with respect to tables MAKT, MSEG tables. The Exercise material of this blog is MM_MATBEL – Archiving object. Steps involved to execute this data archiving are discussed here.
Definition
Material documents created in the Inventory Management transactions are to be archived in the storage system in the form of flat files. Upon successful completion of the archive, the data will be deleted from the system. Following points are considered and followed while doing this archiving process.
Prerequisite
Authorization
In addition to the General Archiving Authorization, authorization is required for the object M_MSEG_WMB (material documents in plant) with activity 06 (delete).
Initial Configuration
Before you start, initial configuration and structure definition for this archiving object MM_MATBEL has to be organized in the session – (T-code AOBJ)
- Structure definition ( like Tables involved etc.)
- Customizing Settings ( like scheduling the deleting jobs, storing of archived files etc.)
- Customizing Transactions ( like scope of plants, document types etc.. )
- Transaction code OMB9
Financial postings
The Financial posting records related to these inventory movement records will not be archived in this archiving object. Only MKPF and MSEG records will be archived. If so, then the FI records should be archived before this activity.
T-code AOBJ
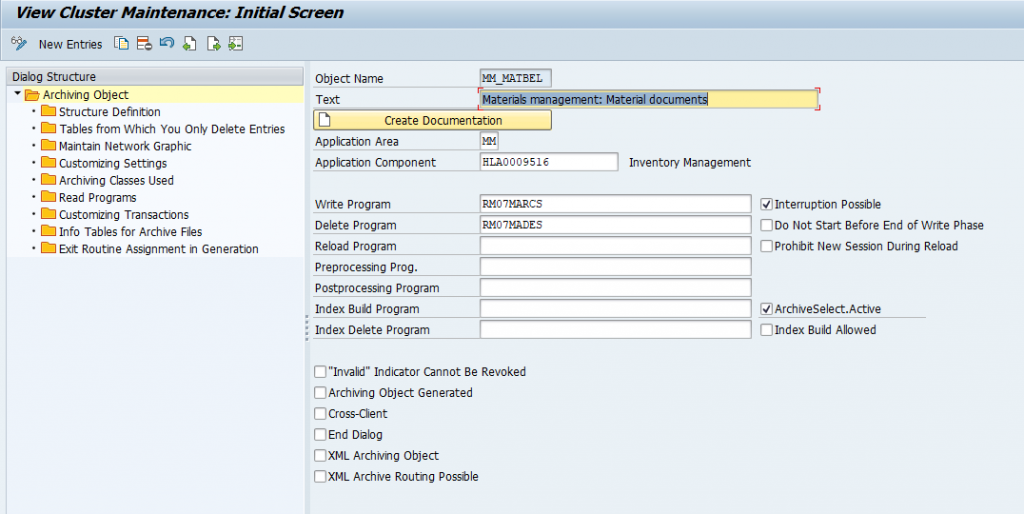
This section explains the steps to maintain the configuration and structure definitions that are required for the archiving object MM_MATBEL.
- This configuration is a cross-client change. Any change done will be affected to all the clients in the server.
- Transport Requests will be generated for each change in this session.
- The Left hand panel shows the areas of configuration
- Right hand side, you can select the Archiving object.
In our example – we have selected MM_MATBEL. Initial screen shows the standard configuration set by SAP. We do not change anything here.
In Customizing Settings – We set the details about archiving file sizes, Delete job options, Content repository if any
In Customizing Transactions – This shows the T-code through which we set the scope of data to be archived.
Initial Screen
As you can see above, the Write and Delete program names ( standard SAP programs ) that will be executed in the Archive and Delete jobs.
- Application Component – (SAP standard definition)
- Application Area – MM (SAP standard definition)
- Write Program name –
- Delete Program name –
Customizing Settings
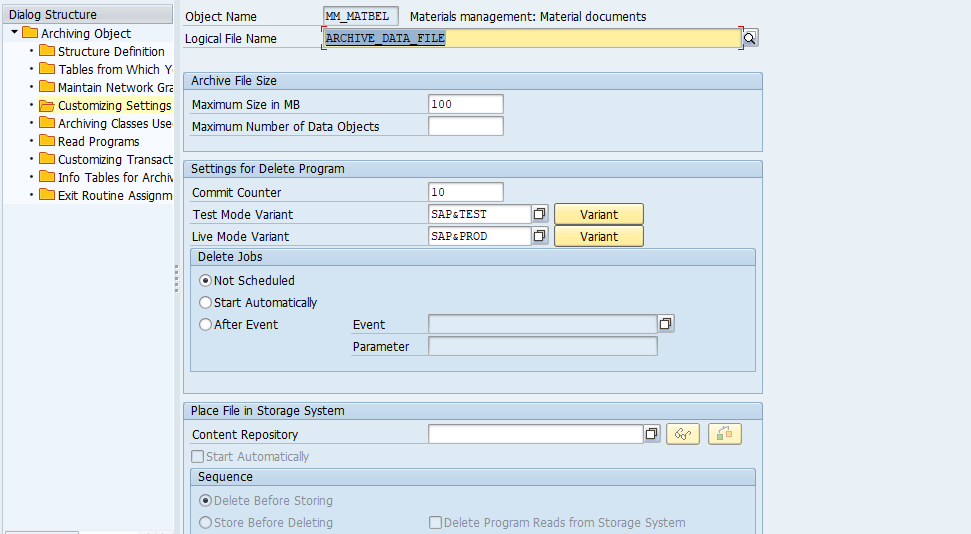
As you can see, the Archive file related information are configured here.
- Size of the archive file
- Schedule of Delete Job
- Content Repository (if required)
- Sequence of Delete (if content repository is configured)
- The delete should be done before or after the file is moved to Content repository
- Sequence of Delete (if content repository is configured)
Customizing Transactions
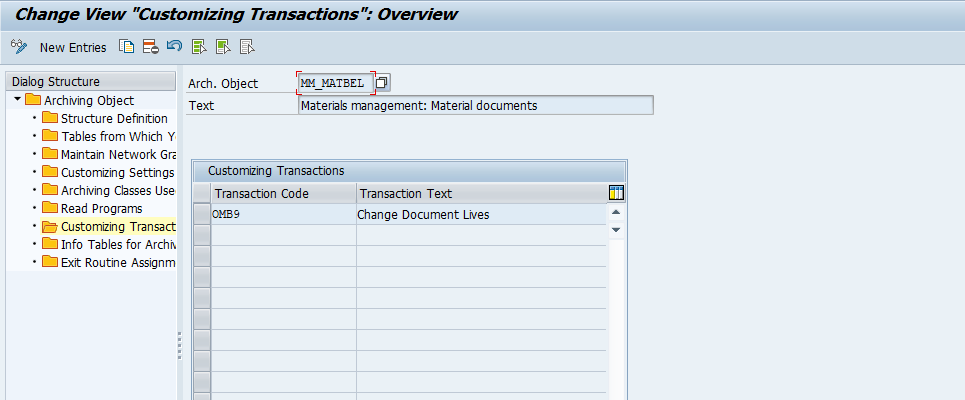
The transaction code OMB9 – to define the data scope. We cannot add any new t-code here. It is defined by SAP standard operation.
T-code OMB9
Defining Scope
This session describes the scope of documents that are to be archived and deleted from the system. In the following example we selected the scope as follows:
Plant : 8100 and 8200 → Document type : WA → Document Life in Days XX
The Document life in days refers to the age of the document. For each combination of plant and document type – one new entry will be created.
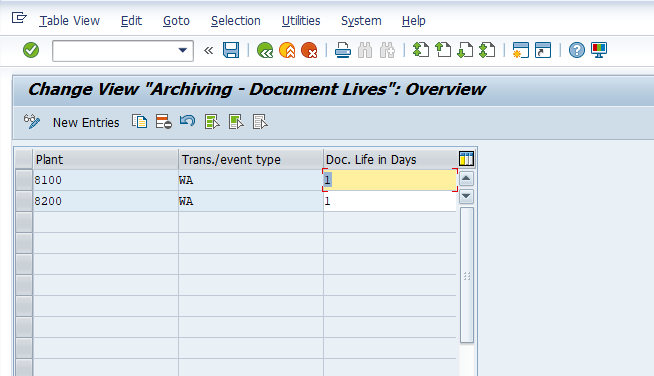
In the above example – the scope is defined as – all inventory movement transactions in the plants 8100 and 8200 with transaction type WA – that have the age more than 1 day.
T-code SARA (Data Archiving Process)
SARA → Enter the Archiving Object MM_MATBEL → Press Enter
SARA – A SAP standard approach to archive the data. It is an Archive Administration cockpit where you can have the link to other related t-codes ( viz. AOBJ, SARI, SM37, etc. ).
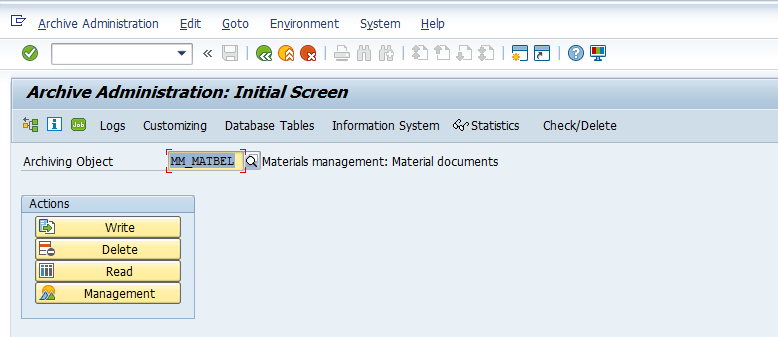
The Toolbar is the place where – you are linked to other t-codes which are related to this archiving object configurations and actions.
The Action steps for this object are as follows:
- Write
- Delete
- Read
- Management
The action steps are different from each archiving object. This archiving object MM_MATBEL has the above four actions.
Write Action
Press Write Action Button
First action is to archive/write the defined scope of transactions (defined in OMB9) records into an archive file. For the Press Write Button. Once you press the Write button a popup screen will appear to make a variant for this action. Variant here is nothing but define the selection criteria of SAP Documents. (Document ranges).
When you schedule the write program you must enter an already existing variant or create a new one. This variant contains the selection criteria for the material documents you want to archive.
Select Variant
Provide the Variant Name – ( Example FI_2018_01 ) – Planning to take all 2018 Period 01 documents.
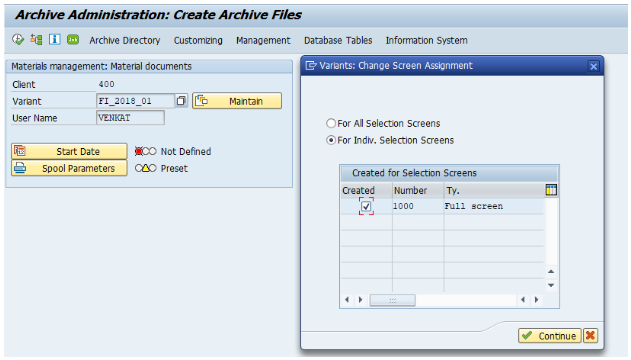
Variant Name: FI_2018_01
User Name: Default
Popup Screen: Choose the radio button as above. – Press Continue. You will get the following Variant – selection criteria screen. The next screen appears as below:
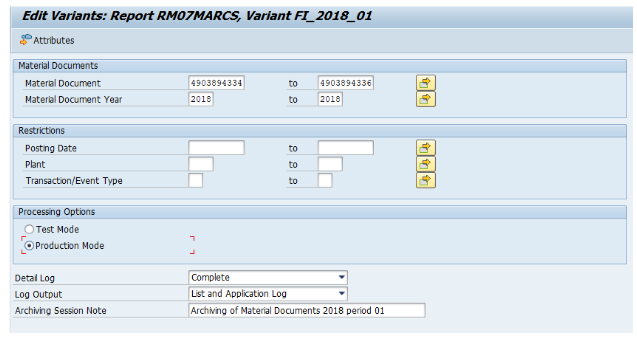
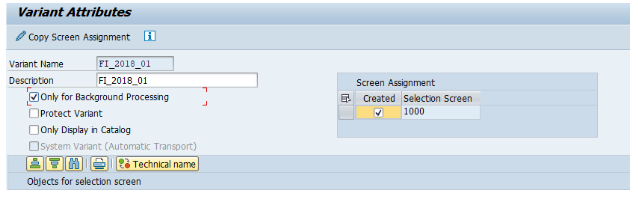
Selection criteria are provided as above. After that, press Attributes button. You will get screen as below: Provide Description, select checkbox Background processing – and Save.
You will return to the Variant screen again and press the back button and come to the initial screen.
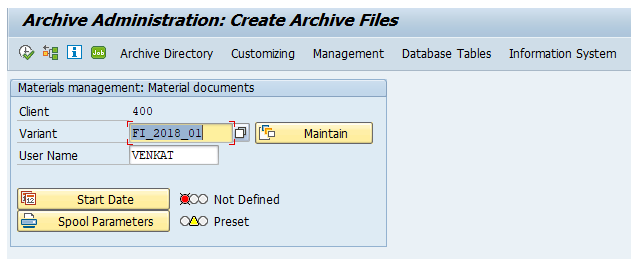
Schedule Job
Now you have to schedule the Job for Writing the archive File – For that Select Start Date button and Schedule the job. Once you press Start Date it will go the Job Scheduler screen and ask necessary parameters as below:
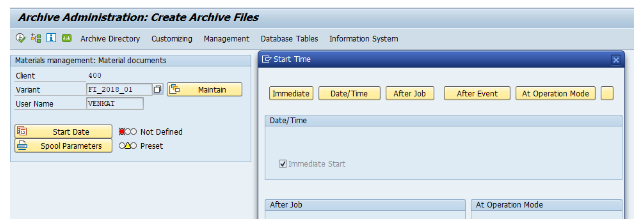
Select Immediate or your preferred date time and save the Job. Now you will get back to the screen as below :
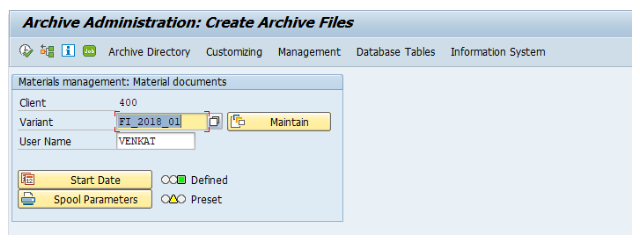
Now we are at stage that,
- Scope of documents to be archived are given in Variant section
- Scheduled the job to Write archive file
Next Press the Spool parameters and select your printer device (this is for writing a log file – that system is looking for). In my screen it was default using my user id – hence shows preset. Hence I can proceed further
Execute Job
Now Press the Execute Button – Once you press the Execute button the job that you scheduled in the earlier step will be started. Since I gave my job to start immediately, once I press the execute button it will be started immediately.
You will see the message New archiving job was scheduled. To see the job status you can press the Job button in the toolbar of this session.
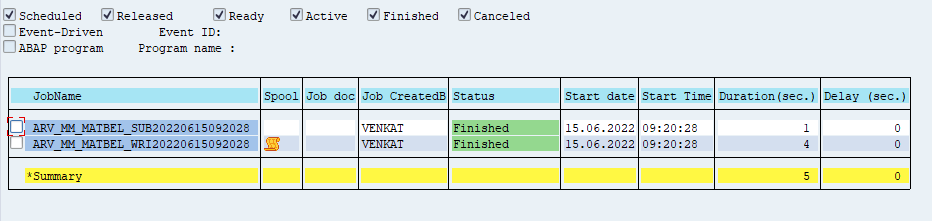
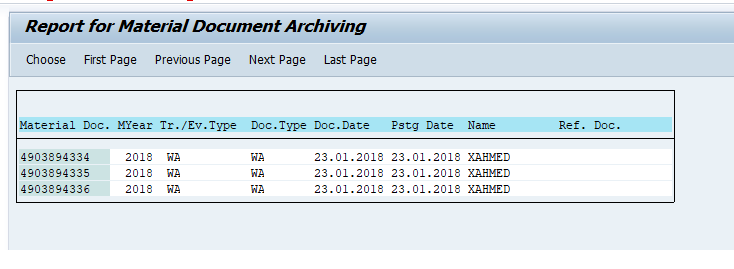
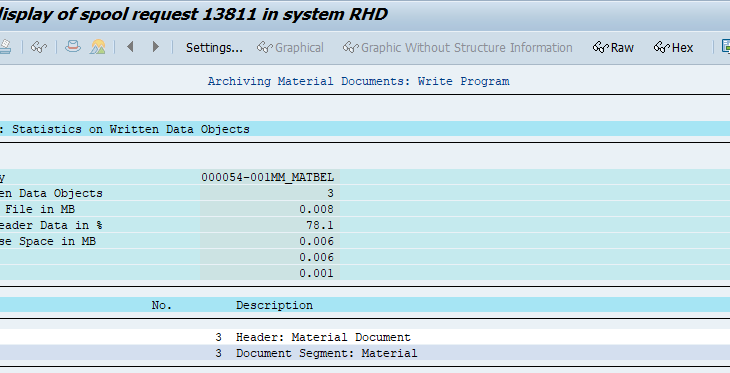
Please note that the above job is finished and spool has the file. You can further open that file to see if the write action is successful or not.
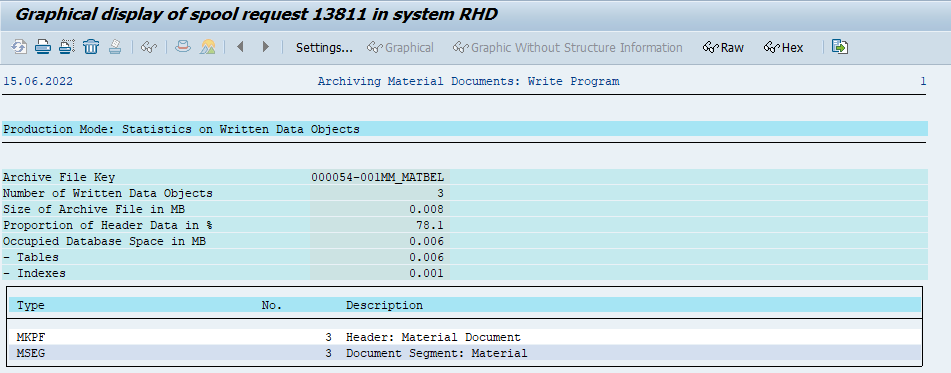
The above log shows – the write action is successful. Three documents that selected were written into an archive file.
Please note that at the end of the successful Write Action, a Job Number will be generated. Please note it down, because we need to provide the job number while doing the Delete process.
Job number for this session is noted as : 54
Please note that the records will be deleted only for those records which are successfully written in the archive file.
Now we are ready to go ahead with Delete Action
Delete Action
Second action is to delete the records from the table once the Write action is successfully completed. Delete will not happen automatically as we mentioned it as scheduled. (in OABJ tcode).
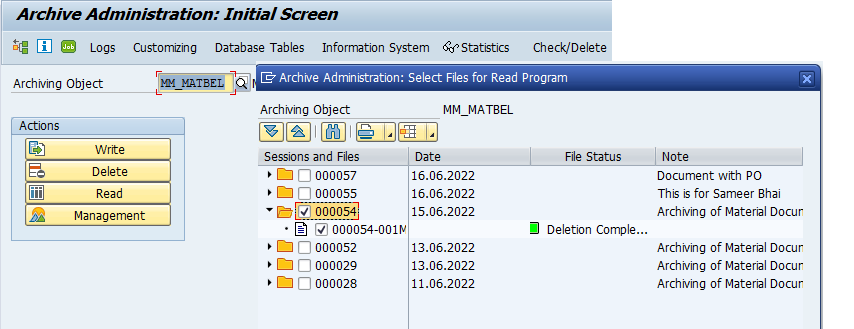
Archive Selection
Press Delete Action Button. Once you press delete action, you will see the following screen.
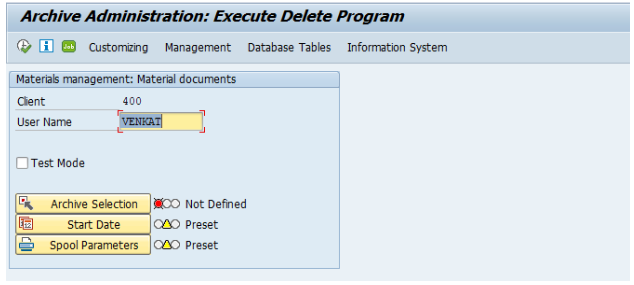
Here you need to select the Archive file – that you created using the above Write Action. To simulate and test it – you may choose the Checkbox Test Mode.
Why do we need to select the archive file?
The reason is that the Delete job will delete the records from the table only for those records are archived successfully.
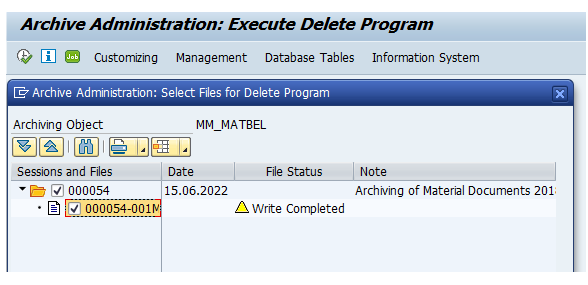
Session and Files: The File explorer of all archived files. You can select it from there.
Right hand side: You can see the Date of Archive, File Status and the Note you gave while archiving.
Select the file and press okay. Then you will go back to the Delete Screen with Archive Selection button as Green light – confirms that the archive file is selected.
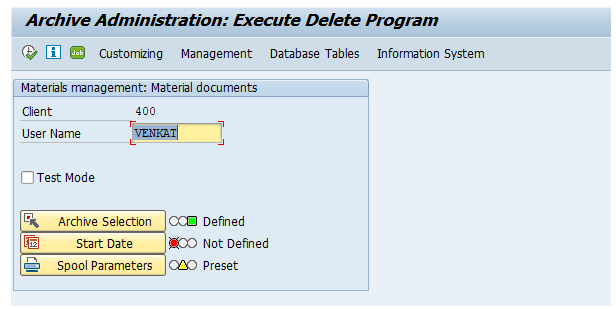
Schedule Job
Now, as we did for writing, a job has to be scheduled for Delete also. Now Click on the Start Date button and schedule the Job. Once the job is scheduled, you will see the screen as below with both Archive selection and Start Date will show green status.

Now, we are set to go with Delete process execution.
Execute Job
As described above, we have set
- Archive File selected
- Scheduled the Delete job
- Log file spool is also set.
Now press the Execute button. A job will be scheduled / started as per the time given in the job parameter.
You may verify the status of job Either in SM37 or by clicking the Job button in the tool bar.

You can notice now
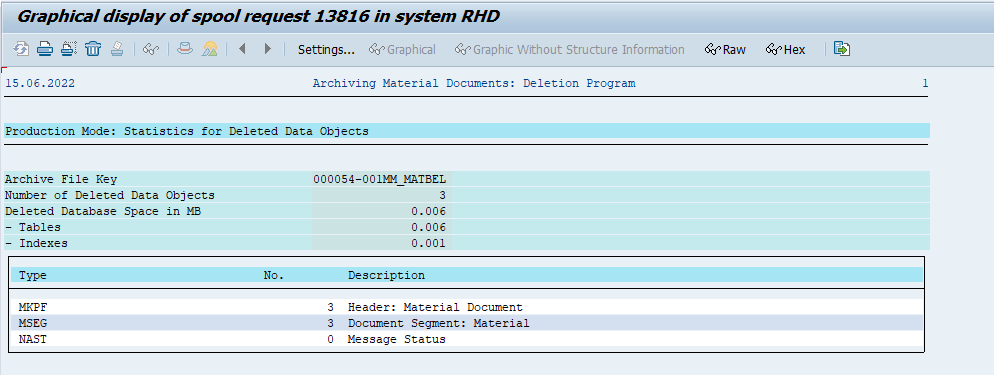
Job ARV_MATBEL_DELXXX – status is finished and spool file is generated.
The log file shows the deleted information. No error logs or messages.
At this state, we are done with the intended archiving job.
- We Customize the scope in AOBJ
- We created the Variant ( scope of transactions )
- Created (Write) archive files
- Delete the Records from the table ( for those records archived in the file)
Validate Deletion
We are done with deletion now. Let us verify the existence of the records in the MKPF and MSEG tables.
Through SE11 / SE16N – I gave the same document range, that I scoped for Archive. I get No Data Found Message.
Read Action
SARA transaction is giving us an option to read the archived data and show us in the form of table display.
Press Read Action Button.
This will take you to the screen where you can provide the selection range (optional).
After giving the range, press the Execute button. It will ask you to select the Archive File as below
You can notice the above archive explorer shows
- Session number ( which is the job number )
- Date – (Job Execution date)
- File Status – the status shows delete action successfully completed.
- Note – this was the note we mentioned in the Variant definitions.
After execution, you will see the documents retrieved from the archive file and show us as below: