In this blog, I’ll discuss various extension points made available to the application developers by ALP for example custom actions, custom filters, table and chart extensions.
Read More: SAP Fiori System Administration Certification Preparation Guide
Prerequisites
- You should have a count in SCP to access Web IDE
- Register here to access the backend OData Service.
- Add the above-registered system as a destination in your SCP account. You can use below destination configuration for your reference
#
#Fri Aug 09 05:54:52 UTC 2019
Description=SAP Gateway Demo System
Type=HTTP
TrustAll=true
Authentication=NoAuthentication
WebIDEUsage=odata_abap,bsp_execute_abap,odata_gen,odata_abap,ui5_execute_abap,dev_abap
Name=ES5
WebIDEEnabled=true
URL=https\://sapes5.sapdevcenter.com
ProxyType=Internet
sap-client=002
WebIDESystem=ES5
4. For reference, you can clone the GIT repo for this sample application which we are building.
ALP Application structure
As any other Fiori elements application, an ALP application is also contained inside a shell bar. Majorly an ALP application can be broadly divided into 3 components:
- Title area: The title area of an ALP application may contain variant management, Global KPIs, Visual/compact filter switch button and share menu.
- Filter area: The Filter area of an ALP application contains filters bar. ALP in addition to a smart filter bar (known as the compact filter in ALP) also provides an option to represent the filters as charts, known as the visual filter. The filter area also contains the adapt filter and go button.
- Content area: The content area of an ALP application may also contain filterable KPIs. The content area of ALP application may contain a chart subsection and a table subsection or both. The content area also has action buttons along with other toolbar buttons at chart and table toolbar.

Adding extensions to ALP
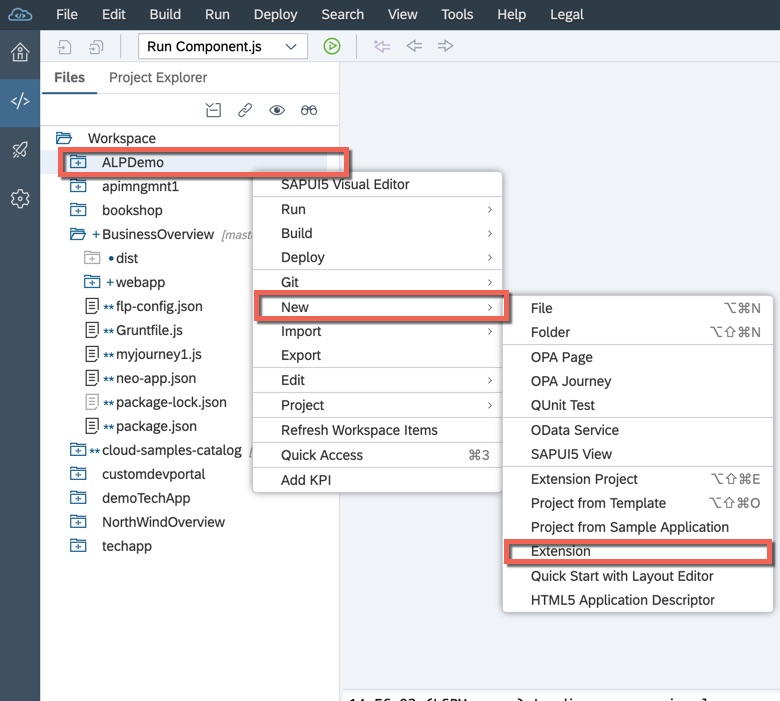
To add any available extension to your ALP application, right-click on your ALP project –> New –> Extensions
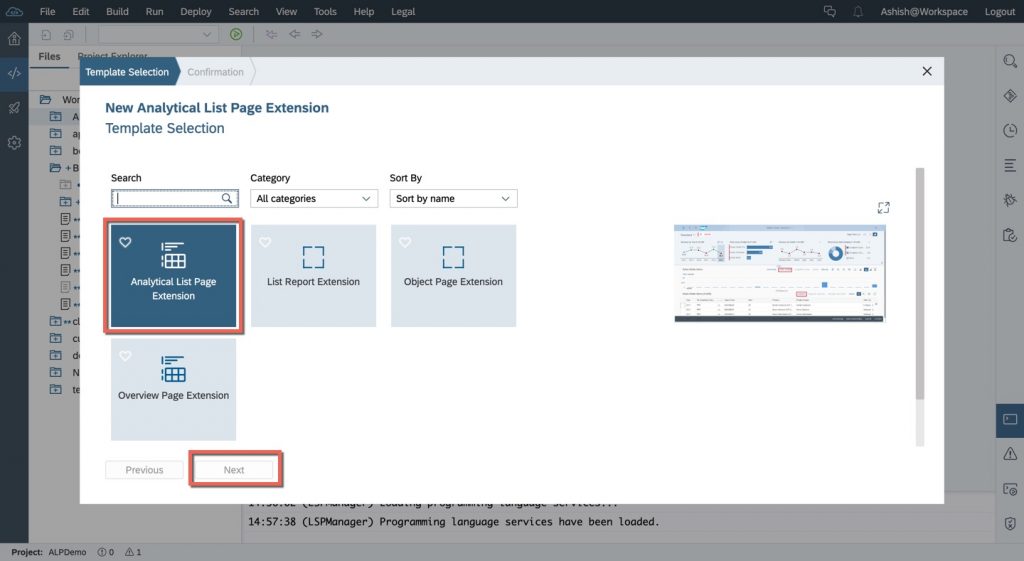
This shall bring up the template selection screen, where you should select Analytical list application and click Next.
This shall present you all the possible extension point for ALP application, which I’ll discuss one by one in subsequent sections of this blog.
Adding Custom Actions
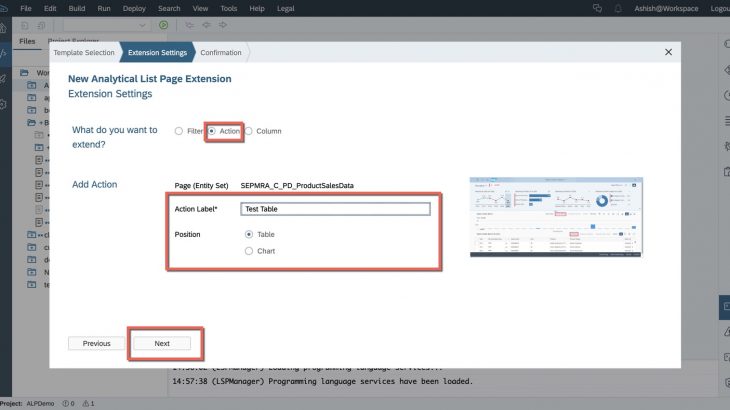
Application developers can add custom action buttons to chart or table toolbar of an ALP application. To do this select “Action” radio button in your extension selection screen, provide an appropriate label for the action button, select the position i.e. table or chart and click on Next.

Once you have done the above steps, you will notice the following sections (sap.ui.controllerExtension) getting added to your application manifest:
"extends": {
"extensions": {
"sap.ui.controllerExtensions": {
"sap.suite.ui.generic.template.AnalyticalListPage.view.AnalyticalListPage": {
"controllerName": "demo.alp.ALPDemo.ext.controller.AnalyticalListPageExt",
"sap.ui.generic.app": {
"SEPMRA_C_PD_ProductSalesData": {
"EntitySet": "SEPMRA_C_PD_ProductSalesData",
"Actions": {
"ActionSEPMRA_C_PD_ProductSalesData1": {
"id": "ActionSEPMRA_C_PD_ProductSalesData1button",
"text": "{{ActionSEPMRA_C_PD_ProductSalesData1}}",
"press": "onClickActionSEPMRA_C_PD_ProductSalesData1"
},
"ActionSEPMRA_C_PD_ProductSalesData2": {
"id": "ActionSEPMRA_C_PD_ProductSalesData2button",
"text": "{{ActionSEPMRA_C_PD_ProductSalesData2}}",
"press": "onClickActionSEPMRA_C_PD_ProductSalesData2"
},
"ActionSEPMRA_C_PD_ProductSalesData3": {
"id": "ActionSEPMRA_C_PD_ProductSalesData3button",
"text": "{{ActionSEPMRA_C_PD_ProductSalesData3}}",
"press": "onClickActionSEPMRA_C_PD_ProductSalesData3",
"filter": "chart"
}
}
}
}
}
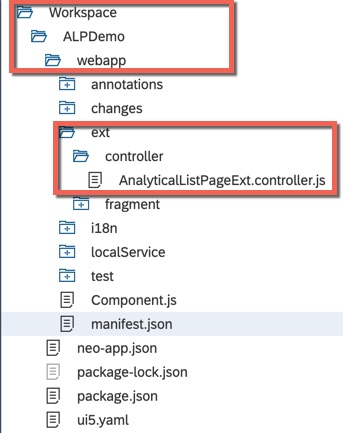
},what is says is that a new extension controller (AnalyticalListPageExt) is added to this project. and all the actions are also mentioned with associated text labels, id and click handler methods which you need to implement in your generated extension controller file. You can find this extension controller under path webapp –> ext –> controller.
So let’s go ahead and implement these click event handlers:
onClickActionSEPMRA_C_PD_ProductSalesData1: function (oEvent) {
		alert("SEPMRA_C_PD_ProductSalesData1 is clicked");
	},
	onClickActionSEPMRA_C_PD_ProductSalesData2: function (oEvent) {
		alert("SEPMRA_C_PD_ProductSalesData2 is clicked");
	},
	onClickActionSEPMRA_C_PD_ProductSalesData3: function (oEvent) {
		alert("SEPMRA_C_PD_ProductSalesData3 is clicked");
	},
Adding custom filter
Application developers can add a custom filter to ALP’s smart filter bar. To do this select “Filter” radio button in your extension selection screen and click on Next. This will add the following sections (sap.ui.viewExtension) getting added to your application manifest:
"sap.ui.viewExtensions": {
					"sap.suite.ui.generic.template.AnalyticalListPage.view.AnalyticalListPage": {
						"SmartFilterBarControlConfigurationExtension|SEPMRA_C_PD_ProductSalesData": {
							"className": "sap.ui.core.Fragment",
							"fragmentName": "demo.alp.ALPDemo.ext.fragment.Customfilter",
							"type": "XML"
						}
					}
The above view extension links the application to the autogenerated XML fragment file (Customfilter.fragment.xml) which contain the view definition for your custom filters. You can find this file under path webapp –> Ext –> fragment. Let’s go ahead and define a custom filter.
<core:FragmentDefinition xmlns="sap.m" xmlns:smartfilterbar="sap.ui.comp.smartfilterbar" xmlns:core="sap.ui.core">
	<smartfilterbar:ControlConfiguration key="pricerange" index="1" label="Custom Filter" groupId="_BASIC">
		<smartfilterbar:customControl>
			<ComboBox id="id">
				<core:Item key="0" text="Item1"/>
				<core:Item key="1" text="Item2"/>
				<core:Item key="2" text="Item3"/>
			</ComboBox>
		</smartfilterbar:customControl>
	</smartfilterbar:ControlConfiguration>
</core:FragmentDefinition>
Likewise you can add as many custom filter by adding new controls to this XML fragment file. Let’s go ahead and run the application. We can see one combo box with 3 options getting added to the compact filters of the application.
Please note that the custom filters added via developer extension only gets added to the ALP’s compact filter and not to the visual filter.

onInitSmartFilterBarExtension
The extension method onInitSmartFilterBarExtension (as the name suggests) is called when the smart filter bar of an ALP application is initialised. This extension method can be used to add some event handler to our custom filter:
onInitSmartFilterBarExtension: function(oEvent) {
       var oSmartFilterBar = oEvent.getSource();
       oSmartFilterBar.getControlByKey("pricerange").attachSelectionChange(function(oChangeEvent){
       	alert(oChangeEvent.getParameter("selectedItem").getText() + " selected");
       },this);
    },
getCustomAppStateDataExtension
The values of this custom filter should be stored in the app state, so that it doesn’t get lost while navigation and also for the URL sharing functionality to work properly. ALP’s extension method getCustomAppStateDataExtension should be used to store the custom filter value to the app state.
/*
	 * Content of the custom field shall be stored in the app state, so that it can be restored later again e.g. after a back navigation.
	 * @param oCustomData  : referance to the custome data.
	 */
	getCustomAppStateDataExtension: function (oCustomAppData) {

		var oCustomField1 = this.oView.byId("customFilterComboBox");
		if (oCustomField1) {
			oCustomAppData.SampleFilterFieldID = oCustomField1.getValue();
		}
		return oCustomAppData;

	},
restoreCustomAppStateDataExtension
The value of the custom filters which was stored in app state should also be restored while inbound navigation. ALP’s extension method restoreCustomAppStateDataExtension should be used to fill the value from app state to the custom control:
/*
	 * In order to restore content of the custom field in the filterbar e.g. after a back navigation.
	 * @param oCustomData  : referance to the custome data.
	 */
	restoreCustomAppStateDataExtension: function (oCustomAppData) {

		if (oCustomAppData.SampleFilterFieldID !== undefined) {
			if ( this.oView.byId("customFilterComboBox") ) {
				this.oView.byId("SampleFilterFieldID").setSelectedKey(oCustomAppData.SampleFilterFieldID);
			}
		}

	}
onBeforeRebindChartExtension
The filter value selected in custom filters should also change the data visualized via chart. ALP’s method extension onBeforeRebindChartExtension should be used to sync your ALP’s chart data to your custom filter values. This extension methods get triggers before the chart gets bound to the model or the binding gets refreshed.
onBeforeRebindChartExtension: function (oEvent) {
		alert("onBeforeRebindChartExtension called!");
	},
OnBeforeRebindTableExtension
The table data should also respect the custom filter value. ALP’s method extension onBeforeRebindTableExtension should be used to sync your ALP’s table data to your custom filter values. This extension methods get triggers before the table gets bound to the model or the binding gets refreshed.
onBeforeRebindTableExtension: function (oEvent) {
		alert("onBeforeRebindTableExtension called!");
	}
onBeforeRebindFilterableKPIExtension
onBeforeRebindFilterableKPIExtension should be used to sync your ALP’s filterable KPI tag value to your custom filter values.
onBeforeRebindFilterableKPIExtension: function (oSelectionVariant, sEntityType, sKPIId) {
		if (sKPIId ===
			"demo.alp.ALPDemo::sap.suite.ui.generic.template.AnalyticalListPage.view.AnalyticalListPage::SEPMRA_C_PD_ProductSalesData--template::KPITag::kpi::KPIRevenue1"
		) {
			oSelectionVariant.addSelectOption("Item", "I", "EQ", "item 1", null);
		}
	}
onClearFilterExtension
The values of your custom filters should also get clear when the end-user clicks on the “clear” button of the filter bar. ALP’s extension method “onClearFilterExtension” should be use to sync your custom filters with the clear button.
onClearFilterExtension: function (oEvent) {
		if (this.byId("customFilterComboBox")) {
			this.byId("customFilterComboBox").setSelectedKey(null);
		}
	}
I haven’t discussed how to enable this clear button in your ALP application yet, I’ll discuss this in my next blog of this blog series when I’ll discuss how to use the visual editor to customize your ALP application.
Customizing visual filters
onBeforeRebindVisualFilterExtension extension method can be used to change the properties of your visual filters. But one another very commonly used and important use case of this extension method is to provide a batch id to your visual filters so that the data fetch call for the visual filters having same batch id should be combined within the same batch call. By default, data fetch call for all visual filters goes as one BATCH call. This functionality is very much to performance optimization of your ALP application.
onBeforeRebindVisualFilterExtension: function (sEntityType, sDimension, sMeasure, oContext) {
switch (sDimension) {
case "Product":
oContext.groupId = "Group1";
break;
case "Currency":
oContext.groupId = "Group3";
break;
case "Product1":
oContext.groupId = "Group2";
break;
default:
oContext.groupId = "default";
}
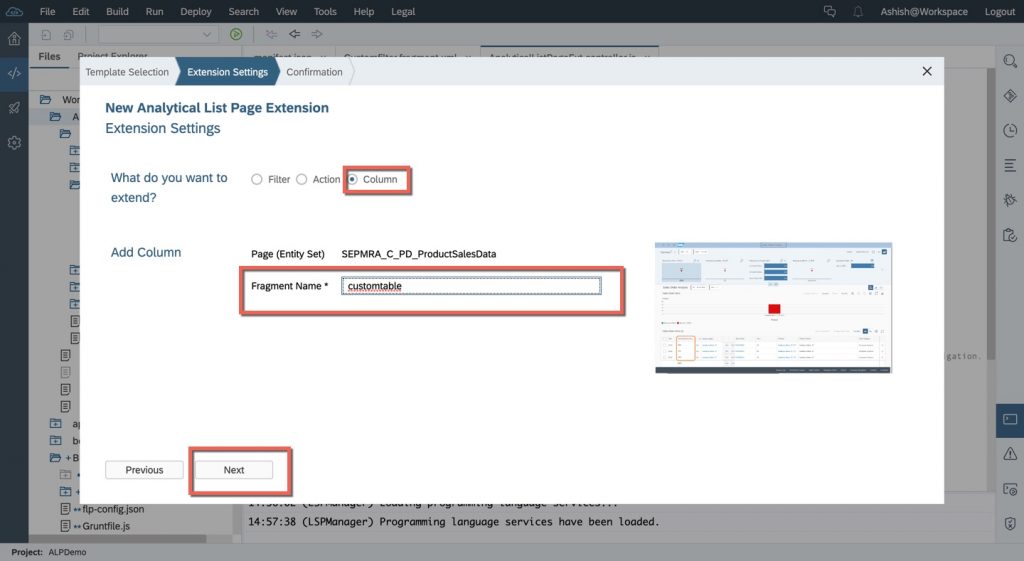
},Adding custom table columns
In order to add a custom column to your ALP’s table select “Column” radio button in your extension selection screen and provide an appropriate name for the view fragment and click on Next.
This will add the following sections (sap.ui.viewExtension) getting added to your application manifest:
"ResponsiveTableColumnsExtension|SEPMRA_C_PD_ProductSalesData": {
							"type": "XML",
							"className": "sap.ui.core.Fragment",
							"fragmentName": "demo.alp.ALPDemo.ext.fragment.customtable"
						}
The above view extension links the application to the autogenerated XML fragment file (customtable.fragment.xml) which contain the view definition for your custom filters. You can find this file under path webapp –> Ext –> fragment. Let’s go ahead and add a custom column to your table.
<core:FragmentDefinition xmlns:core="sap.ui.core" xmlns="sap.m">
	<Column id="ExtensionWizard::ColumnBreakout">
		<Text text="Sample column"/>
		<customData>
			<core:CustomData key="p13nData" value='\{"columnKey": "Test", "columnIndex" : "101"}'/>
		</customData>
	</Column>
</core:FragmentDefinition>
The binding of this table can be controlled via extension method onBeforeRebindTableExtension which is discussed above.

Custom table row navigation
extension method onListNavigationExtension can be used to define navigation based on the selected rows of the table:
onListNavigationExtension: function(oEvent) {
    var oNavigationController = this.extensionAPI.getNavigationController();
    var oBindingContext = oEvent.getSource().getBindingContext();
    var oObject = oBindingContext.getObject();
    // for notebooks we trigger external navigation for all others we use internal navigation
    if (oObject.CostCenter == "300-1000") {
        oNavigationController.navigateExternal("ActualCostsKPIDetails");
    } else {
        // return false to trigger the default internal navigation
        return false;
    }
    // return true is necessary to prevent further default navigation
    return true;
 }


