Augmented Reality – Virtual Reality may seem like a futuristic thing but its applications are many and there are many use cases – like for example – how many of you have tried buying stuff from furniture apps like PepperFry or a spectacles frame from LensKart where you have a VR app/page that will show you how the piece of furniture will look in your room (when you point your camera in that direction) or show you how the frame will look on your face (when you open your front camera).
Also Read: SAP Certifications
Imagine a case where in a UI5 application, you want to show a VR scene that is compatible with any VR device like Oculus, etc. This is possible with the help of A-Frame which is the leading open-source web framework provider for working with AR/VR components and can be easily integrated into a simple HTML page to create virtual reality experience. The DOCS available on the website has all details on which all pre-defined keys/controls available, how to create an ECS framework, etc.
This small blog is just a starter to help you integrate any AR/VR component into an SAP UI5 application.
Without thinking of any particular user-case as of now, if we need to integrate this into a custom UI application, its a pretty straightforward approach.
Since the api/a-frame works on the basis of custom DOM HTML tags, we build a custom control that can render the tags directly into the DOM structure thereby achieving the results.
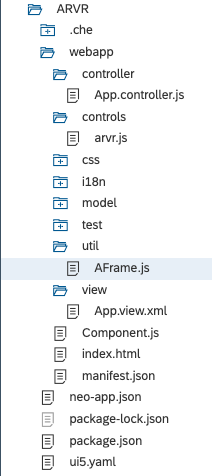
1. Create a custom UI5 application. Below is the project structure:
2. Add a file util/Aframe.js to include the a-frame js library. This is the JavaScript library provided by the framework which enables you to call the tags needed to render the VR artefacts:
jQuery.sap.registerModulePath("aframe_server", "https://aframe.io");
sap.ui.define([
  "aframe_server/releases/1.0.3/aframe.min"
], function() {
  return {
  };
});
3. Create a custom control controls/arvr.js file and add below code. What all do we have here in this custom control
- metadata – This can be enhanced to pass properties into the custom control like height, width, etc. Some other application could be say you can have a property that can take input like “shape” where you can pass “box, cylinder, etc” thereby rendering that particular shape.
- init – This method can be used for some instantiations
- renderer – This is the heart of this custom control or any custom control in particular where we can call the write method to input the DOM elements as needed. In this particular custom control, I have called two “cylinder” shapes and a “plane” shape within an encapsulation called as “scene”.
sap.ui.define([
		"sap/ui/core/Control",
		"ARVR/ARVR/util/AFrame"
	],

	function (Control, AFrame) {
		return Control.extend("ARVR.ARVR.controls.arvr", {
			metadata: {
				properties: {
					width: {
						type: "sap.ui.core.CSSSize",
						defaultValue: "100%"
					},
					height: {
						type: "sap.ui.core.CSSSize",
						defaultValue: "100%"
					}

				},
				events: {},
				aggregations: {},
				methods: {}

			},
			init: function () {},
			renderer: function (oRm, oControl) {
				oRm.write("<div");
				oRm.writeControlData(oControl);
				oRm.writeClasses(oControl);

				oRm.addStyle("height", oControl.getHeight());
				oRm.addStyle("width", oControl.getWidth());
				oRm.writeStyles();
				oRm.write(">");

				oRm.write("<a-scene>");
				oRm.write("<a-cylinder position=\"-0.053 1.7 -3.970\" rotation=\"0.061 0.07 -40.86\" radius=\"0.1\" height=\"2.5\" color=\"#FFC65D\">");
				oRm.write("</a-cylinder>");
				oRm.write("<a-cylinder position=\"-2.048 0.804 -3.976\" rotation=\"0 0 -90.65\" radius=\"0.1\" height=\"2.5\" color=\"#FFC65D\">");
				oRm.write("</a-cylinder>");
				oRm.write("<a-plane position=\"0 0 -4\" rotation=\"-90 0 0\" width=\"4\" height=\"4\" color=\"#7BC8A4\">");
				oRm.write("</a-plane>");
				oRm.write("</a-scene>");
			},

			//Load the map in onAfter Rendering Function
			onAfterRendering: function (args) {

			}
		});
	});
4. Call the custom control in the view, as below. I am calling the custom control within a VerticalLayout which is placed in a Panel.
<mvc:View controllerName="ARVR.ARVR.controller.App" xmlns:mvc="sap.ui.core.mvc" displayBlock="true" xmlns="sap.m"
xmlns:arvr="ARVR.ARVR.controls"
xmlns:l="sap.ui.layout">
<App id="app">
<pages>
<Page id="page" title="{i18n>title}">
<content>
<Panel expandable="true" expanded="true" height="600px" headerText="AR-VR" width="auto" class="sapUiResponsiveMargin">
<content>
<l:VerticalLayout class="sapUiContentPadding" height="580px" width="1710px">
<arvr:arvr id='idAR' height="575px" width="1700px"></arvr:arvr>
</l:VerticalLayout>
</content>
</Panel>
</content>
</Page>
</pages>
</App>
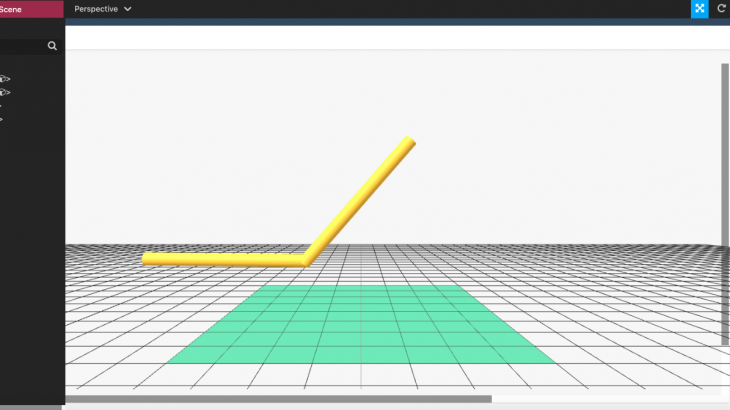
</mvc:View>5. Run the project. You should get something like below: You can click an drag any part of the shape or use your arrow keys or WASD keys to pan left/right and zoom in/out of the scene.

Additions:
The A-Frame framework/library provides something called as a Visual Inspector which is a visual 3D inspector that can be used to play around with the 3D scene and each object and thereby change your code. This is similar to your Inspect Element (F12) on your browser and is very powerful and helpful for playing around with VR scenes.
The Visual Inspector can be called by pressing the <Ctrl>+<Alt>+<i> keys on your keyboard. This will show a maroon button – Inspect Scene or Back to Scene on the top left, based on where you are are. Below is how your page will look like:


In the Inspect Scene mode, you can select any component either from the left pane or directly clicking the object on the main page and you will see multiple options on the right pane which can change the X-Y-Z co-ordinates/rotations/scale. You can even do the same by clicking and dragging on any of the axes show on the plane.


