3 Real Project SAPUI5 Exercises for ABAPers & Beginners in SAPUI5
In any front-end interactive tool where the user has the ability to Add rows and Delete rows, they surely would have an option to Save the data as well. In Part 1 we showed how to read data in the screen elements and Add them to the table control. In Part 2 we showed how to Delete the rows from the table. In this concluding part, we would add a new SAVE button and on the hit of save, the data present on the screen elements would be saved in the backend SAP Table using OData service. We, in fact, would be using CREATE_DEEP_ENTITY i.e. we would pass deep structure payload (string) from the SAPUI5 front end.
This article would cover OData Service Generation at the backend and OData Service Consumption from frontend SAPUI5 screen. And you know for this series, we have used WebIDE for our frontend design (not Eclipse).
A) Create the Backend OData Service
i. Go to T-Code SEGW and create your OData Project.
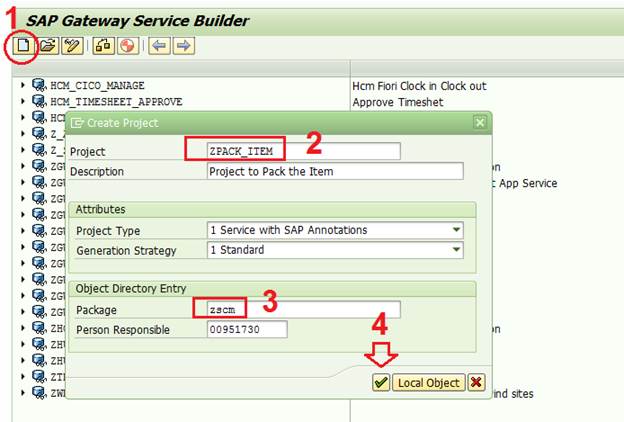
It would look like below.

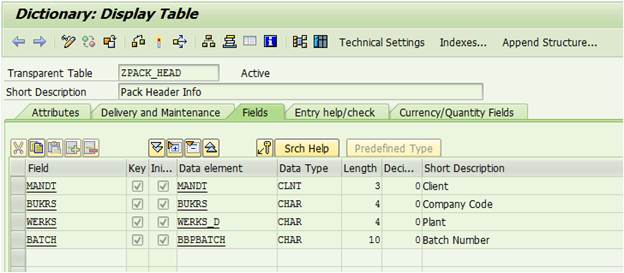
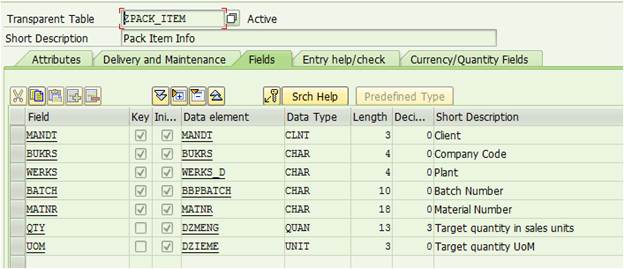
ii. Since we want to save the Packing Item Details and Header, we would create two custom tables. Go to t-code SE11 and created the below two tables.
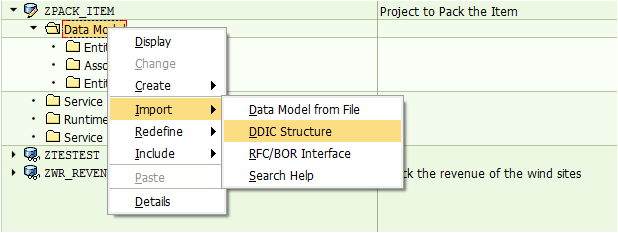
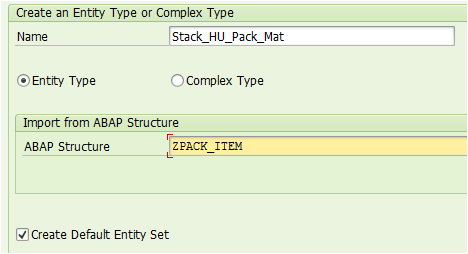
iii. Go to SEGW and create the Entity Types using ZPACK_HEAD and ZPACK_ITEM structures which we created in above step.
Create Entity Type Stack_HU_Head for Header Info.
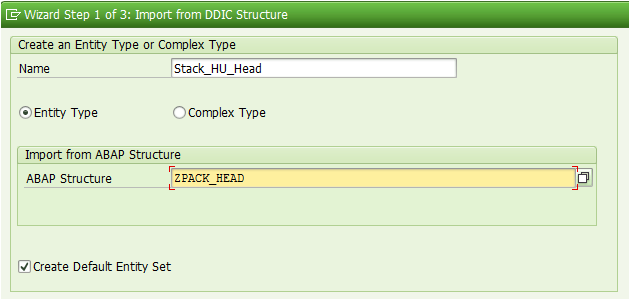
Note – Create Default Entity Set is selected above. So Entity Type and Entity Set both would be created.
We do not want MANDT. So did not Select.
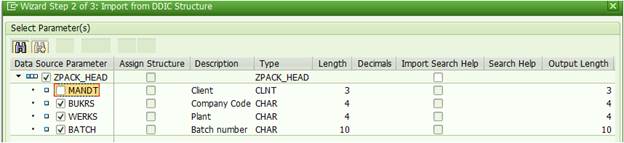
All are Key for us.

Similarly, Create Entity Type Stack_HU_Pack_Mat for Item details.

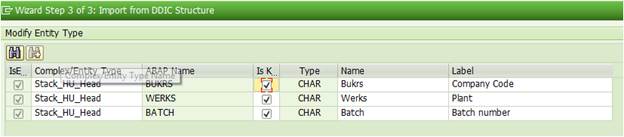
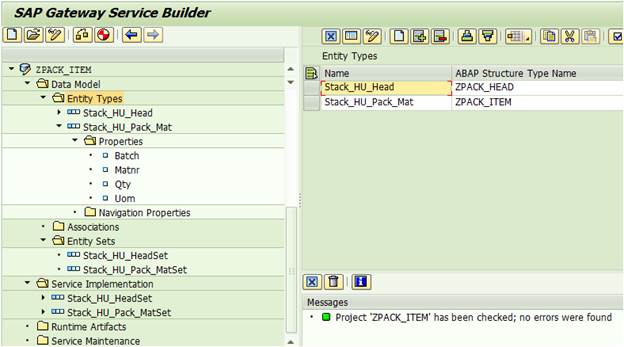
The two Entity Types should look like below.
iv. Generate the runtime objects.
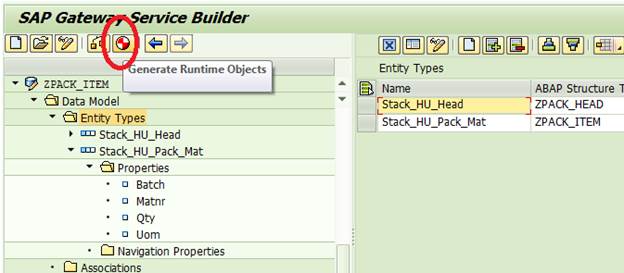
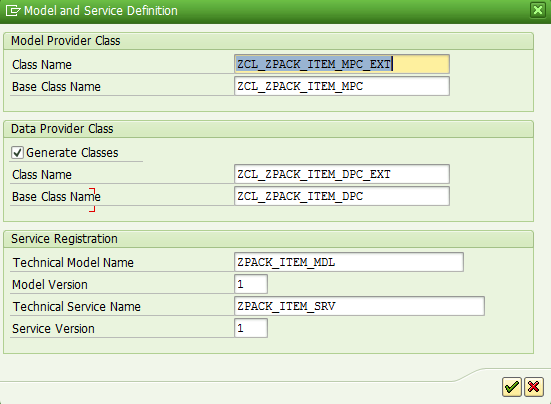
We should get the below success messages.
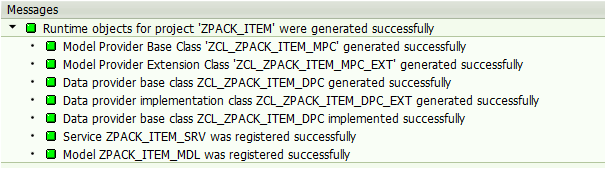
Check the Runtime Artifacts.

v. Activate and Maintain Service using t-code /IWFND/MAINT_SERVICE
Note – If you have Central Hub (different backend and frontend sap) system, execute the t-code in frontend sap system, not in this sap system where you created the OData.
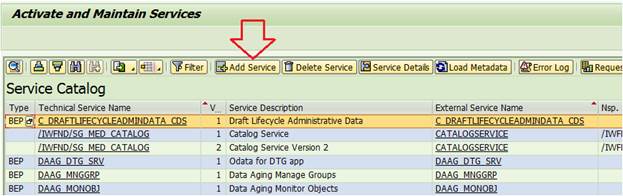
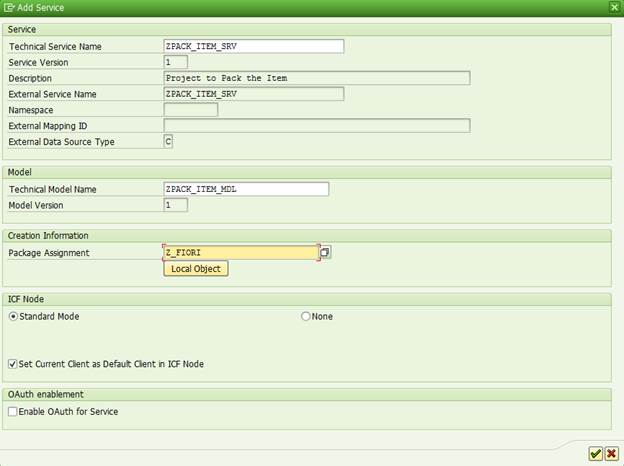
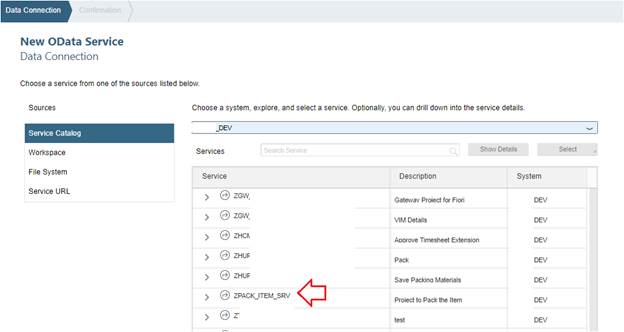
Hit Add Service.
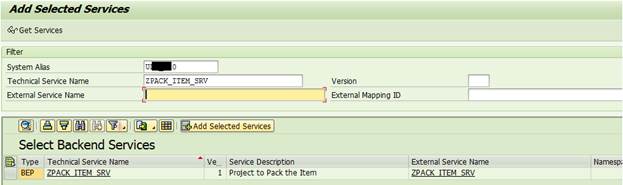
You need to put the backend System name (RFC) as System Alias and Technical Service Name. It is the SEGW Project name with _SRV at the end. For us, the Project name was ZPACK_ITEM so the service name would be ZPACK_ITEM_SRV.
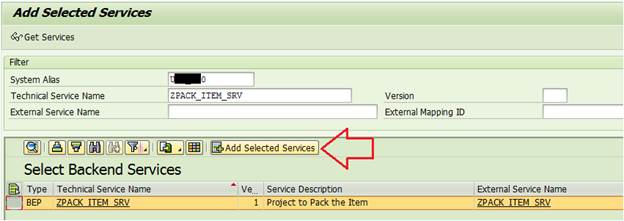
Go back to the t-code /IWFND/MAINT_SERVICE and the new service should be present in the Service Catalog list.
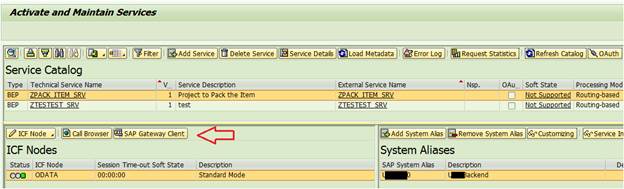
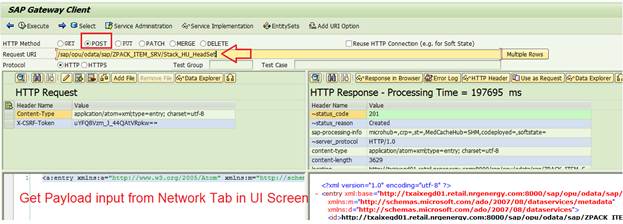
vi. Test using SAP Gateway Client
Hit the SAP Gateway Client button shown above.

Hit Execute Button.
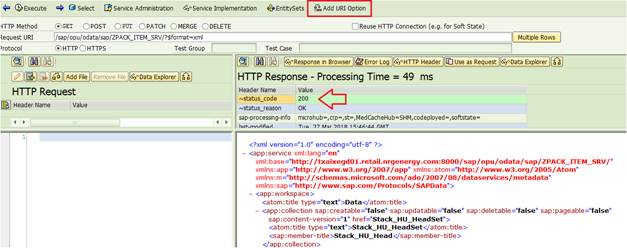
Play around with Add URI Option and check the metadata, json format etc.
If you do not get status 200, that means you have some issue. Usually, it is Authorization Issue. Talk to your SAP Security Team to give you access.
We are good. Our front end and back end are talking correctly, so we can proceed forward.
vii. Redefine the Data Provider Class Method(s).
Try to Pull data from backend Stack_HU_HeadSet Entity Set.
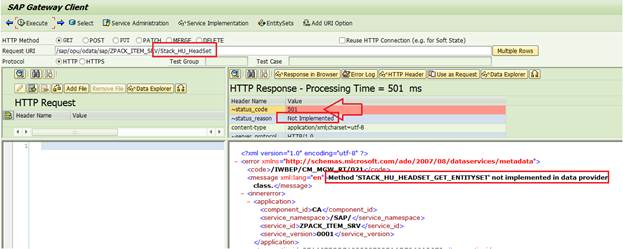
The above message ‘Method not implemented in data provider class’ is quite clear. We need to implement the method in Data Provider class.
Go to the t-code SEGW in the backend system. Right-click on the DPC_EXT and go to ABAP Workbench
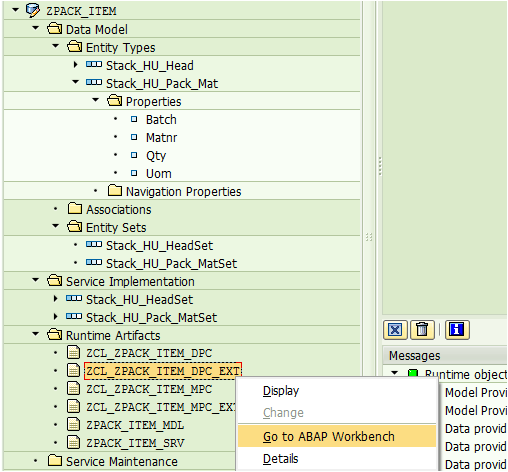
Go to change mode. Since we want to handle deep structure from SAPUI5 screen, we would re-define the method CREATE_DEEP_ENTITY. If your requirement is simple, just to read data or update data, then you should re-define GET, CREATE, UPDATE, DELETE entity and entity set accordingly.
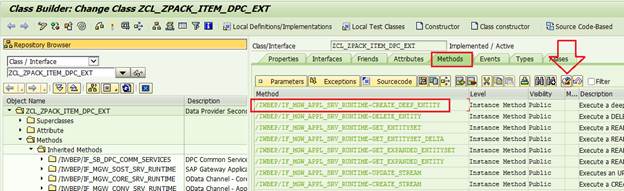
For now, we would re-define CREATE_DEEP_ENTITY by hitting the button shown above.
Let’s reveiw our SAPUI5 front end screen again.
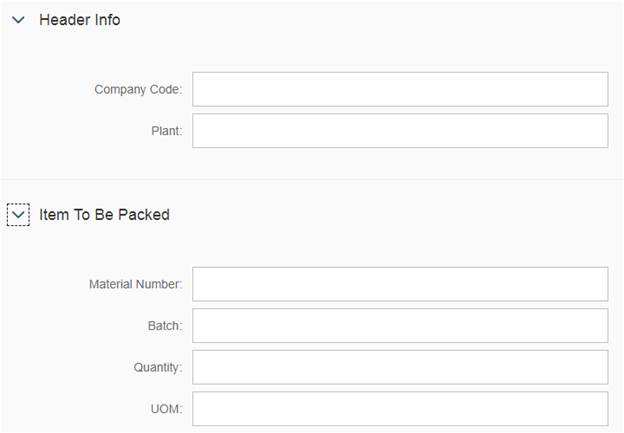
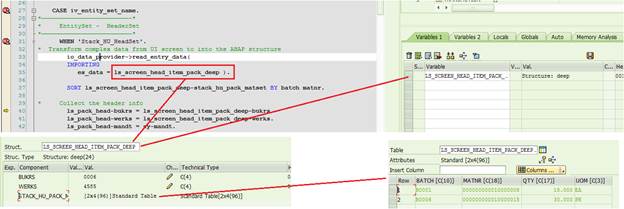
In the redefined method in data provider class, we need to define a Type to handle the deep structure (head and item) coming from UI screen above.
IV_ENTITY_SET_NAME and IO_DATA_PROVIDER are very useful in identifying the incoming string.
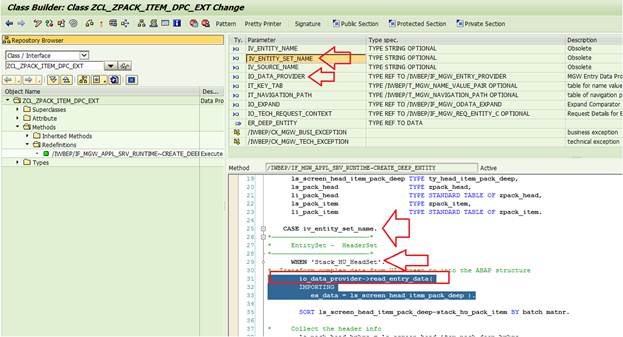
Once you have the deep structure information in your method, you need to read the values in the deep structure and put the data in two internal tables. This is normal ABAP.
The full code would look something like below.
METHOD /iwbep/if_mgw_appl_srv_runtime~create_deep_entity.
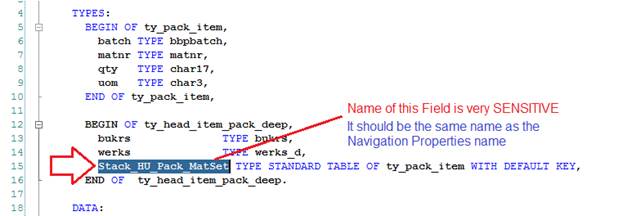
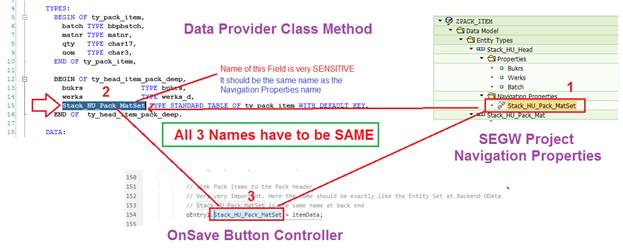
TYPES:
BEGIN OF ty_pack_item,
batch TYPE bbpbatch,
matnr TYPE matnr,
qty TYPE char17,
uom TYPE char3,
END OF ty_pack_item,
BEGIN OF ty_head_item_pack_deep,
bukrs TYPE bukrs,
werks TYPE werks_d,
stack_hu_pack_matset TYPE STANDARD TABLE OF ty_pack_item WITH DEFAULT KEY,
END OF ty_head_item_pack_deep.
DATA:
ls_screen_head_item_pack_deep TYPE ty_head_item_pack_deep,
ls_pack_head TYPE zpack_head,
li_pack_head TYPE STANDARD TABLE OF zpack_head,
ls_pack_item TYPE zpack_item,
li_pack_item TYPE STANDARD TABLE OF zpack_item,
lr_head_item_response TYPE string.
CASE iv_entity_set_name.
————————————————————————
EntitySet – HeaderSet
————————————————————————
WHEN ‘Stack_HU_HeadSet’.
Transform complex data from UI screen to into the ABAP structure
io_data_provider->read_entry_data(
IMPORTING
es_data = ls_screen_head_item_pack_deep ).
SORT ls_screen_head_item_pack_deep-stack_hu_pack_matset BY batch matnr.
Collect the header info
ls_pack_head-bukrs = ls_screen_head_item_pack_deep-bukrs.
ls_pack_head-werks = ls_screen_head_item_pack_deep-werks.
ls_pack_head-mandt = sy-mandt.
Collect the item info
LOOP AT ls_screen_head_item_pack_deep-stack_hu_pack_matset INTO DATA(lwa_screen_hu_pack_item).
ls_pack_item-batch = lwa_screen_hu_pack_item-batch.
ls_pack_item-matnr = lwa_screen_hu_pack_item-matnr.
ls_pack_item-qty = lwa_screen_hu_pack_item-qty.
ls_pack_item-uom = lwa_screen_hu_pack_item-uom.
ls_pack_item-mandt = sy-mandt.
ls_pack_item-bukrs = ls_screen_head_item_pack_deep-bukrs.
ls_pack_item-werks = ls_screen_head_item_pack_deep-werks.
Item table getting filled
APPEND ls_pack_item TO li_pack_item.
AT NEW batch.
ls_pack_head-batch = ls_pack_item-batch.
Header table getting filled
APPEND ls_pack_head TO li_pack_head.
ENDAT.
ENDLOOP.
IF li_pack_head IS NOT INITIAL AND li_pack_item IS NOT INITIAL.
Update the Header Database
INSERT zpack_head FROM TABLE li_pack_head ACCEPTING DUPLICATE KEYS.
IF sy-subrc EQ 0.
Update the Item Database
INSERT zpack_item FROM TABLE li_pack_item ACCEPTING DUPLICATE KEYS.
IF sy-subrc EQ 0.
COMMIT WORK.
ls_screen_head_item_pack_deep-bukrs = ‘S’.
ELSE.
ls_screen_head_item_pack_deep-bukrs = ‘F’.
ENDIF.
ENDIF.
ELSE.
ls_screen_head_item_pack_deep-bukrs = ‘B’.
ENDIF.
Send the Response back to UI
copy_data_to_ref(
EXPORTING
is_data = ls_screen_head_item_pack_deep
CHANGING
cr_data = er_deep_entity ).
WHEN OTHERS.
ENDCASE.
ENDMETHOD.
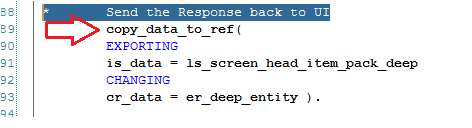
Take note of COPY_DATA_TO_REF method. This would help to pass the response/information back to the UI frontend client system
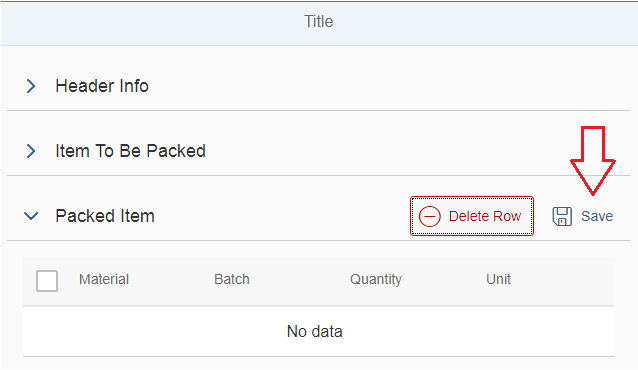
B) Add SAVE button on frontend SAPUI5 Screen
Hopefully, we have re-defined the backend method properly. Now let us design our frontend. We will continue from where we left in Part 2.
i. Add the below line to add the SAVE Button on the screen.
<Button icon=”sap-icon://save” text=”Save” type=”Save” press=”onSave”/>

The button is visible as expected.
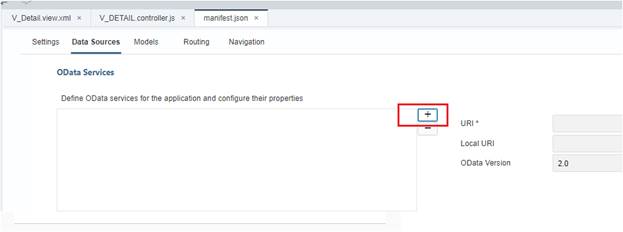
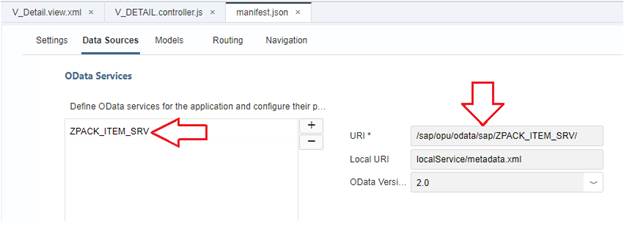
ii. Define the Data Source in the MANIFEST.JSON file.
Till now for Add and Delete buttons, we did not need to interact with backend OData Service. Now on Save button, we need to save the data in the backend database table. So, we need to define the OData service here.
Hit the Add button on the Data Sources of manifest.json file.
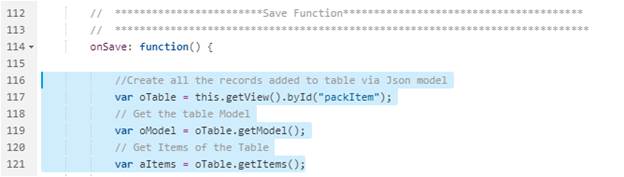
iii. Write logic in the Controller to handle the Save button.
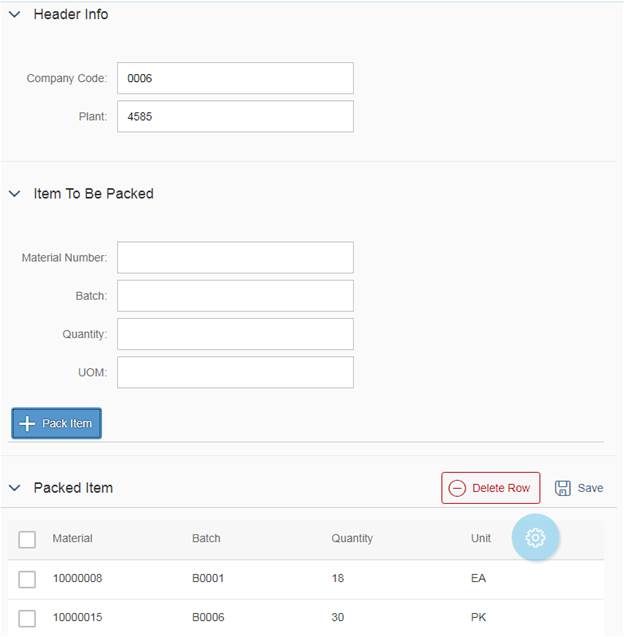
a) Read the table data from the UI screen.
//Create all the records added to table via Json model
var oTable = this.getView().byId(“packItem”);
// Get the table Model
var oModel = oTable.getModel();
// Get Items of the Table
var aItems = oTable.getItems();
b) Put the table data from the UI screen to an Array
Imagine this Array to be the runtime internal table in ABAP.
.Push function is used for appending the entries from work area (variables) to the array.
// Define an empty Array
var itemData = [];
for (var iRowIndex = 0; iRowIndex < aItems.length; iRowIndex++) {
var l_material = oModel.getProperty(“Material”, aItems[iRowIndex].getBindingContext());
var l_batch = oModel.getProperty(“Batch”, aItems[iRowIndex].getBindingContext());
var l_quantity = oModel.getProperty(“Quantity”, aItems[iRowIndex].getBindingContext());
var l_unit = oModel.getProperty(“Unit”, aItems[iRowIndex].getBindingContext());
itemData.push({
Batch: l_batch,
Matnr: l_material,
Qty: l_quantity,
Uom: l_unit,
});
}
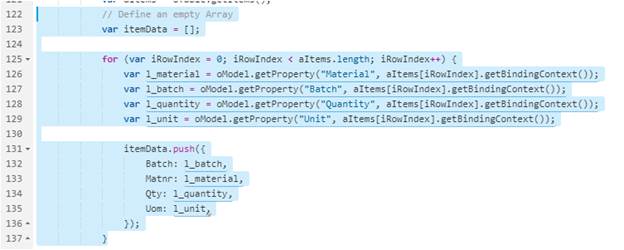
We have already explained the FOR LOOP with i++ in our previous Exercise. In the above code, we are reading each row from the UI Screen table control and pushing/appending it to the runtime Array (internal table) which would subsequently be passed to the OData Service Payload. Please check .push function is used for appending the Array.
c) Read the Header Info from the screen as well.
// Get the values of the header input fields
var ComCode = this.getView().byId(“inputCC”).getValue();
var Plant = this.getView().byId(“inputPlant”).getValue();

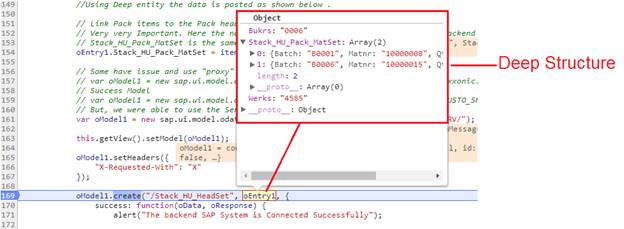
d) Move the Item Array data and Header Info to an Object
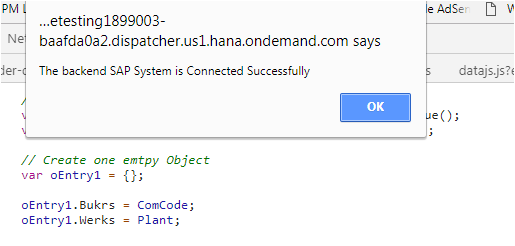
// Create one emtpy Object
var oEntry1 = {};
oEntry1.Bukrs = ComCode;
oEntry1.Werks = Plant;
//Using Deep entity the data is posted as shown below .
// Link Pack items to the Pack header
// Very very Important. Here the name should be exactly like the Entity Set at Backend OData
// Stack_HU_Pack_MatSet is the same name at back end
oEntry1.Stack_HU_Pack_MatSet = itemData;

oEntry1 is a Deep Structure. It has fields and nested table in it.
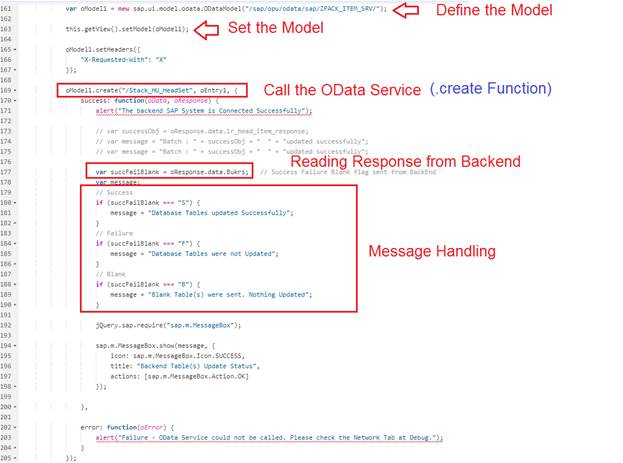
e) Set the Model and call the .create function to call the OData Service.
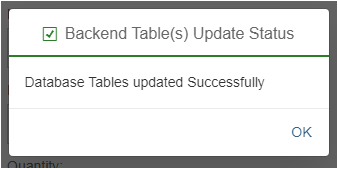
oModel1.create(“/Stack_HU_HeadSet”, oEntry1, {
success: function(oData, oResponse) {
alert(“The backend SAP System is Connected Successfully”);
var successObj = oResponse.data.HandlingUnit;
var message = “Batch : ” + successObj + ” ” + “updated successfully”;
jQuery.sap.require(“sap.m.MessageBox”);
sap.m.MessageBox.show(message, {
icon: sap.m.MessageBox.Icon.SUCCESS,
title: “Backend Table(s) Update Status”,
actions: [sap.m.MessageBox.Action.OK]
});
},
error: function(oError) {
alert(“Failure – OData Service could not be called. Please check the Network Tab at Debug.”);
}
});
iv. Test the Save Button.
You are happy that your Frontend and Backend programming and design is complete. It is time to test your App.
OOPs you get the below Failure Message.
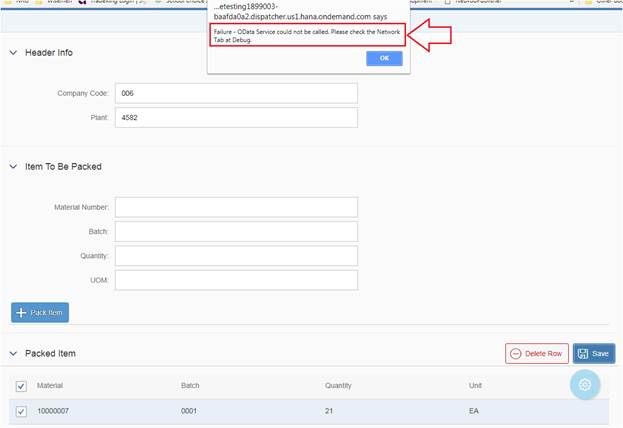
As suggested by Error Message, we go to the Network Tab in Debug and see that it gives the message “POST request not Implemented”.
At the bottom part of the Network Tab is the Payload data. Payload means the input which the UI created and sent to the .create function
oModel1.create(“/Stack_HU_HeadSet”, oEntry1,)
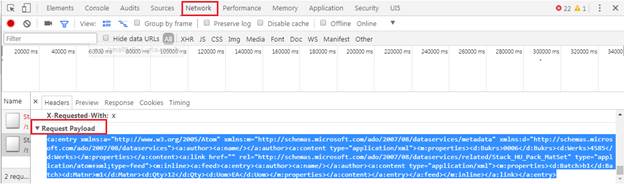
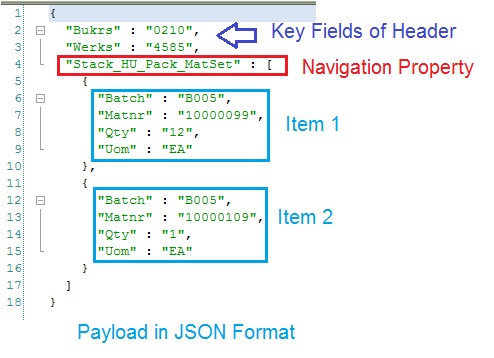
Same above payload in JSON format would be like below
{
“Bukrs” : “0006”,
“Werks” : “4585”,
“Stack_HU_Pack_MatSet” : [
{
“Batch” : “b1”,
“Matnr” : “m1”,
“Qty” : “12”,
“Uom” : “EA”
}
]
}
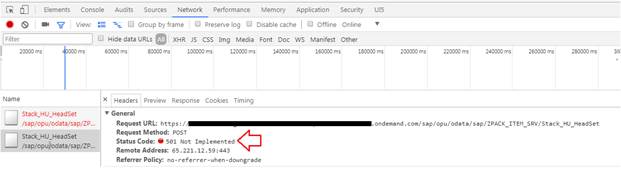
Then we tested directly in the t-code /IWFND/GW_CLIENT and it gave the same error.
Request Method: POST
Status Code: 501 Not Implemented
You are right; we did not implement POST Method. We implemented CREATE_DEEP_ENTITY. Why is it saying POST?
Answer – The POST method should redirect it to CREATE_DEEP_ENTITY. So what are we missing?
After going through numerous google links and other wikis, we understood, there has to be a Navigation Property between Header and Item Entity Types in order for CREATE_DEEP_ENTITY to be triggered.
If Navigation Property is not defined, seems it searches for the CREATE_ENTITYSET method which we have not implemented yet. We will try to write another article and research on this topic, what is triggered when.
For now, we are missing the Navigation Link between Header and Item Entity Sets so we will create one.
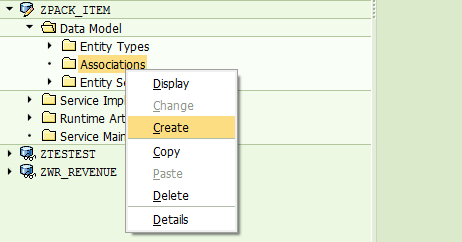
C. Navigation Property is a must for CREATE_DEEP_ENTITY
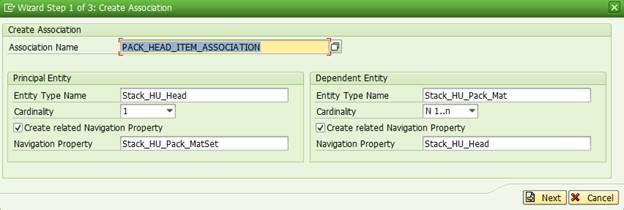
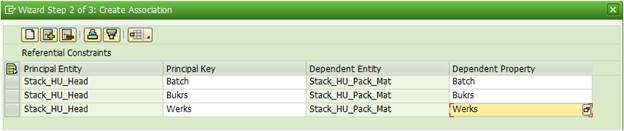
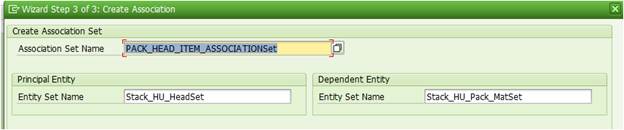
Let us create the Association between them.
Note: The Navigation Property name, The Deep Structure field name in the CREATE_DEEP_ENTITY method and the Array name that holds the table data from UI screen which is passed to the Model to call Create Function, all have to have exactly the SAME name with the same exact case. Isn’t that crazy?
It took us a while to figure this out. Hopefully, you would learn from our mistake and do not waste time.
D. Test and Debug the CREATE_DEEP_ENTITY method.
Press F12 to Debug in Chrome. Go to the source (controller.js file) and put a breakpoint and hit SAVE button.
Check the Deep structure at run-time.
Hit F8 to complete the run. It would give you the success messages.
If you Debug the Payload in the t-code /IWFND/GW_CLIENT, you would have a better picture of the Deep Structure. The payload deep string at SAPUI5 screen and backend Deep structure is exactly same.
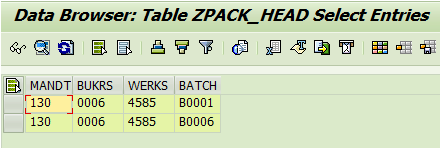
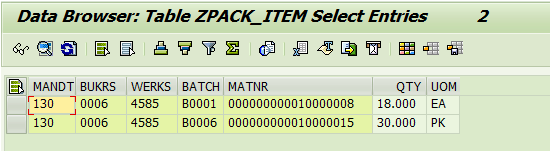
Let us validate the backend. The entries are successfully updated in the Header and Item Tables.
This concludes our 3 Exercises which teach us “How to create a Real Project App in SAPUI5 using WebIDE?” You should now have a clear picture how you can consume an OData Service from SAPUI5 screen. CREATE_DEEP_ENTITY is often needed to be re-defined and implemented when you need to create a Header Item dependent object. Say you want to create a Sales Order or Purchase Order or Invoice or Delivery etc using a BAPI and you need to feed a complex deep structure of header and item and pricing etc information in a string from SAPUI5 front end, you have to have your BAPI called in the CREATE_DEEP_ENTITY method.
Complete Frontend Project Folder – Just download it and import it to get the complete code.

Here is the backend code for the CREATE_DEEP_ENTITY method.
SAPUI5 is not that complex. You just need to know the commonly used standard functions and some general concepts in JS. Building your own custom app is a good way to learn SAPUI5. We have created 3 Apps (including this one) at SAPSPOT. Check the link below. Just practice them and you would surely get more confidence.
My first SAPUI5 App.
An ABAPer’s second SAPUI5 App.
Extra – Same Payloads in JSON and XML Format
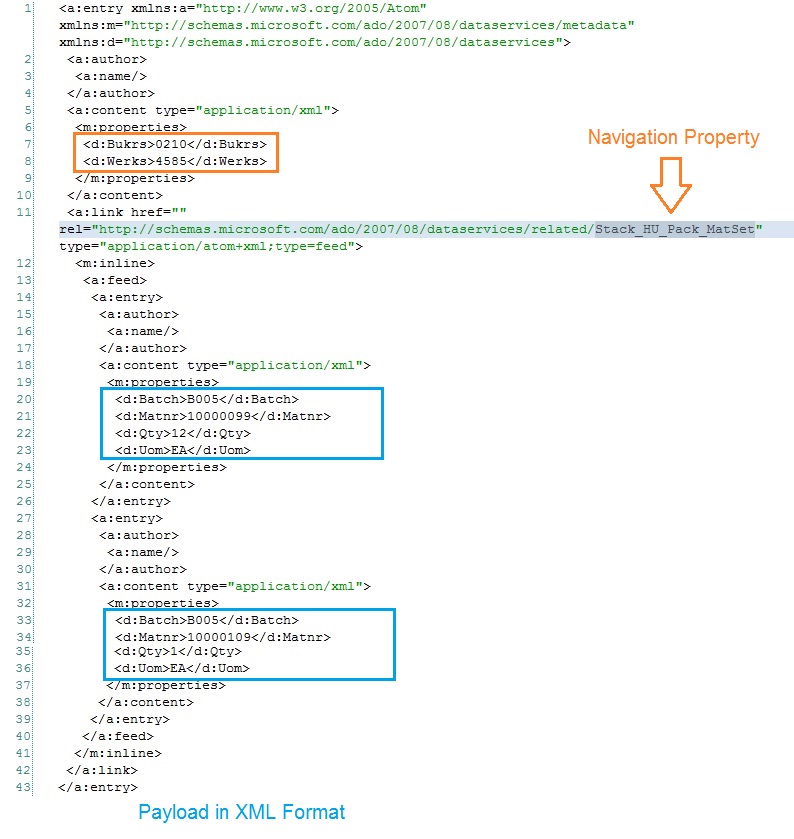
If you get error code “CX_SXML_PARSE_ERROR” with error message “Error while parsing an XML stream”, that means your Payload Input is not correct. Double check your Payload Request and re-test.


