Use Case
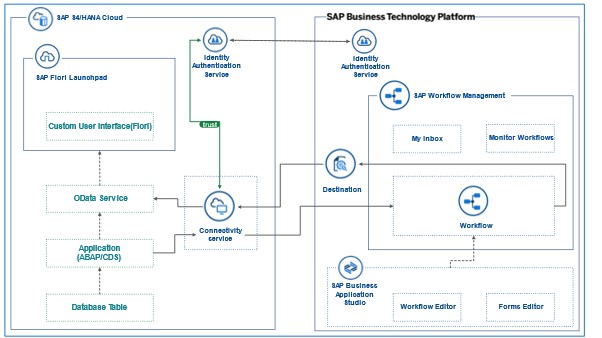
The use case shown here is a Bonus Plan built as a Custom Business Object in SAP S/4HANA Cloud where you trigger an approval workflow for the manager on the SAP Business Technology Platform.
The Custom Business Object and its ABAP Business Logic is developed as an In-App Extension running on the SAP S/4HANA Cloud stack, whereas the Workflow Capability is running on the SAP Business Technology Platform. Workflow Capability is SAP’s Process Execution Engine for the Cloud and part of SAP Workflow Management / SAP Process Automation.
The Bonus Plan app shown in the exercises is for educational purpose only and not meant for productive usage. It is not ensured that the data used in this extension scenario is managed in accordance with applicable legal requirements for all countries and industries and in accordance with the business needs, such as data life cycle requirements.
First of all, let’s have a look at the objects you need to have for this scenario on the SAP S/4HANA Cloud side:
- The definition of the bonus plan with a UI and business logic consisting of
- A Custom Business Object, where you can define the bonus plan, request the approval from the manager and finally perform the calculation of the bonus.
- A Custom Catalog Extension to link the tile of the bonus plan app to a certain Fiori catalog, which implicitly also defines the authorization you need for the app.
- A Custom Reusable Elements library for the manager determination
- A Custom Business Object, where you can define the bonus plan, request the approval from the manager and finally perform the calculation of the bonus.
- The setup of the communication (inbound and outbound) between SAP S/4HANA and the SAP Business Technology Platform consisting of
- A Custom Communication Scenario which defines the
- inbound OData service of the bonus plan object
- outbound call of the Workflow capability on the SAP Business Technology Platform
- inbound OData service of the bonus plan object
- A technical Communication User for the inbound call
- A Communication System, where you define the host name of the workflow on the SAP Business Technology Platform and the inbound and outbound communication users.
- A Communication Arrangement, which brings together the scenario, users and system.
- A Custom Communication Scenario which defines the
- We will use My Inbox app to easily access the Workflows by subscribing to Workflow Management in SAP BTP.
On the SAP BTP you need:
- The enabling and configuration of the
- Workflow Capability
- SAP Business Application Studio
- SAP Workflow Management
- Workflow Capability
- A Workflow definition
- A Destination to the SAP S/4HANA Cloud
- A technical communication user
Let’s go step by step through these points, where I will show you how to create the corresponding objects, what coding is necessary or how to setup and configure certain features.
SAP S/4HANA Cloud
Let’s start on the SAP S/4HANA Cloud side with the definition of the Custom Business Object and the communication settings.
Custom Business Object
As a prerequisite your user must have a business role assigned, which contains the business catalogs SAP_CORE_BC_EXT and SAP_CORE_BC_EXT_TST. For the communication settings you need in addition the business catalog SAP_CORE_BC_COM.
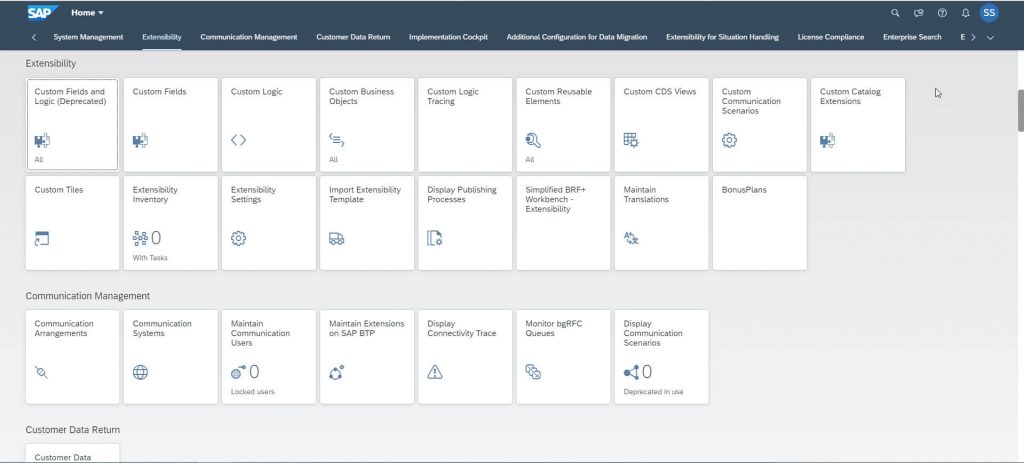
Start the app Custom Business Objects from the Extensibility group in your Fiori Launchpad.
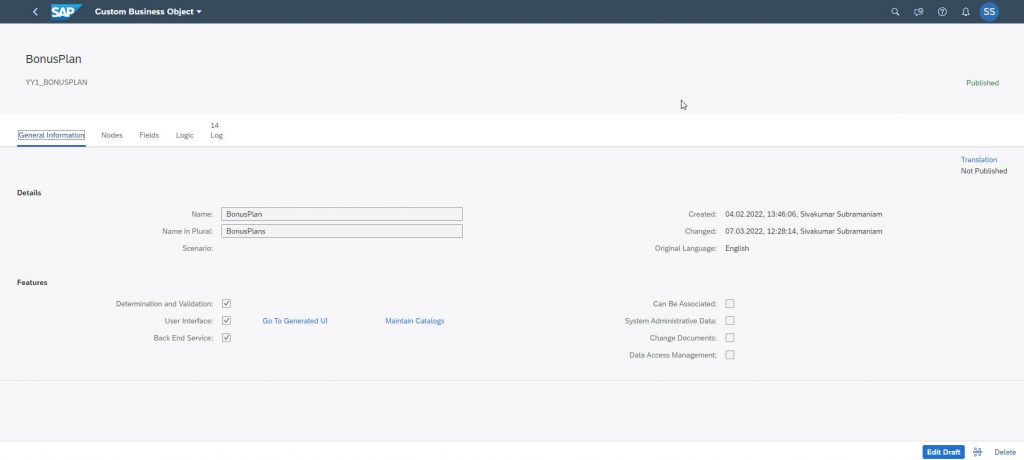
There you create the Custom Business Object BonusPlan with the root node BONUSPLAN and a subnode Products. As Features Determination and Validation, UI Generation and Service Generation be selected.
Switch to the Fields tab. On the BONUSPLAN node we need the following fields:
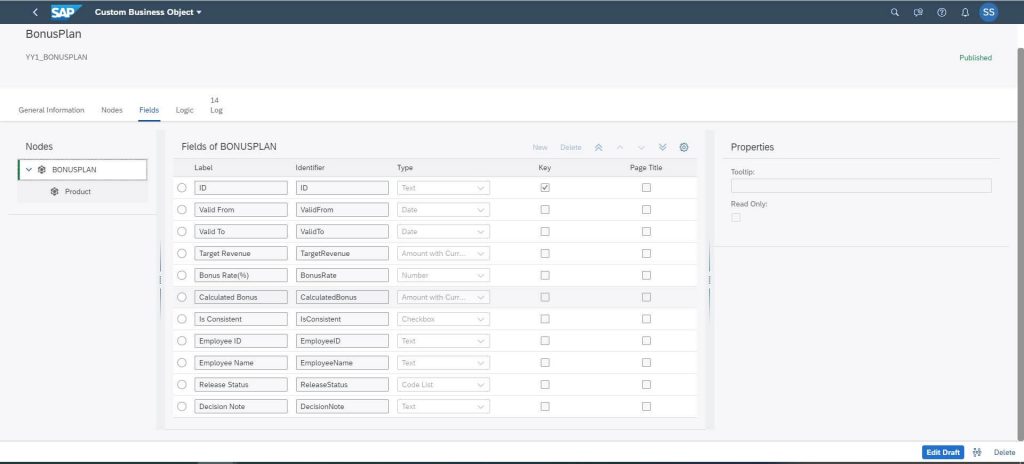
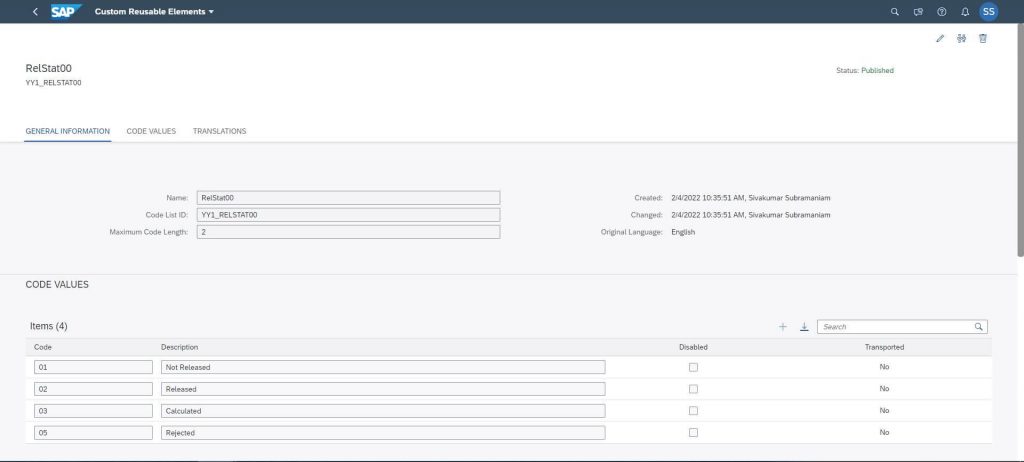
The Release Status is linked to the following Custom Code List:
On the subnode Products of the Custom Business Object BonusPlan we have the two text fields Product ID (Text 20) and Product Description (Text 255).
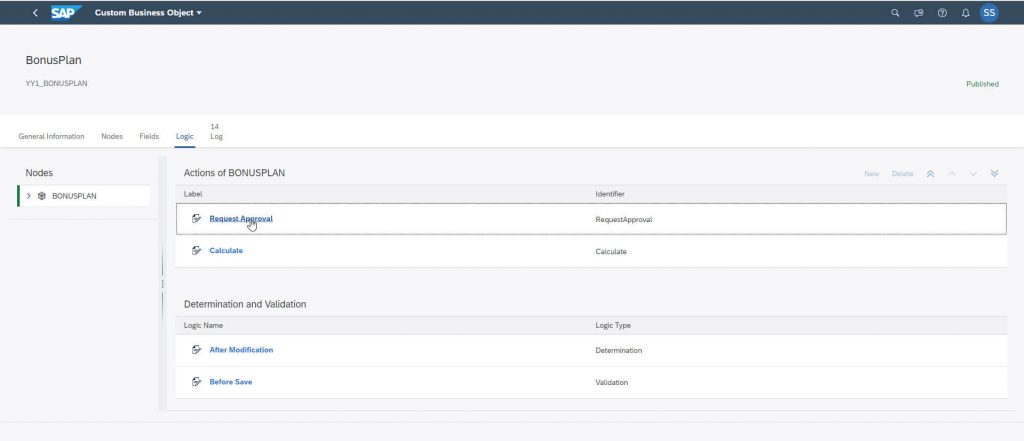
With these settings you have defined the data structure of the Custom Business Object out of which the corresponding database tables and CDS Views will be created during Publish. Now we will add the two Actions Calculate and Request Approval. For this, Switch to the Logic tab, where you find already the events Before Save and After Modification. Click on Edit Draft, then click New to add the Actions.
In this blog post,we will focus on the Request Approval action, which triggers the workflow on the SAP Business Technology Platform.
You must publish the object now to generate all the backend objects like tables, CDS views, classes, services or UI, before you can start your coding.
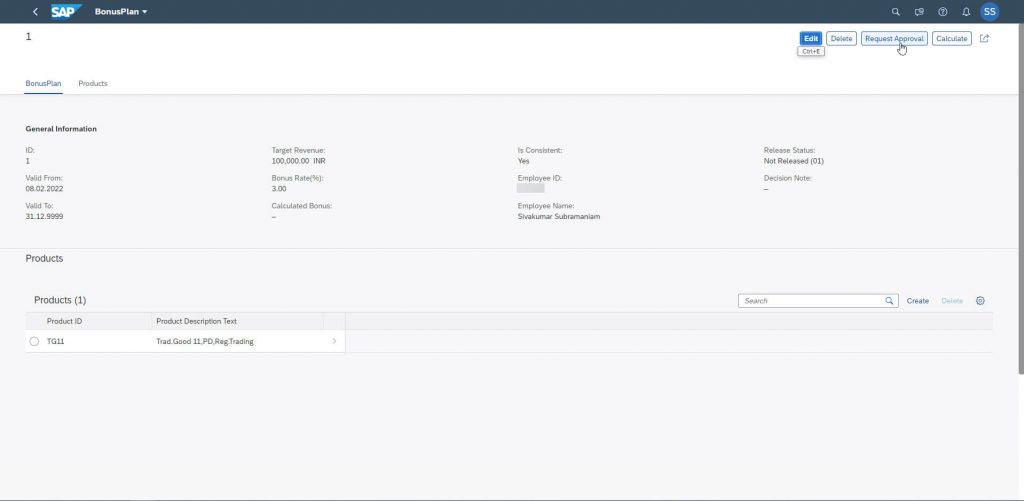
In this BonusPlan UI you can create now a bonus plan instance:
Let’s have a look at the Request Approval action and add there some coding.
Go back to your Custom Business Object and open the ABAP editor for the Request Approval action:
Initially the action is empty, so you add the following coding.
Start after some declarations with the central TRY block, where at the beginning the manager of the employee is determined. This coding is stored in the Custom Library yy1_business_partners. You can find the coding in the appendix of this blog post.
* Action RequestApproval for Node ID BONUSPLAN
*
* Importing Parameter : association (Navigation to Parent/Child/Associated Node Instances)
*                       write (API for creating and updating Custom Business Object Node Instances)
* Changing Parameter  : BONUSPLAN (Current Node Data)
* Exporting Parameter : message (Message with Severity S(uccess), W(arning), E(rror))

DATA: iv_input  TYPE string.
DATA: cv_output TYPE string.
DATA: msg_body  TYPE string.
DATA: token     TYPE string.
DATA: srank     TYPE string.

TRY.
    DATA(lv_bupa)         = yy1_business_partners=>get_bp_for_user( bonusplan-employeeid ).
    DATA(lv_manager_id)   = yy1_business_partners=>get_current_manager( lv_bupa ).
    DATA(lv_manager_user) = yy1_business_partners=>get_user_for_id( lv_manager_id ).
    DATA(lv_manager_name) = yy1_business_partners=>get_name_for_id( lv_manager_id ).
The next part is the outbound service handling, where a HTTP request is sent to the Workflow on the SAP Business Technology Platform.
You need to create an HTTP-client based on a Communication Scenario and a Communication Arrangement, which you will create later.
Using this HTTP-client you then can prepare and send out a POST-request to trigger the workflow.
If you need some more information on the requests, you can use the tracing feature (Custom Logic Tracing app), which is part of the Extensibility group in your Fiori Launchpad in SAP S/4HANA Cloud.
DATA(lo_client) = cl_ble_http_client=>create(
        communication_scenario = 'YY1_BPWORKFLOW' "'SAP_COM_0542'
        outbound_service       = 'YY1_BPAPPROVAL_REST'     "'SAP_COM_0542_0001_REST'
    ).

    DATA(request) = cl_ble_http_request=>create( ).
The last part is the preparation of the POST request and some error handling.
The message body contains the structure you will define for the workflow (we come to that later) with the employee, manager and bonus data.
To send back the approval decision of the manager from SAP BTP, you need the guid of this bonusplan instance for the PATCH request. Since this is not an importing parameter for this action, you select it using the CDS-View of the bonusplan object.
request->set_method( 'POST' ).
    request->set_resource_extension( '/workflow-instances' ). "/rest/v1/workflow-instances(std comm.scenario)
    request->set_header_parameter(
      EXPORTING
        name    = 'Content-Type'
        value   = 'application/json'
    ).

    SELECT SINGLE from yy1_bonusplan FIELDS sap_uuid
    WHERE id = @bonusplan-id
    INTO @DATA(uuid).

    new cl_system_uuid( )->convert_uuid_x16_static(
       EXPORTING
          uuid     = uuid
       IMPORTING
          uuid_c36 = data(lv_c36) ).


    msg_body =
        '{ "definitionId": "bonusplan_wf", "context": { '             &&
            '"id": "'               && bonusplan-id                   && '",' &&
            '"suid": "'             && lv_c36                         && '",' &&
            '"manager": "'          && lv_manager_user                && '",' &&
            '"employeeId": "'       && bonusplan-employeeid           && '",' &&
            '"employeeName": "'     && bonusplan-employeename         && '",' &&
            '"targetAmount": "'     && bonusplan-targetrevenue_v      && '",' &&
            '"targetAmount_C": "'   && bonusplan-targetrevenue_c      && '"'  &&
         '} }'.

    request->set_body( data = msg_body ).

    response = lo_client->send( request ).

*   cl_ble_trace_writer=>write_info_message( msg_body ).

    cv_output = response->get_body( ).
    message = VALUE #(
      severity = co_severity-success
      text     = | 'Approval from ' { lv_manager_user } - { lv_manager_name } | ).


  CATCH cx_ble_http_exception INTO DATA(lx).
     cl_ble_trace_writer=>write_info_message( lx->get_text( ) ).
     cl_ble_trace_writer=>write_info_message( conv #( lx->status_code ) ).

     message = VALUE #(
       severity = co_severity-error
       text     = lx->get_text( ) ).

 ENDTRY.
     cl_ble_trace_writer=>write_info_message( 'Bonus Plan Workflow Triggered' ).
     message = VALUE #(
       severity = co_severity-success
       text     = 'Action RequestApproval executed').
Custom Catalog Extension
After publishing you also create the Fiori tile via the link Maintain Catalog Extension on the General Information tab.
You will find the tile with the generated Fiori Elements UI in the extended catalog, or if you follow the link “Go to Generated UI” on the General tab of the Custom Business Object.
Custom Communication Scenario
The setup of the communication (inbound and outbound) between SAP S/4HANA and SAP BTP starts with the definition of a Custom Communication Scenario.
The Custom Communication Scenario contains the information for both inbound and outbound HTTP-calls.
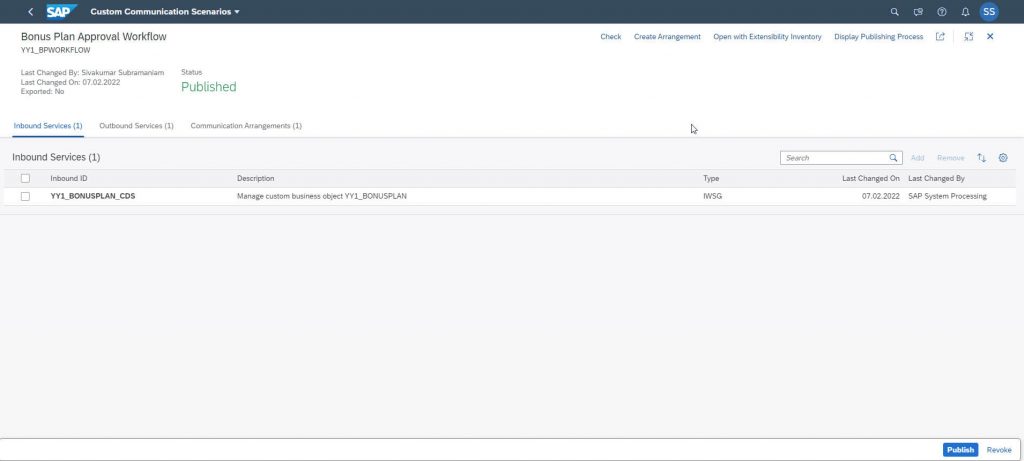
Open the app Custom Communication Scenarios from the Extensibility group and create a new one with the name YY1_BPWORKFLOW (same as in the ABAP coding of the action).
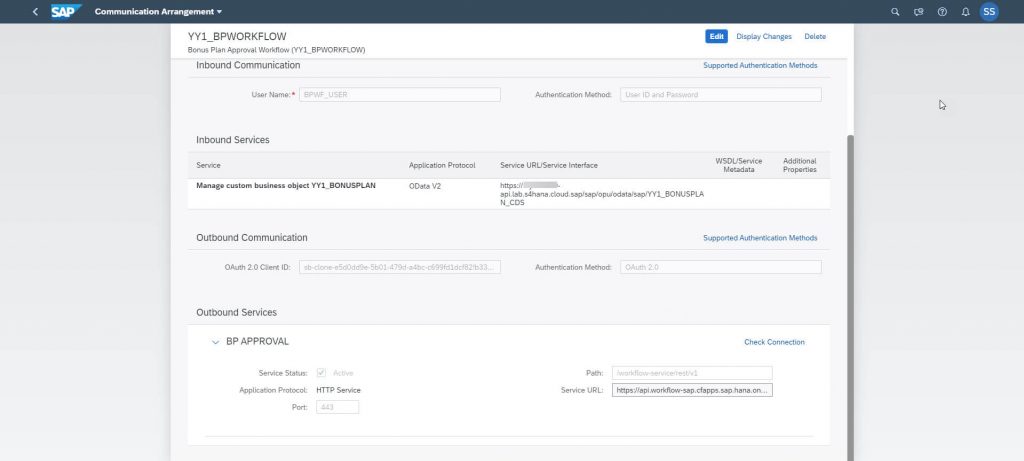
On the tab Inbound Services, you create an entry for your Custom Business Object:
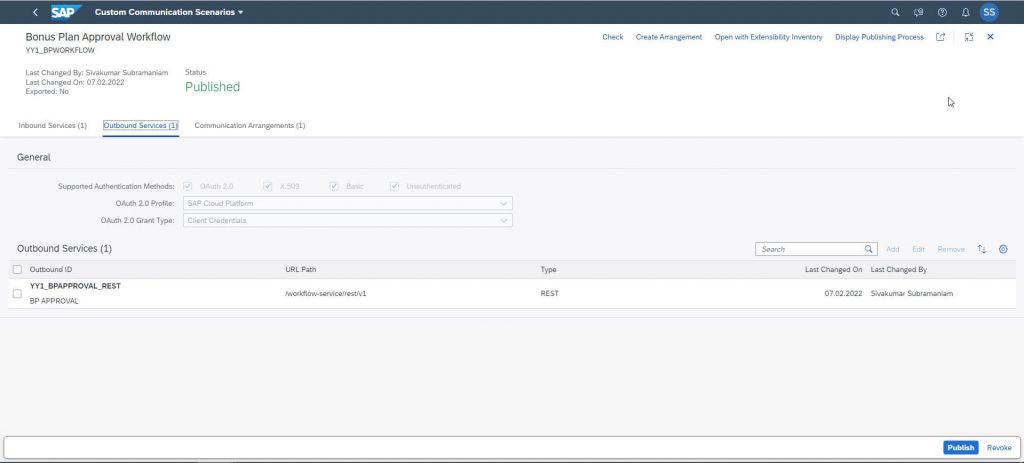
On the Outbound Services tab you create an entry for the workflow capability on SAP BTP with the URL-Path /workflow-service/rest/v1
The Outbound ID must be the same as in the ABAP coding of the action, in our case YY1_BPAPPROVAL_REST.
Communication User
If you want to access the BonusPlan OData service (Inbound) you need also to setup an authorization method. You can use several methods like e.g., Basic Authentication, Certificate or OAuth.
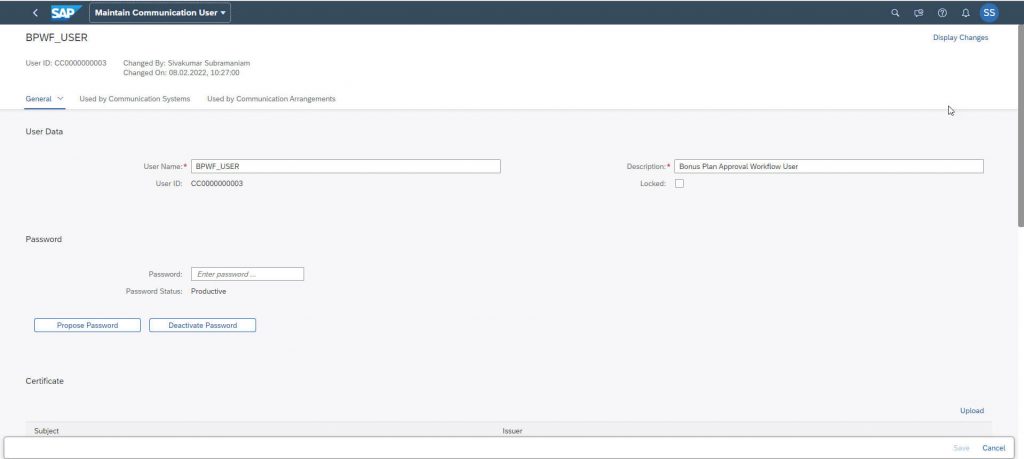
We are choosing here in this example Basic Authentication for which you need to setup a Communication User.
Open the app Maintain Communication Users from the Communication Management group and create there a new user with username, description and password.
Communication System
In the Custom Communication Scenario, you have defined the relative URL-part of the service, the system, where this service runs, is defined as a Communication System.
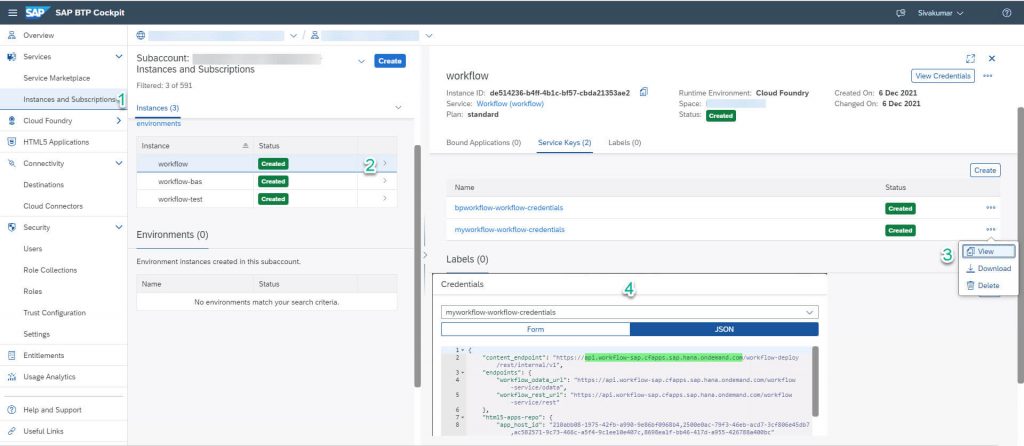
Open the app Communication Systems from the Communication Management group and create there a new one with ID (e.g., BPWF_COM_SYS), name and a host name.
The host name points to the base URL of Workflow service instance. Copy the base URL from the service key into the Host Name field.
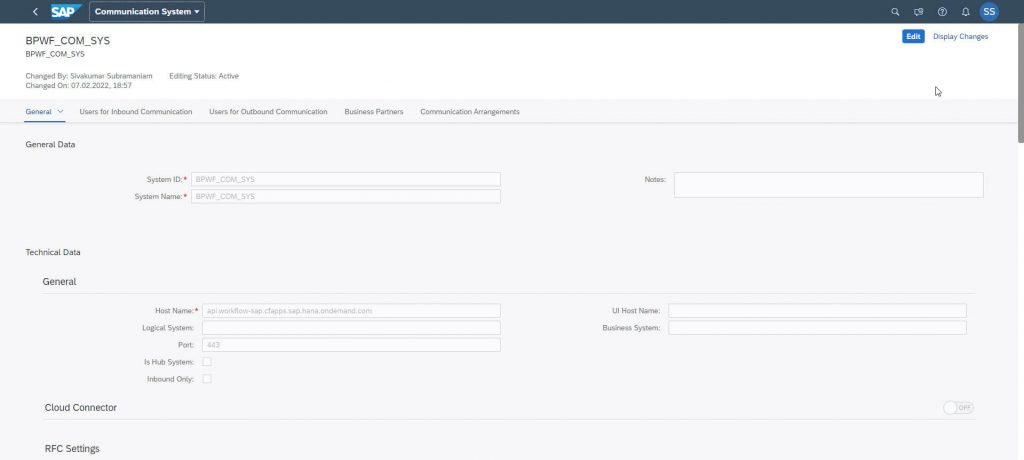
In addition to the host name, you define the users for inbound and outbound communication.
Add in the section Users for Inbound Communication the Communication User you just have created with the method User ID and Password, and in the section Users for Outbound Communication, we will utilize OAuth2.0 with client credentials with a SAP Business Technology Platform user with the WorkflowInitiator role assigned (see the workflow setup chapter later in this blog post).
For Outbound communication, since workflow supports OAuth2.0, we will utilize OAuth2.0 with client credentials.
Hostname: api.workflow-sap.cfapps.sap.hana.ondemand.com
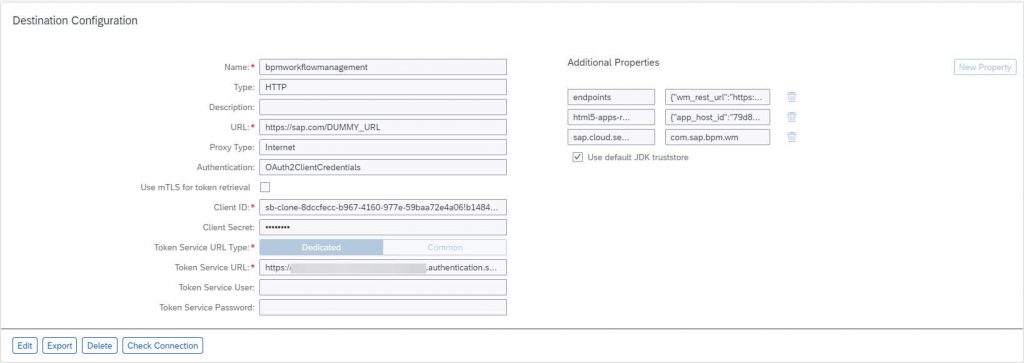
OAuth 2.0 Settings
Auth. Endpoint: xx-xx-xx.authentication.sap.hana.ondemand.com/oauth/authorize
Token Endpoint: xx-xx-xx.authentication.sap.hana.ondemand.com/oauth/token
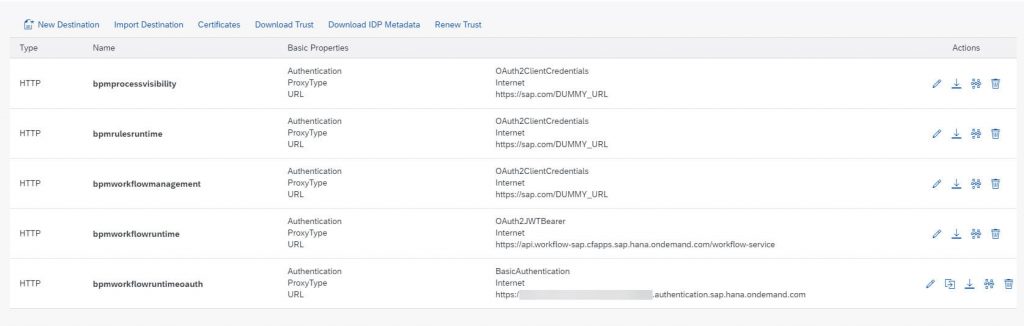
If you have used Booster for Workflow setup, the token URL can be found in the created destination bpmworkflowmanagement.
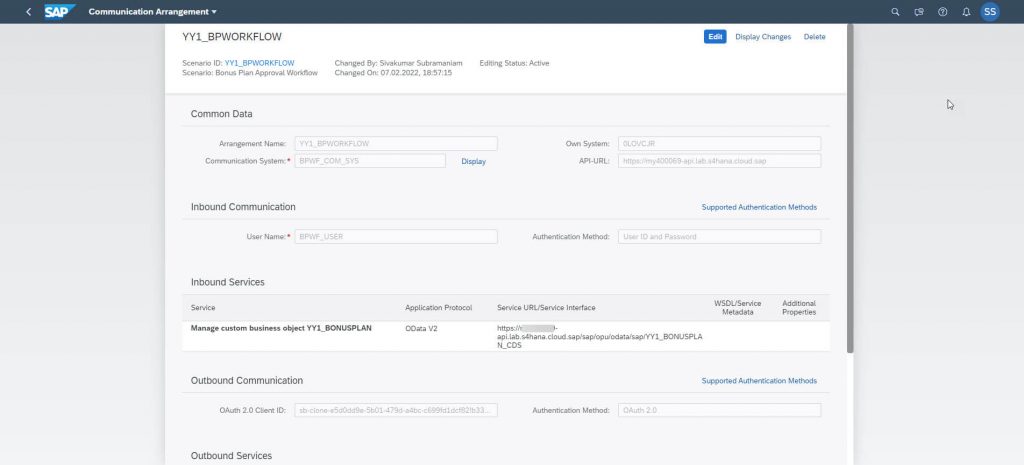
Communication Arrangement
As the last part the Custom Communication Arrangement brings all these previously created information together. It contains the information for both inbound and outbound HTTP calls.
Open the app Communication Arrangements from the Communication Management group and create there a new one based on the previously created Custom Communication Scenario YY1_BPWORKFLOW.
Add the name of the Communication System, all other information will be filled in the automatically.
With that you have completed the SAP S/4HANA Cloud side.
SAP Business Technolgy Platform
The next step is the enabling and configuration of the SAP BTP services
- Workflow Capability
- SAP Workflow Management
- SAP Business Application Studio
For the configuration of the SAP BTP parts, you switch to the SAP BTP Cockpit. The following description is based on the SAP BTP and the usage of the SAP ID service.
Workflow Capability and Workflow Management Service Configuration
Workflow capability and Workflow management service configuration can be done either manually or via Boosters.
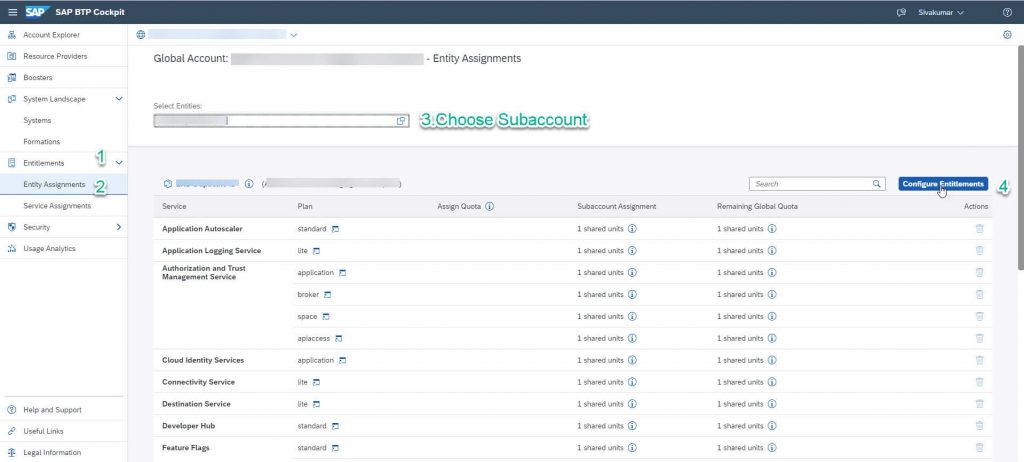
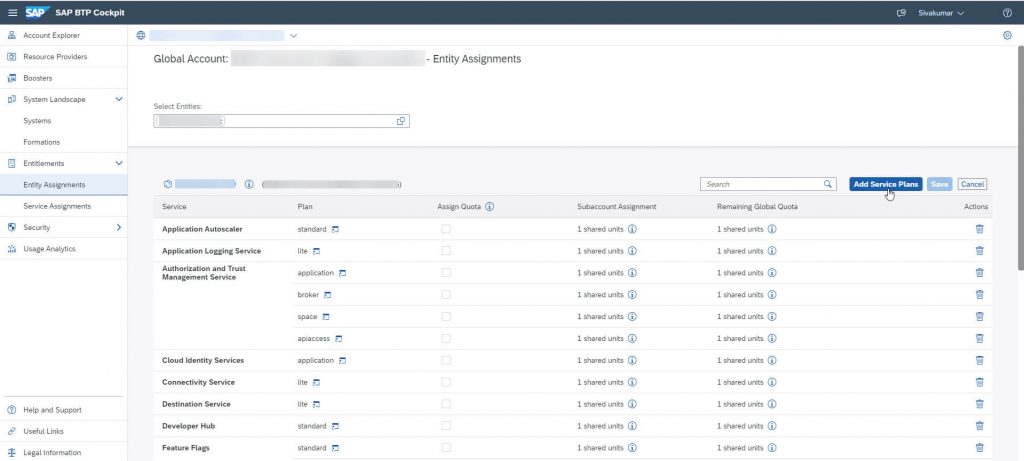
The first step in workflow configuration is to add the following entitlements to the global account.
To add Entitlements to your global account in SAP BTP,
SAP BTP Cockpit->Entitlements->Entity Assignments->Select Entities(Choose your subaccount here)->Configure Entitlements->Add Service Plans.
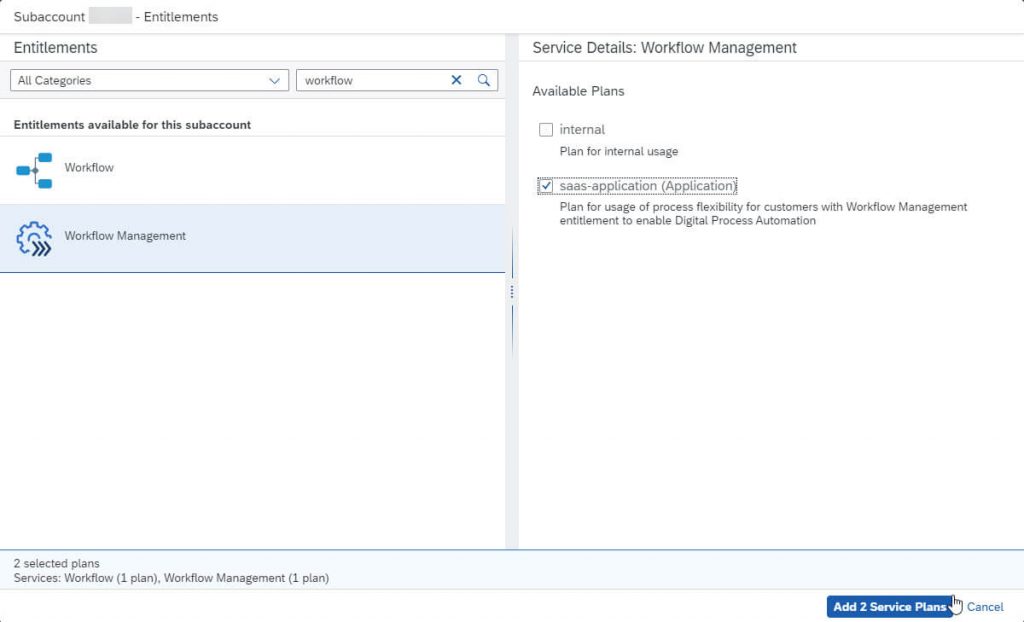
Services: Workflow
Applications: Workflow Management, SAP Business Application Studio
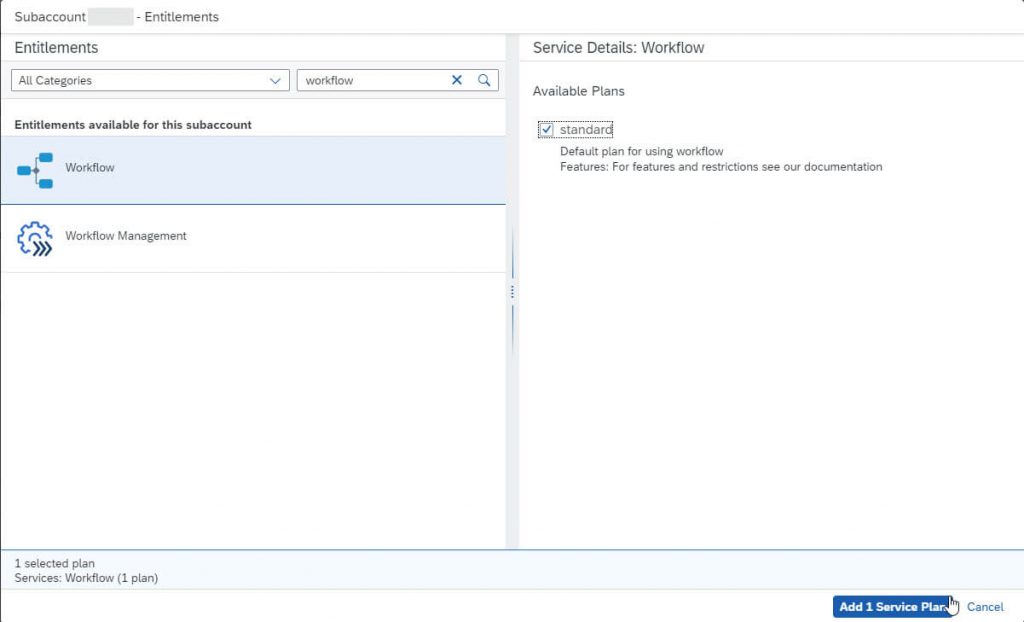

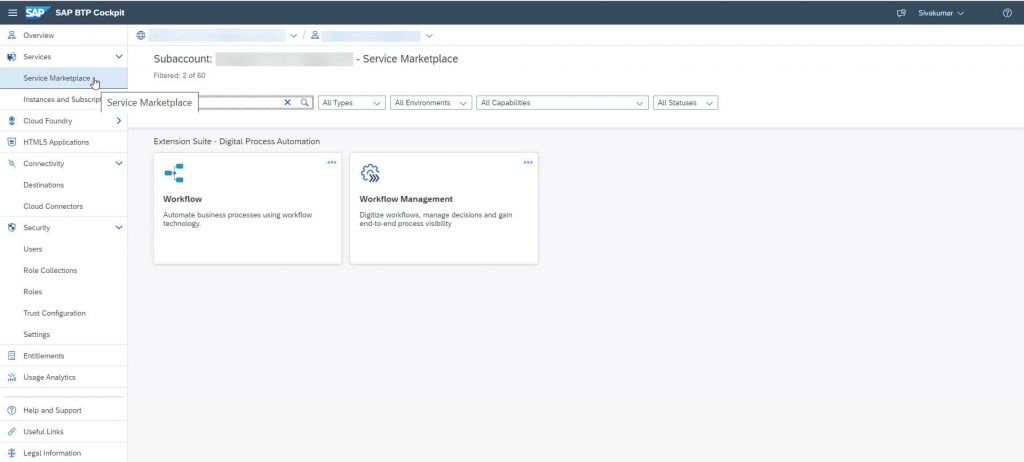
In the Services menu search for the Workflow tile.
If the service is not enabled yet, you have to enable it.
Click on the Workflow tile and select Configure Service > Roles
Assign the following roles to your user:
- WorkflowInitiator
- WorkflowAdmin
- WorkflowMessageSender
- WorkflowViewer
- WorkflowDeveloper
- WorkflowTenantOperator
- WorkflowContextAdmin
- WorkflowParticipant
- WorkflowContextViewer
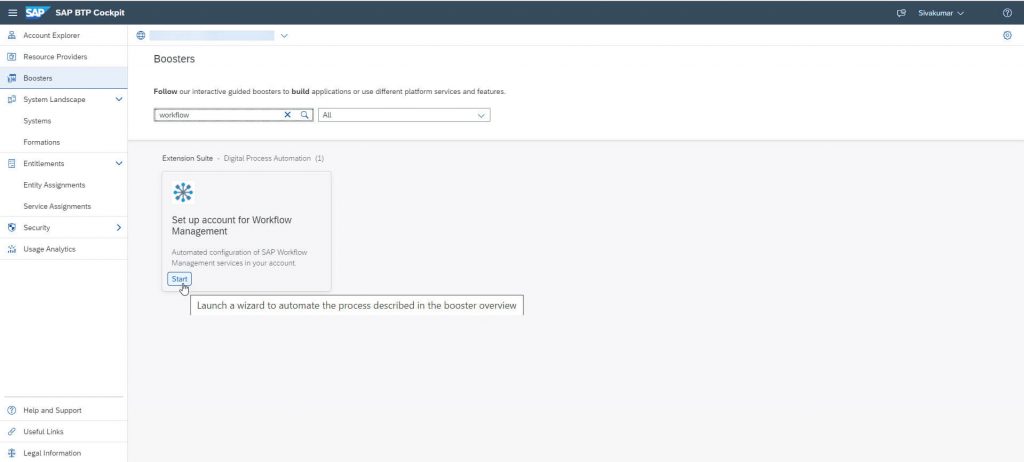
You can automatically Setup Workflow Management in SAP Business Technology Platform using a booster.

SAP Business Application Studio Configuration
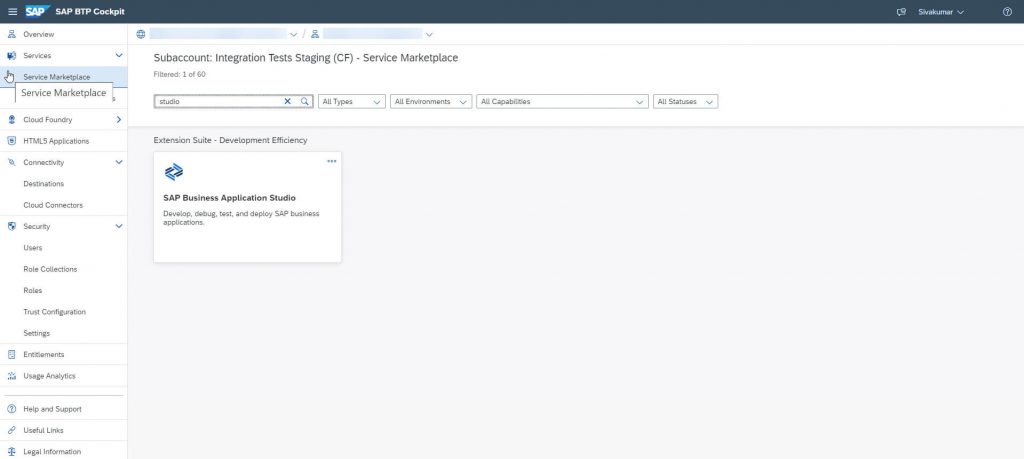
In the Services menu search for the SAP Business Application Studio tile.
If the service is not enabled yet, you must enable it.
Create a Destination to the SAP S/4HANA Cloud System
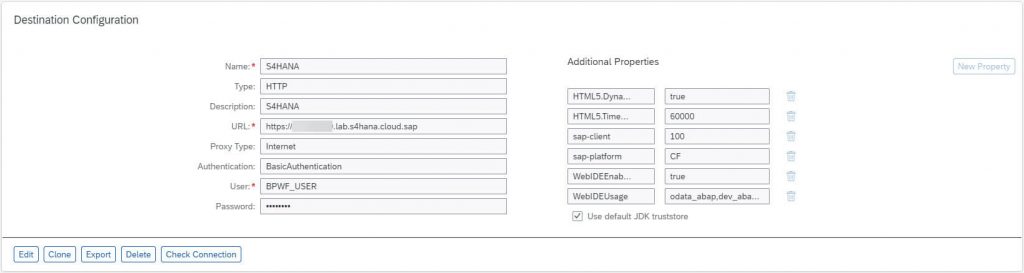
The destination S4HANA which you have entered in the SendApproval task needs to be defined as a destination in the SAP Business Technology Platform Cockpit.
Select the menu Connectivity > Destinations and create a new destination with the name S4HANA, the URL of your SAP S/4HANA Cloud tenant and User and Password of the Communication User you have created before. Authentication is BasicAuthentication and Proxy Type is Internet.
As URL you must take the host name from the Service URL in the Communication Arrangement, e.g., http://my3xxxxx-api.s4hana.ondemand.com.
Create a Workflow definition
Before you can define the workflow, you enable SAP Business Application Stuio and create a DEV space for workflow. Click on the Preferences menu icon and select then Extensions.
Search for Workflow and switch on the Workflow Editor.
You can go back to the Development section and create a new workflow project.
Select File > New > Project from Template and switch there the Category to Business Process Management. Now you can see the Workflow Project tile.
Enter BonusPlan_WF as Project Name and as Name. The name you enter here must correspond in lower case to the definition_id, which you have entered in the message body in the RequestApproval action before.
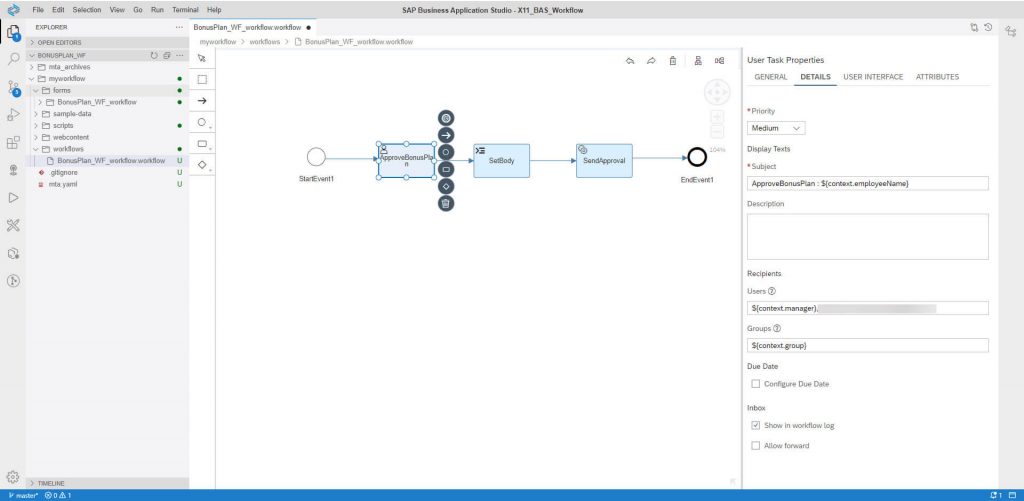
Initially the workflow has only a start and end event.
Add a User Task ApproveBonusPlan, a Script Task SetBody and a Service Task SendApproval.
Click on ApproveBonusPlan and enter ${context.manager} as recipient User on the DETAILS tab. With context you address the fields of the message body you have sent to the Workflow instance.
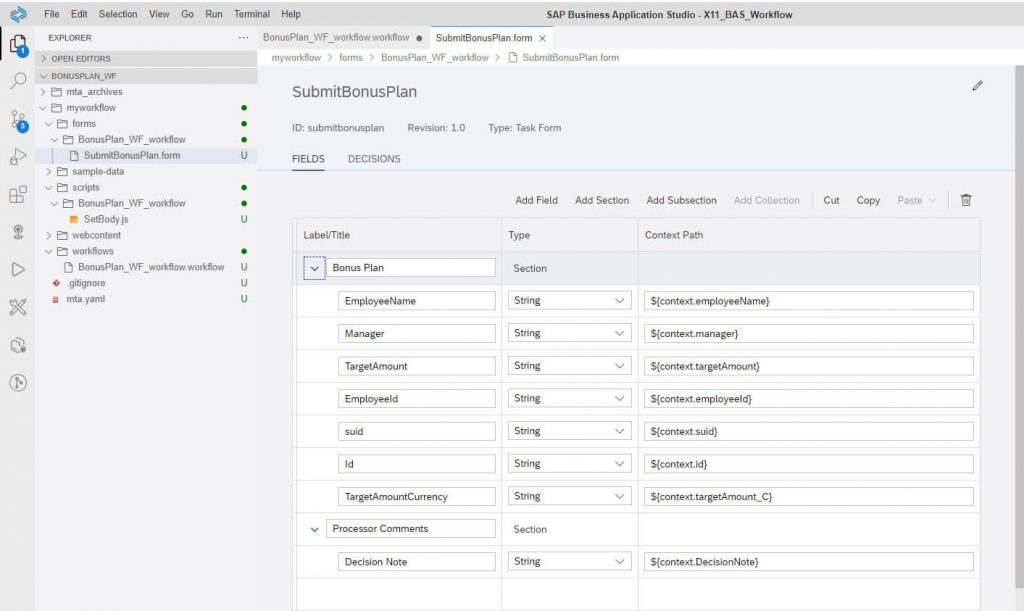
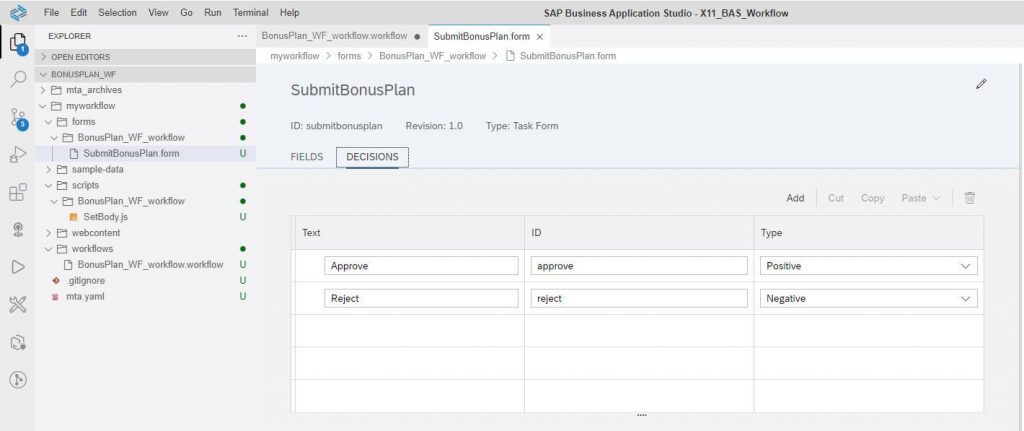
You can create a form based on the form-based UI. For that you must switch the type to Form, and define the form, the used fields and the decisions.
As next step you configure the script task.
Click on the SetBody task. Here you map the approval decision to the defined values of the Custom Business Object:
// read from existing workflow context

usertasks.usertask1.last.decision === "approve" ? $.context.response = { ReleaseStatus: "02", DecisionNote: $.context.DecisionNote } : $.context.response = { ReleaseStatus: "05",DecisionNote: $.context.DecisionNote }
As last step you send back the decision to the OData service of the Custom Business Object in SAP S/4HANA Cloud.
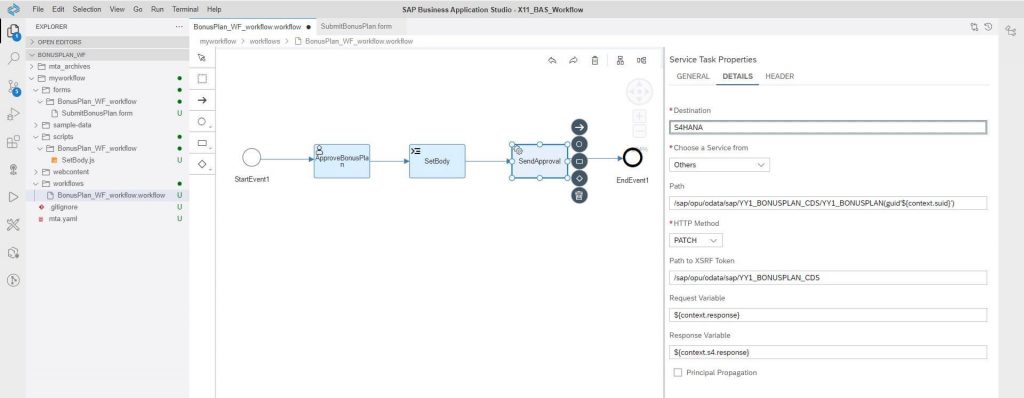
Click on the SendApproval task and enter the following parameter:
Destination: S4HANA
Path: /sap/opu/odata/sap/YY1_BONUSPLAN_CDS/YY1_BONUSPLAN(guid’${context.suid}’)
HTTP-Method: PATCH
Path to XSRF-Token: /sap/opu/odata/sap/YY1_BONUSPLAN_CDS
Request Variable: ${context.response}
Response Variable: ${context.s4.response}
Select and right-click on mta.yaml and choose Build mta Project in the SAP Business Application Studio project tree. Expand mta_archives folder in the project tree and deploy the file BonusPlan_WF_0.0.1.mtar to SAP BTP.
Create a technical communication user
Like the Communication User on the SAP S/4HANA Cloud side we need a user on the SAP Business Technology Platform, which can be used for the authorization of the workflow POST request.
This user must be added to the Communication System on the SAP S/4HANA Cloud side as outbound user. The workflow service API supports OAuth 2.0, and we use OAuth 2.0 authentication for Clients (Client Credentials Grant).
End to End Test
After finalizing all configuration steps, you can test the scenario end to end.
Start the test on the Fiori UI of the BonusPlan in SAP S/4HANA Cloud System, where you already have created a Bonus Plan instance, which should still have the Release Status Not Released.
Trigger the approval workflow via the button Request Approval. This sends out the HTTP request to SAP BTP.

You can see the result on the My Inbox app of Workflow Management, where the counter is increased by one.
You can reach this UI via the Services section of the SAP Business Technology Platform Cockpit and there on the Workflow tile, where you follow the link Fiori Launchpad (Default Site).
If you want to simplify the access to this UI, you can also embed a Custom Tile in the Fiori Launchpad of the SAP S/4HANA Cloud, like you see it in the first screenshot of this blog post.
This can be defined via the app Custom Tiles in the Extensibility group. There you just enter the URL, an icon and the catalog (in our example Extensibility) where the tile should show up.
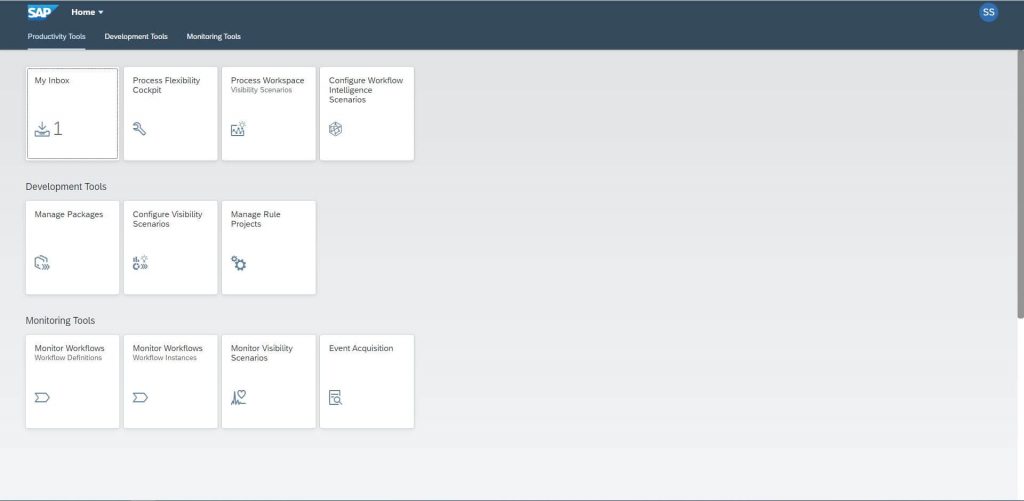
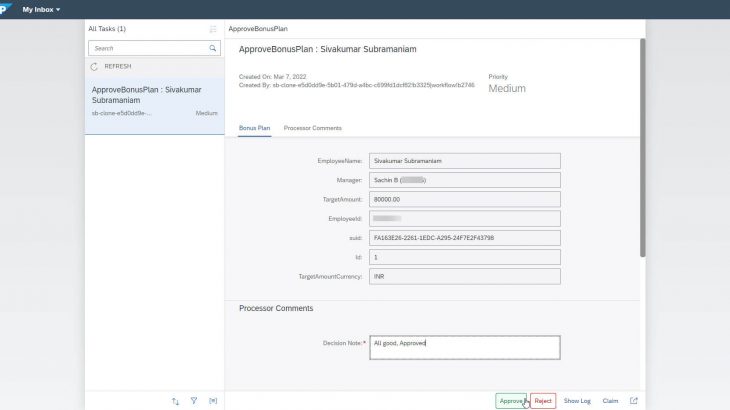
If you click on the My Inbox tile, you can see the UI you have defined before with the data you sent in the message body to the Workflow Capability (Workflow context).
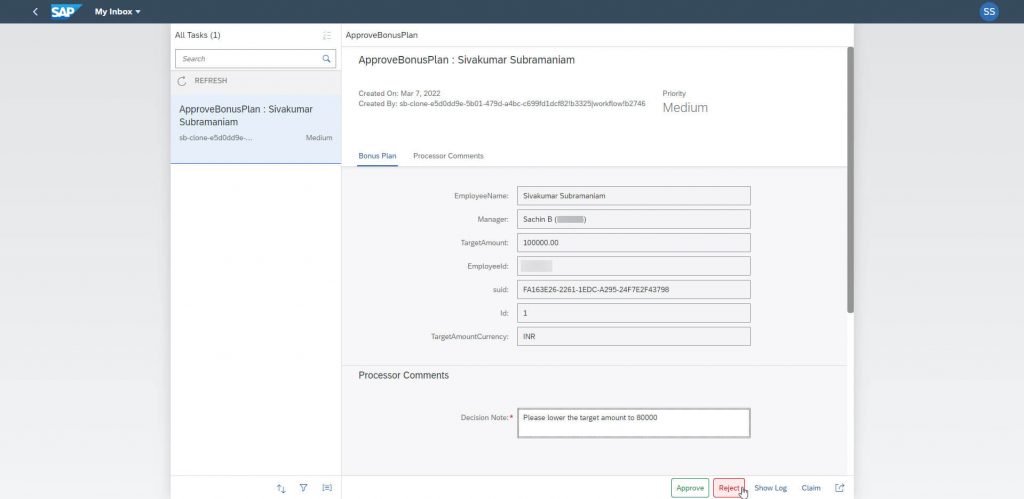
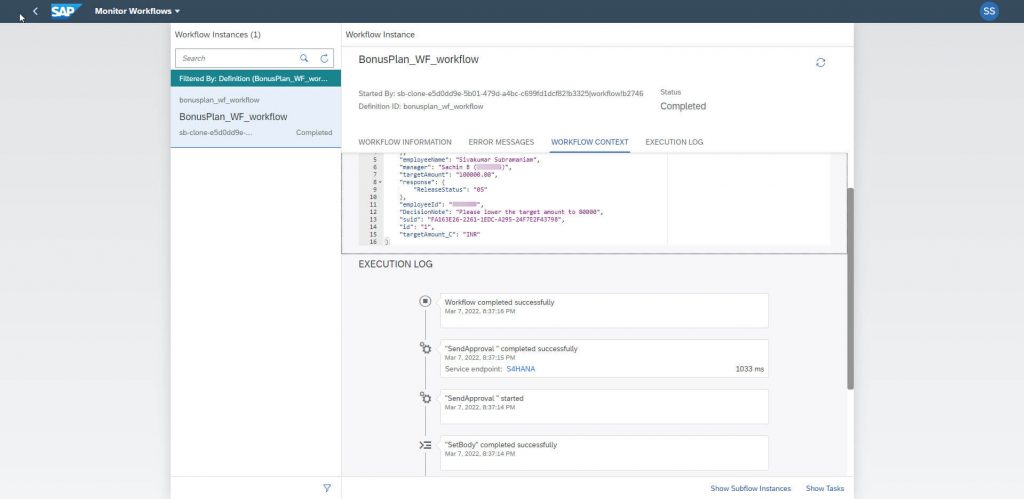
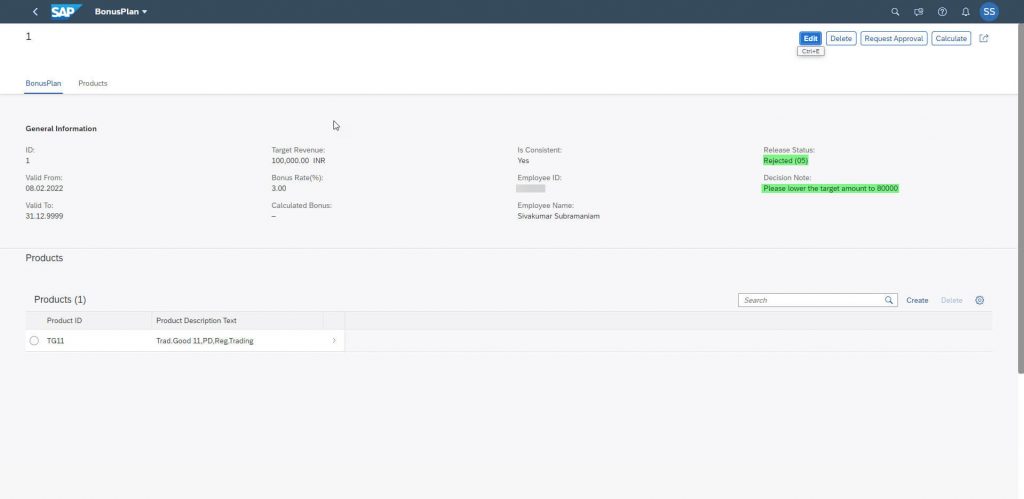
If you click on the Monitor Workflow – Workflow Instances tile, you can see all information of this instance. Add a decision note (Please lower the target amount to 80000) and click on Reject.
Back on the SAP S/4HANA Cloud side you refresh the BonusPlan UI or start the app again.
There you see the changed Release Status which is now Rejected.
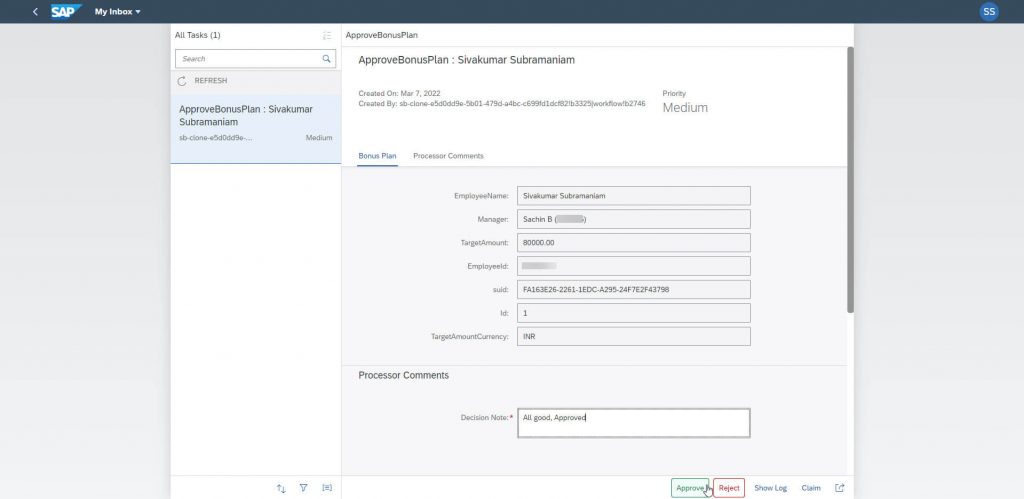
Click on Edit button and change the Target Revenue to 80000, Release status to Not Released and click on Request Approval button.
A new Workflow will be triggered. Go to My Inbox app, add a decision note(All good, Approved) and click on Approve.
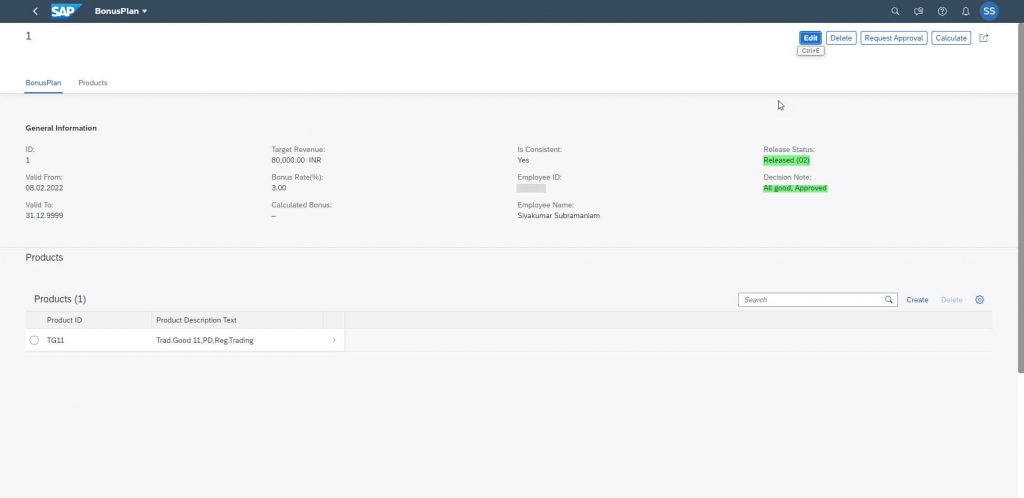
Refresh the BonusPlan UI and there you see the changed Release Status which is now Released.
With this example you have seen how to build an extension scenario with In-App and Side-by-Side Extensions for SAP S/4HANA Cloud and SAP BTP.
But you can not only implement manager approvals like this. If you don´t have a Standard Flexible workflow for a SAP S/4HANA Cloud Standard Business Object or nor needed extension step for approvals, you can add an approval process with this approach and Workflow Management also to standard processes and send updates to these objects.
Appendix: Custom Libraries
In the coding of the RequestApproval action I have referred to the Custom Library yy1_business_partners for the manager determination. To approve the BonusPlan, the manager needs to be a Workflow standard user in BTP.
You can find the code snippets of these libraries and their methods here.
Business Partners
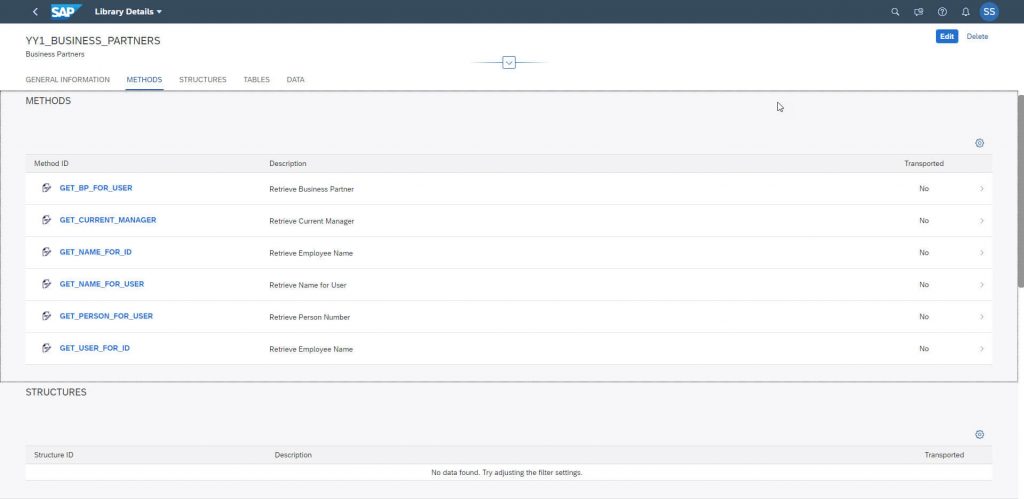
GET_BP_FOR_USER:
select single from I_businessuservh
       fields BusinessPartner
       where BPIdentificationNumber = @IV_USER
       into @data(lv_bupa).

* cl_ble_trace_writer=>write_info_message( conv #( lv_bupa ) ).

RV_BP = lv_bupa.
GET_CURRENT_MANAGER:
data(lv_current_wa)         = yy1_work_agreements=>get_current_wa_for_bp( iv_bp ).

data(lv_current_manager_wa) = yy1_work_agreements=>get_current_manager_wa_for_wa( lv_current_wa ).

rv_manager_bp = yy1_work_agreements=>get_bp_for_wa( lv_current_manager_wa ).
GET_USER_FOR_ID:
select single from I_businessuservh
       fields BPIdentificationNumber
       where BusinessPartner = @IV_BP
       into @data(lv_mgr_empid).

*    cl_ble_trace_writer=>write_info_message( conv #( lv_mgr_empid ) ).

  RT_USER = lv_mgr_empid.
GET_NAME_FOR_USER:
SELECT SINGLE FROM i_businessuservh
       FIELDS personfullname
       WHERE bpidentificationnumber = @iv_bu
       INTO @DATA(lv_personfullname).

* cl_ble_trace_writer=>write_info_message( CONV #( lv_personfullname ) ).

  rt_name = lv_personfullname.
Work Agreements
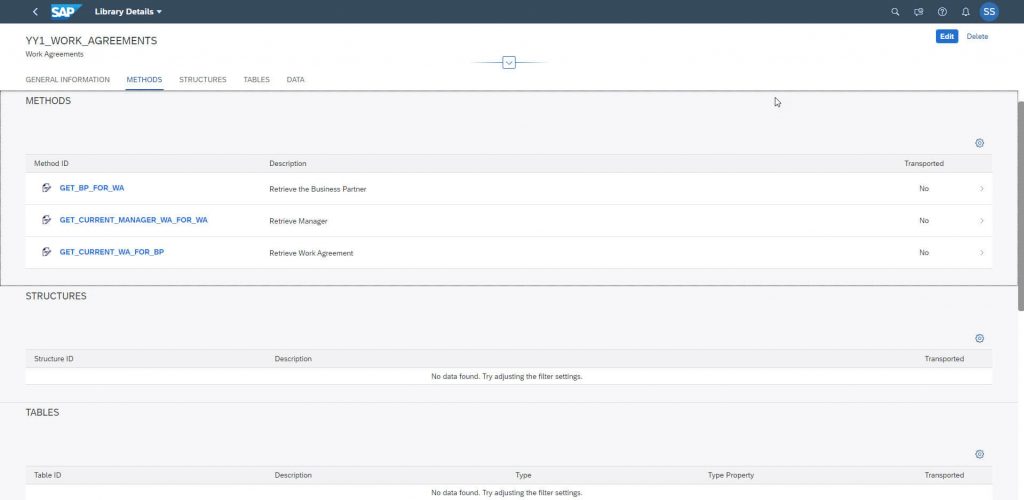
GET_CURRENT_WA_FOR_BP:
data(lv_current_data) = cl_abap_context_info=>get_system_date( ).

select single from i_personworkagreement_1 fields personworkagreement
    where \_businesspartner-businesspartner = @iv_bp
    and \_personwrkagrmtforkeydate-keydate = @lv_current_data
    into @data(lv_personworkagreement).

cl_ble_trace_writer=>write_info_message( conv #( lv_personworkagreement ) ).

rt_wa = lv_personworkagreement.
GET_CURRENT_MANAGER_WA_FOR_WA:
select single from i_perswrkagrmtmanagerforkeydte( ) fields managerpersonworkagreement
    where personworkagreement = @iv_wa
    into @data(lv_managerpersonworkagreement).

cl_ble_trace_writer=>write_info_message( conv #( lv_managerpersonworkagreement ) ).

rt_wa = lv_managerpersonworkagreement.
GET_BP_FOR_WA:
data(lv_current_data) = cl_abap_context_info=>get_system_date( ).

select single from i_personworkagreement_1 fields \_businesspartner-businesspartner
    where personworkagreement = @iv_wa
    and \_personwrkagrmtforkeydate-keydate = @lv_current_data
    into @data(lv_businesspartner).

cl_ble_trace_writer=>write_info_message( conv #( lv_businesspartner ) ).

rv_bp = lv_businesspartner.


