ADT Eclipse/HANA Studio for ABAPers
In the SAP ABAP on HANA Part I, we talked about some common questions and answers. We also created our first program in HANA Studio. In this article, we would get accustomed with the HANA Studio screen, various buttons and icons. How/Why to use them and also we would try to correlate the functionalities of HANA screen icons to that of classic GUI icons.
HANA Studio Toolbar
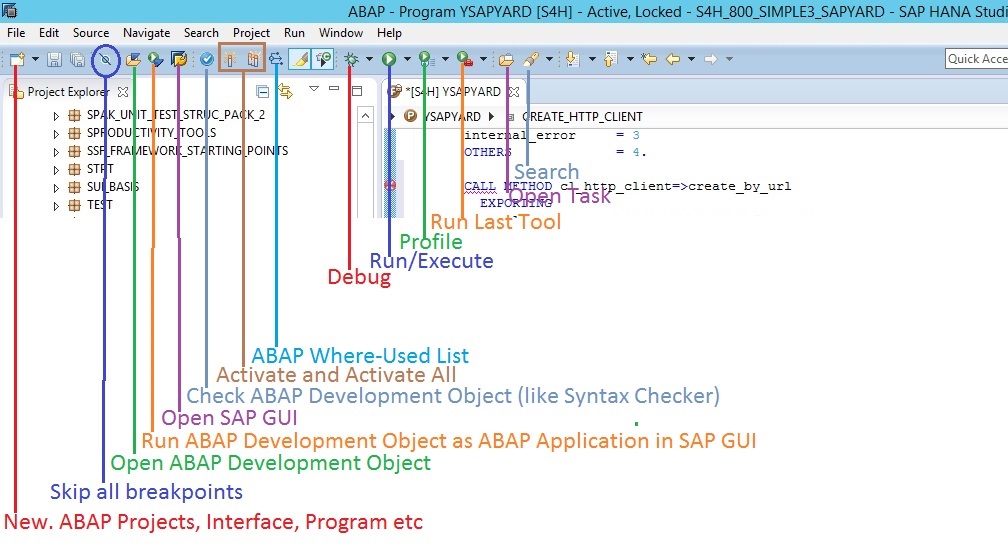
Most of the icons are self-explanatory.
Open ABAP Development Object: The system-wide search for development objects is possible.
Search: The workspace-wide search for development objects is possible. With this function, we can search for ABAP development objects across all usable ABAP projects.
A. What is NOT there in ADT Eclipse/HANA Studio, which was available in ABAP GUI editor?
1. Change/Display Icon
We were not able to figure out the change/display toggle icon in HANA Studio ABAP editor. Whenever we opened the program in our development system, it opened in change mode. If any reader knows about the change/display icon (or shortcuts) in eclipse, please do mention it in the comment section or email us and educate all.
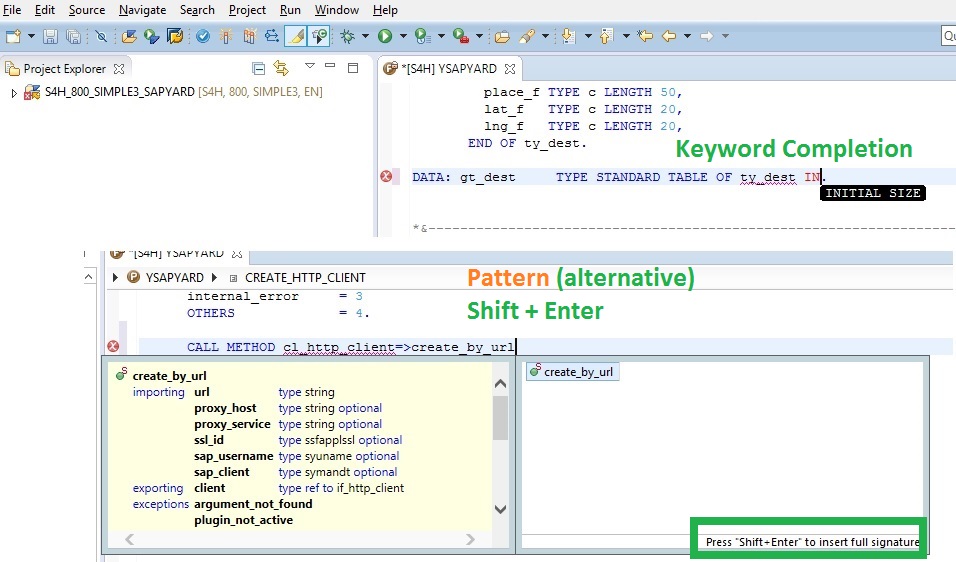
2. Pattern Icon
Another significant button which we could not figure out in HANA Studio is the Pattern Icon. When we want to auto generate the FM/Class/Method or any custom pattern, we are so habituated to use this Pattern icon in ABAP editor. We were little surprised, not to find this commonly used button. But you need not be disappointed. Type initial letters of the syntax you want to use and then use Ctrl + Space and Shift + Enter to insert the full signature (e.g. for function module / method selected).
3. Pretty Printer
There is no pretty printer icon. How would developers impress their team leads and quality reviewers without the pretty printer? Do not worry, the pretty printer button might not be there, but the functionality still exists. Go to Windows -> Preference -> ABAP Development -> Source Code Editor -> Formatter to set up the formatting needs.
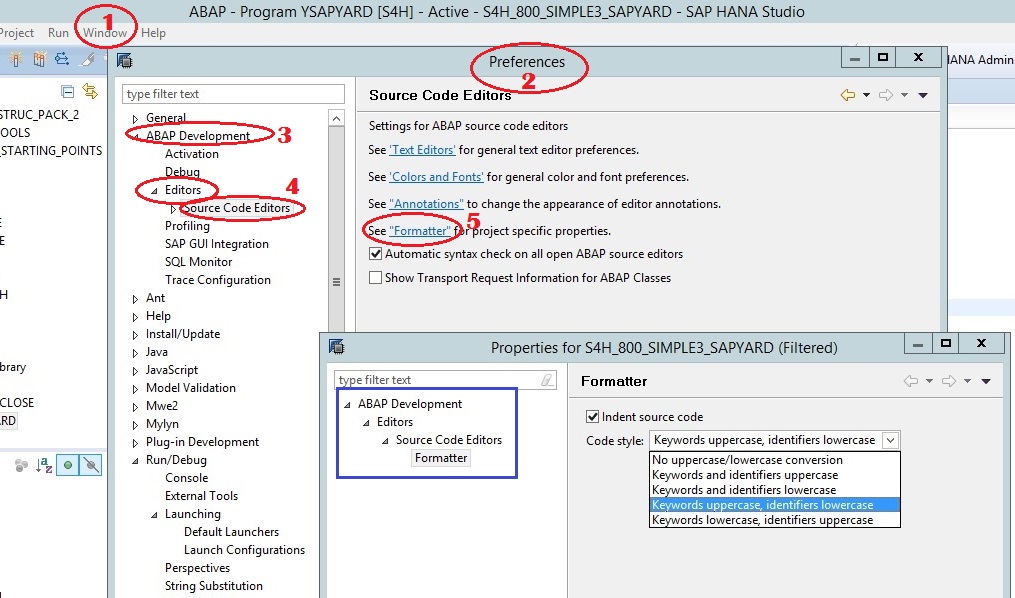
You might not see the Formatter option upfront. You need to click on Source Code Editors. Then you would see settings for different options (number 5 in above image) and Formatter is one of them.
Once you set the format, Shift + F1 is the shortcut for the desired formatting.
So, Pretty Printer in GUI = Shift + F1 in HANA Studio
These are some commonly used icons/buttons which are missing in Eclipse ADT. Please note, this is not the whole elaborate list.
B. Check the common/similar or near similar features in Vanilla ABAP editor and Eclipse/HANA Studio ABAP editor
1. Outline View
Let us start with the Outline View in HANA Studio. Check the outline view on the lower left corner of the studio.

The Outline view displays the internal structure of a program or class that is currently open in the ABAP source code editor. The Outline view is synonyms to the Object detailed screen of ABAP editor in SE80. Just like when we click any element on SE80, it takes to that element in the main program, similarly, the outline is synchronized with the contents of the editor. Hence, when an element in the Outline view is selected, we can navigate quickly to the corresponding position in the ABAP source code.
Just like in SE80 editor, for each element in Outline View in Studio, we can navigate to the declaration part in the source code editor or the implementation part (e.g. in the case of methods of a class).
2. Keyword Completion/Suggestion
Just like in GUI, ABAP editor on HANA studio suggests keywords as you type the syntax. The GUI shortcut Ctrl +Space holds good in eclipse too.
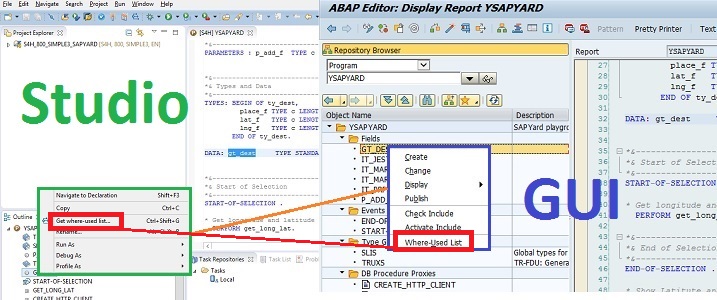
3. Where-Used List
This powerful feature is still available.
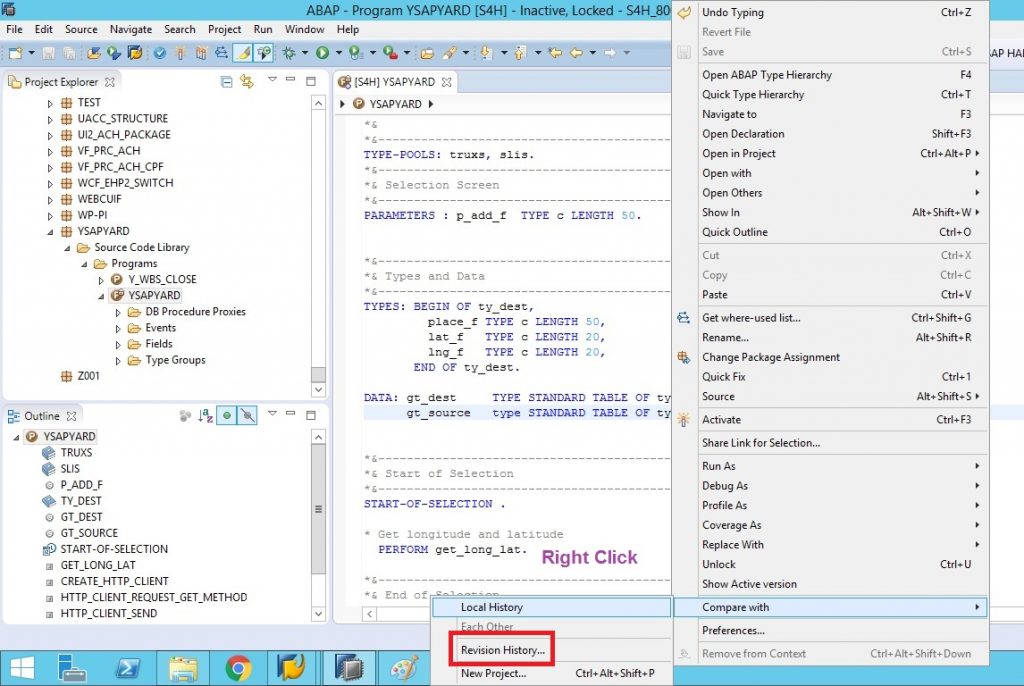
4. Revision History.
Like in GUI ABAP editor, we can compare changes from one transport of source code to another in ADT. Right click on the source code area of the program and choose Compare with -> Revision History.
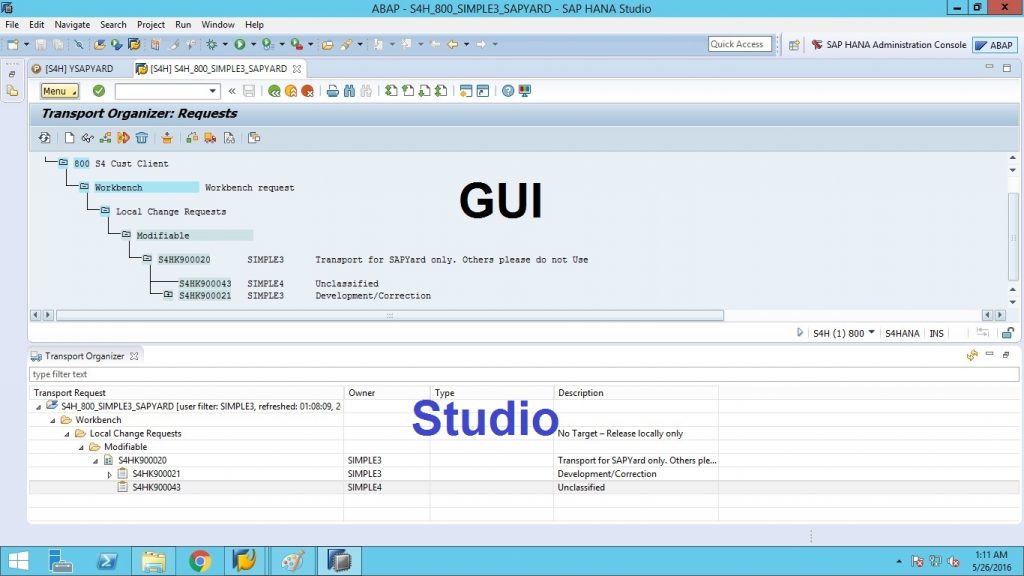
4. Transport Organizer
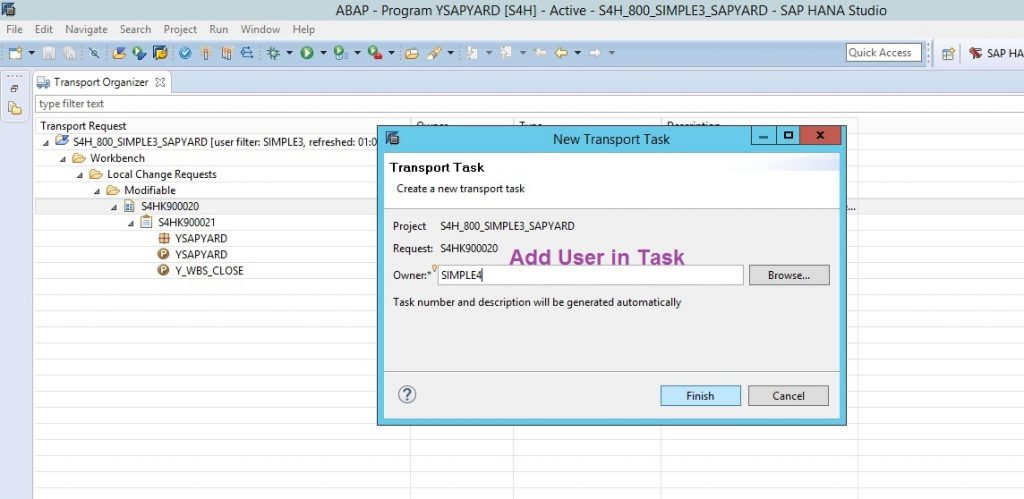
Transport Organizer in ADT for Eclipse enables ABAP developers to perform the below Transport related operation through Studio.
i) Adding user to Transport request (TRs)
ii) Changing owner of TRs and tasks.
iii) Checking consistency
iv) Releasing and deleting TRs
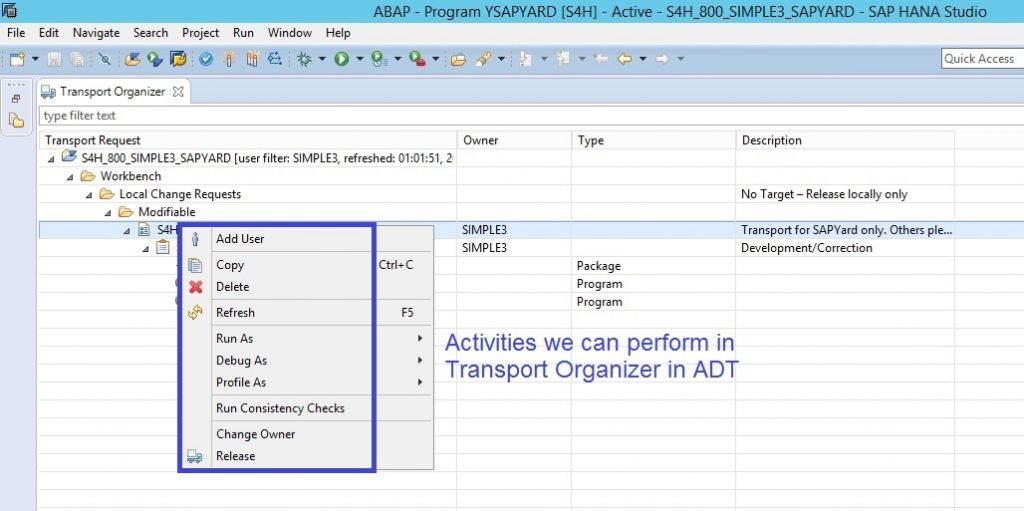
Right-click on the transport to see all the activities you can perform. One example of adding a user under an existing transport is shown below.
Limitation of Transport Organizer in HANA Studio:
Transport request CANNOT be created within the Transport Organizer view of ABAP Development Tools. But, if you create/edit an object (say table/program/FM/package etc) in Studio ADT and it asks for a new transport, you can create new transport within that corresponding wizard. Remember, transports can be created from those wizards and not stand alone from Transport Organizer.
Advantage of Transport Organizer in HANA Studio:
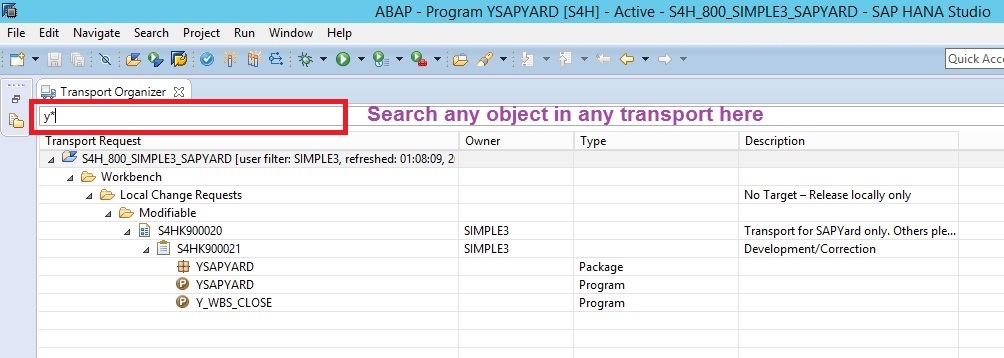
The Search option in the Transport Organizer. Any object (table/program/FM/package etc) can be searched for, to check the TR and task it belongs to. In SAP GUI transaction SE10, we cannot search that easily. Although we have other t-codes and ways to figure it out. But the ease and user experience in Transport Organizer in HANA Studio is unmatched.
C. The new features in Eclipse/HANA Studio ABAP editor, which were not available in GUI editor.
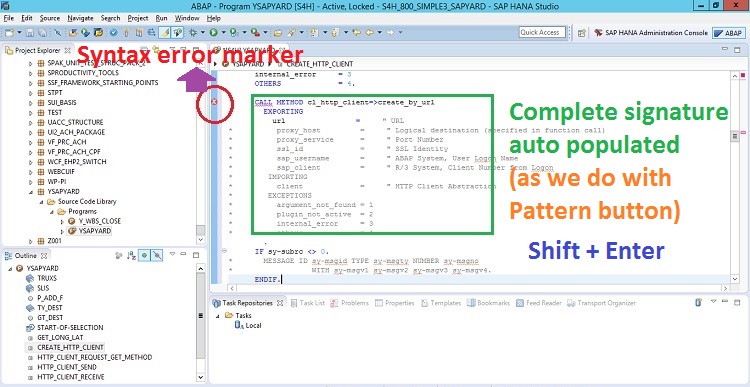
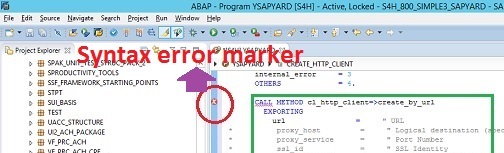
1. Syntax Error Marker:
Check the red cross on the left side of the code editor. This feature warns you of any error lines while you are typing your program and even before you hit the syntax checker. This comes really handy for the ABAPers to type the right syntax as and when he/she is.
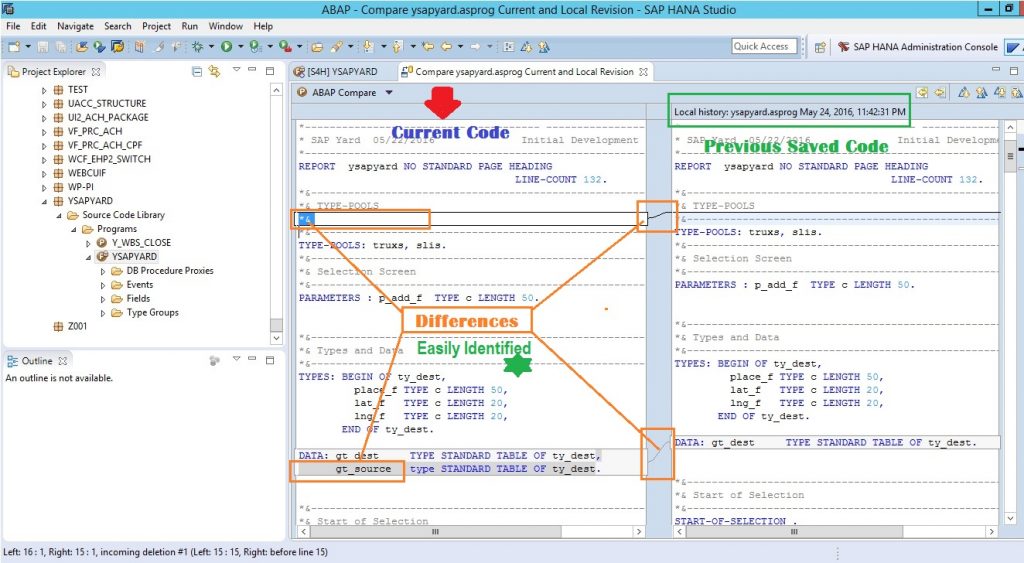
2. Local code comparison:
Compares current saved version with the selected saved version.
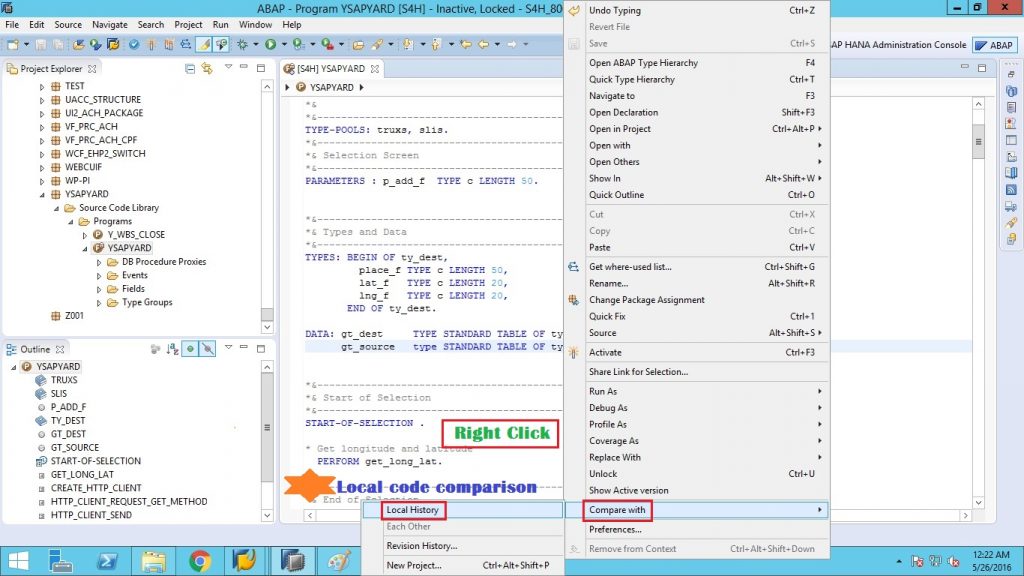
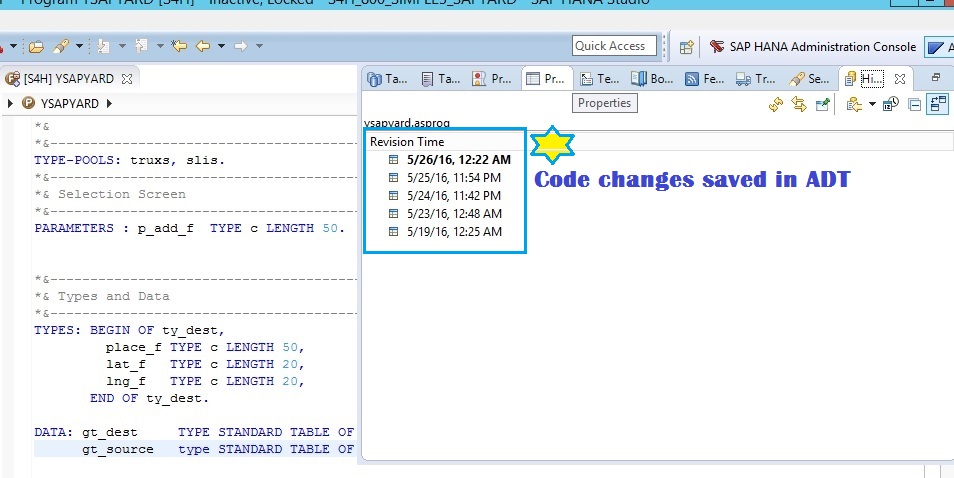
Right click on the code area of the program and choose Compare with -> Local History. Choose one of the previously saved version and see the comparison. This local change history gives the comparison between saves in the ADT, showing changes in the code as stored in the local workspace.
Check, the code difference can be so easily identified.
3. Rename elements/texts.
Although we have Find and Replace (or Ctrl + H) option in SAP GUI, but Eclipsed based ADT has better renaming experience. Just right click on the source editor and select Rename or hit Alt+Shift+R, to open the replace wizard.

Select the element you want to replace and hit Rename (Alt+Shift+R), give the new name for the element and hit Next.

Before it finishes, it would show the Original code and the new code after the change. It would also show all the lines which would be changed.
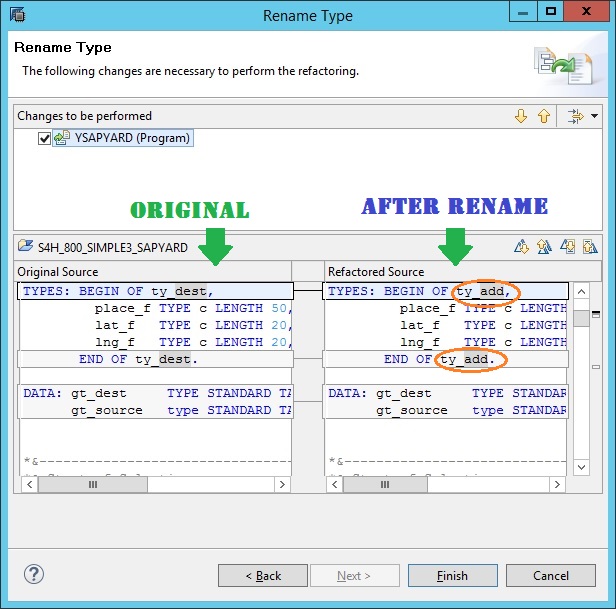
Hit Finish and the element is renamed throughout the entire source code.


